RSS Feed

Tag Archives: quick

One-Bowl Chocolate Cake

Posted on

This is a very simple chocolate cake but I daresay it might be even better then my previous favorite. It is incredibly moist and so tender, with the perfect amount of chocolate flavor. It is a perfect cake to whip up when you don’t have time for a fussy recipe, and who needs fussy when simplicity brings such deliciousness? I hope you try it.

One-Bowl Chocolate Cake

Printable recipe

Printable recipe with picture

2 cups all-purpose flour

2 cups sugar

1/2 cup baking cocoa

2 teaspoons baking soda

1 teaspoon baking powder

1/2 teaspoon salt

2 large eggs, lightly beaten

1 cup canola oil

1 cup buttermilk

1 cup hot water

Frosting of your choice

Colored sprinkles, optional

Preheat oven to 350°. Grease a 13×9-in. baking pan, or spray with cooking oil. In a large bowl, whisk the first six ingredients. Stir in eggs, oil and buttermilk. Add water; stir until combined.

Transfer batter to prepared pan. Bake 35-40 minutes or until a toothpick inserted in center comes out clean. Cool completely in pan on a wire rack. Frost cake. If desired, decorate with sprinkles.

Chocolate Buttercream Frosting: In a large bowl, beat 1/2 cup softened butter until creamy. Beat in 2 cups confectioners’ sugar, 1/4 cup baking cocoa, 1-1/2 teaspoons vanilla extract and 3-4 tablespoons 2% milk (I used heavy cream) to achieve desired consistency.

*Veronica’s notes: I sifted my dry ingredients since my cocoa powder was really lumpy. If you find yourself in the same boat, with big clumps of cocoa powder in the dry ingredients that won’t mix out, I would suggest sifting so you don’t have any clumps.

Recipe source: Taste of Home

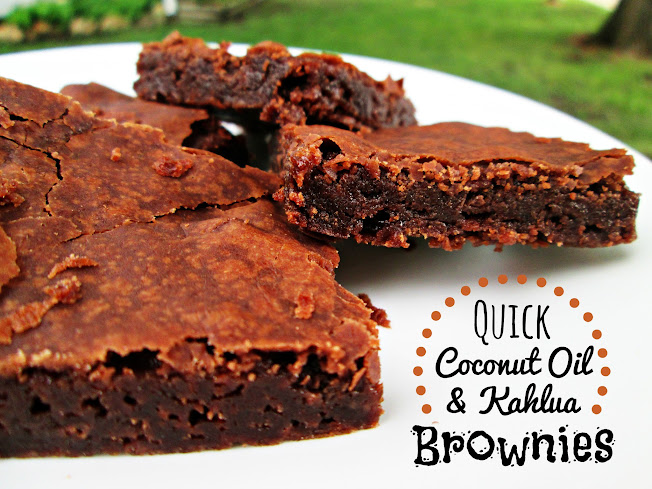
Quick Coconut Oil & Kahlua Brownies

Posted on

In looking over all the food photos I have in my “future blog” folder, I’m noticing a trend. Everything is baked in the oven! In the past, I’ve tried to save most of my baked recipes to share in cooler weather, but I just bake so much in summer, that’s really all I’ve got for you. Even the main dishes I’ve been making have come from the oven.  Am I the only one? Maybe I’ve got some Australian readers eager for baked treats & casseroles? haha!

So these are a box mix recipe which I know, is probably a food crime combining wonderful virgin coconut oil in conjunction with a box mix, but it’s really good! If you’re wanting a good from-scratch coconut oil brownie you might be able to just sub coconut oil in my favorite Fudge Brownies recipe.  But if you’re in a hurry, this one will do you.

My usual trick to make box mix brownies taste homemade is to sub melted butter for the oil, but I was out, so I used coconut oil. The slight coconut oil flavor mixed with the Kahlua (I used my homemade stuff) is pretty out of this world. Using the coconut oil changes the finish on the top and although it’s got that flaky crispy layer, it’s dull, not shiny. I also noticed they were harder to remove from the pan, but nice and fudgy and the flavor is much better than just following the instructions on the back. Enjoy!

Quick Coconut Oil & Kahlua Brownies

Printable recipe
Printable recipe with picture

1 fudge brownie mix
2/3 cup virgin coconut oil, melted
2 eggs, room temperature
1/4 cup Kahlua, room temperature

Mix all ingredients and bake according to package directions.

Veronica’s note: You want the ingredients at room temperature to keep the coconut oil from hardening during the mixing. If it hardens, it will not mix evenly. Also, if your box calls for 1/2 cup oil, use 1/2 cup coconut oil, not 2/3 cup. Mine turned out pretty thin in a 9×13 pan so if you like thicker brownies, go with a smaller pan.

You can’t see in this photo, but he’s already holding a half-eaten brownie while reaching for another. These are definitely Joshua-approved. I served these to five other children and three adults besides myself, they were a hit all-around.

Italian Grilled Cheese

Posted on

I love quick, easy meals like sandwiches in the summer.  Usually cold, but this is one grilled cheese I really enjoy when the temps start to rise.  I think because it reminds me of bruschetta, which reminds me of summer.  Probably because that’s when fresh basil abounds!  This is a very nice change from the traditional grilled cheese, and I love the flavor of the basil and melty mozarella and tomato all together…almost like a Margherita pizza but in the form of a quick sandwich. Can’t beat that.  Bring on the melty bruschetta/pizza sammich.

Italian Grilled Cheese

Printable recipe
Printable recipe with picture

8 fresh basil leaves
8 thin tomato slices
4 slices provolone or mozzarella cheese
4 slices Italian bread ( 1/4″ thick)
2 tablespoons prepared Italian salad dressing

Layer the basil leaves, tomato slices and provolone cheese on two slices of bread. Top with remaining bread. Brush outsides of sandwiches with salad dressing. Grill, uncovered, over medium heat for 3-4 minutes on each side or until cheese is melted. Makes 2 sandwiches.

Last-Minute Lasagna


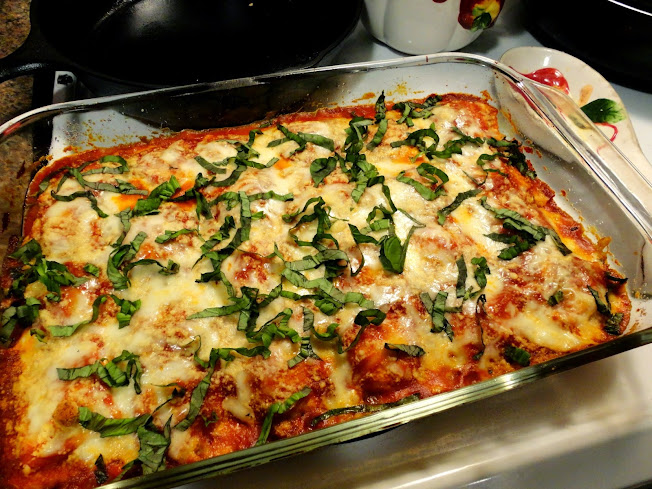
This isn’t the greatest lasagna of all time, but it’s really good (quality does depend on the products you use), and it’s really FAST!  And that makes it a winner in my book. I served this to company (Nana Donna, AKA Momma Donna), and she said she had no idea it wasn’t real lasagna and she really enjoyed it a lot! So if you ever need a meal in a hurry, this one’s a great one to try.

Last-Minute Lasagna

Printable recipe
Printable recipe with picture

1 (24-26 oz) jar pasta sauce
2 (16 oz) containers frozen large, cheese or beef ravioli
1 (10 oz) box frozen chopped spinach, thawed and excess water squeezed dry
8 oz mozzarella, shredded
1/2 cup (2 oz) grated Parmesan
Fresh basil or parsley for garnish, if desired

Heat oven to 350° F.  Coat a 9 x 13 baking dish with cooking spray, spread 1/3 of sauce to cover the bottom of dish. Cover with half of the ravioli, half of the cheeses, all of spinach, 1/3 of the sauce. Repeat with another layer of ravioli (not all the ravioli may be needed), spread with remaining sauce and top with remaining cheese. Cover with foil and bake for 30-40 minutes. Uncover and bake until bubbly, 5 to 10 minutes more. Let sit for 10 minutes before serving.

Recipe source: Real Simple, as seen on Nutmeg Notebook

Other Italian favorites…

Lasagna & Garlic Bread – really good stuff! Possibly my favorite lasagna recipe.

shrimp-scallop-scampi-4-6-10Shrimp & Scallop Scampi with Linguini – a restaurant-worthy meal.

Really Great Spaghetti & Meatballs – this is the easiest way to make spaghetti and meatballs, and it’s just fantastic!

Peanut Butter Cookie Dough Baked Oatmeal

Posted on

I like keeping things simple and easy at meal time, especially breakfast, so when I discovered how much Joshua enjoys baked oatmeal, I decided to make more of it.  A pan lasts several days and it’s so nice to be able to just take out a square and heat it in the microwave. Bam. Breakfast is done. He takes care of the rest.

I made this in an attempt to make a baked oatmeal that really would be reminiscent of cookie dough, since the pumpkin didn’t really have that feel to me (granted, I may have over baked it a tad, as I tend to do a lot these days). And wow, you guys, I nailed it.  *pats self on shoulder* ;) This stuff is warm and gooey and melty and soft and creamy and really, a lot like a thick, warm cookie dough. Dennis even ate it for dessert after dinner one day, with some whipped cream on top. It’s that good. And low in sugar, or sugar-free if you want to leave the chocolate chips out. You would never guess, it’s just so good, but feel free to use sugar if you prefer. This one is definitely worth a try.

Peanut Butter Cookie Dough Oatmeal

Printable recipe
Printable recipe with picture

2 cups quick-cooking oats
4 packets stevia*
½ teaspoon salt
1/3 cup peanut butter
2/3 cup milk
1 (4 oz) snack cup of unsweetened applesauce (heaping 1/3 cup)
1 egg
2 tablespoons oil or melted butter
2 teaspoons vanilla
½ cup chocolate chips, plus more for top if desired

Mix all ingredients together well until blended. Pour batter into an 8×8 pan sprayed with oil. Bake at 350F for 30 minutes.

*If you want to use sugar, I’d recommend brown sugar for a more cookie dough-like flavor. I’m not certain on the amount, but I’d try 1/3 cup and add more to your taste if needed.

***

I have to show you guys what this looks like with the flash – the photo is cheaper-looking but this really shows off how cookie dough-like it is. It’s soooo soft and I just couldn’t capture that gooey softness as well with natural light. Honestly, sometimes the flash is the only way to show the true colors & textures. Amateur photographer problems. :)

Microwave Peanut Butter Cookies

Posted on

For some reason I’ve never had the urge to make one of those quick and easy chocolate mug cakes that are done in the microwave.  I’ve saved recipes for them, thinking it sounds like a fun idea, but I guess it seems like too much work to mix up the ingredients for such a small cake. Especially since I know I’d have to do it at least twice in a row to satisfy my sweet tooth-lol.

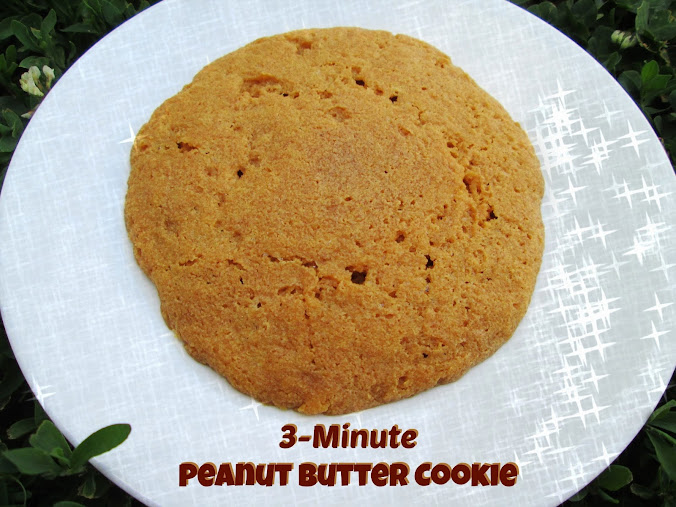
But a microwave cookie?  I had to try that.  (Don’t forget my second favorite food group is “Cookies,” with “Dip” being the first-haha.)  The original recipe was for a single cookie but I don’t keep a carton of Egg Beaters on hand and didn’t want to measure out a single tablespoon of egg white from a real egg, so I just multiplied the recipe by four to use a whole real egg (I’ve got mad baking mathematical skillz and knew that a whole egg = 1/4 cup or 4 tablespoons, just like I know how many ounces is in a cup of flour & sugar so that I don’t have to use measuring cups!).  This yielded four cookies, which is totally preferable to one cookie in my world.  :D

Dennis and I split the cookies and both loved them!  They are soft and chewy and totally hit the sweet spot. So simple and you don’t even have to turn on the oven.  Now that’s a summer dessert I can get behind. Extra bonus for those with food allergies: these are naturally gluten and dairy free!

Microwave Peanut Butter Cookies

Printable recipe
Printable recipe with picture

½ cup (4 ¾ oz) creamy peanut butter
¼ cup (2 oz) brown sugar, packed
½ teaspoon baking powder
1 large egg

Use a fork to mix the peanut butter and brown sugar together in a small bowl. Stir in the baking powder until completely incorporated. Mix in the egg until batter is uniform, thick & smooth. Remove ¼ – 1/3 of the batter and place on a small microwave-safe plate. Press into a thick cookie shape about 2″ in diameter and microwave 1 minute. Allow to cool while repeating with remaining batter. I preferred these when just a little warm.

Makes 3-4 large cookies.

Recipe source: adapted from Carrot’s ‘n Cake

Chicken and Dumpling Casserole

Posted on

Chicken & Dumpling Casserole | veronicascornucopia.com

Although the first day of spring has come and gone, it’s been chilly and blustery here in Kansas, so I thought I’d share this warm and delicious casserole for everyone that’s still eagerly awaiting spring before it’s hot and sweltering and nobody wants to bake a casserole. This is pure comfort food and perfect to warm the soul on a chilly day.  It’s very quick and simple to make, which is good if you have a baby that has decided that if you aren’t holding him or playing with him or taking him on a stroller ride, he isn’t happy, because you won’t have to listen to him scream for very long  before dinner is in the oven. ;)

Chicken and Dumpling Casserole

Printable recipe
Printable recipe with picture

3 – 4 cups cooked chicken, cut into bite sized pieces (use rotisserie chicken if desired)
4 tablespoons butter
1 cup milk
1 cup all-purpose flour
1 1/4 teaspoons baking powder
1/4 teaspoon salt
2 cups chicken broth
1 (10.75 oz) can cream of chicken soup

Preheat oven to 400F. Place butter in 9″ X 13″ baking dish and place in oven while it’s preheating. Once butter is melted, you can remove the pan to continue with the recipe, or let it cook a little to brown it and add an extra dimension of flavor. Be sure to watch it if you decide to let it brown because it can go from nutty to burnt pretty quickly.

Remove pan from the oven and sprinkle prepared chicken over the top of the butter. In a medium bowl, whisk together milk, flour, baking powder and salt. Pour over the chicken, but do not stir. In same bowl, after scraping out as much flour mixture as possible, whisk together chicken broth and cream of chicken soup. Pour that over top of casserole; do not stir.

Bake uncovered for 35 – 45 minutes. When done, the top will be beautifully browned and bubbly around the edges.

Yield: about 6 servings

Veronica’s notes: I boiled a whole chicken for this recipe. It was about 5 lbs and I covered it with water in a stock pot and added a teaspoon of salt, boiling for an hour or two. I forgot to set the timer so I really don’t know how long I boiled it because I was so busy with the baby- lol. If you make it this way, it’s very economical, and you automatically make your own broth to use in the recipe.

Recipe source: The Better Baker

Basic Buttermilk Biscuits & Sausage Gravy


Happy Monday, my Cornicopi-cats! :)  Today I was just going to share my basic recipe for buttermilk biscuits, but I figured you can’t have biscuits without sausage gravy. OK, so you can, you can have them plain, with butter, with jam, with honey, but once in a while you gotta get your sausage gravy on.  Is it a custom where you live to eat biscuits smothered in sausage or country gravy?  If not, you must try it, at least once.  This is straight up comfort food for me.

I make my biscuits two ways, depending on how much time I want to spend on them.  The first way includes a little bit of folding the dough over and then cutting into rounds. This yields a taller, layered biscuit.  The second way is just dropping the dough onto a baking sheet, then patting it into place with floured hands.  Either way, they are soft and so tender–some seriously good eatin’.

Basic Buttermilk Biscuits

Makes 8-10 biscuits
Printable recipe
Printable recipe with picture

1 ½ cups all-purpose flour
½ tablespoon baking powder
½ teaspoon baking soda
½ teaspoon salt
4 tablespoons cold unsalted butter
2 tablespoons vegetable shortening
¾ cup cold buttermilk

Preheat oven to 425 degrees and line a cookie sheet with parchment.

Measure the dry ingredients into a food processor or bowl and pulse once to combine. Pulse or cut in the butter and shortening until fats are the size of peas. Dump the contents into a bowl and stir in the buttermilk until dough is moistened.  You can pulse to combine in the food processor, but it is too easy to overwork the dough so I like to stir it in by hand.  At this point you can either 1) drop the dough in mounds the size of your choice onto prepared baking sheet. With floured hands, pat the tops and sides of the dough until they take on more of a shaped appearance.

Or 2) dump dough onto a floured surface and lightly flour the top.  Knead a few times (careful, don’t knead more than ten turns) and roll out to 1” thick.  Using a 2 ½” biscuit cutter or glass, cut out rounds going straight up and down without twisting the cutter, place on baking sheet, and brush tops with beaten egg if desired (this will make the tops golden but doesn’t change the flavor).  Bake for 10-12 minutes.  Serve warm with butter, jelly, or…

Suzie’s Sausage Gravy

Printable recipe
Printable recipe with picture

1 lb. good quality sausage roll, like Bob Evans
¼ cup all-purpose flour
2 cups milk
salt and black pepper to taste
Prepared biscuits

Crumble and cook sausage in large skillet over medium heat until browned. Stir in flour until dissolved. Gradually stir in milk. Cook gravy until thick and bubbly. Season with salt and pepper. Serve hot over biscuits. Refrigerate leftovers.

Secret Recipe Club

Buttery-Soft Beer Bread


One of my all-time favorite recipes on this blog is for Buttery Beer Bread, which is slightly sweet with a delicious yeasty flavor, and a thick, crunchy, and buttery crust.  The only downside to it is that it is best fresh from the oven and does not store well, so it’s a little hard to fit into a diet plan because we usually end up splitting the whole loaf between us and polishing it off in one sitting.  (Avoiding dry leftover bread is perfection justification for the overindulgence, no?)  If you’ve made this bread, you know that eating half a loaf of it is a lot easier to manage than one would imagine.  In the interest of trying to shrink our midsections, however, we try not to pull that stunt too often.

Deciding I needed a soft beer bread that stored well so that we could enjoy it for several days versus five minutes, I instinctively knew (well, hoped may be the better word) all I had to do was add an egg and blend the butter in with everything else instead of pouring it over the top.  And voilà!  I was right.  I love being right.  Especially when it results in something so delicious!

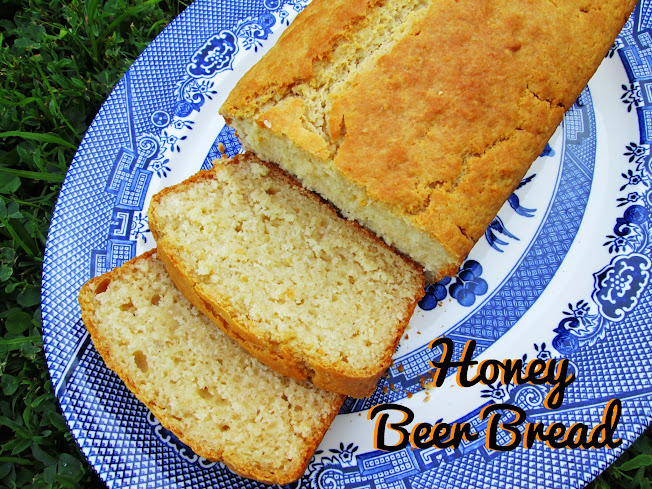
This bread has the same flavor I fell in love with in the original beer bread, the beer giving it a nice yeasty flavor despite this being a quick bread containing no yeast (another bonus-fresh bread in under an hour!).  But it is a million times prettier (smooth top versus major bumpiness), the texture is velvety soft when fresh from the oven, and the crust still has just a bit of that buttery crunch to it.  And it fulfills the reason for the modification: it stores well and stays soft and moist!

While I might still make the original if we have company over since there would be less risk of leftovers, and I adore that thick, crunchy & buttery crust, this is the one I’ll be making most often because the texture is so wonderful and its ability to stay that way upon storage robs me of the justification for polishing off an entire loaf in one sitting.  Which I may not be so thankful for, but my hips surely are.

*Despite this loaf storing well, we still ate half of it as soon as it was out of the oven, so I only had half a loaf (OK, maybe a little less than half, truth be told) to photograph the next day.  Sorry.  Our stomachs got in the way of the interests of my blog!  At least we didn’t eat the whole thing this time. At least not all at once.  :)

Buttery-Soft Beer Bread

Printable recipe
Printable recipe with picture

3 cups self-rising flour*
1/4 cup sugar
1 (12-oz) can beer
1 stick (1/2 cup) salted butter, melted
1 egg, beaten

Preheat oven to 375 degrees. Spray a loaf pan with cooking spray and set aside.

Whisk the flour and sugar together in a large bowl. Add beer, butter, and the egg, and whisk well to combine. Pour into the prepared pan and bake for 45-50 minutes or until golden brown. Remove from pan and cool on a wire rack for at least 15 minutes before slicing.

*I know it’s weird, but I really feel I get the best results using self-rising flour for this bread. However, if you do not have it, you can replace it with 3 cups all-purpose flour, 1 Tablespoon baking powder and 1 teaspoon salt instead. I recommend using a baking powder without aluminum, such as Rumford, particularly in this recipe since you need so much of it. The aluminum has an aftertaste and can foul up baked goods which call for quantities in excess of 1 teaspoon.

Update 2/18/15: I’ve discovered you can substitute honey for the sugar with delicious results as well, lending a light honey-sweet taste to the bread.  Just look at how tender it is!


How To Make a Splatter-Proof Recipe Binder

Posted on

A couple years ago I got sick of the huge collection of recipes I had in different locations throughout my house.  A file in the filing cabinet marked “recipes.”  A couple binders with uncategorized hole-punched recipes that were falling out and splattered with batter and grease because I used the recipes so often.  A stack of them on my computer desk.  Fed up, I finally made a binder to keep my favorite tried-and-true recipes in.  The ones I make over and over again and want easy access to.
My friend, Teri, has a binder very similar and I just copied her idea to create my own.  I recently made a starter binder for a friend’s housewarming and took some pictures of the creation process so I could share this idea with you.

Supplies:

1 Presentation View Binder
Transparent Page Protector Sheets
Adhesive Index Tabs
Recipes printed on 8 1/2″ x 11″ paper

For this project, I like to use a binder that has a transparent sheet over the top so you can put a “Title Page” inside of it, of your own design. Using page protector sheets to hold the recipes works well for recipes you use often, because the clear plastic protects the recipe. If you splatter it, you can just wipe it clean before returning the recipe to the binder.  It is also more durable and the holes won’t tear as easily as a paper with holes punched in it.

First, write your recipe categories on the paper tabs that come in the index tabs box. Most everyone will use different categories, depending on the type of recipes they use.  For instance, I not only have a “Desserts” category in my own, but also divided desserts into three subcategories: cake, pie, and cookies.  These are the basic categories you might want to include, adding more if you need to:

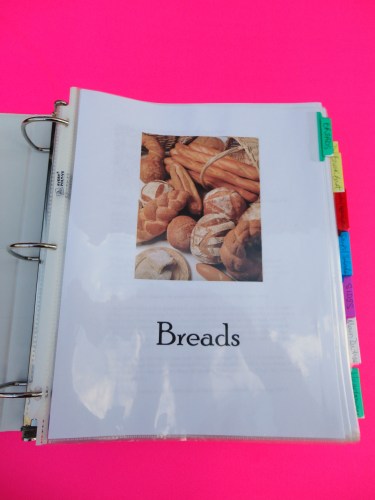
Breads
Breakfast
Appetizers & Snacks
Soups & Salads
Main Dishes
Side Dishes
Desserts
Etc. (for beverages, condiments, etc.)
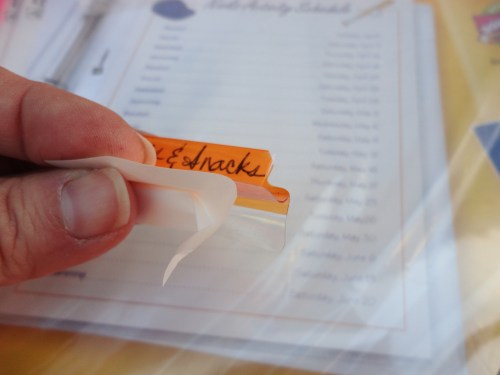
Slip the papers into your tabs and then arrange them in the order you want them to appear in your binder. Put enough page protector sheets in the binder for all the tabs. Remove the backing from the first category you want to use and slip it over the side of the first plastic sheet at the very top, then squeeze so it sticks.

These are quite easy to remove if you mess up or want to change how high or low the tab is positioned, so don’t fret if it’s not exactly how you want it. Gently pry it off and adjust it. Repeat the process with the remaining tabs, placing each one on the sheet below the last and a bit lower on the side so it shows beneath the tab before it. Soon you will have a binder that looks like this:
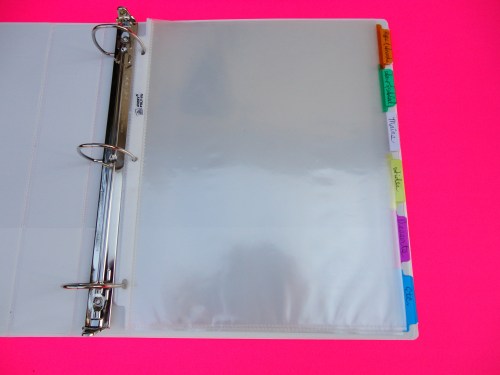
If you like, you can create title pages for each recipe category, as I did. I searched for images using Google, then copied the ones I liked into a Word document and used the same font that I used on the front of my binder to type the category title below the photo.

To create the title page, I did the same thing and searched for a picture I liked (I remember searching for cooking related coloring pages and liked the old-time feel of the one I chose). For the side title, I printed it in a Word document in landscape format in the middle of the page, then folded it to fit the pocket, and with much wailing and gnashing of teeth, I finally managed to get it in. It is difficult to get a paper in that tight spot, so you definitely want to use a folded paper for its sturdiness, or cardstock.
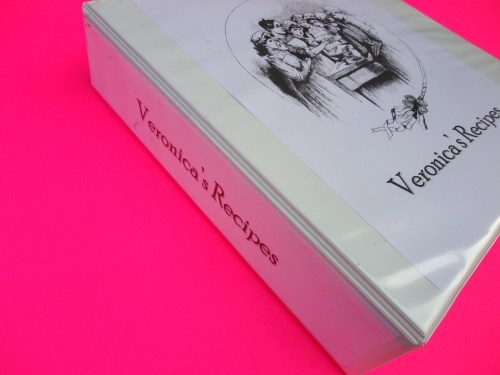
All that’s left is to fill the binder with recipes!

I have this slow cooker enchilada chile recipe posted here.

I put my blank page protector sheets in the front of my binder, before the recipes so that when I want to add a new one, I slip it in, then put it in the correct spot in my binder. I give each recipe its own sheet to make it easier to alphabetize them, therefore they are easier to find, but eventually I will have to start putting two recipes into each protector sheet (one facing forward, one backward) so that it doesn’t get too thick.

That’s about all there is to it! Very simple and quick.  What system do you use for organizing your recipes?  I also have about a million and a half saved to my computer into folders with different recipe categories!