RSS Feed

Category Archives: Beverages

Chocolate Mocha Punch


Seriously, a recipe today! :D I drafted this November 14th so it’s about time I posted it-lol.  I’ve shared a few of my friend, Teri’s, recipes before (see them all here), and this one is just as wonderful as the others.  She made this punch for my last baby shower and it was delicious! I’m sure once you scan the ingredients, you won’t have a hard time figuring out why.  It’s very decadent!  She also made it for her daughter’s wedding and the holiday party at her home last week, and I think it’s great for any occassion.  New Year’s Eve, maybe? :)

Chocolate Mocha Punch

Printable recipe
Printable recipe with picture

3 quarts water
1 cup Nesquik
1 cup granulated sugar
1/2 cup instant coffee granules (decaf is fine)
1/2 gallon vanilla ice cream
1/2 gallon chocolate ice cream
2 cups whipped cream (Teri uses Cool Whip)
Chocolate curls for garnish

In a large saucepan, bring the water to a boil. Remove from heat and add Nesquik, sugar and coffee; stir until dissolved. Cover and refrigerate for 4 hours or overnight. About 30 minutes before serving, pour into a punch bowl. Add ice cream by scoopfuls, stir until partially melted. Garnish with dollops of whipped cream and chocolate curls.

Advertisement

Cranberry & Apple Cider Punch


There’s probably not a huge need amongst the masses for an ice-cold autumnal punch recipe, since usually you want to start drinking hot beverages when the weather cools, but this is a nice refreshing drink that is a great alternative to serve at holiday gatherings. Thanksgiving, even?  My sister, Lacey (that’s her hands pouring the punch below), mixed up a big punch-bowl full for my Lil’ Pumpkin Baby Shower and there was hardly a drop left by the end.  It was so perfect with the pumpkin cupcakes and the entire theme and tasted wonderful!

And if you’re in need of more Thanksgiving recipes, I’ve updated my current favorites on the side bar. I love everything over there and can’t wait to eat some of it soon! Gobble gobble! :D

Cranberry & Apple Cider Punch

Printable recipe
Printable recipe with picture

1/2 gallon apple cider
1 (64 oz) bottle cranberry juice cocktail
1 (2 liter) bottle ginger ale
1/2 gallon orange sherbet

Combine the apple cider, cranberry juice, and ginger ale in a large punch bowl.  Scoop the orange sherbet on top and allow to sit for at least half an hour before serving.  Stir the sherbet into the punch and serve.  Fills 1 large punch bowl.

*Veronica’s notes: I made ice cubes by freezing two batches of the single serving recipe for this punch linked to below, however the ice cubes aren’t really necessary with the orange sherbet, which keeps the punch cold. Also, Dennis added the sherbet and only used half of the half gallon, but I think it would be best with a full half gallon.

Recipe source: adapted from Jam Hands (click the link to get Ali’s single-serving recipe)

Other favorite autumn drinks from my archives…

Skinny Pumpkin Spiced Latte

Easy Iced Pumpkin Spice Latte

Butterbeer

Coconut Oil Coffee


Growing up, my Mom used to go through “nervous break downs” in the summer when we were home from school and one summer, her breakdown took on a whole new level of crazy when she went entirely mental for raw garlic.  This was obsession, I tell you.  You couldn’t get her to shut up about the garlic, and she’d be talking to you about the benefits of raw garlic while rubbing a clove that had been cut in half on the soles of her feet.  It was definitely an aromatic summer as she seemed to be convinced that rubbing her entire body in garlic cloves 24/7 was the cure to all her ills.

I love this photo of Mom! The huge glasses! The t-shirt without pants! The totally rad high top tennis shoes with neon orange laces! Caught her in all her glory, and as you can tell, she was thrilled.

That’s kinda how I feel about coconut oil.  I’m obsessed with it in an eat it, drink it, rub it all over my body kind of way.  It started with my first jar of extra-virgin organic coconut oil.  Oh mah goodness, have you ever tasted pure unadulterated extra-virgin organic coconut oil?!  You can just eat a spoonful of it straight and the delicate & pure coconut flavor is heaven and the solid oil melts instantly in your mouth–it’s like candy to me.  But I only allow myself half a spoonful a day and unlike real candy, it’s not addictive so I don’t have to keep going back for more.

I also have been using a teensy bit on the dry parts of my face and it works better than any moisturizer and it absorbs without leaving a greasy shine behind.  I’ve also taken to rubbing it into my hair and sleeping in a shower cap from time to time and my hair is always so soft and silky after washing it the next day.  And I know it sounds so weird, but I use it to scramble my eggs.  I know coconut and eggs sound so wrong together, but my Grandpa cooked them that way for us when he visited last summer and although weird, I loved it and now don’t use any other oil to cook my eggs.

Grandpa cooked us eggs to show off his porcelain skillet. He says nothing sticks to it, and it’s safer than regular non-stick pans.

Needless to say, when I ran across this recipe for coconut oil coffee, I knew I had to  have it immediately!  Whose ever heard of putting coconut oil in their coffee, right?  So weird! But hello, I have a family obligation to be a freak!  Is being weird going to stop the woman whose mother once rubbed her entire body with raw garlic for a week? I think not!

So try it I did.  Love!  Blending the coconut oil into the hot coffee makes it so creamy…without any cream!  I mean look at that cup up there, that was black coffee, and look how creamy it is with the coconut oil blended in.  Love the frothy top & the coconut flavor too.  :)  With a little stevia, this was so much better than any Starbucks $$$ cuppa, IMHO.  So good, you guys.  I hope you try it!  Just don’t use refined coconut oil, that stuff doesn’t have the health benefits of extra-virgin, nor the flavor (you can read the original post where I found this recipe to learn all about the health benefits).

Coconut Oil Coffee

Printable recipe
Printable recipe with picture

1/4 cup Cold-Brewed Coffee + 3/4 cup hot hot water or 1 cup hot brewed coffee
1 tablespoon organic extra-virgin coconut oil
Stevia or another sweetener, if desired

Place all ingredients in blender and blend!

Recipe source: The Veggie Nook

I love my CW! Thanks for teaching me all the best ways to embrace the crazy. :)

Skinny Dark Hot Cocoa


Hot cocoa?  Hot chocolate?  I’ve always said hot chocolate, no matter if it’s made with real chocolate or cocoa powder or a mix.  I also have always said pop, not soda or soda pop.  Potato, potahto I guess.  What about you?

Anyway, remember how Dennis and I weren’t planning on having sugar on Valentine’s Day?  Well, it would be just be unAmerican not to have any chocolate on the day when the rest of the country is eating 58 million pounds of it.  (I know, right?)  So, inspired by Faith’s delicious Skinny Caramel Hot Cocoa, I made this plain version for our Valentine’s Day dinner dessert, only changing the basic recipe a smidge to deepen the chocolate flavor (had to make up for our lack of chocolate candy, you know).  We like our chocolate dark in this house.

This hot cocoa is so sweet, so chocolatey and delicious, creamy even, that you wouldn’t guess that it’s fat and sugar free.  That it’s actually healthy.  Protein and calcium-rich milk?  Check.  The antioxidant power of cocoa powder?  Check.  Totally natural with no chemical sweeteners?  You got it.

I’m usually semi-opposed to healthifying sweet treats because, in my opinion, they’re called treats because they are meant to be enjoyed.  Mostly what cutting out fat and sugar does is make them less enjoyable (although I hope to prove my own theory wrong because I’m going to be experimenting soon, given that we’ve nixed sugar in our house!).  But when you can do it with such a satisfying result, I’m all for feeling great about drinking something that tastes so sinful.

*A note about stevia: I’m a huge advocate of using stevia to sweeten things, versus chemical sweeteners and even real sugar.  This is the ONLY completely natural sweetener out there that is also calorie free.  It is taken from the leaves of a plant and it is tremendously sweet so you need much less of it than sugar.  I was blessed to win a bunch of NuNaturals products through a giveaway from Renee of My Kitchen Adventures (thank you so much Renee!), and hope to do a review soon with comparisons to other sugar substitutes.  NuNaturals products are by far the best I’ve tried and I highly recommend them.

Since I’m not counting calories on the 17 Day Diet, I didn’t calculate them for this cocoa when we drank it, but just going from the labels on the milk and the cocoa (the only things that have calories in the recipe), I can tell you that there is 120 calories, 1 g fat,  22 g carbohydrates, and 2 grams fiber. Not to shabby, and I think you’ll agree that this hot cocoa is totally worth every healthy & delicious calorie.

Skinny Dark Hot Cocoa

Printable recipe
Printable recipe with picture

1 tablespoon cocoa powder
1 tablespoon Dutch process cocoa powder
2 packets NuNaturals NuStevia
Pinch fleur de sel or kosher salt
1 ¼ cups nonfat milk
½ teaspoon pure vanilla extract

Whisk together the cocoa powders, stevia powder, and salt in a small saucepan. Add half the milk and whisk vigorously until the cocoa powder is dissolved. Turn the heat to medium, and whisk in the remaining milk. Heat until the hot cocoa starts to steam (do not boil), and pour into a mug.  Enjoy!

For a caramel hot cocoa: stir in ¼ teaspoon caramel extract along with the vanilla at the end.

Serves 1

Recipe source: adapted from An Edible Mosaic

Yummy either way!

P.S. Happy leap day!  I know this is crazy, but this is the first year I’ve actually been aware that it’s a leap year.  How did I miss the other seven I lived through?  Queen Oblivious here! I know I’m getting random here but did anyone else used to watch the show Quantum Leap?  I honestly can’t remember a thing about it except I think I liked it (I was pretty young so maybe it was too mature for me), and I always associated the name with leap year.  Did it even have anything to do with a leap year?  OK, seriously, I’ll shut up now.

Easy Iced Pumpkin Spice Latte

Posted on

Last fall, I posted a recipe for a skinny pumpkin spiced latte that I became addicted to, making it almost every morning.  Now that I have a big jug of cold-brewed coffee in my fridge at all times, I realized how easy it would be to make an iced pumpkin spice latte.  This is perfect right now because fall is in the air, but isn’t quite here yet, so you can enjoy your fall flavored coffee over ice until the cold really hits, then start heating it.  This really couldn’t be faster or more simple (and delicous!).

Easy Iced Pumpkin Spice Latte

Printable recipe
Printable recipe with picture

1 cup milk (any kind)
1/4 cup cold-brewed coffee concentrate, or to taste
2 tablespoons pumpkin butter,* or to taste
1/4 teaspoon pumpkin pie spice

Add ingredients to a wide-mouth glass and blend with an immersion blender until foamy. Add ice and enjoy! If you don’t have a stick blender, put everything in a regular blender blend until smooth and foamy, then pour over ice in a tall glass.  Garnish with whipped cream, if desired.

If you want to know what I drizzled on top, here it is:

I bought this last year and I’m not sure if it will return this fall, but it is a great syrup and probably could even be used in place of the pumpkin butter in this latte.

*Veronica’s note: To make your own pumpkin butter, add 1/2 cup of brown sugar and two teaspoons of pumpkin pie spice to every cup of pumpkin puree you use.  Cook over medium heat in a saucepan, stirring oven, until very thick.  I think I cooked mine half an hour.  Be careful, it bubbles and spatters!  I like to help it create a steam vent so that it doesn’t bubble as much, and stir every minute or so, so it doesn’t start scorching on the bottom.  If you make a large batch, you’ll be set on lattes for a while!

Cold-Brewed Iced Coffee

Posted on

I recently read a short story, by an unknown author, that teaches a simple, yet incredible lesson about life.  Since I’m sharing a recipe for coffee with you today, I thought this would be the perfect time to share this parable with you as well.

Life is Like a Cup of Coffee

A group of alumni, highly established in their careers, got together to visit their old university professor. Conversation soon turned into complaints about stress in work and life.

Offering his guests coffee, the professor went to the kitchen and returned with a large pot of coffee and an assortment of cups – porcelain, plastic, glass, crystal, some plain-looking, some expensive, some exquisite – telling them to help themselves to the coffee.

When all the students had a cup of coffee in hand, the professor said: “If you noticed, all the nice looking expensive cups have been taken up, leaving behind the plain and cheap ones. While it is normal for you to want only the best for yourselves, that is the source of your problems and stress.

“Be assured that the cup itself adds no quality to the coffee. In most cases it is just more expensive and in some cases even hides what we drink. What all of you really wanted was coffee, not the cup, but you consciously went for the best cups… And then you began eyeing each other’s cups.

“Now consider this: Life is the coffee; the jobs, money and position in society are the cups. They are just tools to hold and contain Life, and the type of cup we have does not define, nor change the quality of life we live.

“Sometimes, by concentrating only on the cup, we fail to enjoy the coffee. Savor the coffee, not the cups! The happiest people don’t have the best of everything. They just make the best of everything.”

Live simply. Love generously. Care deeply. Speak kindly.

~Author unknown

*******************************

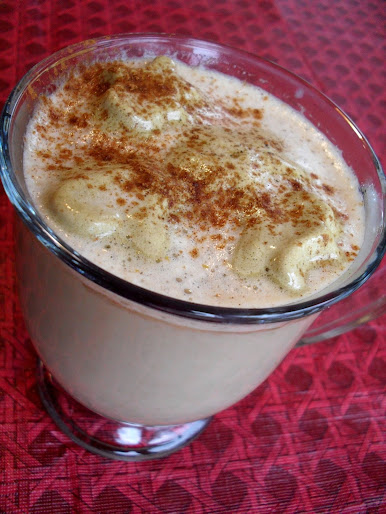
Since we’re concentrating on the coffee here, let’s talk about this recipe, which really lets coffee shine.  Allowing the coffee to steep at room temperature overnight yields a strong brew devoid of any of the usual bitterness you get when percolating it.  I have never been able to tolerate the bitterness of strong coffee, which is why I steer clear of Starbucks.  I still prefer a milder coffee, but cold-brewing makes it so much smoother that I can even enjoy a strong cup prepared this way.  You can control how strong your cup is by adding more or less water to the coffee concentrate.

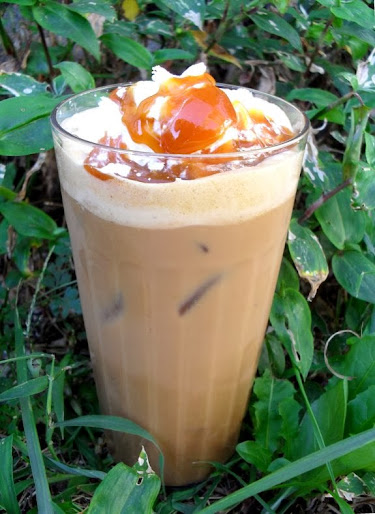
Unless you are averse to sweet coffee drinks, I highly recommend you use some of that leftover sweetened condensed milk from my pound cake recipe to try a Vietnamese-style iced coffee.  It is out of this world!

Cold-Brewed Iced Coffee

Printable recipe
Printable recipe with picture

3 cups water
2/3 cup ground coffee

Optional additions:
Milk &/or Sweetener
Sweetened Condensed Milk

In a 4-cup measure, add 3 cups water and stir in coffee.

Unless you are super cool like me (are you laughing?!?!) and have Tupperware measuring cups, you will have to measure two 1/3 cups, or use one of those one-cup measures that have marks on the inside/outside to show where 2/3 is.  I’m so happy to now have 2/3 and 3/4 cup measures for the first time since I left home!! Thank you, Tupperware! (Wait, am I already losing sight of the lesson by concentrating on the measuring cup and not the coffee?)

Cover your measuring cup with plastic wrap and let rest at room temperature overnight or 12 hours.  Line a sieve or colander with a large coffee filter, cheesecloth, or a double layer paper towels, and prop inside a bowl.  Strain coffee through the sieve.

As you can see, my measuring cups are way cooler (why are you laughing?!?!) than my colander, which I’ve had longer than I’ve been married, and I’m pretty sure I bought it for 10 cents at a garage sale, where the owner was getting rid of it because it was the first colander ever made.  So, you see, I can’t get rid of it.  It is a piece of living history, in my very own kitchen.

Besides, it’s all about the coffee (or life, if you will), so whatever colander I use really doesn’t matter because it won’t alter the resulting brew, or my life. Wow, this “life is coffee” philosphy is so empowering!  :)

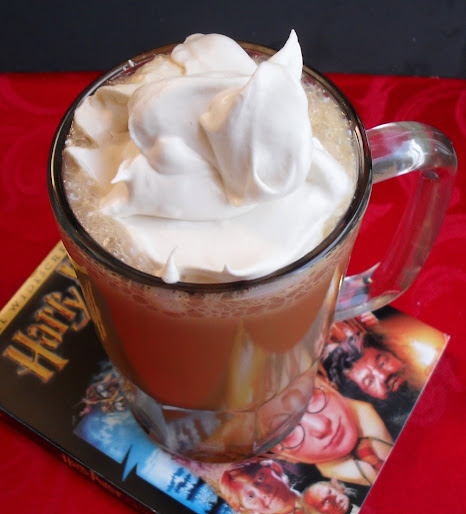
Pour strained coffee concentrate into a jar, or rinse out the measuring cup and pour it back in to store.  Keep refrigerated.  To serve, fill a glass with ice, and add equal parts coffee concentrate and water, or to taste.  Stir in milk and sweetener, if desired.  For a Vietnamese iced coffee, stir in a tablespoon or two of sweetened condensed milk.

Bada-bing, bada-boom!  If you like sweet stuff, you have to try it this way!  I’m hooked.

Yield: 2 1/2 cups coffee concentrate, usually good for 4-5 servings.

Recipe source: adapted from Smitten Kitchen

Homemade Kahlua {Coffee Liqueur}

Posted on

When I was little, my Mom went through a Kahlua phase that joyfully caused her to have ice cream in the freezer for like a month straight.  Having any sort of sweets on hand was literally unheard of in our house, but when she discovered this coffee liqueur and how good it tasted on ice cream, she stocked up!  To our further delight, Mom let us have it with her!  That is until Dad found out and told us that our Kahlua and ice cream days were over.  Mom seemed stunned at his outrage, as if she hadn’t realized that giving alcohol to children 9 and under might be folly.  I was majorly bummed at the time, but appreciate Dad’s intervention now.  With my addictive nature (have I mentioned my sweet teeth?), I hate to think of what my teen years might have been like with an unlimited supply of delicious Kahlua!

Although I don’t drink, I do love to bake with alcohol because it’s excellent for highlighting and intensifying flavor.  Because of my early exposure to Kahlua, it is my favorite liqueur and the one I use most often in baking.  I go through a large bottle of it every year, using it in Mocha-Frosted Kahlua Brownies and THE Mocha Crunch Cake exclusively.  Seriously, I make those two things so much that I need that much Kahlua just for them!

Unless you live in Mexico, Kahlua doesn’t come cheap, so I was thrilled when my friend, Suzie, shared her recipe for homemade Kahlua with me.  It never even occurred to me that it was something you could make at home, or I could have saved hundreds of dollars by now!  It is so much cheaper to make it yourself, and just as delicious.  You can use it in any recipe that calls for Kahlua with good results.

Homemade Kahlua {Coffee Liqueur}

Printable recipe
Printable recipe with picture

2/3 cup instant coffee
2 cups boiling water
2 cups brown sugar
2 cups white sugar
3 cups vodka
1/4 cup Buttershots (a butterscotch flavored liqueur, optional)
1 teaspoon vanilla extract or 1 vanilla bean

Place coffee in large glass bowl.  Pour water over and stir.  Add sugars and stir until most of the heat has dissipated.  The sugar won’t be completely dissolved but that is OK.  Stir in the vodka, Buttershots, and vanilla or vanilla bean.  Cover with plastic wrap and let sit at room temperature for about two weeks.  Stir every day or every couple of days.  Remove vanilla bean, if used, and ladle into bottles using a funnel.  Keeps in refrigerator for about 6-8 months.

Makes about 2 liters.

Recipe source: Suzie S.

%d bloggers like this: