RSS Feed

Tag Archives: vegan

Fully Loaded Vegetarian Salsa Chili


Though my tastes have changed during pregnancy, mainly from loving sweets, to abhorring them, to loving them again, one thing has remained pretty consistent. My zeal for soup. It started early on, I think before I even announced I was pregnant, and continues now, though not as strong. I enjoyed and made many soups during the heat of summer, which was previously against my food religion (ewwww, hot soup in summer?!), but pregnancy knows no restrictions on seasonal meals.  I enjoyed winter meals all summer!

I created this chili during one of the weeks a month or so back when we had to eat mainly out of our cupboards because we were stretching our budget to include things like baby bedding, a 3D sonogram and bigger bras.  :D  And what a blessing that necessity became, because we had some of our best meals during those weeks, including the Tilapia with Chile Lime Butter (I found like 2 tons of tilapia in our freezer).

It’s hard to believe I actually had all these ingredients on hand (even the peppers – I barely saved them before they went bad), but I’m so glad I did because the flavor was just incredible and I can’t imagine leaving any of them out.  I usually enjoy meat in my chili, but I never missed it here because it’s so hearty and flavorful.  I ate leftovers for lunch for several days and was sad to eat the last bowl.  It is so, so very good, and for the record I never once ate it with the additional toppings pictured.  I just didn’t need anything else – it was so good all on its own.

Fully Loaded Vegetarian Salsa Chili

Printable recipe
Printable recipe with picture

3 carrots, peeled and roughly chopped
3 cloves garlic, peeled
1 red pepper, seeded and diced
1 green pepper, seeded and diced
1 orange or yellow pepper, seeded and diced
2 stalks celery, chopped
1 large onion, diced
1 ½ cups salsa
1 (14.5 oz) can diced tomatoes (roasted, if you have them)
2 (15.5 oz) cans white beans (great Northern or navy) , drained and rinsed
1 (15.5 oz) can black beans, drained and rinsed
1 (15.5 oz) can kidney beans, drained and rinsed
1 (15.25 oz) can corn, drained
1 (10 oz) can diced tomatoes and green chiles (such as Rotel)
1 (8 oz) can tomato sauce
1 serrano pepper, finely chopped, seeds included (optional for a spicy kick)
2 tablespoons chili powder
2 tablespoons ground cumin
2 tablespoons real maple syrup
½ teaspoon rubbed sage
Salt to taste
1 bunch cilantro, leaves only, chopped
Optional garnishments: shredded cheddar, sour cream, limes for squeezing over individual bowls

Add the carrots and garlic to a food processor and process until very fine and wet, about a minute, stopping to scrape down the sides often. Add to a stock pot along with the remaining ingredients, except for the cilantro. Bring to a boil, reduce heat to medium, cover, and simmer for an hour or until veggies are tender, stirring occasionally. You can simmer as long as you want but I recommend at least an hour. Stir in the cilantro and serve hot with optional garnishments and cornbread (this chili is especially good with some sweet cornbread to contrast the heat if you made it hot like I did). I have several recipes to choose from below, if you’re looking for a new one to try.

Favorite Cornbread (this one is a sweet Northern cornbread and it is the best. ever.)
Lighter Northern Cornbread
Homestead Cornbread (a flourless, sugarless, Southern-style cornbread)
Amish Friendship Creamed Cornbread
Honey Whole Wheat Cornbread
Sweet Corn Muffins (two ingredients!)

A Veronica’s Cornucopia original, with help from Biz’s Beef & Bean Salsa Chili, and Suzie’s award-winning Next Day Chili.

Secret Recipe Club

Interested in other delicious meatless meals? You might enjoy…

Chickpea Salad Wraps {Mock Tuna Salad}

Corn, Avocado & Black Bean Tostadas

Bean Curry

Barley with Butternut Squash, Apple & Onion

Posted on

This is one of the “meals” (it’s really a side dish but I like to eat it as a meal) I’ve been making for years and usually resurrect come fall/winter.  My family absolutely loves it too, even my little nephew (or at least he did at 4 years old, the last time he ate it)!  I appreciate delicious vegetarian meals that satisfy me and this one fits the bill fo sho. The combination of the creamy squash, chewy barley, crisp red pepper & apple, and the contrasting savories and sweetness–it’s all just magic to me.  And I guess if a four year old boy will relish something that only contains unrecognizable healthy ingredients, it is pretty magical.

Barley with Butternut Squash, Apple & Onion

Printable recipe
Printable recipe with picture

3/4 teaspoon salt, divided
1/2 cup uncooked barley
1 tablespoon olive oil
2 cups butternut squash, peeled & diced
1 cup onion, chopped
1/2 cup sweet red pepper, diced
1 medium apple, peeled, cored, diced
1 1/2 teaspoons garlic, minced
3/4 teaspoon dried thyme
1/4 teaspoon black pepper
1/3 cup fat-free chicken or vegetable broth

Bring 3 cups of water and 1/2 teaspoon of the salt to a boil in a medium saucepan; add barley. Cover saucepan and simmer barley until tender, about 30 to 35 minutes; drain.

Meanwhile, heat oil in a large nonstick skillet over medium-high heat; add squash and cook, stirring often, until it’s starting to soften–about five minutes. Add the onion and red pepper and cook for an additional 3 minutes.

Stir in apple, garlic, thyme, black pepper and remaining 1/4 teaspoon of salt. Cook, stirring, until apple is almost tender, about 2 minutes; stir in broth, scraping bottom of skillet with a wooden spoon to loosen any browned bits. Stir in cooked barley; toss over low heat to mix and coat. Remove from heat and serve.

Serves 4, about 1 cup per serving.

Per serving: 192 calories; 4.2 g fat; 0 g cholesterol; 37 g carbohydrate; 8 g fiber; 5 g protein; 5 Points Plus

Recipe source: WeightWatchers.com

Small Batch Coconut-Chocolate Chunk Cookies {Vegan}


This month my Secret Recipe Club blog assignment was to Delicious Existence.  (Gotta love that blog title!)  On Twitter, Danielle (that’s my sister’s name, I love her already!) describes herself as a social worker, holistic health coach, lifestyle motivator and kitchen magician.  And after perusing her blog, I’d have to agree with the last two–all her wonderful vegan recipes are definitely motivating and magical!  Although not a vegan myself, I have mad love for their choice and actually try to eat vegan or vegetarian at least once a week, which isn’t too hard for me since I prefer fat and carbs (the good and bad kind :)) over meat anyway.  Over time I’ve been so wonderfully surprised how delicious & satisfying a completely meatless, dairy-free, and egg-free meal can be.

Don’t believe me?  Check out Danielle’s Herb Pinwheels, Jalapeno Popper Panini, Triple Chocolate Lust Cookies (I’m so making these!), Zucchini, Onion & One Pepper Stew, and Cinnamon Raisin Oatmeal Pie with Dark Chocolate Drizzle–just a few of the contenders for the recipes I marked to try.  I have gone vegan before and found it challenging to find enough variety, but Danielle is clearly a master.  Definitely go to her blog to get some inspiration!

I chose her coconut-chocolate chunk cookies to make for this month’s reveal, which is totally random, I know.  If it was December, they’d fit right in since that’ s the month everyone starts baking hoards of them to give away.  And these would be a great addition to your cookie tins this year!  But it’s the week of Thanksgiving and there’s not a speck  of cinnamon or pumpkin or even sweet potato in the recipe I chose.  I’m sorry, but you guys know about my obsession with coconut oil.  Did you really think I could pass up a recipe for cookies that contained not only my beloved coconut oil, but chocolate as well?  I think not.

You guys, these are so good.  Crazy good.  So good that I’m glad I kept it a small batch recipe so I could only eat a dozen at a time.  OK, so I didn’t really eat them all myself…but I did eat quite a few.  Both times I made them.  Yes, I made them twice this month, and will be making them again in a larger batch in December.  They’re so good!

The coconut flavor is perfectly balanced with the semisweet chocolate, IMHO.  You just would not believe how wonderful the coconut oil makes these cookies taste.  So much better than using an extract!  The cookies are sticky-crispy on the outside and the middles are soft & chewy-my favorite texture for a cookie, and I believe the corn syrup helps with it.  The original recipe did not call for corn syrup, but I wanted to use ingredients that most people would have in their kitchen so instead of making a flax seed egg (mixing flax meal with water creates a binder similar to egg), I decided to use something else that was sticky to bind the cookie together.  (You could also use agave nectar for a more natural cookie.) I used more corn syrup in the first batch and the cookies were a lot more chewy and a lot more crispy at the edges, and I think I’ve improved them by subbing a tablespoon of the corn syrup for milk (I used almond milk but coconut would obviously work great here), making the cookies softer but still crispy-chewy.

Whether you’re vegan or not, if you like coconut, I think you’re going to love these cookies!  If you don’t believe me take my friend Kevin’s word for it (it was his birthday and I gave him some, along with an accidentally egg-less version of this banana bread)–he cracks me up!

I call Kevin “Obiewan,” thus his Star Wars reference. :)

Thank you Danielle for sharing your fabulous recipe!  It pleases Jedi masters and padawans alike. :)

Coconut-Chocolate Chunk Cookies {Vegan}

Printable recipe
Printable recipe with picture

1/4 cup (1 7/8 oz / 52 g) virgin coconut oil, melted & cooled slightly (measured solid)
1/3 cup ( 2 ½ oz / 72 g) packed light brown sugar
1 tablespoon corn syrup or agave nectar
1 tablespoon milk of choice (I used almond)
1 teaspoon vanilla extract
1/4 teaspoon baking soda
1/8 teaspoon salt
¾ cup (3 oz / 85 g) all-purpose flour
¼ cup shredded sweetened coconut
1/3 cup semisweet chocolate chunks

Preheat oven to 350F and line a baking sheet with parchment or a silpat mat.

In a small mixing bowl combine the coconut oil, brown sugar, corn syrup, milk, and vanilla. Stir until blended, then add the baking soda and salt and stir well. Add the flour and mix well, using your hands if necessary, then stir in the coconut & chocolate, again using your hands to combine. Roll the dough into 12 (1-inch) balls, making sure there are three chocolate chunks per cookie. Place on prepared baking sheet and bake for 10 minutes, or until golden at the edges. As soon as you remove them from the oven, use a spatula to push any misshapen cookies into place so that they retain a round shape. Allow to cool on baking sheet for five minutes, then remove to a cooling rack to cool completely. Store in an airtight container or Ziploc bag.

Makes 1 dozen cookies.

Recipe source: adapted from Delicious Existence

I learned this trick from fellow SRC members Katrina & Liz–to whip any misshapen cookies back into shape, as soon as they’re out of the oven, scoot them into a round shape with your metal spatula.  Easy peasy and looks so much better!

To check out the other Group C SRC recipes, click the linky man below!  As always, thank you for being the bestest hostess with the mostest Miss Debbi!


Coconut Oil Coffee


Growing up, my Mom used to go through “nervous break downs” in the summer when we were home from school and one summer, her breakdown took on a whole new level of crazy when she went entirely mental for raw garlic.  This was obsession, I tell you.  You couldn’t get her to shut up about the garlic, and she’d be talking to you about the benefits of raw garlic while rubbing a clove that had been cut in half on the soles of her feet.  It was definitely an aromatic summer as she seemed to be convinced that rubbing her entire body in garlic cloves 24/7 was the cure to all her ills.

I love this photo of Mom! The huge glasses! The t-shirt without pants! The totally rad high top tennis shoes with neon orange laces! Caught her in all her glory, and as you can tell, she was thrilled.

That’s kinda how I feel about coconut oil.  I’m obsessed with it in an eat it, drink it, rub it all over my body kind of way.  It started with my first jar of extra-virgin organic coconut oil.  Oh mah goodness, have you ever tasted pure unadulterated extra-virgin organic coconut oil?!  You can just eat a spoonful of it straight and the delicate & pure coconut flavor is heaven and the solid oil melts instantly in your mouth–it’s like candy to me.  But I only allow myself half a spoonful a day and unlike real candy, it’s not addictive so I don’t have to keep going back for more.

I also have been using a teensy bit on the dry parts of my face and it works better than any moisturizer and it absorbs without leaving a greasy shine behind.  I’ve also taken to rubbing it into my hair and sleeping in a shower cap from time to time and my hair is always so soft and silky after washing it the next day.  And I know it sounds so weird, but I use it to scramble my eggs.  I know coconut and eggs sound so wrong together, but my Grandpa cooked them that way for us when he visited last summer and although weird, I loved it and now don’t use any other oil to cook my eggs.

Grandpa cooked us eggs to show off his porcelain skillet. He says nothing sticks to it, and it’s safer than regular non-stick pans.

Needless to say, when I ran across this recipe for coconut oil coffee, I knew I had to  have it immediately!  Whose ever heard of putting coconut oil in their coffee, right?  So weird! But hello, I have a family obligation to be a freak!  Is being weird going to stop the woman whose mother once rubbed her entire body with raw garlic for a week? I think not!

So try it I did.  Love!  Blending the coconut oil into the hot coffee makes it so creamy…without any cream!  I mean look at that cup up there, that was black coffee, and look how creamy it is with the coconut oil blended in.  Love the frothy top & the coconut flavor too.  :)  With a little stevia, this was so much better than any Starbucks $$$ cuppa, IMHO.  So good, you guys.  I hope you try it!  Just don’t use refined coconut oil, that stuff doesn’t have the health benefits of extra-virgin, nor the flavor (you can read the original post where I found this recipe to learn all about the health benefits).

Coconut Oil Coffee

Printable recipe
Printable recipe with picture

1/4 cup Cold-Brewed Coffee + 3/4 cup hot hot water or 1 cup hot brewed coffee
1 tablespoon organic extra-virgin coconut oil
Stevia or another sweetener, if desired

Place all ingredients in blender and blend!

Recipe source: The Veggie Nook

I love my CW! Thanks for teaching me all the best ways to embrace the crazy. :)

Avocado Chocolate Pudding

Posted on

You may have noticed I’m no longer posting regularly.  I have a feeling that’s how VC will be from now on, with periodic posts when I have the time.  While I hope my sporadic posting doesn’t bother any of my readers, I likely wouldn’t begin to post regularly for your sake at the expense of my own, so it would help my conscience out a lot if you would just be OK with it.  Thanks. :)

Onto the pudding.  I know it sounds weird, but you just have to try this to believe it how good it is.  Even my avocado-hating husband loves this pudding!  Basically it’s just avocado blended up with cocoa powder and agave nectar to create a sweet, silky, perfectly chocolate-y pudding.  No dairy, no refined sugar, no gluten, no cooking, just blending and eating of the most delicious & wholesome dessert ever…refrigeration totally optional.  We couldn’t wait and ate ours as soon as it was blended and it was fabulous.  But I bet it would be even better cold.

Chovocado Pudding

Printable recipe
Printable recipe with picture

1 ripe avocado
1/4 cup cocoa powder
1/4 cup raw agave nectar
1/4 cup almond milk
1 teaspoon vanilla extract

Peel and quarter the avocado. Put all the ingredients in a Magic Bullet or food processor and blend until smooth. Serve and enjoy!

Recipe source: Forgiving Martha

Chickpea Salad Wraps {Mock Tuna Salad}
Posted on

The Jey of Cooking is donating $1 to the American Heart Association for each heart-healthy recipe that is linked to her fundraiser, and I thought this was a fun way to spread the word on the importance of heart health, so I decided to post this particular recipe because it’s chock full of ingredients to keep your ticker in tip-top shape!

Heart disease is the leading cause of death for both men and women in the United States.  In 2008, 616,000 people died of heart disease.  Studies have shown that lowering blood pressure and cholesterol can reduce your risk of developing of heart disease, and this recipe perfectly fits into a dietary plan focused on doing both.

The chickpeas and celery add dietary fiber (and so will your tortilla, if you choose a whole wheat one), which is well-known for naturally lowering cholesterol and blood pressure.  What you may not know about onions  is that they stave off heart disease by promoting thinner blood and breaking up blood clots.  They contain a powerful antioxidant called quercetin, which can help with high blood pressure.  These benefits are most powerful when onions are eaten raw, as in this salad.  And last but not least, the sunflower seeds add some heart-healthy poly- and monounsaturated fat into the mix, not to mention a tasty crunch!

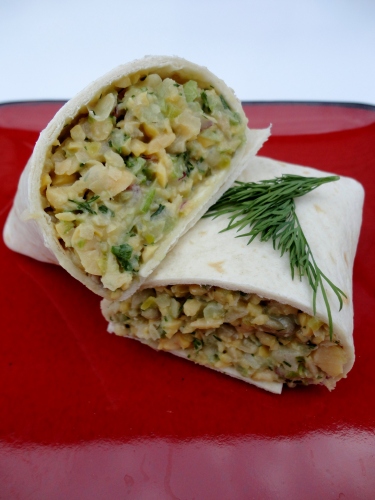
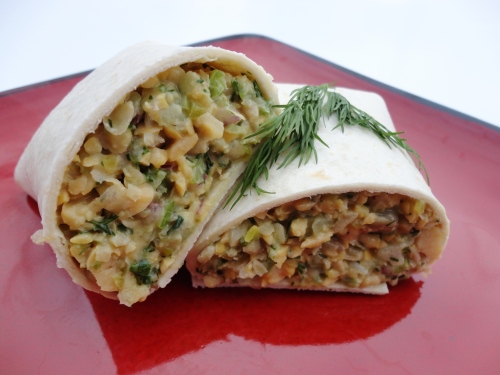
Now that we know how healthy this recipe is, let’s talk about how it tastes.  Eating foods for the sake of health is all well and good, but I’m a firm believer that those foods should also be full of flavor to make it an enjoyable experience.  And this salad certainly fits the bill!  It tastes very similar to tuna salad, and if you like tuna salad, I know you will like this as well.  The beans make it creamy, with a lovely contrasting crunch from the celery, onions and sunflower seeds.  You might be surprised how similar this tastes to tuna salad, and if you are following a vegan diet, this would be a great substitute.

Chickpea Salad Wraps

Printable recipe
Printable recipe with picture

1 (15 oz) can chickpeas, drained and rinsed
½ cup celery, diced
¼ cup roasted, salted sunflower seeds
¼ cup mayonnaise, Miracle Whip or Vegenaise
3 tablespoons red onion, diced
3 tablespoons dill pickle, diced (or use dill relish)
2 tablespoons fresh dill, minced (or 2 teaspoons dried)
1 tablespoon fresh parsley, minced (or 1 teaspoon dried)
2 tablespoons lemon juice
1 garlic clove, minced
1 teaspoon reduced sodium soy sauce
½ teaspoon prepared mustard
Salt & pepper to taste

Place everything in the bowl of a food processor fitted with the blade attachment. Pulse until it is the texture you desire. I wanted mine to be slightly chunky and a little creamy, which took about 20 pulses. Serve in burrito-size tortillas, other wraps, or on bread as a sandwich.

Recipe source: adapted from Oh She Glows

*Sources for information on heart health: Centers for Disease Control and Prevention, How Dietary Fiber Lowers Cholesterol, The Healing Power of Onions, Nutritional Power of Sunflower Seeds

And you know you want to see my First Day of Spring manicure (I did it yesterday):

I forgot the grass but still love it.  Guess how many nail polishes I used on it?  Every single one of these:

I know. I’m crazy.  Big thanks to Suzie, who gifted me with a gazillion polishes, some pictured here.  You know you’re feeding my problem, right Suze? ;)

Carrot Cake Protein Muffins {Vegan}

Posted on

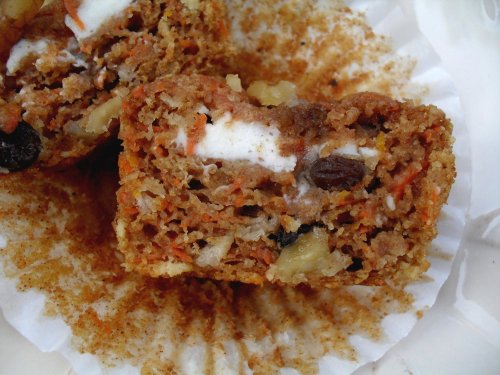
You may remember these from the roundup of all my fair entries.  The challenge was to make a heart-healthy muffin using at least one soy product (the contest was sponsored by the Kansas Soy Commission) and I created these beauties using four: soy flour, soy milk, tofu, and soy “cream cheese.”

These were so delicious, I had high hopes of coming home with the $75 prize for first place.  There was just one problem.  Two, actually.  I didn’t notice, until it was too late, that these were supposed to be “fruit muffins” and one of the judging criteria was “ease of preparation.  I gave a sigh of relief over the “fruit muffin” thing because although these are mostly a vegetable muffin, there are raisins in them and so they might pass the “fruit muffin” test.  My heart sank at the second oversight, however, because these really aren’t simple to prepare.  They’re not horribly difficult, but you don’t look at a list of ingredients this long and with this many steps and call it “easy.”

Well, that’s exactly what the judges wrote on my judging paper.  “Very healthy ingredients.  Wide variety of ingredients.  They taste wonderful & attractive.  We are looking for ease of preparation & thought this muffin, though wonderful, has too many ingredients.”

Shoot.  The real kick in the butt was my soy yeast bread, though (pictured above).  It didn’t rise as well as I would have liked, and thought the judges must have found it too dense because it didn’t place.  Well, this is what they wrote on that paper: “Beautiful bread-the cinnamon with the raisins is fantastic. I loved it!  HOWEVER: due to the facts listed in the State Fair Rule Book, this entry was to be entered on a “sturdy white plain paper plate” & had to be disqualified.  I am sorry.  Please pay close attention to the listed rules.” (Wasn’t she sweet about? Aw!)

I entered my bread on a foil-wrapped piece of cardboard because that is what I used for all my other breads for the regular contests.  But the special contests apparently have special rules too. DRAT!  Oh well, maybe next year I’ll get it right.

One thing I did get right is the moisture (so moist!) and taste (like dessert!) on these muffins.  They are just SO good you would never guess they don’t have any eggs or dairy–even the soy “cream cheese” filling tastes nothing like soy.  Honestly, they hardly even taste “healthy” because they are so good.  I froze the leftovers and have been enjoying them slowly.  I have only a precious few left and even after almost two months in the freezer, they are still as wonderful as the day I made them!

Carrot Cake Protein Muffins

Printable recipe
Printable recipe with picture

Filling
8 oz. Toffutti Better Than Cream Cheese
2 tablespoons granulated sugar

Muffins
1 cup white whole wheat flour
¾ cup all-purpose flour
¼ cup soy flour*
½ cup rolled oats
1 cup sugar
2 teaspoons baking powder
½ teaspoon baking soda
1 ½ tablespoons cinnamon
½ teaspoon nutmeg
¼ teaspoon ginger
1 ½ teaspoons salt
16 oz. silken tofu
½ cup orange juice
½ cup soy milk
¼ cup agave nectar
2 tablespoons canola oil
1 tablespoon orange zest
1 ½ cups finely shredded carrots
½ cup chopped walnuts
½ cup raisins

Topping
¼ cup chopped walnuts
2 tablespoons brown sugar

Mix the filling ingredients together until smooth; set aside. Line 24 muffin cups with paper liners and set aside. Preheat oven to 400 degrees.

In a large bowl, whisk together the flours, rolled oats, sugar, baking powder, baking soda, cinnamon, nutmeg, and salt. Set aside. In a blender, combine tofu, orange juice, soy milk, agave nectar, and canola oil. Blend until smooth, then add the orange zest and pulse once to combine. Pour into the bowl with the flour mixture and stir until moistened. Fold in the carrots, walnuts, and raisins. Divide half the batter between prepared muffin cups, then spoon about 1 ½ teaspoons of the filling mixture over the centers before covering with the remaining batter. Bake for 20-22 minutes or until the center no longer looks wet and feels done when touched in the middle (a toothpick will not come out clean because of the filling so go by the look and feel). Remove to cool completely on a wire rack.

*There’s no need to go out and buy soy flour if you don’t have it, just use a full cup of all-purpose flour and omit the soy flour.

Recipe source: adapted beyond belief from Healthy Happy Life

Wacky White Cake {Vegan}

Posted on

I recently had a request on facebook for a vegan white cake recipe from a lady whose daughters both have extreme food allergies.  Since I don’t have one, I decided to try making one up, and unlike many baking experiments, this one turned out great the first time!  I combined my recipe for Wacky Cake with the Dairy-Free White Cupcakes recipe and although the resulting cake is heavier than a regular white cake, it is very moist and has a great flavor.  I have no pictures of the whole cake because I hate a whole row of the cake while it was still warm.  Oops!

Wacky White Cake

Printable recipe
Printable recipe with picture

3 cups all-purpose flour
2 cups granulated sugar
1 teaspoon salt
1 tablespoon baking powder
¼ teaspoon baking soda
1 cup vegetable oil
2 tablespoons lemon juice
1 tablespoon vanilla extract (use clear to keep the cake white-I didn’t)
2 teaspoons almond extract
1 cup cold water

Preheat oven to 350. Spray a 9×13 pan with cooking spray and set aside. Sift all dry ingredients together into a large bowl. Make three wells and put the oil in one, the vanilla & almond extract in another, and the lemon juice in the last. Pour water over it all and mix until well blended. Pour into prepared pan and bake 30-40 minutes, or until a toothpick inserted in center comes out clean. Cool on a wire rack. Frost with white celebration frosting, or your favorite recipe. (I made a simple glaze with lemon juice, water, and powdered sugar.)  Serve at room temperature.

Raw Double Chocolate Brownie Bites

Posted on

I joined The Secret Recipe Club at the end of May, which was too late to participate in June, so I was super eager to finally get my assignment for July.  In this club, each month the participating bloggers make a recipe from another participant’s blog.  The blog is assigned secretly and at random, so no one else knows who’s making something from their blog that month.  I found the whole idea really fun and exciting!  (Don’t judge me.)

I was assigned to make a recipe from Ginger Lemon Girl’s blog, and my first reaction was a mixture of both trepidation and anticipation.  Carrie follows a gluten-free diet, and since I don’t have any dietary restrictions, I wasn’t sure if the recipes would appeal to me, but I knew I could adapt them if necessary and was ready for the challenge.  Once I started browsing her archives, I quickly realized that her recipes were good, wholesome foods that anyone could enjoy, and some of them were naturally gluten-free because no flour was involved.  Like this one!

When I came across Carrie’s recipe for Raw Chocolate Brownie Bites, I immediately thought of my love for Fudge Babies, and knew it was the one I’d have to make.

I made the recipe as it was written the first time (pictured above) and really liked it (maybe that’s an understatement, seeing as how I ate half the batch the first day!), though adding as much agave nectar to sweeten them as I liked (2 T) made them too soft for me. I wanted them chewier and a little sweeter (i.e. more dates!). I also wanted more of the chocolate dough so that it would completely cover the bottom of a loaf pan. The first batch, spreading it to the thickness I wanted, filled only 2/3 of the bottom of the pan. So I took Carrie’s rockin’ recipe and tweaked it a bit, and couldn’t help adding some mini chocolate chips to make them doubly chocolatey!  The chocolate chips only add 16 calories per Brownie Bite and don’t change the points, so I really recommend you put them over the top to make these bites, well, over the top. :)

For those unfamiliar with raw desserts, they are a lot like Larabars, but better (at least I think these are).  If you’ve never had those either, now’s your chance to see what all the fuss is about.  This isn’t like eating a candy bar or any sort of processed sweet, because it’s all-natural, raw, and much healthier (not to mention allergy-friendly), but they are very good!  I bet even your kids will love them.  Give them a try and see if you don’t agree.

Raw Double Chocolate Brownie Bites

Printable recipe
Printable recipe with picture

1 cup pitted dates
1 1/3 cups raw nuts (I used 2/3 cups each almonds & pecans)
¼ cup cocoa powder
½ teaspoon Fleur de Sel or kosher salt
~or ¼ teaspoon table salt
1 teaspoon vanilla
1/3 cup mini semisweet chocolate chips

Soak the dates in a bowl of hot tap water for five minutes; drain well. (Skip the soaking step if you are using Medjool dates.) In a food processor fitted with the blade attachment, grind the nuts until very fine. Add the drained dates, cocoa powder, and salt. Process for a minute or two, until nuts are very fine and the mixture sticks together quite easily, if it’s not already coming together in the bowl. With the food processor running, add the vanilla through the feed tube and continue processing until the mixture starts to form a ball. Just run it for another 10-30 seconds and if it doesn’t form a ball, check the consistency and see if it will stick together when pinched. If not, add a teaspoon of water and continue processing, adding more water if necessary (it shouldn’t be) until the mixture is sticky. Pat the chocolate dough into a loaf pan. It is OK if oil separates a little and forms a layer on top; it will soak back down into the brownie dough while it sits in the refrigerator.   Sprinkle the chocolate chips over the top and pat them down into the surface so that they will stick. Cover the pan with plastic wrap and refrigerate for 2-3 hours. Cut into 18 squares (6 rows x 3 rows) and enjoy cold.

Makes 18 Brownie Bites

Per Brownie Bite: 107 calories; 7 g fat; 1.1 g saturated fat; 1.6 g polyunsaturated fat; 3.8 g monounsaturated fat; 0 g cholesterol;  33.2 mg sodium; 151 mg potassium; 12 g carbohydrates; 2.4 g fiber; 2.1 g protein; Vitamin B-6 2%; Vitamin E 8%; Calcium 2.2%; Copper 10%; Iron 4%; Magnesium 8.4%; Manganese 21.3%; Phosphorous 5.6%; Riboflavin 3.6%; Thiamin 3.3%; Zinc 3.6%      3 Points Plus

Recipe source: adapted from Ginger Lemon Girl


Corn, Avocado, and Black Bean Tostadas

Posted on

For some reason, before I made these tostadas, I had an aversion to chipotle peppers that came canned in adobo sauce.  I think I made one bad dish with them that turned me off, and I was hesitant to use them in anything again.  This recipe has completely turned me around!  These are the absolute best tostadas I’ve ever made.  I love how the sweet corn balances the smoky and spicy flavor of the chiles.

I really love it when I can find vegan meals that don’t require a lot of fake ingredients, and love it even more when those meals are just as delicious as a meat-centric meal.  I have to say that these tostadas beat the pants off of any tostada I’ve made with meat to date.  Although I did put cheddar cheese on these, you can leave it off for a vegan meal because you get plenty of (healthy) fat from the avocado.

This is a great summer meal because it comes together really quickly and only requires a few minutes of heat on the stovetop.  Enjoy!

Corn, Avocado, and Black-Bean Tostadas

Printable recipe
Printable recipe with picture

1 large zucchini, diced
2 cups frozen corn kernels
2-3 medium tomatoes, diced
1/3 cup red onion, chopped
¼ cup cilantro, chopped
2-3 chipotle chiles in adobo sauce, minced
2 tablespoons fresh lime juice
½ teaspoon kosher salt
8 tostada shells
1 cup refried black beans*
Shredded lettuce
1 avocado, peeled & sliced
1 cup shredded cheddar cheese

Spray a large nonstick skilled with oil and heat over medium-high head. Add zucchini and sauté 3 minutes. Add corn and cook until heated through. Remove from heat and stir in tomatoes, onion, cilantro, chipotle chiles, lime juice, and salt. Spread each tostada shell with 2 tablespoons of heated beans and top with shredded lettuce. Spoon corn mixture over lettuce, then top with shredded cheddar and slices of avocado.

*To make your own quick refried black beans, drain a can of black beans and reserve the liquid. Place beans in a food processor fitted with the blade attachment, along with 1 teaspoon cumin, 1/2 teaspoon onion powder, and 1/4 teaspoon garlic powder. Process, adding in liquid through the feeding tube as necessary to obtain your desired texture. Taste and add salt, pepper, and additional seasonings if desired.

Makes 8 tostadas.

Per tostada: 235 calories; 11.6 g fat; 27.5 g carbohydrates; 5.4 g fiber; 8.6 g protein; 6 Points Plus

Recipe source: adapted from Redbook, October 2010

Secret Recipe ClubThis recipe has actually been recreated twice by the SRC. Here is the first blogger who made it (click the box above for the second): Thru the Bugs on My Windshield