RSS Feed

Category Archives: Secret Recipe Club

Spiced Butterscotch & Black Walnut Banana Bread


This month I was assigned to Manu’s Menu for the Secret Recipe Club. Manuela is an Italian married to an Indian, living in Australia with her family, so her blog is a smorgasbord of delicious international recipes, with the majority being delicious, authentic Italian food. She has recipes for many things on my 40 by 40 list, like Lamingtons, croissants, biscotti/Cantucci, & risotto. And what did I do? I’m so predictable. I went for the banana bread because as you know, I have an obsession and I seem to always have overripe bananas on hand. I may have not checked anything off my bucket list of recipes to make, but we’re enjoying some really delicious banana bread in the mean time, so that makes up for it. :)

I took Manu’s recipe for the bread and kicked it up a notch, just on a whim that started because of the butterscotch chips sitting on my desk when I was reading her recipe. We really loved the combination of oozing butterscotch, black walnuts, and subtle spices in a loaf rich in banana flavor.  I went ahead and used the butter called for but next time will try oil as I just really prefer the soft & silky texture that oil gives to quick breads. If only oil had all the delicious flavor as butter!

This was a wonderful loaf and I thank you, Manuela for helping me create it. Buon appetito!

Spiced Butterscotch & Black Walnut Banana Bread

Printable recipe
Printable recipe with picture

2 cups (8 ½ oz / 245 g) all-purpose flour
¾ cup (5 ½ oz / 150 g) granulated sugar
1 teaspoon baking powder
¼ teaspoon baking soda
¼ teaspoon salt
1 teaspoon cinnamon
¼ teaspoon nutmeg
¼ teaspoon ginger
¼ teaspoon cardamom
1/8 teaspoon allspice
1/8 teaspoon cloves
2 eggs
½ cup (4 oz / 113 g) butter, melted
3 large (or 4 small) overripe bananas, mashed
1 teaspoon vanilla extract
½ cup (2 ½ oz / 60 g) toasted black walnuts, chopped
½ cup (3 ½ oz / 94 g) butterscotch chips

Preheat oven to 350F. Butter a 9×5 loaf pan and set aside.

In a medium mixing bowl, whisk together the flour, sugar, baking powder, soda, salt, and spices. In a separate smaller bowl, whisk together the eggs, butter, bananas, and vanilla. Stir together until just moistened, then add the walnuts and butterscotch chips. Stir together until just combined and spread into prepared loaf pan. Bake for about an hour and 10 minutes, or until a toothpick inserted in center comes out clean.  Remove from pan and allow to cool on a wire rack. Store tightly wrapped in plastic wrap.

Recipe source: adapted from Manu’s Menu

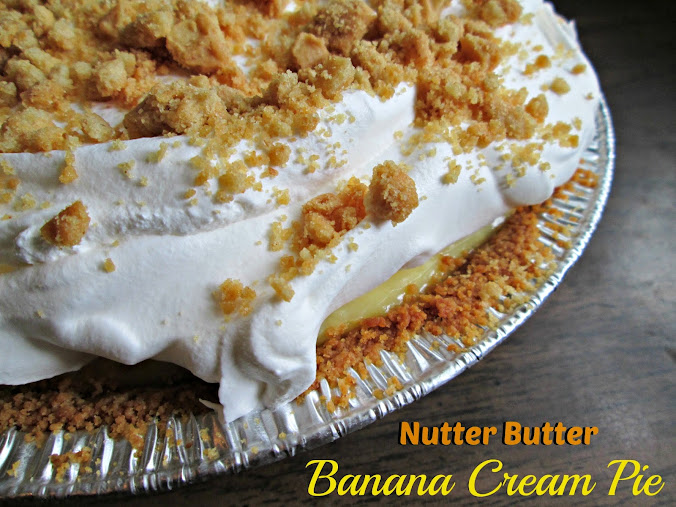
Nutter Butter Banana Cream Pie

Posted on

This month for the Secret Recipe Club I was assigned to Our Eating Habits – pretty nifty considering I had Jamie’s blog last month!  Jamie called my blog “pay dirt” and I’d have to say the same of hers – there were just so many comfort food recipes (my favorite kind!) that I had a blast browsing through them.  I decided to make something for our annual Mother’s Day picnic from her blog and ended up making two things, this delicious pie and Smoky Baked Beans – both fabulous!

There was only one piece of pie left when we arrived late to the picnic (the pie preceded us in my IL’s van), but I had a good excuse to make it again in order to get pictures of the inside – my Father-in-law’s birthday was coming up, and he just so happens to adore banana cream pie.  Turns out so do I. It was so hard not to hog the pie all to myself but I took my single slice and let him have the three pieces that were left after we’d all had one.  He raved, everyone raved, and the pie is an official success.  Thank you, Jamie, for sharing such a fun and delicious recipe! I never would have thought to use Nutter Butters for a pie crust but it is the perfect compliment to the banana cream filling.

Nutter Butter Banana Cream Pie

Printable recipe
Printable recipe with picture

Crust
12 nutter butter cookies
1- 1/2 tablespoons cream cheese, softened

Banana Cream Filling
3/4 cup white sugar
1/3 cup all-purpose flour
1/4 teaspoon salt
2 cups milk
3 egg yolks
2 tablespoons cold butter
1 1/4 teaspoons vanilla extract
3-4 bananas, sliced

Topping
1 (8 oz) tub frozen whipped topping, defrosted
4 Nutter Butters, crushed
Place 12 Nutter Butters in food processor and pulse until fine crumbs. Add cream cheese and process until completely incorporated. Press into 9″ pie plate (not deep dish) and bake at 350F for 12 minutes. Set aside to cool while you continue with the recipe.

In medium-sized saucepan whisk together white sugar, flour, and salt.  Whisk in the milk and cook over medium heat, whisking constantly, until bubbles form. Cook for additional 2 minutes, whisking constantly to avoid scorching. Remove from heat.

Place egg yolks in a small bowl and whisk. Whisk in a small amount of milk mixture to egg yolks, then repeat a second time.  Pour egg yolk mixture into remaining milk mixture in pot and whisk to combine. Return to burner and heat again over medium heat for about 2 more minutes. Remove from heat and stir in butter and vanilla. Slice bananas into the pudding and stir gently to combine well, then pour and smooth into prepared crust.  Place plastic wrap directly on top of the pie to seal out air and refrigerate until ready to serve, at least four hours.  Before serving, spread whipped topping over the top and sprinkle on the crushed Nutter Butters.

Recipe source: Our Eating Habits

Lemon Cream Whoopie Pies

Posted on

It’s been a year since I left the Secret Recipe Club but I’m finally back, baby! So excited! If you haven’t been around here long enough to know what the heck the Secret Recipe Club is, lemme break it down for ya. Once you’re in the club (click the link to sign up), each month that you participate, you’re assigned to another participating blog. Nobody knows who has whose blog, and everyone in the group picks a recipe from their assigned blog and makes it, then everyone posts on the same day and it’s all fun and exciting looking through the posts to figure out who had your blog and to see which recipe they picked. It’s a really fun way to visit new blogs and make recipes you might not usually try.

This month I was assigned to Chris and Amy’s blog, A Couple In The Kitchen. Aww! So sweet – a couple that cooks and blogs together! Their motto is, “The couple that sautes together, stays together.” I just love it.  The coolest thing is that they had my blog back in October of 2011 and made my Apple Cider Doughnuts, so it’s neat to finally get assigned to them in return.

I went crazy perusing their blog and pinning the recipes I wanted to try to one of my secret boards.  I’ve never made a risotto and really want to try it, so I was very close to picking their Springtime Risotto.  Their Corn and Black Bean Salsa Nachos were also calling my name, along with their Seared Scallops with Blood Orange Gastrique and Chicken Piccata.  However, my sweet tooth and curiosity drew me to their Flour Frosting and I thought I could use it as a filling in some springtime-y whoopie pies.

I’ve heard of flour frosting before and have wanted to try it for a long time, much longer than I’ve wanted to make a risotto, and I was glad to have the extra motivation to finally make it.  But let me tell you, I nearly had as much trouble with this frosting as I did with another SRC post on the whole wheat bread that would never turn out for me, even after 9 loaves. I don’t know what my problem is, but I just could not get the flour mixture right – it was always lumpy and made my frosting lumpy no matter how much I beat it (we’re talking 20 minutes people!).  Through trial and error, I devised a fool-proof way to create the smooth and fluffy frosting it’s meant to be, and while it’s a little more tedious because it involves an extra step, it’s worth the effort if you have lumpy thickened milk issues like me.  This lightly sweet frosting is incredibly light and fluffy, perfect for sandwiching between sweet, lemony cake-cookies.  Get your whoopie on!

Lemon Cream Whoopie Pies

Printable recipe
Printable recipe with picture

Cookies:
1 (15.25 oz) lemon cake mix
1/2 cup unsalted butter, melted
1/2 cup water
3 eggs

Filling:
¼ cup (1 1/8 oz) all-purpose flour
1 cup whole milk
1 teaspoon vanilla extract
1 cup (7 oz) granulated sugar
pinch of salt
1/2 cup (3 ¼ oz) vegetable shortening
1/2 cup (4 oz) unsalted butter, softened

Preheat oven to 350F. Line cookie sheet(s) with parchment paper and set aside.

Before starting the cookies, do the first step for the filling: whisk the flour and milk together in a small saucepan and continue to whisk constantly while cooking it over medium heat until it forms a thick paste, about five minutes. Set aside to cool completely.

Combine cookie ingredients in large bowl and beat on low until combined, about 30 seconds, scraping sides of bowl to incorporate. Increase speed to medium and beat for an additional minute. Drop 1 1/2 – 2 tablespoons of dough (preferably from a cookie scoop to make them nicely round) onto prepared baking sheet, 2 inches apart, and bake for about ten minutes or until lightly golden brown on edges and set in the center. Remove onto a wire rack to cool and repeat with remaining batter.

To make the filling, add the cooled milk and flour mixture to the bowl of a food processor fitted with the blade attachment. Add the vanilla and process until completely smooth and no lumps remain, a minute or two. (You can also beat it with a mixer but if there are any lumps, it will ruin your frosting. I couldn’t get the lumps out of mine without using the food processor.) In a large mixing bowl, add remaining filling ingredients and beat on medium-high for four minutes, then add in the flour mixture and beat together until nice and fluffy and no grit from the sugar remains, 3-4 minutes.

To make the pies, turn half the cookies over and spread about 2 tablespoons of filling over the flat side. Top with another cookie, flat side down and press lightly together.

Recipe source: a Veronica’s Cornucopia original, with the filling recipe adapted from A Couple in the Kitchen

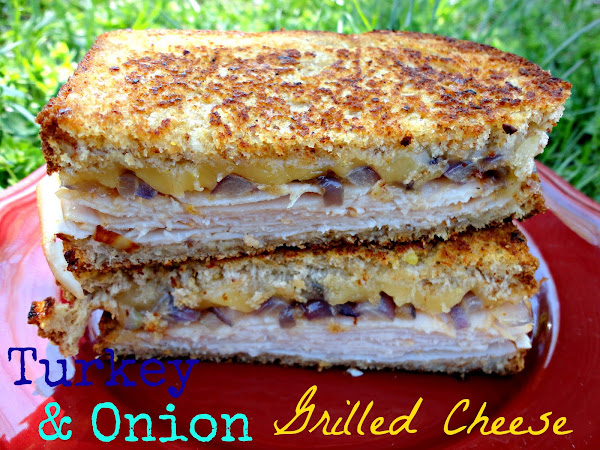
Turkey & Onion Grilled Cheese

Posted on

So so so excited today!  This is probably my last month with the Secret Recipe Club, and I’m so excited that I was assigned to Desi’s blog, Steak ‘n Potatoes Kinda Gurl!  I actually “met” Desi through being in Group C of the Secret Recipe Club, and have been following her since she joined.  Very happy to be assigned to someone I know and love for my last hurrah!

For those who may have missed or never understood my monthly Secret Recipe Club posts, here’s the premise.  You are assigned to a participating blog each month, but no one knows who’s assigned to who.  It’s a secret!  You secretly stalk browse your assigned blog and pick a recipe, make it, photograph it, and post it on reveal day.  It’s something I’ve always enjoyed, I think because it’s kind of like Christmas each month with a big surprise on reveal day.  If this sounds like something you’d like to participate in, click here to find out how to join.

Now let’s talk gooey cheese.  Since April is National Grilled Cheese Month, and I’ve been meaning to make this recipe since Desi posted it during last year’s Grilled Cheese Month, there really wasn’t any question as to which one I’d choose from her blog.  I had to have this sandwich!

It was well worth the wait.  Totally crazy delicious.  I couldn’t find maple turkey, so I had to add in some maple flavor a different way.  I was a little scared I might have ruined it, but Dennis and I both loved it!  Delicious smoked turkey, sweet grilled onions, and melty Gouda cheese packed between two slices of multigrain buttery, crunchy, toasty bread make for  quite the delicious sandwich.  Thank you, Desi, for creating this masterpiece and thus giving me an opportunity enjoy it and spread the gooey gouda love a little further through my own blog.  Love ya girl!

Also, a huge THANK YOU and shout out to our SRC leader, April Tuell, and our hostesses (especially Debbi Smith, my hostess!), and all the volunteers that keep it running.  And of course, to all my group C bloggers (OK, and group A too, I enjoyed my short time with you guys as well!)!  It has been a beautiful, wonderful ride and I wouldn’t trade my time in the SRC for anything.  Love you guys!  But I won’t miss you because I’ll still be stalking you forever! >:)

Turkey and Onion Grilled Cheese

Printable recipe
Printable recipe with picture

1 small red onion, halved and sliced
2 tablespoons butter
1/2 teaspoon maple syrup (optional)
4 slices of multigrain bread
3 tbsp or so of softened butter
4 slices (or more) of quality deli turkey (I used Applewood Smoked Turkey)
4 slices of gouda cheese

In a medium skillet, add 2 tablespoons butter over medium heat. Once melted, add the sliced red onion and saute until softened and golden brown. Remove to a small bowl and stir in the maple syrup if desired.

Spread the bread slices with 3 tablespoons softened butter. In a large skillet on medium-low, add the bread slices. If you have a large enough skillet, you can add two slices of bread at once. If not, you will need to make one sandwich at a time. Top one slice of bread with 2 slices of gouda. Then add 2 slices of turkey, then some sauteed red onions. Top with the other slice of bread, buttering the outside before you place it on top. Cook until golden brown, then flip and cook until golden brown on the other side.  Repeat with second sandwich.

*Yields 2 sandwiches

Recipe source: adapted from SteakNPotatoesKindaGurl.

Check out the other Group C Secret Recipe Club Posts by clicking below!


Blueberry-Lemon Pound Cake

Posted on

Secret Recipe Club

I’m so happy to return today with my recipe for the Secret Recipe Club! I was assigned to a beautiful blog called NY City Eats and wow, Lacy is so gourmet.  She’s a professionally trained chef who graduated from The Institute of Culinary Education in 2010.  Impressive!  As are her recipes, and I was pretty much in awe of all the fancy ingredients she incorporates into them.  (Check out this pizza video-it is so professional! And even her “simple” pizzas sound and look so fancy.)  Being less of a cook, especially not a gourmet one, and more of a baker, I felt more at home when I looked through her dessert recipes, which happily were plentiful.

I happened to inherit 16 pints of blueberries and a crate full of lemons from my Grandpa (long story, will tell it later), so I searched for something I could use them in from Lacy’s blog.  I first ruined her recipe for Low Calorie Banana Blueberry Muffins by making it sugar-free (was testing out Swerve’s sweetener) and under-baking them.  They were awful and I won’t share my adapted recipe, just visit the link for hers, which looks much better.

Again on the hunt for blueberry-filled recipes, I found her Mixed Berry Bundt Cake and made my own blueberry-lemon version almost as soon as the muffins were trashed.  After clicking back through all the “adapted from” links to find where the recipe originated (a difficult feat in this age of food blogs, and I gave up after five clicks), I discovered this was a lower fat version of the Elvis Presley Pound Cake I’d been wanting to try for years.  It has less sugar than the original recipe I’d saved to my computer back in 2009, but I made it with the smaller amount and found it to be perfectly sweet.  I did, however, use the whipping cream called for in the original recipe, rather than yogurt as I was out of yogurt and didn’t want to go to the store.

The cake was buttery and dense, as a proper pound cake should be, and I loved the taste of the lemon and blueberries in it.  I believe the cake would be best eaten the same day it’s baked, as it was a little dry on day two.  Eating it fresh also helps the appearance, as the blueberries will be more whole (the juices get absorbed as time goes on, making them shrivel up inside the cake as in the pictures.

Please check Lacy’s healthier recipe, which looks very moist and delicious.  Thank you for sharing it, Lacy, I so appreciate you helping me use up some of these blueberries!  And we so enjoyed eating it!

Blueberry-Lemon Pound Cake

Printable recipe
Printable recipe with picture

1/2 cup unsalted butter, plus extra for pan, room temperature
1 cup (7 oz) granulated sugar
1/2 teaspoon salt
3 large eggs
1 teaspoon vanilla extract
1 1/2 cups (6 oz) cake flour
½ cup quality heavy whipping cream
1 lemon, zested and juiced
1 cup fresh blueberries
1 cup powdered sugar

Preheat oven to 350 degrees F. Grease a 9×5 loaf pan with butter and dust with flour, set aside.

Cream the butter and sugar on medium-high speed for five minutes, until light, creamy and fluffy. Add eggs one at a time, mixing well after each. Mix in the vanilla. Sift in half of the flour, beat on low until blended, then add the cream and blend again until mix. Sift in the remaining flour and mix just until blended. Add the lemon zest and mix on low until incorporated and batter is smooth. Fold in the blueberries and spread batter into prepared pan.

Bake in preheated oven for 55-60 minutes, or until a tester inserted in the center comes out clean. Remove from pan and cool completely on a wire rack.

Once cool, whisk together 1 tablespoon of the fresh lemon juice and the powdered sugar until smooth. Drizzle over the cake and let it set for half an hour before serving. Best served same day.

Recipe source: adapted from NY City Eats

Click Mr. Linky below to view the other SRC Group C recipes!

Key Lime Pie


So happy to return today for the Secret Recipe Club‘s Group C reveal day!  Life has been keeping me pretty busy, but I’ll talk about life another day.

Today I need to tell you about this Key Lime Pie.  This amazing key Lime Pie.  I was assigned to Mother Thyme‘s blog this month, which is a new-to-me blog, and I was really excited to peruse it.  Jennifer’s blog is attractive, organized (yay for a recipe index!), and her photos are beautiful, so it was a real treat!  Not to mention that most of the recipes are her own creations!  I truly admire bloggers like Jennifer who mostly post their original creations, since I find that difficult, personally.  My creations are very rarely blog-worthy. LOL!

So when I ran across this key lime pie recipe, I was excited because Dennis loves Key Lime Pie and I’ve been wanting to make him one for a long time, but I was also very skeptical.  The main ingredients are sweetened condensed milk and lime juice.  And it only calls for for 9 minutes of baking.  I thought it was mis-typed, and eggs and extra baking time were missing.  I mean, how can two very liquid hardly-baked ingredients make a thick, creamy filling?

So I searched online recipes and found some similar ones that didn’t even require any baking.  What?  Really?  Wouldn’t this make soup pie?

I decided to give it a go, and I’m so glad I had faith in Mother Thyme!  This is kitchen science, folks, and utterly fascinating.  Apparently when the acidic lime juice is combined with the condensed milk, it thickens it, because as soon as I whisked it in, the two liquids turned into a thick, pudding-like filling.  Amazing!  After just two hours, it was ready to slice, and I didn’t even bake it at all!

The taste?  Just as amazing as the magical thickness.  Perfect balance of sweet and tart!  I’m just so excited by this pie, you guys, you don’t even know.  It’s so easy to make, so magical, and so delicious.  You could even say…it’s magically delicious.  :)

I made it a little festive by adding some food coloring to intensify the green (it’s really more ivory without the food coloring), and added shamrock sprinkles for a St. Patrick’s Day look.  This would make a nice change for a St. Patty’s day dessert since most of them feature booze and/or mint.  But even if you don’t try it for a holiday (would also be cool for Christmas with red sprinkes!), it’s great any time of year–especially spring and summer.  Dig in!

Key Lime Pie

Printable recipe
Printable recipe with picture

Crust
1 1/2 cups crushed graham crackers
5 tablespoons melted butter
4 tablespoons granulated sugar

Filling
3 (14.5 oz) cans sweetened condensed milk
2 drops green food coloring + 1 drop yellow (optional)
1/2 cup sour cream
1 cup key lime juice (or regular lime juice)
2 tablespoons freshly grated lime zest (from about 2 large limes)

Garnish
Whipped cream or Cool Whip
Extra lime zest or sprinkles

Preheat oven to 350 degrees. Mix crumbled graham crackers, butter and sugar in a 9” spring form pan or a deep dish pie plate and firmly press evenly over bottom and sides of pan. Bake for 8 minutes. Let cool before adding filling.

Meanwhile, combine sweetened condensed milk and food coloring if desired, mixing until totally blended. Add the sour cream, lime juice and lime zest and whisk until thickened and completely incorporated. Pour mixture in to cooled crust and refrigerate 2 hours or until ready to serve.

If desired, just before serving, pipe whipped cream around the edge of the pie (I used Wilton tip 1M) and garnish with some extra lime zest or festive sprinkles of your choice.  Or you can just serve with a dollop of whipped cream on top.  Refrigerate leftovers.

Veronica’s note: never mind my shallow pie dish, do not use a regular pie dish or you will have too much crust and filling, as I did (I made a second small dish of pie with my leftovers). Do as I say, not as I do. ;)

Recipe source: Mother Thyme

You can see all the other Group C SRC recipes by clicking the linky man below:


Small Batch Coconut-Chocolate Chunk Cookies {Vegan}


This month my Secret Recipe Club blog assignment was to Delicious Existence.  (Gotta love that blog title!)  On Twitter, Danielle (that’s my sister’s name, I love her already!) describes herself as a social worker, holistic health coach, lifestyle motivator and kitchen magician.  And after perusing her blog, I’d have to agree with the last two–all her wonderful vegan recipes are definitely motivating and magical!  Although not a vegan myself, I have mad love for their choice and actually try to eat vegan or vegetarian at least once a week, which isn’t too hard for me since I prefer fat and carbs (the good and bad kind :)) over meat anyway.  Over time I’ve been so wonderfully surprised how delicious & satisfying a completely meatless, dairy-free, and egg-free meal can be.

Don’t believe me?  Check out Danielle’s Herb Pinwheels, Jalapeno Popper Panini, Triple Chocolate Lust Cookies (I’m so making these!), Zucchini, Onion & One Pepper Stew, and Cinnamon Raisin Oatmeal Pie with Dark Chocolate Drizzle–just a few of the contenders for the recipes I marked to try.  I have gone vegan before and found it challenging to find enough variety, but Danielle is clearly a master.  Definitely go to her blog to get some inspiration!

I chose her coconut-chocolate chunk cookies to make for this month’s reveal, which is totally random, I know.  If it was December, they’d fit right in since that’ s the month everyone starts baking hoards of them to give away.  And these would be a great addition to your cookie tins this year!  But it’s the week of Thanksgiving and there’s not a speck  of cinnamon or pumpkin or even sweet potato in the recipe I chose.  I’m sorry, but you guys know about my obsession with coconut oil.  Did you really think I could pass up a recipe for cookies that contained not only my beloved coconut oil, but chocolate as well?  I think not.

You guys, these are so good.  Crazy good.  So good that I’m glad I kept it a small batch recipe so I could only eat a dozen at a time.  OK, so I didn’t really eat them all myself…but I did eat quite a few.  Both times I made them.  Yes, I made them twice this month, and will be making them again in a larger batch in December.  They’re so good!

The coconut flavor is perfectly balanced with the semisweet chocolate, IMHO.  You just would not believe how wonderful the coconut oil makes these cookies taste.  So much better than using an extract!  The cookies are sticky-crispy on the outside and the middles are soft & chewy-my favorite texture for a cookie, and I believe the corn syrup helps with it.  The original recipe did not call for corn syrup, but I wanted to use ingredients that most people would have in their kitchen so instead of making a flax seed egg (mixing flax meal with water creates a binder similar to egg), I decided to use something else that was sticky to bind the cookie together.  (You could also use agave nectar for a more natural cookie.) I used more corn syrup in the first batch and the cookies were a lot more chewy and a lot more crispy at the edges, and I think I’ve improved them by subbing a tablespoon of the corn syrup for milk (I used almond milk but coconut would obviously work great here), making the cookies softer but still crispy-chewy.

Whether you’re vegan or not, if you like coconut, I think you’re going to love these cookies!  If you don’t believe me take my friend Kevin’s word for it (it was his birthday and I gave him some, along with an accidentally egg-less version of this banana bread)–he cracks me up!

I call Kevin “Obiewan,” thus his Star Wars reference. :)

Thank you Danielle for sharing your fabulous recipe!  It pleases Jedi masters and padawans alike. :)

Coconut-Chocolate Chunk Cookies {Vegan}

Printable recipe
Printable recipe with picture

1/4 cup (1 7/8 oz / 52 g) virgin coconut oil, melted & cooled slightly (measured solid)
1/3 cup ( 2 ½ oz / 72 g) packed light brown sugar
1 tablespoon corn syrup or agave nectar
1 tablespoon milk of choice (I used almond)
1 teaspoon vanilla extract
1/4 teaspoon baking soda
1/8 teaspoon salt
¾ cup (3 oz / 85 g) all-purpose flour
¼ cup shredded sweetened coconut
1/3 cup semisweet chocolate chunks

Preheat oven to 350F and line a baking sheet with parchment or a silpat mat.

In a small mixing bowl combine the coconut oil, brown sugar, corn syrup, milk, and vanilla. Stir until blended, then add the baking soda and salt and stir well. Add the flour and mix well, using your hands if necessary, then stir in the coconut & chocolate, again using your hands to combine. Roll the dough into 12 (1-inch) balls, making sure there are three chocolate chunks per cookie. Place on prepared baking sheet and bake for 10 minutes, or until golden at the edges. As soon as you remove them from the oven, use a spatula to push any misshapen cookies into place so that they retain a round shape. Allow to cool on baking sheet for five minutes, then remove to a cooling rack to cool completely. Store in an airtight container or Ziploc bag.

Makes 1 dozen cookies.

Recipe source: adapted from Delicious Existence

I learned this trick from fellow SRC members Katrina & Liz–to whip any misshapen cookies back into shape, as soon as they’re out of the oven, scoot them into a round shape with your metal spatula.  Easy peasy and looks so much better!

To check out the other Group C SRC recipes, click the linky man below!  As always, thank you for being the bestest hostess with the mostest Miss Debbi!


Coming soon to a blog near you…


Today is reveal day for Group C (my group) of the Secret Recipe Club.  I usually schedule my posts for 8 am but our agreed upon reveal time for the club is 11 am CST so please check back then for a delicious cookie recipe and a tip on how to whip  misshapen cookies back into shape!

If you’re super bored and need something to do in the mean time, you can scope out my past posts for the Secret Recipe Club:

2012

February: Steak au Poivre
March: Crockpot Chicken Cacciatore
April: Lemongrass Chicken
June: Blueberry-Lemon Upside Down Cake
July: Whole Wheat Potato Bread
August: Quick Veggie Quesadillas
September: Sour Cream Pound Cake
October: Apple Pie Cupcakes

2011

November: Gołąbki {Polish Cabbage Rolls}
October: Sugar-Free Banana Bread Two Ways
September: Chuncheon Chicken Wings
August: Choco-Cherry Cheesecake Cookie Bars
July: Raw Double Chocolate Brownie Bites


Blueberry-Lemon Upside Down Cake

Posted on

Secret Recipe Club

Whoop whoop!  I took a month off from the Secret Recipe Club and am so excited to be back with this recipe! My assignment this month was Evelyne’s blog, Cheap Ethnic Eatz.  As the title implies,her recipes are from around the world and affordable to make.  I nearly made her beautiful Peach Salsa since I’ve been on a salsa kick lately, but in the end, this beautiful cake won out.  When I read the titles of the recipes I was considering to my husband, including Strawberry Puff Pastry Pizza, Lazy Chocolate Raspberry Cake, Self-Saucing Chocolate Pudding, Afghan Cardamom Pudding, and Peanut Butter Daifukumochi Balls (apparently I was really craving sweets when searching Evelyne’s archives-big surprise!), he absolutely insisted that I make this one.  I aim to please.

Well, thank you very much dear Evelyne, because this cake surely did please us both.  I’m almost embarrassed to admit how much.  Between the two of us, it only took us two days to polish off the entire cake.  While we do enjoy our sweets, this was ridiculous even for us, and a testament to how wonderful (and addictive) the cake is.

I did change it up by adding lemon flavor to the cake, because I really enjoy the combination of lemon and blueberry flavors .  It was amazeballs, as my friend, Jennifer, would say.  I think I also changed the texture of the cake as well by switching the baking powder for baking soda (the only science I’m any good at is baking science, and I knew the acid in the lemon juice was a perfect catalyst for baking soda, so I pulled the old switcharoo on my leaveners) and the cake was crazy moist to the nth degree.

I would probably try making this cake with the baking powder next time because although I did love the moist texture, with the juicy, dripping blueberry topping it wasn’t really necessary.  Another benefit of using the baking powder (which is baking soda with an acid mixed in (cream of tartar) to activate it) is that it wouldn’t take away the tartness from the lemon juice like the baking soda does (baking soda reacts with acids, which causes the bubbles and rising, and it neutralizes the acid in the process), so it might balance the sweet topping a little better.  But unless you hate sweet sweets, you will love this cake as is.  You know we did!

Blueberry-Lemon Upside Down Cake

Printable recipe
Printable recipe with picture

1 lemon
1/4 cup melted butter
1/2 cup brown sugar
1 (12 oz) bag frozen blueberries OR 2 cups fresh blueberries
2/3 cup milk
1 1/3 cups all-purpose flour
1 teaspoon baking soda
1/4 teaspoon salt
1/2 cup butter, softened
3/4 cup granulated sugar
1 egg
1 teaspoon vanilla

Preheat oven to 350 degrees. Zest the lemon and set the zest aside. Squeeze the lemon and set the juice aside. In an 8 or 9 inch square cake pan, combine melted butter and brown sugar; spread evenly on bottom. Spread blueberries evenly over top. Sprinkle with 1 tablespoon of the lemon juice. If you are using frozen blueberries, put the dish in the oven for 10 minutes or until the blueberries are mostly defrosted. Remove from oven and allow to cool while preparing the cake batter. *It is OK if the dish is still warm when you add the batter.

Pour the milk into a 1-cup glass measure. Add enough of the leftover lemon juice to equal ¾ cups liquid. If you don’t have enough lemon juice, just add a bit more milk. Set this aside to curdle while you prepare the batter.

Whisk together flour, baking soda, and salt in a small mixing bowl. In a separate larger mixing bowl, cream the butter and sugar together with an electric mixer, beating for about five minutes, until light and fluffy. Beat in egg and vanilla. Add dry ingredients alternately with milk to creamed mixture, beating well after each addition, beginning and ending with the flour mixture (flour, milk, flour, milk, flour). Spread batter evenly over blueberry layer.

Bake for 45 to 50 minutes or until toothpick inserted in center comes out clean. Let cool 10 minutes in pan, then turn out on to a large flat plate. Serve warm or at room temperature.

Recipe source: adapted from Cheap Ethnic Eatz


P.S. Happy 12th anniversary, sweetheart! I’m testing him to see if he’ll read this without me telling him he should.  :)  And happy birthday to my itty bitty sweetie who turns eight today!

Lemongrass Chicken with Peppers

Posted on

Secret Recipe Club

It’s that time again! Secret Recipe Club time!  This is my sixth month with the club, and still having a ball.  My favorite part is getting my assignment and then stalking my assigned blog, bookmarking all the recipes I want to try.  I really love the secrecy and wonder how far the other members take it.  I take it so far as to not even pin the recipes I want to try on Pinterest (how I usually keep track of recipes), for fear that the blog owner will find my bajillion pins and figure out I have their blog this month.  That would ruin the surprise.  I also don’t subscribe to the blog I’m assigned to, just in case they keep track of their subscribers, and I don’t leave comments.  Nothing to let on that I’m the one that has their blog!  The secrecy is pretty fun and makes me feel super sneaky. :)

This month, I was assigned to Quick and Easy, Cheap and Healthy, and boy did I have fun scouring Anne’s archives.  Although you may not be able to tell  it from the amount of buttery, sugary treats I post, I really love healthy food, especially if it’s easy to prepare (kinda helps balance out all the time and calories in my desserts), so this blog was perfect for me!  I counted the recipes I bookmarked and know this has got to be a personal record: 44.  No joke.  Um, Amanda (Amanda started the club), is there a reward for “most recipes bookmarked in a SRC assignment?” ;)

But when I came across Anne’s Lemongrass Chicken, there was little doubt that it was the winning recipe.  The grocery store closest to us started carrying lemongrass a couple years ago, and was really happy to have an excuse to buy some!  Of course, when I went to buy it, they were out. Of course!  So off I went to my trusty Asian market, and I found a big bucket of lemongrass stalks, bundled in bunches of 3 for $1.  Can’t beat that!

My friend, Pia, mailed me some vegetable cutters for Christmas and while I was trying to think of what veggies I could add to the chicken (I bulk up most of our meals with as many veggies as I can), I thought of those cutters and knew I’d be adding in some pretty peppers.  I know most people will not have these special cutters (I believe you can buy them at Asian markets, though), so just slice your peppers if you don’t–it will still make a very colorful and pretty dish!

Thanks, Anne, for sharing this wonderful recipe!  It was the MOST delicious dish I’ve ever made with SRC, hands down.  I’ve never had lemongrass before, and I was surprised (though I shouldn’t have been) that it smelled exactly like the lemongrass soap that my sister makes!  It has a bright & fresh slightly lemony smell and flavor.  It looks like a green onion, and has a fibrous texture similar to ginger.  It is very good and I hope that you have an Asian market near you so you can make this chicken.

I do want to mention that I made this sweet, almost as sweet as the sauces you get on Americanized Chinese fare, so if you want a more subtle sweetness, halve the honey.  I started with 1/4 cup, which was good but barely sweet.  I wanted it sweeter and my recipe reflect the change I made to 1/2 cup honey, but you might want to start with less and taste it once the chicken is cooked. You can always add more!

Lemongrass Chicken with Peppers

Printable recipe
Printable recipe with picture

3 lbs. boneless skinless chicken breasts, cut into bite-size pieces
½ cup honey
½ cup soy sauce, divided
1 teaspoon (1 clove) minced garlic
1 tablespoon cornstarch
2 tablespoons canola oil
½ cup (about 1 large stalk) minced fresh lemongrass
3 green onions, chopped
½ of a red pepper, cut into strips or shapes
½ of a green pepper, cut into strips or shapes
½ of a yellow pepper, cut into strips or shapes
¼ cup fresh cilantro, chopped

In a gallon-sized Ziploc bag or in a large bowl, combine chicken, honey, ¼ cup of the soy sauce, and garlic, and allow to marinate 10-15 minutes (this is a good time to prep your veggies). Mix the remaining ¼ cup soy sauce with the cornstarch and set aside.

Heat an extra-large skillet over medium-high heat and add the oil. Add lemongrass and stir-fry for about 15 seconds, until fragrant but not brown. Add the chicken, and continue to stir-fry until the pieces are cooked through, about ten minutes. Stir the soy sauce & cornstarch mixture, and add it to the skillet along with the green onions and peppers. Stir-fry until sauce is thickened and serve hot over rice, topped with a sprinkle of cilantro.

Makes 6-8 servings

I have to pimp my Tupperware lady, Stacy, because I just got a rice maker from her and used it to prepare my brown rice for this dish.  There are only instructions for white rice and a few other quick-cooking grains on the insert, so here’s how I did mine if you get one and want to make brown rice (the insert does say it can be used for brown rice, but doesn’t give instructions): 1 cup brown rice, 2 1/4 cups water.  5 minutes on high, 30 minutes on 50% power in a 1000 watt microwave.  (The rice cooker is BPA-free, in case you are worried about cooking your rice in plastic.)  Perfect brown rice, and a little faster than it takes on the stove!  Get your own rice cooker here.