RSS Feed

Tag Archives: no-bake

Strawberry Cream Cheese Pie

Posted on

I was challenged by a former co-worker years ago (five years ago, to be exact), to reproduce the Strawberry Cream Cheese Pie you could get at Long John Silvers.  He was slightly obsessed.

Although I didn’t duplicate it exactly, the crust is almost spot-on (it’s an unbaked graham cracker crust, unusual but so good), and it’s fairly close.  It has taken me this long to share the recipe because I couldn’t share the first one with you – I used wild strawberry essence in it, and not many people would have that on hand to use in a humble pie, such as this.  But I remembered how good it was and wanted to see if I could recreate my recreation of Mrs. Smith’s pie by concentrating the strawberry flavor in another way.  Then I made jam a few weeks ago, inspiration hit.  Jam, to me, is the essence of the fruit used to create it.

So I tried it, replacing the gelatin and fresh strawberries in my original recipe with the homemade jam, and it was perfect. It’s not as light as the original*, but so good in it’s own right. So thick and creamy, so cream cheese-y, so strawberry-y. And so perfect for summer because, unlike most of my recipes this summer, no part of it requires an oven. You’re welcome.

Strawberry Cream Cheese Pie

Printable recipe
Printable recipe with picture

Crust
1 ½ envelopes graham crackers (13 1/2 sheets)
6 tablespoons butter, melted
2 tablespoons sweetened condensed milk
2 tablespoons brown sugar
1 tablespoon water

Filling
1 (8 oz) package cream cheese
1 heaping cup (13 oz jar) good quality strawberry jam
1 (14 oz) can (minus 2 tablespoons for the crust) sweetened condensed milk
2 cups whipped topping or homemade (sweetened) whipped cream

Garnish
Leftover whipped topping or 1-1 1/2 cups homemade sweetened whipped cream
Leftover crust crumbs

While still in the package, smash up the graham crackers a little bit, then empty into the bowl of a food processor fitted with the blade attachment. Pulse & process until fine crumbs. Add the butter, sweetened condensed milk, brown sugar & water and process until thoroughly combined. Set aside 1/2 cup of the crumbs and press the remaining crumbs into a 9” pie plate. Place in fridge.

Wipe out the food processor. Add the cream cheese, jam, and sweetened condensed milk, and process until smooth. Add the whipped topping or whipped cream and pulse until mixed. Pour into prepared pie plate, cover with plastic wrap, and refrigerate overnight. Pipe whipped cream around the edge in stars or rosettes using Wilton tip 2110 (1M). Garnish with whipped cream & the remaining crumbs before serving.

Veronica’s notes: If you’d like a lighter pie, you could use 3 cups of whipped cream, or the entire carton of whipped topping, and use another cup or two for garnish. You will have too much pie filling, but I doubt you’ll complain about eating the extra. ;) Also, it’s important to use the best jam possible, as this is what gives the pie its strawberry flavor. If you buy cheap Walmart jam, it will taste like you bought a Great Value frozen pie, not made it yourself. I’ve actually tried this using Walmart strawberry jam, so I unfortunately speak from experience (it was bad).  Homemade is ideal, and Bonne Maman is the only brand I can put my own stamp of approval on if you go with store-bought.

Chewy No-Bake Granola Bars

Posted on

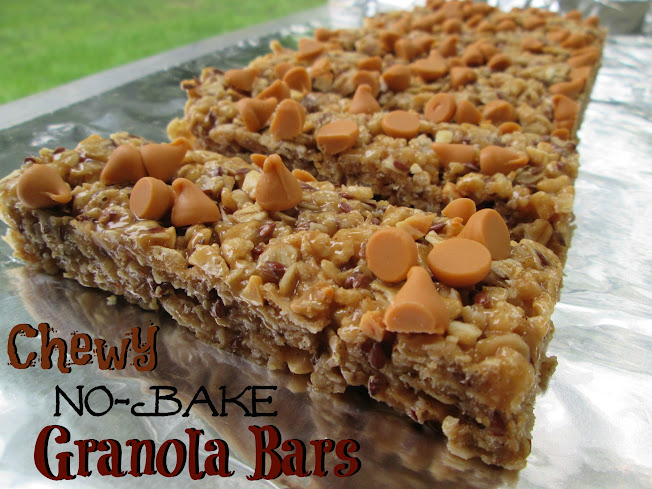
Are you a crunchy granola bar person, or a chewy granola bar person? I’m the latter.  My favorite granola bars are the Sunbelt Bakery ones. and it has been a quest of mine for a long time to find a recipe that would duplicate their soft, chewy texture.  I felt that baking them wasn’t the way to go, as all the ones I baked were just a little too firm, a little too dry, and not chewy enough.  I made lots of my own recipes in the search to find that perfect recipe, and never did find it.

Until Sarah.  She posted a recipe for Chewy Coconut Oil Granola Bars and my search ended there.  I’m tellin’ ya, coconut oil is such a good friend in the kitchen.  Makes great cookies, coffee, and granola bars!  These are exactly what I was looking for, and a little healthier than Sunbelt Bakery’s with the flaxseed, honey, coconut oil, and lack of processed/weird ingredients.  And totally crazy delicious!

Chewy No-Bake Granola Bars

Printable recipe
Printable recipe with picture

2 1/2 cups Rice Krispies cereal
1 3/4 cup rolled oats
1/4 cup ground flaxseed* (I used whole)
1/2 cup mix-ins of your choice (I used peanuts)
1/2 cup honey
1/2 cup brown sugar
dash of salt
1/3 cup unrefined virgin coconut oil
1/3 cup natural peanut butter
1 teaspoon vanilla extract
1/2 teaspoon ground cinnamon
1/2 cup dark chocolate chunks (I used butterscotch chips)

*You can use wheat germ, wheat bran, or more rolled oats in place of the flaxseed.

Line a 9×13 pan with aluminum foil or wax paper, and grease well with cooking spray.

In a large bowl, stir together cereal, oats, flaxseed, and mix-ins. In a saucepan, stir together honey, brown sugar, and salt. Turn heat onto medium-low, then stir constantly until mixture comes to a boil. Boil for 60 seconds, then remove from heat and gently mix in coconut oil and peanut butter, careful not to splash. Stir in vanilla and cinnamon. Pour wet ingredients over the dry and mix to combine.

Press mixture into prepared pan, then evenly distribute chocolate chunks over top. If you mix the chocolate in, it will melt. Press into granola mixture with a spatula then cover and refrigerate for 2 hours to set. Cut into bars and wrap in aluminum foil or wax paper for easy transport.

Recipe source: The Pajama Chef

Microwave Peanut Butter Cookies

Posted on

For some reason I’ve never had the urge to make one of those quick and easy chocolate mug cakes that are done in the microwave.  I’ve saved recipes for them, thinking it sounds like a fun idea, but I guess it seems like too much work to mix up the ingredients for such a small cake. Especially since I know I’d have to do it at least twice in a row to satisfy my sweet tooth-lol.

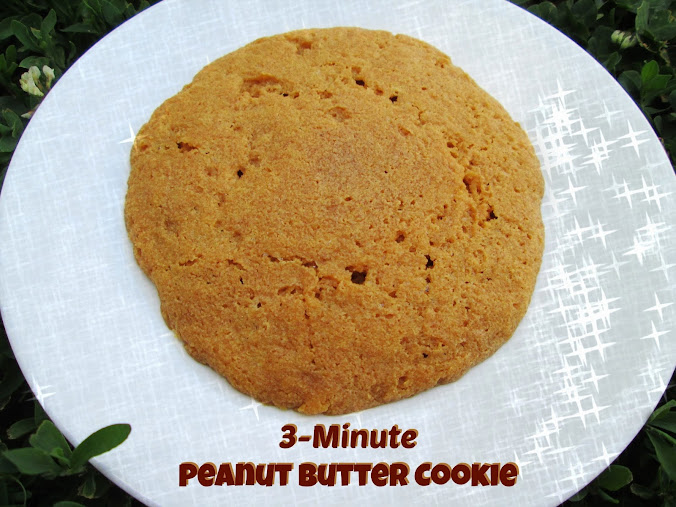
But a microwave cookie?  I had to try that.  (Don’t forget my second favorite food group is “Cookies,” with “Dip” being the first-haha.)  The original recipe was for a single cookie but I don’t keep a carton of Egg Beaters on hand and didn’t want to measure out a single tablespoon of egg white from a real egg, so I just multiplied the recipe by four to use a whole real egg (I’ve got mad baking mathematical skillz and knew that a whole egg = 1/4 cup or 4 tablespoons, just like I know how many ounces is in a cup of flour & sugar so that I don’t have to use measuring cups!).  This yielded four cookies, which is totally preferable to one cookie in my world.  :D

Dennis and I split the cookies and both loved them!  They are soft and chewy and totally hit the sweet spot. So simple and you don’t even have to turn on the oven.  Now that’s a summer dessert I can get behind. Extra bonus for those with food allergies: these are naturally gluten and dairy free!

Microwave Peanut Butter Cookies

Printable recipe
Printable recipe with picture

½ cup (4 ¾ oz) creamy peanut butter
¼ cup (2 oz) brown sugar, packed
½ teaspoon baking powder
1 large egg

Use a fork to mix the peanut butter and brown sugar together in a small bowl. Stir in the baking powder until completely incorporated. Mix in the egg until batter is uniform, thick & smooth. Remove ¼ – 1/3 of the batter and place on a small microwave-safe plate. Press into a thick cookie shape about 2″ in diameter and microwave 1 minute. Allow to cool while repeating with remaining batter. I preferred these when just a little warm.

Makes 3-4 large cookies.

Recipe source: adapted from Carrot’s ‘n Cake

Key Lime Pie


So happy to return today for the Secret Recipe Club‘s Group C reveal day!  Life has been keeping me pretty busy, but I’ll talk about life another day.

Today I need to tell you about this Key Lime Pie.  This amazing key Lime Pie.  I was assigned to Mother Thyme‘s blog this month, which is a new-to-me blog, and I was really excited to peruse it.  Jennifer’s blog is attractive, organized (yay for a recipe index!), and her photos are beautiful, so it was a real treat!  Not to mention that most of the recipes are her own creations!  I truly admire bloggers like Jennifer who mostly post their original creations, since I find that difficult, personally.  My creations are very rarely blog-worthy. LOL!

So when I ran across this key lime pie recipe, I was excited because Dennis loves Key Lime Pie and I’ve been wanting to make him one for a long time, but I was also very skeptical.  The main ingredients are sweetened condensed milk and lime juice.  And it only calls for for 9 minutes of baking.  I thought it was mis-typed, and eggs and extra baking time were missing.  I mean, how can two very liquid hardly-baked ingredients make a thick, creamy filling?

So I searched online recipes and found some similar ones that didn’t even require any baking.  What?  Really?  Wouldn’t this make soup pie?

I decided to give it a go, and I’m so glad I had faith in Mother Thyme!  This is kitchen science, folks, and utterly fascinating.  Apparently when the acidic lime juice is combined with the condensed milk, it thickens it, because as soon as I whisked it in, the two liquids turned into a thick, pudding-like filling.  Amazing!  After just two hours, it was ready to slice, and I didn’t even bake it at all!

The taste?  Just as amazing as the magical thickness.  Perfect balance of sweet and tart!  I’m just so excited by this pie, you guys, you don’t even know.  It’s so easy to make, so magical, and so delicious.  You could even say…it’s magically delicious.  :)

I made it a little festive by adding some food coloring to intensify the green (it’s really more ivory without the food coloring), and added shamrock sprinkles for a St. Patrick’s Day look.  This would make a nice change for a St. Patty’s day dessert since most of them feature booze and/or mint.  But even if you don’t try it for a holiday (would also be cool for Christmas with red sprinkes!), it’s great any time of year–especially spring and summer.  Dig in!

Key Lime Pie

Printable recipe
Printable recipe with picture

Crust
1 1/2 cups crushed graham crackers
5 tablespoons melted butter
4 tablespoons granulated sugar

Filling
3 (14.5 oz) cans sweetened condensed milk
2 drops green food coloring + 1 drop yellow (optional)
1/2 cup sour cream
1 cup key lime juice (or regular lime juice)
2 tablespoons freshly grated lime zest (from about 2 large limes)

Garnish
Whipped cream or Cool Whip
Extra lime zest or sprinkles

Preheat oven to 350 degrees. Mix crumbled graham crackers, butter and sugar in a 9” spring form pan or a deep dish pie plate and firmly press evenly over bottom and sides of pan. Bake for 8 minutes. Let cool before adding filling.

Meanwhile, combine sweetened condensed milk and food coloring if desired, mixing until totally blended. Add the sour cream, lime juice and lime zest and whisk until thickened and completely incorporated. Pour mixture in to cooled crust and refrigerate 2 hours or until ready to serve.

If desired, just before serving, pipe whipped cream around the edge of the pie (I used Wilton tip 1M) and garnish with some extra lime zest or festive sprinkles of your choice.  Or you can just serve with a dollop of whipped cream on top.  Refrigerate leftovers.

Veronica’s note: never mind my shallow pie dish, do not use a regular pie dish or you will have too much crust and filling, as I did (I made a second small dish of pie with my leftovers). Do as I say, not as I do. ;)

Recipe source: Mother Thyme

You can see all the other Group C SRC recipes by clicking the linky man below:


No-Bake Granola Cookie Bars

Posted on

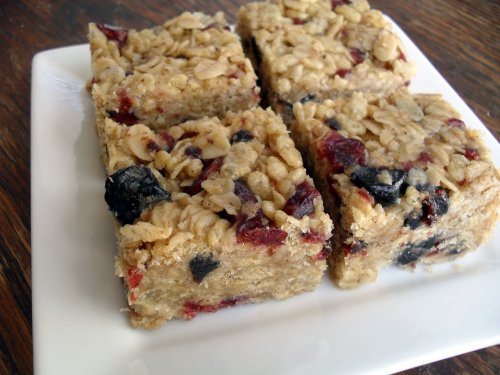
In Tupperware’s July specials brochure, there was a recipe for Peanut Butter Granola Bites that caught my eye because it was easy and the photo was very appealing.  The best part is that it contained no granola, which I never have on hand, just ingredients contained in granola, which I always have on hand.

However, I just so happened to be running low on peanut butter when I decided it was time to make them (we are always running low on peanut butter because we eat it like crazy), so I adapted the recipe and made my own walnut butter for it.  I have the original printer-friendly recipe here if you want to try that one instead.  I can’t vouch for it since I haven’t tried it yet, but my similar version was very good and I’m sure it is too.  I mine for snacks and even had some for breakfast since they are fairly healthy.

No-Bake Granola Cookie Bars

Printable recipe
Printable recipe with picture

2 cups raw nuts (I used walnuts)
½ teaspoons salt
½ cup (1 stick) unsalted butter
½ cup honey
2 cups rice cereal
2 cups rolled oats
1 cup dried fruit, roughly chopped (I used half cherries, half cranberries)

Spread nuts out on microwave-safe plate. Microwave one minute; stir with fingers. Microwave for 1-2 minutes more, stirring every thirty seconds, until toasted and fragrant. Place nuts in food processor bowl with blade attachment in place, and process until nuts go from a meal, to a paste, to liquid. You will have to stop the food processor several times to scrape the sides down. Once it it liquid, add salt (use ¼ teaspoon if you’re using salted butter) and let it run another minute.

While you’re toasting and processing the nuts, start your oats to toasting. Place them in a skillet over medium heat and stir every minute or two until golden and fragrant, about five minutes. Set aside until you’re ready for them.

Melt butter in a microwave-safe bowl, microwaving one minute or until melted. Add to the nut butter in the food processor, then pour in the honey. Process until mixture is blended.

Place cereal, oats, cherries, and cranberries in large bowl. Pour the butter mixture over the top and mix until combined. Spray a 13″ x 9” baking dish with oil and spread mixture into the pan. Cover with plastic wrap and refrigerate for two hours, or until firm. Slice into squares and devour.

Recipe source: adapted from Tupperware