RSS Feed

Tag Archives: bars

Tips for Shipping Food Items

Posted on

Many participants in the online bake sale have asked me for tips on shipping baked goods, and since there will also be many needing this information for the cookie swap, and probably others reading who would like to ship food items at some point in their life, I figured it behooved everyone for me to share my tips.  I’ve shipped a lot of food items, and have always had success getting my goodies from one place to another, fresh and (mostly) unbroken.  You may find a way that suits you better, but this is how I do it.

1.  Wrap/package the baked goods very well so that they are air tight.  For soft/chewy cookies, I put them together in a Ziploc bag and press the air out before sealing. For more fragile cookies, wrap individually in plastic wrap before putting in a tub or tin.  If you are shipping something that will smash or break easily (delicate cookies, marzipan, etc), it is best to place it inside a sturdy container, within the box you are shipping it in.

2. If you put your cookies or other goodies in a tub or tin, fill it to the top or so there’s no room for the goodies to move around in.  If you don’t have enough to fill up the tub or tin, fill the empty space with wadded up waxed paper, parchment paper, or plastic wrap.  The goal is to be able to shake the tin and not hear or feel anything moving around.  No movement equals no breakage.

Notice I filled this tin all the way to the top with cookies (Chocolate Chip Coconut Macaroons).  I did have to rearrange them to make sure I could close the lid without smashing them, but when I closed it, there was no room for the cookies to move around when shaken.  I shipped this all the way to Afghanistan with no problems.  If you need to ship to a very far away place, coconut macaroons are a great cookie to choose as they get better with age, stay moist, and are sturdy.

3.  Once the baked goods are in the shipping box, pack well around the them so that they will not shake inside the box.  Use packing peanuts, wadded up newspaper, bubble wrap, etc.  Fold the box flaps down and shake it to test and make sure that the goodie package within the box does not move around.  I find it best to use a box closest to the size of the baked goods possible, so there isn’t much packing necessary.  A dozen cookies fits perfectly in a small Flat-Rate Priority box (offered for free at Post Offices everywhere) and you will only need a few peanuts to fill in the open space between your bag of cookies and the box. I have shipped many cookies this way and have seen photos of them after arrival, and they look just as good as the day I baked them.  Packing them tight so that they don’t move around during shipping is key.

After taking this photo, I made sure to fill in every gap with peanuts, closed the flaps, shook the box, and put in more peanuts if anything shifted.  By the time I sealed the box, those cookies were completely stable inside their box.   And as you can see, below, they arrived in the same condition they left in (minus the eaten part, lol). Julie described the cookies favorably as chewy, salty, and sweet (they were Sneaky Snickers Cookies, peanut butter cookies with mini Snickers hiding inside), so they also arrived tasting the same as they left.


4. For bread, wrap well in plastic wrap, making sure it is air tight.  You can then place it inside a plastic tub if you can find one that fits, or just put it right inside the box you are mailing it in, preferably one not much larger than the bread.  Pack with bubble wrap or peanuts to ensure the bread does not jostle during shipping.  Have the postal clerk mark “This Side Up” if you don’t want your box being turned upside down.

5. For glass jars, wrap each jar in bubble wrap before placing in box, secure the bubble wrap with tape, and fill in the empty space in the box very well with wadded newspaper, peanuts, or more bubble wrap.  Have the postal clerk mark “Fragile” on your box.

6.  Use Priority Mail (2-3 days delivery) or Express Mail (overnight) service.  Parcel Post is used a lot by companies shipping heavier items and if you choose this service, which will only be a little cheaper than Priority Mail, not only will it take longer to arrive, it may be placed beneath a heavier package and crushed.

7.  Request delivery confirmation.  (You will have to fill out a little slip that you can find usually while you are in the Post Office line and fill out the address while you wait.)  This allows you to track the progress of your package online and make sure it gets delivered.  This really helps when someone wants to know where their package is, then you can just provide a tracking number if need be.  It does cost 75 cents extra (free when you ship online with Priority Mail) but it is worth the peace of mind.

There are also a lot of tips here that I did not mention, but are very important to know, such as waiting for your baked goods to cool completely before wrapping/packing, and much more.

What NOT to do…

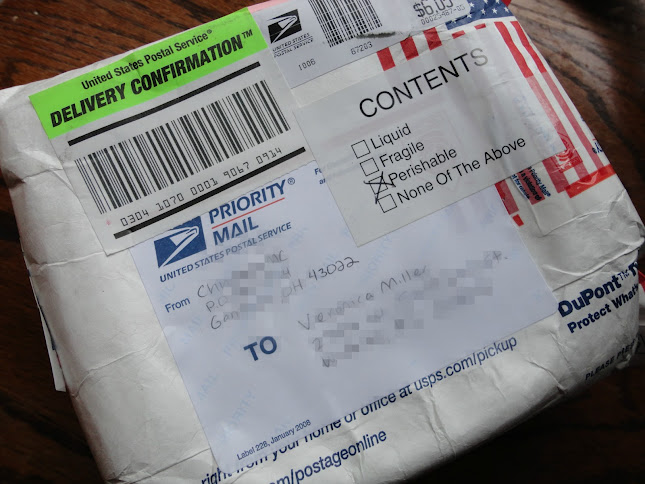
I once received a package of cookies in a Tyvec bag with no padding.  Notice the price she paid to ship it was more than it would have cost to use a small flat rate priority mail box, and the cookies would have been in better condition if she had mailed them that way.

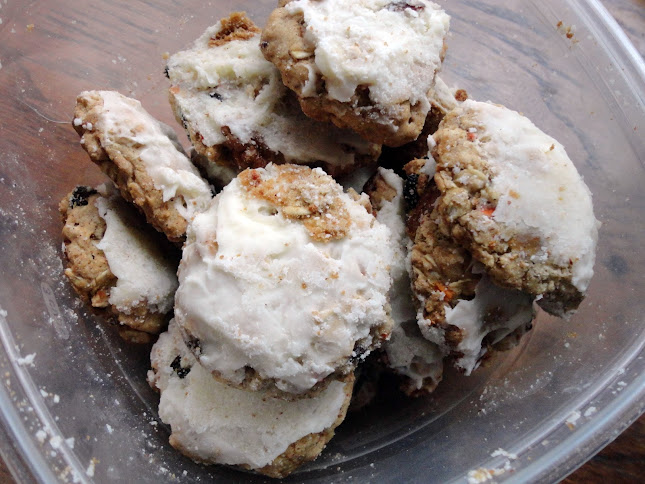
She also would not have had to buy a container if she’d used a flat rate box, just a Ziploc bag.  The container had cracked during shipping because of the lack of padding, so it wasn’t air tight.  You can see that the cookies got beat up because the tub had a lot of extra room for them to move around in during shipping.  Despite all this, the cookies weren’t completely dried out yet and were still very good.  But they could have been wonderful if more carefully packaged.

Also, please do not try to ship a frosted cake.

whites_bakery_cake-10

So sad.  :(  I got this photo here, and you can read the lovely story of how a mother shipped her daughter a birthday cake.  Unless you don’t mind your cake arriving in a heap of crumbles like the thankful daughter who received this cake, please leave it to the professionals. (How DO they get them delivered in one piece?! I really wish I could figure that out.  But I don’t want to pay the price of delivery to find out for myself-lol.)

I hope this helped you with any concerns you might have had and if you have any questions, just leave me a comment below.

Advertisement

Choco-Cherry Cheesecake Cookie Bars

Posted on

*Update 10/4/11: I won the editor’s choice award for these bars. Whee!

Editor's Choice: Choco-Cherry Cheesecake Cookie Bars

It’s Secret Recipe Club time again!  Members of the club are assigned a secret food blog each month and they can pick any recipe(s) they want to make from the blog.  On reveal day, nobody knows what other blogger was assigned their blog so I find it really fun.

This month I was super stoked to get assigned to Big Bear’s Wife, because Angie (who also happened to be my group’s host this month) has plenty of dessert recipes to choose from.  I think you all know by now that dessert is both my strength and my weakness!

I thought of Dennis when I saw these bars because he loves cherries and chocolate.  Chocolate-covered cherries (aka cherry cordials), black forest ice cream sundaes, cherry mudslides (layers of ice cream, cherry pie filling, and hot fudge), black forest cake.  He loves it all.  And I think I’ve mentioned my little cheesecake problem.  So yeah, I pretty much had to make these.  And then I pretty much had to get them out of the house as soon as possible so I didn’t eat the whole pan.  I managed to inhale two rows before he got them out the door to bring to work.  Doh!

I never buy packaged cookie dough (perhaps it’s hypocritical to be for cake mixes but against premade cookie dough-lol), so I adapted the recipe with homemade, but you can use a package of store-bought to save time.

Be sure to check out all the other secret recipe club blogs at the bottom of this post! ***Something is up with the linky thing so there may be no links at the bottom. While it is getting figured out, you can go to Big Bear’s Wife at the bottom of her post to see all the links.***

Choco-Cherry Cheesecake Cookie Bars

Printable recipe
Printable recipe with picture

Sugar Cookie layer:
½ cup (1 stick) butter, softened to cool room temperature
½ cup granulated sugar
3 tablespoons powdered sugar
1 large egg
½ teaspoon vanilla extract
¼ teaspoon almond extract
1 ½ cups all-purpose flour
1 teaspoon baking powder
¼ teaspoon salt

Filling & topping:
1 egg, separated
1 package (8 oz) cream cheese, softened
2 eggs
1 can (14 oz) sweetened condensed milk (not evaporated)
¼ teaspoon almond extract
3 drops red food color
1 jar (10 oz) maraschino cherries, finely chopped, drained on paper towels
1 (12 oz) bag semisweet chocolate chips (2 cups)
½ cup butter or margarine
½ cup whipping cream

Preheat oven to 350°F. In a large bowl, cream together the butter and sugars for 3-4 minutes, until the mixture is light and fluffy. Add the egg and extracts and mix until blended. Add half the flour, baking powder and salt. Mix. Add remaining flour and mix just until flour is incorporated and the dough is smooth and soft. Spread and press dough into the bottom of a 9”x13” baking dish. Bake 15 to 20 minutes or until light golden brown. Meanwhile, in small bowl, beat 1 egg white until frothy. Brush egg white over crust. Bake 3 minutes longer or until egg white is set.

Meanwhile, in large bowl, beat cream cheese with electric mixer on medium speed until smooth. Add egg yolk, 2 eggs, the condensed milk, almond extract and food color; beat until well blended. Stir in chopped cherries. Pour cherry mixture evenly over crust. Bake 20-25 minutes longer or until set. Cool completely, about 45 minutes.

Meanwhile, in medium saucepan, heat chocolate chips and butter over low heat, stirring frequently, until melted and smooth. Remove from heat. Cool 20 minutes. Stir whipping cream into chocolate mixture until well blended. Spread over cooled bars. Refrigerate about 30 minutes or until chocolate is set. For bars, cut into 8 rows by 6 rows. Store in refrigerator.

Recipe source: adapted from Big Bear’s Wife


Caramel Chocolate Chip Bars

Posted on

I like to have an arsenal of easy emergency recipes on hand for gifts, and recently added this one because I happened to have a caramel cake mix and dulce de leche in my cupboard when I was scrambling to get something ready for a friend with a birthday, who I was going to see later in the day.  If you can’t find caramel cake mixes in your grocery store, you can request them at your customer service counter like I do, or purchase them online.

Caramel Chocolate Chip Bars

Printable recipe
Printable recipe with picture

1 (18.25 oz) Duncan Hines caramel cake mix
2 eggs
¼ cup brown sugar
¼ cup butter
¼ cup water
1 (12 oz) package semisweet chocolate chips, divided
1 (14 oz) can dulce de leche

Preheat oven to 375 ºF.. Spray a 9×13 dish with oil. Combine cake mix, eggs, water, brown sugar and butter in large bowl. Stir until thoroughly blended. Mixture will be thick. Stir in chocolate chips. Spread in greased pan.

Bake for 24 to 27 minutes or until toothpick inserted in center comes out clean. While it’s still hot and fresh from the oven, spread dulce de leche over the top and sprinkle chocolate chips over that. Wait five minutes, then use a butter knife or spatula to swirl the chocolate into the caramel. Cool completely in pan. Cut into bars.

Recipe source: adapted from Duncan Hines

No-Bake Granola Cookie Bars

Posted on

In Tupperware’s July specials brochure, there was a recipe for Peanut Butter Granola Bites that caught my eye because it was easy and the photo was very appealing.  The best part is that it contained no granola, which I never have on hand, just ingredients contained in granola, which I always have on hand.

However, I just so happened to be running low on peanut butter when I decided it was time to make them (we are always running low on peanut butter because we eat it like crazy), so I adapted the recipe and made my own walnut butter for it.  I have the original printer-friendly recipe here if you want to try that one instead.  I can’t vouch for it since I haven’t tried it yet, but my similar version was very good and I’m sure it is too.  I mine for snacks and even had some for breakfast since they are fairly healthy.

No-Bake Granola Cookie Bars

Printable recipe
Printable recipe with picture

2 cups raw nuts (I used walnuts)
½ teaspoons salt
½ cup (1 stick) unsalted butter
½ cup honey
2 cups rice cereal
2 cups rolled oats
1 cup dried fruit, roughly chopped (I used half cherries, half cranberries)

Spread nuts out on microwave-safe plate. Microwave one minute; stir with fingers. Microwave for 1-2 minutes more, stirring every thirty seconds, until toasted and fragrant. Place nuts in food processor bowl with blade attachment in place, and process until nuts go from a meal, to a paste, to liquid. You will have to stop the food processor several times to scrape the sides down. Once it it liquid, add salt (use ¼ teaspoon if you’re using salted butter) and let it run another minute.

While you’re toasting and processing the nuts, start your oats to toasting. Place them in a skillet over medium heat and stir every minute or two until golden and fragrant, about five minutes. Set aside until you’re ready for them.

Melt butter in a microwave-safe bowl, microwaving one minute or until melted. Add to the nut butter in the food processor, then pour in the honey. Process until mixture is blended.

Place cereal, oats, cherries, and cranberries in large bowl. Pour the butter mixture over the top and mix until combined. Spray a 13″ x 9” baking dish with oil and spread mixture into the pan. Cover with plastic wrap and refrigerate for two hours, or until firm. Slice into squares and devour.

Recipe source: adapted from Tupperware

Snickerdoodle Blondies

Posted on

Whether you’re a fan of snickerdoodles or not, I think you will love these bars!  I personally don’t love snickerdoodles.  I’ll eat them.  Come on, cookies are my favorite food group so of course I’ll take one when offered.  But these, I love.  They are so soft and buttery sweet and just…wonderful.  I think it must be the cinnamon in them, but I think the flavor is perfect for fall!

I know from experience that they have a good shelf life–I shipped a package of them in the hot summer and they weren’t delivered for five days because of a Post Office error, but they were still fresh when the birthday girl picked them up.  So don’t be afraid to make these up in advance for holiday gatherings/gifts–they freeze great too!

Snickerdoodle Blondies

Printable recipe
Printable recipe with picture

Cookies:
2 2/3 cups (10 oz) all-purpose flour
2 teaspoons baking powder
1 teaspoon ground cinnamon
¼ teaspoon ground nutmeg
½ teaspoon cream of tartar
1 teaspoon salt
2 cups (15 oz) brown sugar, packed
1 cup (8 oz) butter, at room temperature
2 large eggs, at room temperature
1 tablespoon vanilla extract

Topping:
2 tablespoons granulated sugar
1 teaspoon ground cinnamon
pinch of nutmeg

Preheat oven to 350 degrees F.  Spray 9×13-inch pan with nonstick spray, line pan with parchment and let it hang over the sides, then  spray the parchment with nonstick spray too. (The parchment is optional but creates nice handles to lift the bars out for easier cutting.) In a medium bowl, whisk together flour, baking powder, cinnamon, nutmeg, cream of tartar and salt; set aside. In a large bowl, cream together butter and brown sugar with an electric mixer (3 to 5 minutes). Mix in eggs, one at a time, then vanilla, beating until smooth. Stir in flour mixture until well blended. The batter will be thick. Spread it evenly into the prepared pan. Spray your hands with cooking spray and use them to pat the mixture down evenly. Combine the topping ingredients in a small bowl; sprinkle evenly on top of batter. Bake 25 to 30 minutes or until surface springs back when gently pressed. Let pan cool completely. When ready to cut, use ends of parchment paper to lift out baked bars. Place on a cutting board. Use a large, sharp knife to cut into bars.

Makes 20 to 24 bars

Recipe source: Recipe Girl (her optional additions left out)

Cookie Mondays: Millionaire Bars

Posted on

I made these bars in my new Perfect Brownie pan and now I’m going to make a batch of brownies tonight because it worked so well, I can’t wait to see how perfect it will turn out the product it was intended for!

These bars consist of a buttery, flaky shortbread layer, a creamy caramel layer and a chocolate layer. They are sooo delicious and for the first time since cookie Mondays, Dennis didn’t return home with any leftovers. They remind me a lot of Twix and I’ve seen them turned into homemade Twix bars here, so I might try that next time just for fun!

Millionaire’s Shortbread Bars
Recipe from Joy of Baking

SHORTBREAD:
3/4 cup (1 1/2 stick) (170 grams) unsalted butter, room temperature
1/4 cup (50 grams) granulated white sugar
1/2 teaspoon pure vanilla extract
1 1/2 cups (210 grams) all purpose flour
1/8 teaspoon salt

CARAMEL FILLING:
1 – 14 ounce can (1 cup) Dulce de Leche or sweetened condensed milk

CHOCOLATE TOPPING:
6 ounces (170 grams) semi-sweet or bittersweet chocolate, cut into pieces
1 teaspoon unsalted butter

Preheat oven to 350 degrees F (177 degrees C) and place rack in center of oven. Grease with butter (or use a cooking spray) a 9 x 9 inch (23 x 23 cm) pan.

FOR SHORTBREAD: In the bowl of your electric mixer, or with a hand mixer, cream the butter and sugar until light and fluffy. Beat in the vanilla extract. Add the flour and salt and beat until the dough just comes together. Press onto the bottom of your greased pan and bake for about 20 minutes, or until pale golden in color. Remove from oven and place on a wire rack to cool while you make the filling.

FOR CARAMEL FILLING: If using Dulce de Leche then simply warm the caramel in the microwave or in a heatproof bowl set over a saucepan of simmering water. If using sweetened condensed milk, pour the milk into a heatproof bowl and place the bowl over a saucepan of simmering water. Cover and cook, over low heat, stirring occasionally, for 60 to 90 minutes or until the milk has thickened and has turned a caramel color. Remove from heat and beat until smooth. Pour the caramel over the baked shortbread and leave to set.

Note: You can also do this step in a microwave oven. Place the sweetened condensed milk in a large microwaveable bowl and cook on medium power for about 4 minutes, stirring halfway through baking time. Reduce the powder to medium-low and continue to cook for another 8 to 12 minutes, or until the milk has thicken and has turned a light caramel color. Remove from microwave and beat until smooth.

FOR TOPPING: Melt the chocolate and butter either in the microwave oven or in a heatproof bowl set over a saucepan of simmering water. Pour the melted chocolate evenly over the caramel and leave to set. Cut the shortbread into pieces using a sharp knife.

Store the shortbread in the refrigerator to keep the chocolate nice and firm. (I found this unnecessary–it was hard at room temperature.)

Yield: 16 – 2 inch (5 cm) squares

If you’d like to make this in your Perfect Brownie pan, spray the pan & insert with cooking spray. Press the shortbread into the pan with some waxed paper (it was sticking to my hands and this worked perfect) and then press the insert into place before baking. You don’t need to bake it on top of a cookie sheet–the shortbread won’t leak out. After removing the shortbread (I only had to cook mine about 18 minutes), you can immediately remove the insert. Take a minute to admire the perfection of the shortbread squares.

Spread the warmed dulce de leche over the bars after you remove the insert and let them cool. Then spread on the chocolate layer. Now this is where I went wrong. I let the chocolate layer set up before I tried to put the insert back to re-divide the bars. The insert isn’t sharp enough to cut into that hard chocolate layer, so I had to cut into it with a knife in order to separate the bars. Next time I would spray the insert again with cooking spray and insert it while the chocolate is still warm and then remove it once set. That should work!

Pumpkin Gooey Butter Cake

Posted on

https://i0.wp.com/a2.ec-images.myspacecdn.com/images02/109/4504e752320344f29df9b093570d7885/l.jpg

I have been making this dessert every fall for about five years because not only is it my favorite fall dessert, but it is usually requested at our Thanksgiving gathering.  Although “Pumpkin Gooey Butter Cake” is the official name, I feel that “Pumpkin Bars” is more apt and usually refer to them that way.  The bottom layer is like a cross between cookie and cake and the pumpkin filling is sweet, perfectly spiced and ultra creamy (not what I would call gooey, though it does jiggle when you take it out of the oven).

If you want to know how this recipe rates, here’s is the list of my top five favorite desserts (that I make):
1. Laura’s Cherry Crumble Bars
2. Laura’s Chocolate Chip Cookies
3. Pumpkin Gooey Butter Cake
4. Dark chocolate Raspberry Cake
5. Zesty Lemon Pound Cakes

And if you still don’t believe me, here’s further proof that this is a must-try.  I brought this to the charity bake sale at work last week and it sold out faster than anything else.  I watched one woman scrape her container of every crumb after finishing the slice she bought, then go back to buy another only to find they’d all sold in the time it took her to eat it.  When she found out I’d made it, she made me promise to bring more next week!

She is not the first to catch the butter cake fever and won’t be the last.

https://i0.wp.com/a3.ec-images.myspacecdn.com/images02/57/cb7a7245f6224b5e903a6c1d879c3602/l.jpg

Pumpkin Gooey Butter Cake

Printable recipe
Printable recipe with picture

Cake:
1 (18 1/4-ounce) package yellow cake mix
1 egg
1 stick butter, melted

Filling:
1 (8-ounce) package cream cheese, softened
1 (15-ounce) can pumpkin
3 eggs
1 teaspoon vanilla
1 stick butter, melted
1 (16-ounce) box powdered sugar
1 teaspoon cinnamon
1 teaspoon nutmeg

Preheat oven to 350 degrees F.

Combine the cake mix, egg, and butter and mix well with an electric mixer. Pat the mixture into the bottom of a lightly greased 13 by 9-inch baking pan.

To make the filling: In a large bowl, beat the cream cheese and pumpkin until smooth. Add the eggs, vanilla, and butter, and beat together. Next, add the powdered sugar, cinnamon, nutmeg, and mix well. Spread pumpkin mixture over cake batter and bake for 40 to 50 minutes (I usually do 45 minutes). Make sure not to overbake as the center should be a little gooey.

Serve with fresh whipped cream.

From Paula Deen’s Lady & Sons Savannah Country Cookbook

Dulce de Leche Bars


I came up with this recipe for the “mix it up” contest at the fair.  You could either use a mix for something it wasn’t intended for or make a cake with a mix and put a twist on it.  I went for the former and used a cake mix for the base of these indulgent treats.  Although they didn’t place, the judges wrote “Very good–wonderful flavor!” in the notes on my eval sheet and everyone I’ve served them to agrees.  My favorite thing about them is that you can whip them up and have them in the oven in less than 10 minutes.  Perfect for us busy people!

https://i0.wp.com/a3.ec-images.myspacecdn.com/images02/90/1e0c70be8b044c62bd0bd4eb6570cb56/l.jpg

Dulce de Leche Bars

1 (18.25 oz) Golden Butter Recipe cake mix
1 egg
1 stick unsalted butter, melted
1 (13.4 oz) can Nestle Dulce de Leche (or 1 cup homemade)
1 cup pecan pieces
½ cup sweetened shredded coconut
1cup semi-sweet chocolate chips
½ cup Heath candy baking bits

Preheat oven to 350 degrees and grease the bottom and sides of a 9×13 pan.

In a large bowl, combine the cake mix, egg & butter.  Beat on medium speed until well mixed.  Shape the dough into a ball and, using your hands, press it out into the bottom of the prepared pan until it is in an even layer & reaches the edges.

Spread the dulce de leche over the cake mix layer, all the way to the edges.  Sprinkle the remaining ingredients over the top, layering half of each and then repeating, and bake for 35 minutes.  Remove from oven and give it a few hard taps against a heat resistant surface to settle any puffiness.  Allow to cool completely on a wire rack before cutting.

Cherry Crumble Bars

Posted on

This is my favorite recipe of Laura’s.  The chocolate chip cookies are my favorite cookie but this is my favorite recipe of hers….so far.  I have a lot left to try.  The buttery cherry-almond combo here is very good.  I’m being very reserved because if I unleashed my enthusiasm for this recipe, I’d probably be put in a straight jacket in a padded cell.

Cherry Crumble Bars

Cookie base and topping
1 ½ cups all-purpose flour
½ cup sugar
½ teaspoon salt
½ teaspoon baking powder
1/3 cup almond paste (not marzipan)
1/4th teaspoon almond extract
1 stick (1/2 cup) cold unsalted butter, cut into pieces
½ cup sliced almonds (Reserve for topping)

Filling
2 cups frozen cherries
3/4th cups sugar
3 Tablespoons water
2 tablespoons cornstarch
1 Tablespoon fresh lemon juice
1 Tablespoon unsalted butter
Pinch of salt

Icing
1/3 cup powdered sugar or more if needed, whisked or sifted
2 Tablespoons heavy cream
1/4th teaspoon almond extract
Pinch of salt

Heat oven to 350 degrees. Line a 9 inch square pan with foil and grease lightly with vegetable or olive oil.

In a food processor add flour, sugar, salt and baking powder and process to fluff and combine. Add almond paste and almond extract and pulse to combine. Add cold butter pieces and pulse until crumbly. Remove 1 cup of the mixture and set aside for topping.

Put the rest of the mixture into the pan, spread out evenly, and press with the bottom of a measuring cup to make a crust. Bake for 15-17 minutes until crust starts to brown slightly around the edges. Remove and leave the oven on.

Meanwhile dump all the filling ingredients into a saucepan and cook on medium high heat until thickened and translucent. About 8 to 10 minutes. Spread the filling over the crust.

Sprinkle the top with the reserved crumb mixture and top with the sliced almonds. Bake for about 28 to 30 minutes or until the filling bubbles and the top is golden. Let cool completely in the pan on a cooling rack.

Whisk or beat the icing ingredients together, drizzle over bars.

Hint: To easily remove bars from the pan freeze for 30 minutes and lift out by the foil edges. Peel off foil and cut into squares or diamonds.

Veronica’s Notes: I’ve also made this successfully with a can of tart cherries.  To do this, put a (14.5 oz) can red tart cherries packed in water in the saucepan, water and all, along with the other filling ingredients but omit the water & lemon juice.  It won’t have the same deep red color as the frozen cherries give, so you can add some red food coloring if you wish.

Secret Recipe Club

%d bloggers like this: