RSS Feed

Tag Archives: dulce de leche

Cookie Mondays: Millionaire Bars

Posted on

I made these bars in my new Perfect Brownie pan and now I’m going to make a batch of brownies tonight because it worked so well, I can’t wait to see how perfect it will turn out the product it was intended for!

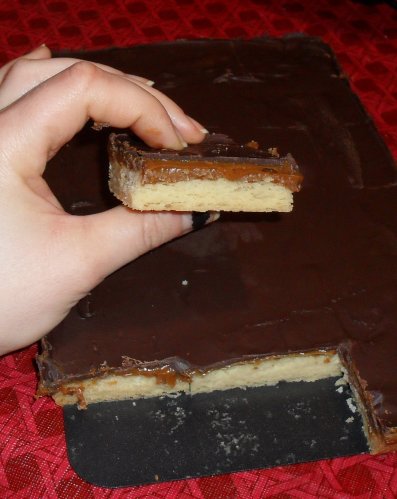
These bars consist of a buttery, flaky shortbread layer, a creamy caramel layer and a chocolate layer. They are sooo delicious and for the first time since cookie Mondays, Dennis didn’t return home with any leftovers. They remind me a lot of Twix and I’ve seen them turned into homemade Twix bars here, so I might try that next time just for fun!

Millionaire’s Shortbread Bars
Recipe from Joy of Baking

SHORTBREAD:
3/4 cup (1 1/2 stick) (170 grams) unsalted butter, room temperature
1/4 cup (50 grams) granulated white sugar
1/2 teaspoon pure vanilla extract
1 1/2 cups (210 grams) all purpose flour
1/8 teaspoon salt

CARAMEL FILLING:
1 – 14 ounce can (1 cup) Dulce de Leche or sweetened condensed milk

CHOCOLATE TOPPING:
6 ounces (170 grams) semi-sweet or bittersweet chocolate, cut into pieces
1 teaspoon unsalted butter

Preheat oven to 350 degrees F (177 degrees C) and place rack in center of oven. Grease with butter (or use a cooking spray) a 9 x 9 inch (23 x 23 cm) pan.

FOR SHORTBREAD: In the bowl of your electric mixer, or with a hand mixer, cream the butter and sugar until light and fluffy. Beat in the vanilla extract. Add the flour and salt and beat until the dough just comes together. Press onto the bottom of your greased pan and bake for about 20 minutes, or until pale golden in color. Remove from oven and place on a wire rack to cool while you make the filling.

FOR CARAMEL FILLING: If using Dulce de Leche then simply warm the caramel in the microwave or in a heatproof bowl set over a saucepan of simmering water. If using sweetened condensed milk, pour the milk into a heatproof bowl and place the bowl over a saucepan of simmering water. Cover and cook, over low heat, stirring occasionally, for 60 to 90 minutes or until the milk has thickened and has turned a caramel color. Remove from heat and beat until smooth. Pour the caramel over the baked shortbread and leave to set.

Note: You can also do this step in a microwave oven. Place the sweetened condensed milk in a large microwaveable bowl and cook on medium power for about 4 minutes, stirring halfway through baking time. Reduce the powder to medium-low and continue to cook for another 8 to 12 minutes, or until the milk has thicken and has turned a light caramel color. Remove from microwave and beat until smooth.

FOR TOPPING: Melt the chocolate and butter either in the microwave oven or in a heatproof bowl set over a saucepan of simmering water. Pour the melted chocolate evenly over the caramel and leave to set. Cut the shortbread into pieces using a sharp knife.

Store the shortbread in the refrigerator to keep the chocolate nice and firm. (I found this unnecessary–it was hard at room temperature.)

Yield: 16 – 2 inch (5 cm) squares

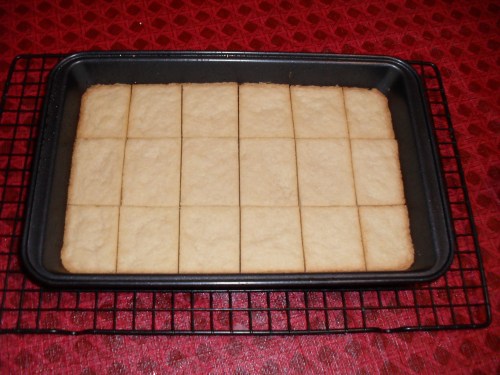
If you’d like to make this in your Perfect Brownie pan, spray the pan & insert with cooking spray. Press the shortbread into the pan with some waxed paper (it was sticking to my hands and this worked perfect) and then press the insert into place before baking. You don’t need to bake it on top of a cookie sheet–the shortbread won’t leak out. After removing the shortbread (I only had to cook mine about 18 minutes), you can immediately remove the insert. Take a minute to admire the perfection of the shortbread squares.

Spread the warmed dulce de leche over the bars after you remove the insert and let them cool. Then spread on the chocolate layer. Now this is where I went wrong. I let the chocolate layer set up before I tried to put the insert back to re-divide the bars. The insert isn’t sharp enough to cut into that hard chocolate layer, so I had to cut into it with a knife in order to separate the bars. Next time I would spray the insert again with cooking spray and insert it while the chocolate is still warm and then remove it once set. That should work!
Dulce de Leche Apple Pie


On average, I save about five recipes a day.  Each is saved with full intention of making it ASAP, but most are forgotten by the following day when I’ve found five or twenty more recipes that I just HAVE to try right away.  It’s a never-ending cycle.
This one, however, has been stuck in my head ever since I read it on Laura’s blog two months ago.  It is not one I forgot, but continued thinking, imagining, and fantasizing about.  So when I unexpectedly got the day off on Thursday, I immediately knew how I would spend some of my free time.  Making. This. Pie.
 
It was worth the wait and all the anticipation.  Honestly, it’s the best apple pie I’ve ever had–even better than the apple pie that has won me local acclaim and an order for 15 of them to serve as the groom’s “cake” at a wedding.  Grandma Ople’s Apple Pie is killer, but this one tops it.  And it’s easier to put together, so that makes it a definite winner. 
 
Personally, I don’t taste the dulce de leche in the pie itself so I like to drizzle dulce de leche over the top to enhance the flavor.


Dulce de Leche Apple Pie

from The Cooking Photographer, with some modifications
 
Double crust for 9” pie (I always use this recipe)
Egg white for brushing dough (reserve the yolk in a separate dish)
5 cups peeled and sliced mixed apples (I used 2 small Jonathan, 1 large Rome and 1 Granny Smith)
¼ cup
dulce de leche
2 Tablespoons apple cider
½ cup brown sugar
1/3 cup granulated sugar
1/3 cup cornstarch
½ teaspoon vanilla extract
1/4 teaspoon cinnamon
1/8 teaspoon freshly grated nutmeg
Pinch of salt
1 Tablespoon of butter for dotting pie
Additional dulce de leche for drizzling (optional)
9” Pyrex pie dish, not the 9 1/2″ deep dish
1. Place the oven rack on the lower 3rd of the oven and preheat to 400 degrees.

2. Mix together sugars, cornstarch, cinnamon, nutmeg, and salt. Make sure the cornstarch is well mixed in so you don’t get cornstarch lumps in your pie.

3. In a large bowl toss together the apples with dulce de leche, apple cider, and vanilla extract. Add the dry mixture and toss to combine. Set aside.

4. Roll out one of the discs of pie dough and line a 9” Pyrex pie dish with the bottom crust, then brush with the egg white. (Keep the remaining egg white for later use.) Add the filling and spread out evenly. Dot the mixture with little bits of butter here and there.

6. Roll out the other dough disc & cover with the top crust. Cut it slightly wider than the edge of the bottom crust, then tuck the edges under before fluting.

7. Mix the egg yolk with the remaining egg white & brush over the crust. Poke a few holes in the crust for venting or cut out decorations.

8. Bake for 30 minutes. Then turn the temperature to 375 degrees, cover crust edges with a pie shield*, and bake for another 30 minutes or until crust is golden on the bottom and no longer wet and raw looking.

9. Remove the pie from the oven and set on a cooling rack for several hours to set up the filling.

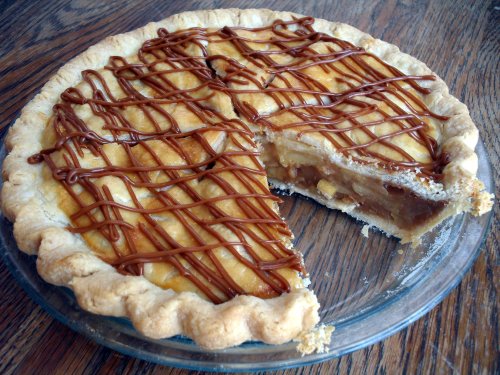
10. If desired, you may drizzle dulce de leche over the top of the pie shortly before serving. Don’t do it too far in advance or the dulce de leche will dry out and get hard. To drizzle it, warm the dulce de leche and either put it in a pastry bag or a ziploc bag and snip a small hole from the tip. Then just sweep the bag back and forth over the pie while you squeeze the bag.

*There is no need for a pie shield if using the recipe for crust in the link above. It doesn’t burn easily. Also, I only needed to cook my pie 45 minutes before the crust looked done, so I removed it and the apples were soft & perfect.

Dulce de Leche Bars


I came up with this recipe for the “mix it up” contest at the fair.  You could either use a mix for something it wasn’t intended for or make a cake with a mix and put a twist on it.  I went for the former and used a cake mix for the base of these indulgent treats.  Although they didn’t place, the judges wrote “Very good–wonderful flavor!” in the notes on my eval sheet and everyone I’ve served them to agrees.  My favorite thing about them is that you can whip them up and have them in the oven in less than 10 minutes.  Perfect for us busy people!

https://i0.wp.com/a3.ec-images.myspacecdn.com/images02/90/1e0c70be8b044c62bd0bd4eb6570cb56/l.jpg

Dulce de Leche Bars

1 (18.25 oz) Golden Butter Recipe cake mix
1 egg
1 stick unsalted butter, melted
1 (13.4 oz) can Nestle Dulce de Leche (or 1 cup homemade)
1 cup pecan pieces
½ cup sweetened shredded coconut
1cup semi-sweet chocolate chips
½ cup Heath candy baking bits

Preheat oven to 350 degrees and grease the bottom and sides of a 9×13 pan.

In a large bowl, combine the cake mix, egg & butter.  Beat on medium speed until well mixed.  Shape the dough into a ball and, using your hands, press it out into the bottom of the prepared pan until it is in an even layer & reaches the edges.

Spread the dulce de leche over the cake mix layer, all the way to the edges.  Sprinkle the remaining ingredients over the top, layering half of each and then repeating, and bake for 35 minutes.  Remove from oven and give it a few hard taps against a heat resistant surface to settle any puffiness.  Allow to cool completely on a wire rack before cutting.

Dulce de Leche

Posted on

My method of making dulce de leche is probably the most commonly used.  It is the cheater’s way of making it so go elsewhere if you want the stuff with real cream and vanilla bean seeds. This blog is for the non-food snobs. Me? I can be both but I prefer to cheat when it comes to dulce de leche.

Dulce de Leche

1. Remove the label from a can of sweetened condensed milk. (This is the only ingredient, by the way.) I use Eagle brand and recommend you do not buy generic. Generic cans have a tendency to let water in and make the dulce de leche form sugar crystals, which ruins it.

2. Place it in the bottom of a pot on its side and cover with water at least an inch above the top of the can.

3. Put it on the stove, put the lid on, and turn the burner to high. You will let it boil on high for 2 hours. Alternately, you can simmer it on medium for four hours but it turns out exactly the same so I do it on high to save time.

4. Check the water level every half hour or so and add more water to keep it above the top of the can. DO NOT LET THE WATER LINE FALL BENEATH THE TOP OF THE CAN, OR THE CAN COULD EXPLODE, RESULTING IN SERIOUS INJURY.

5. Have I scared you into never trying my method yet?

6. Once it has boiled for two hours, turn off the heat and carefully remove the can with tongs.

7. Allow to cool completely, then open and use as you wish. Some just wait until the can is warm but not hot before opening, but I’m not so brave. The fear of the can exploding in my face keeps me from attempting anything of the sort. I usually let it sit overnight or just stash it in the cupboard if I won’t be using it for a while. It has a long shelf life, even after cooking. I’m not sure how long, because the longest it’s ever lasted on my cupboard shelf is one month. I’d say you’ve got until the expiration date on the can, but I’m not making any promises.

I opened this can today, one month after making it–still perfect!

When it’s done, you’ll have some lovely thick, caramelly stuff like this. Dip apples in it, heat it and swirl it over ice cream, or use it in PMS Pie or put it on top of some banana slices in a pie crust with whipped cream over that to make a Banoffee Pie. Heaven!

Veronica’s tip: I use a stock pot and cook several at once so I have them on hand. Also, I recently found prepared dulce de leche in a can at the grocery store on the Mexican food aisle so if preparing dulce de leche yourself doesn’t appeal to you, check to see if your grocer sells them. The kind I found looks like this (and it it tastes almost as good as homemade):

PMS Pie

Posted on

When you start screaming at the pot of water because it hasn’t boiled yet, then start slamming drawers while searching for your pasta server, and eventually start throwing utensils on the kitchen floor and then start grabbing things off the counter with intent to break as many of them as possible…you know it’s time to make this pie.  You can tell your friends that it’s Five-Layer Toffee Pie but you and I both know it’s just a cure for PMS.

*Warning: this sucker is RICH so cut into small slivers if you are not actually suffering from PMS.  Otherwise, this pie serves one.

PMS Pie (AKA Five-Layer Toffee Pie)

1 store-bought Oreo cookie crust (or make your own)
2 cups dulce de leche*, room temperature
1 (8-oz) container Cool Whip, thawed
1 (8-oz) bag toffee bits (you won’t use the whole bag but you’ll need something to sustain you until the pie is assembled)

Sprinkle some toffee bits over the bottom of the crust, spread the dulce de leche over it, sprinkle on some more toffee, spread on the Cool Whip,  and then top it off with more toffee.

It’s best to refrigerate it overnight so that the dulce de leche firms up but if you’re thinking about taking a meat cleaver to the back of your neighbor’s head for parking in front of your driveway again, by all means–dig in immediately!

*You can find dulce de leche on the Mexican foods aisle at your supermarket in a can the size of sweetened condensed milk.  If you can not find any, click here for my favorite method for preparing it at home..