RSS Feed

Category Archives: Mexican

Zucchini-Beef Enchiladas

Posted on

Enchiladas are one of my favorite foods, but they are a bit filling and heavy for summer fare.  I had a few zucchini to use up, and decided to try adding one to enchiladas.  Worked great, added some low-calorie nutrition & a little extra texture without detracting from the yummy flavor.  These were a hit, and we all liked them so much, I know I will never make my Mom’s Beef and Cheese Enchiladas without zucchini added in again.  And pssst: you can totally “bake” these in the microwave – doesn’t take long, just until the cheese is melted.

Zucchini-Beef Enchiladas

Printable recipe
Printable recipe with picture

1 tablespoon olive oil
1 medium zucchini, quartered & chopped
1 lb lean ground beef
2 1/2 tablespoons homemade taco seasoning (or 1 packet store-bought)
2 tablespoons water
15 corn tortillas
1 (8 oz) package cheddar cheese, finely shredded
1 (19 oz) can red enchilada sauce

Preheat oven to 350F. Spray a 9×13 dish with cooking spray and set aside.

Heat skillet over medium-high heat and add olive oil, swirling to coat bottom of pan.  Add the zucchini and cook about ten minutes, stirring often, or until soft.  Remove to a plate, then add the ground beef and cook until browned.  Drain and add taco seasoning, water, and the cooked zucchini.  Stir well and cook a few minutes longer. Remove from heat.

Wrap four tortillas in a damp paper towel and microwave for 30 seconds. Set aside a cup of the cheese to use for the top. Take tortillas one at a time, keeping the others wrapped, and put a little cheese in a line down the middle, then some of the beef mixture, about 2-3 tablespoons. Roll up tight and place in prepared dish. Repeat, warming additional tortillas as necessary, until all the filling is used. Pour enchilada sauce over the top, then sprinkle the remaining cheese over. Cover with foil and bake about 30 minutes, or until cheese is melted.

Veronica’s note: I know it’s so much easier to buy pre-shredded cheese, but you just will never get the same glorious melt that you get with cheese you’ve shredded yourself. It’s worth the few minutes and extra clean up. Also, if you’d like to “bake” these in the microwave, it’s best to divide the recipe between two smaller microwave-safe dishes. Keep an eye on it and just let it go until the cheese is melted – should take five minutes or less. I prefer to do a few at a time on a plate.

Smoky Red Lentil Chili {vegan}

Posted on

This was the chili I made the Sweet Buttermilk Cornbread to go with last week.  It was the smoky factor that called to me when I saw it on Tami’s blog, and it didn’t disappoint! I upped the spicy factor to suit our tastes and it was just wonderful.  The only change I would make next time is to take the suggestion to run the red peppers through the food processor (and use two red peppers instead of one orange-lol), because I imagine that makes the chili thicker and more red and visually appealing.  I wasn’t reading the recipe closely and just diced the peppers as I usually do, which was fine, but I look forward to trying it the recommended way.

And don’t be scared of the lentils! I personally have a distaste for regular lentils, but red lentils are totally different and do not have that earthy flavor to them at all.  I found mine at a Lebanese market (you can get them at N & J Cafe’s market here in Wichita), and hope you’ll be able to find them in your area too.  So much tastier than regular lentils, IMO.

This chili has a wonderful balance of flavors and I was impressed that the creator even thought to add vinegar, something I’ve never added to chili, but somehow it’s perfect here.  You won’t really notice it, but it did need some tang to balance everything.  So good, you won’t even miss the meat.

Smoky Red Lentil Chili

Printable recipe
Printable recipe with picture

2 ounces dates (approximately 9 Deglet Noor)
1 pound red lentils (they look orange in the package)
7 cups water, divided
2 14.5-ounce cans diced tomatoes (fire roasted preferred)
1 6-ounce can tomato paste
1 large chopped onion
2 large red bell peppers, finely chopped*
8 cloves garlic, finely minced
¼ cup apple cider vinegar
1½ tablespoons dried parsley
1½ tablespoons dried oregano
1½ tablespoons chili powder
2 teaspoons smoked paprika (different than regular paprika)
1 teaspoon salt
½ teaspoon chipotle chile powder (or more to taste – I used 1 teaspoon)
¼ teaspoon crushed red pepper flakes (or more to taste – I used 1 teaspoon)
scallions or Faux Parmesan – optional (for topping at the end)

Blend the dates in one cup of the water until smooth (unless you have a water-tight food processor, use a blender, or the liquid will fly out. Lesson learned the hard way by me). Place the puree, along with all remaining ingredients in a stock pot and bring to a boil. Reduce heat to medium and simmer for 20 minutes, or until lentils are soft. Alternatively, you can cook in an electric pressure cooker and cook on high for 10 minutes, or in a slow cooker on low for 8 hours. Sprinkle with chopped scallions or Faux Parmesan and serve with baked tortilla chips or over a baked potato if desired.

*Chef AJ’s note: I like to use the food processor so it’s almost a puree.

*Veronica’s note: If you live in Wichita, go to The Spice Merchant for the smoked paprika and chipotle chile powder – you will pay much less than you would for the pricey McCormick spices, and they’re just as good!

Yield: 8 servings

Recipe source: Nutmeg Notebook, originally from Unprocessed by Chef AJ.

Creamy Green Chile Chicken Enchilada Casserole


Wow, that title is a mouthful!  Sometimes it’s hard to stick to a two or three-word recipe name when there’s so much goodness going on with it.  I had to tell you this was creamy, because that’s one of the best features of this dish.  I had to tell you it features green chiles, both straight up and in salsa verde, because the flavor profile this creates with the creamy & cheesy ingredients is rockin’.  And it’s a chicken enchilada casserole so I couldn’t exclude those words.  For your sake, I didn’t mention the beans in the title, though I was tempted to call this “Creamy Green Chile Chicken & White Bean Enchilada Casserole.”  You gotta draw the line somewhere, am I right?

Pretty much everything I eat right now seems like the best thing I’ve ever eaten in my life.  So maybe it’s not true that this is the best thing I’ve ever eaten in my life, but it sure felt that way while I was eating it.  It’s filling (yay for protein, fat and fiber! hehe), which made me so sad because I wanted to eat the whole casserole, in one sitting, all by myself.  It seriously rocked my world.  I was so excited to serve it to my husband (we hardly ever eat dinner together, and on this occasion I actually ate before him, which is unusual since he usually gets off work before me) and I tried not to lean over his shoulder to gauge his reaction.  But I kinda did.  He never gets excited about food like I do, but he said it was “really good” and ate a huge plateful rather quickly, then went back for more.  I’d say that’s a big two thumbs up from the Den man!

There’s pepper in this dish, but the black flecks come mainly from the roasted salsa verde, linked to in the recipe.

I based the recipe off of my favorite Creamy Chicken Enchiladas, and maybe it’s just that I haven’t had them in over a year (so many recipes, so little time), but I do believe this green casserole version is even better than the original enchiladas.  All I know is it’s good, and I would definitely make it for company!

Creamy Green Chile Chicken Enchilada Casserole

Printable recipe
Printable recipe with picture

1 ½ lbs. boneless, skinless chicken breasts
1 medium onion
2 tablespoons butter
1 (7 oz) can chopped green chiles
½ cup salsa verde (I used Walmart’s World Table Roasted Salsa Verde, which I highly recommend)
1 (15.5 oz) can white beans (such as navy or Great Northern), drained and rinsed
1 cup light sour cream
1 (10.5 oz) can light cream of chicken soup
1 ½ cups Monterrey Jack, divided
1 ½ cups Cheddar, divided
*OR 3 cups shredded Mexican cheese blend substituted for both cheeses
½ teaspoon garlic powder
¼ teaspoon salt
¼ teaspoon black pepper
8-10 white corn tortillas, quartered
Butter for pan

Preheat oven to 350 degrees F. Grease a 13×9 pan with butter and set aside.

Salt your chicken breasts and cook them in a skillet or grill (I use my George Foreman). Allow to cool enough that they won’t burn your hands, then chop them up; set aside.

While the chicken is cooking, heat a skillet over medium-high heat and chop up your onion. Melt the butter in the heated skillet and add the onions, sautéing until softened. Stir in the green chiles and salsa verde and cook for 3-5 more minutes to cook off some of the liquid. Add the chicken, white beans, sour cream, cream of chicken soup, 2 cups of the cheese (reserve the rest for the top), garlic powder, salt, and pepper.  Stir together until well blended and cheese is melted.

Spread a small amount of the chicken mixture over the bottom of your prepared pan, then put a layer of the quartered tortillas over it, slightly overlapping. Spread half of the remaining chicken mixture over the tortillas, then another layer of tortillas, and finish with the remaining chicken mixture. Sprinkle the reserved cheese over the top, then cover with foil that has been sprayed with cooking spray to keep the cheese from sticking (or use the nonstick foil). Bake for 15 minutes, remove foil, and bake another 5 minutes or until bubbling around the edges. Let sit 10 minutes before cutting.

Veronica’s notes: I highly recommend shredding your own cheese, as the preshredded kind doesn’t melt as well and IMHO, does not taste as good. You will need ¾ of an 8 ounce block of both cheddar and Monterrey Jack for this recipe (every 8 oz block makes 2 cups of shredded cheese). The tortillas are super simple to cut into quarters if you layer five tortillas and use a pizza cutter on them, or a chef’s knife. Also, this would make an excellent meatless meal if you just replace the chicken with another 2-3 cans of white beans.

A Veronica’s Cornucopia original, with help for transforming it into a casserole from 4 Little Fergusons

Taco Chili

Posted on

Usually on the rare occasion I ask Dennis if he will make something while I’m at work, I get the irritated face.  The “I hate to cook why must you torture me?” face.  The “wouldn’t you rather me rather scrub the toilet and clean the sink drain out by hand instead?” face.  Cooking just isn’t his thing.  It stresses him out.

But chili is another story.  It’s what he lived on as a bachelor and may be the only thing that he really likes to cook.  I handed him the recipe for this with instructions for adapting it to what we had, preparing myself for the sound of grinding teeth (worst sound ever!), but there was no teeth grinding and he didn’t even frown a little.  He actually seemed excited.  It was like I’d been speaking a foreign language all these years and I finally communicated something he understood.  Even better, he reported that he “really enjoyed” making it.  I think his enjoyment translated into the final product because this chili is incredible!  It’s very simple, but oh so good, and if you top it with sour cream and cheese and scoop it up with tortilla chips, you get the total deluxe taco effect. :)

Taco Chili

Printable recipe
Printable recipe with picture

1 lb. ground beef
1 envelope taco seasoning (or 2 1/2 tablespoons homemade taco seasoning)
1 (16 oz) can black beans, drained
1 (16 oz) can kidney beans, drained
2 garlic cloves, minced
1 medium onion, chopped
1 jalapeno pepper, minced
1 green bell pepper, chopped
10 oz package frozen corn kernels (Dennis used fire-roasted frozen corn)
1 (8 oz) can tomato sauce
1 (28 oz) can diced tomatoes
1/4 cup chopped fresh cilantro
Optional toppings: Additional cilantro, shredded cheese, chopped tomatoes, chopped scallions, sour cream, crushed tortilla chips, etc.

Brown the ground beef in a skillet over medium heat; drain.  Combine with remaining ingredients in a large pot  and stir together.  Bring to a boil, then reduce heat and simmer until you can stand it no longer.  (Dennis simmered his for one hour.)  Serve hot with optional toppings.

Veronicas note: There’s no need to remove the seeds from the jalapeno, unless you are very sensitive.  Dennis left half the seeds in and this was a mild chili.

Recipe source: adapted from The Comfort of Cooking

Quick Veggie Quesadillas

Posted on

Secret Recipe Club

This month for the Secret Recipe Club, I was assigned to Itzy’s Kitchen.  Erica lives a healthier lifestyle than I’m living now (she’s a fitness instructor and has lots of yummy, healthy eats on her blog), so browsing her blog got me back into the “healthy thinking mode.”  I wish I didn’t have a switch that was either turned to “healthy” or “totally heart-clogging, butt dimple-building unhealthy,” but unfortunately, this is my history.  I have decided to ease myself back into healthier eating as I need to lose the fifteen or twenty pounds I’ve gained since going off the rails in March, and Erica helped me do that.

I have been making quick stove top meals often this summer, and I was happy to find her recipe for veggie quesadillas because they were 1) healthy, 2) quick, ad 3) easy.  Perfect summer eating.

We really enjoyed these, especially dipped in salsa.  They come together so fast and easy and I know I’ll be making this again.  FYI, if you have leftover filling, it’s great as a hot dip mixed with salsa with cheddar melting on top. But maybe not as healthy if you use as many tortilla chips as I did. >:)

Quick Veggie Quesadillas

Printable recipe
Printable recipe with picture

1 (15 oz) can black beans, rinsed & drained well
1 (11 oz) can Mexican style corn (or 14.5 oz regular corn), drained well
1 teaspoon chili powder, or to taste
¼ teaspoon cumin
Optional: 1 cup additional vegetables
8 oz. cheddar cheese, shredded
8 flour tortillas (soft-taco size)
Salsa & sour cream for serving

Mix the black beans, corn, chili powder & cumin. If you’d like to add any other vegetables (I added onions), cook them in a skillet until softened and stir into the bean & corn mixture. Place one tortilla in a skillet over medium heat (you can oil the skillet if you like, but I didn’t) and sprinkle no more than ½ cup cheese over it, then scatter no more than ½ cup of the bean mixture over the cheese. Top with another tortilla. Once the cheese is melted on the bottom, about two minutes, carefully flip the quesadilla over and cook for an additional two minutes to heat through and crisp up the other tortilla. Remove to a plate and cook the remaining three quesadillas. Cut each into 6 triangles and serve with salsa and sour cream, if desired.

Recipe source: adapted from Itzy’s Kitchen


A special thank you to my friends Kriss and Nicole for generously giving me the Japanese steak plates pictured in this post, along with  many other dishes that will be gracing my blog in the future.  They are moving their family to Japan this week and not taking much with them, so I was the happy recepient of much of their dishware. It’s hard to say goodbye and feel like I have to do it too often (Japan has already stolen one of my friends!), but I wish you guys the best!

Fresh Mild Salsa

Posted on

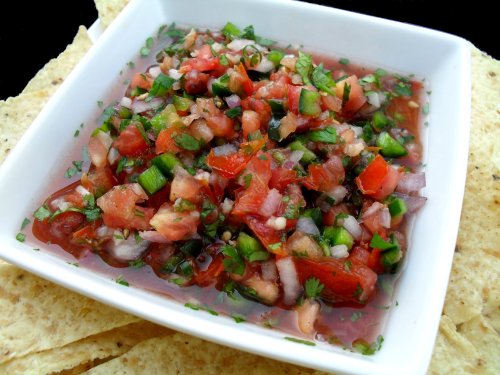
The secret ingredients chosen for the Holiday Recipe Club‘s Cinco de Mayo blog hop were dulce de leche, tomatoes, and chorizo.  For last month’s Easter blog hop, I went crazy and put a lot of effort into creating something with all three secret ingredients (carrot cracker treats with carrots, spinach, and eggs).  This month, I’m totally cheating and taking the easy route by using this as an excuse to finally post my fresh salsa recipe that I won third place for at the fair last year.

My inspiration for the recipe came from my sister, Danielle, who usually only makes recipes that turn out things like soap, lip balm, or bath fizzies.  But one edible thing she does make, and well, is fresh salsa.  Her secret ingredient is orange juice, and while I didn’t follow her original recipe to a T, I did make sure to use some fresh orange juice in it. I also replaced the jalapeño with poblano, which is a mild pepper, sort of like a bell pepper with just a bit of kick to it.  (I love spicy food but I was making this salsa for the “mild” category.  The salsa also had to use fresh ingredients, which is why I didn’t just make my favorite salsa.)  If you’d like a hotter salsa, dice up some seeded jalapeño instead!

The judges loved my salsa, but said it had a bit too much garlic, so I’ve adjusted the recipe to up it to blue ribbon status by cutting the garlic from four cloves (hey, what can I say, I love garlic!) to two (the amount in Dani’s original recipe–I should have listened to the expert!).  But as with all recipes, just add amounts to suit your own tastes!

Fresh Mild Salsa

Printable recipe
Printable recipe with picture

6 medium fresh tomatoes on the vine
1 poblano pepper, seeded and finely diced
½ large red onion, finely diced
½ a bunch of fresh cilantro, finely chopped
1-2 cloves fresh garlic, minced
Juice from ½ a lime, ½ a lemon, and ½ an orange
1 teaspoon salt
¼ teaspoon freshly grated pepper

Finely dice the tomatoes, removing the seeded pulp as you go, and place them in a wire mesh sieve set over a bowl to drain for five minutes. Discard juice, then stir the tomatoes and all other ingredients together in a large bowl. Store in the refrigerator.

Makes 2 pints.

Recipe source: adapted from Danielle Davis

Check out the other Cinco de Mayo recipes in the blog hop by clicking below!


Fiesta Chicken & Southwest Cornbread Casserole

Posted on

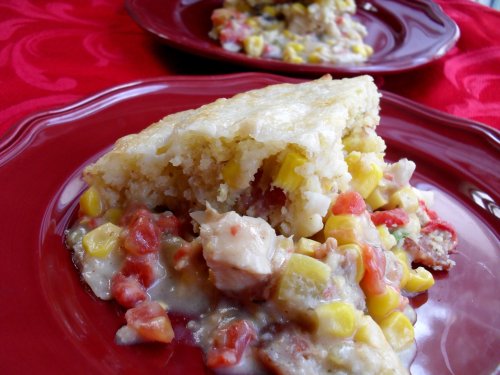
Oy, the ugly deliciousness of a casserole! I know there are amazing photographers that can make a scoop of casserole look great on a plate, but that has never been my fortune. As you can tell. Check out my King Ranch Chicken Casserole if you need further proof. Barfola.

All I have to say is, don’t judge a book by its cover. My buddy, Marina, submitted this recipe last year when I was hosting the BSI contest on my blog, and I ended up making it as soon as she sent it. After reading through it, I think you’ll see why I had to make it ASAP. Seriously–look at the ingredients in the recipe below.  Whipping cream, butter, bacon grease and bacon?  There is enough fat in there to make Paula Deen die a happy death.

Believe me, this casserole is in-cre-di-ble. Please make it and judge it by the flavor, not my photo skills. :)

Fiesta Chicken & Southwest Cornbread Casserole

Printable recipe
Printable recipe with picture

½ cup onions, chopped
½ cup butter
½ cup flour
1 (10 oz) can cream of mushroom soup
1 cup whipping cream
2 cups chicken broth or stock
3 tablespoons Tabasco Green Pepper sauce (optional)
4 cups cooked chicken breast, chopped
1 (10 oz) can Ro-Tel tomatoes, drained
1 (11 oz) can Mexicorn, drained
1 (4 oz) can chopped green chilies
Southwest cornbread (recipe follows)
1 cup grated Monterrey Jack cheese

SOUTHWEST CORNBREAD:
1 ½ cup flour
½ cup yellow cornmeal
2 tablespoons sugar
2 tablespoons baking powder
½ teaspoon baking soda
½ teaspoon salt
1 to 1 1/2 cups buttermilk
1/4 cup bacon dripping
1 large egg
1 cup yellow kernel corn, drained
10 slices crisp bacon, crumbled
1 (4 oz) can Ortega chopped green chilies
½ cup minced green onions
½ cup grated Monterrey Jack Cheese

Preheat oven to 400 degrees F.

Sauté onions in butter until soft. Add flour and blend well. Add soup, whipping cream, broth, and Tabasco green pepper sauce (if using). Cook until thick. Add chicken, tomatoes, corn and chilies.Pour chicken mixture into a large deep 13-inch casserole baking dish and set aside.

Mix the first 6 ingredients for the Southwest Cornbread together and set aside.  In a separate small bowl, beat together the buttermilk, bacon dripping and egg.   Stir in dry ingredients only until moistened: DO NOT OVER MIX. Batter will be lumpy. Stir in corn, crumbled bacon, chilies, onions and cheese.  Spoon batter over the top of the casserole and spread to edge of casserole covering chicken completely. Sprinkle with 1 cup of Monterrey Jack cheese.

Bake in preheated oven for 20 to 25 minutes. Allow to stand for 5 to 10 minutes before serving so it can set up a little.

Serves 9-12

Warm Chorizo & New Potato Salad

Posted on

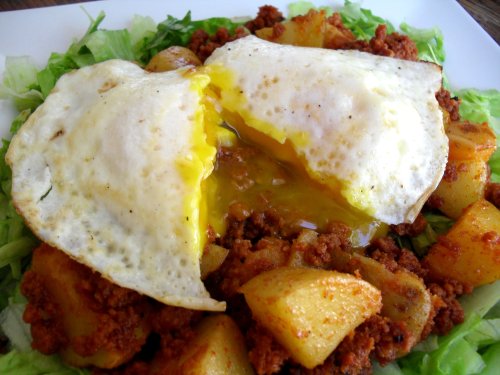
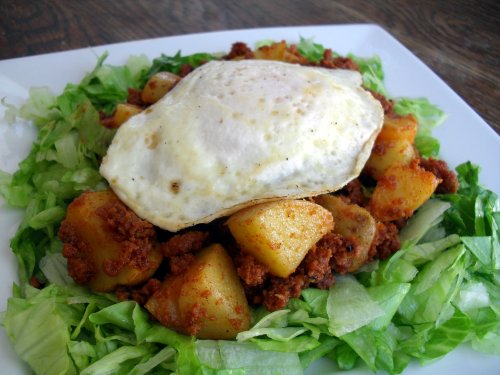
This is a very simple summer-friendly recipe that is also, shockingly, husband-friendly. My poor man just does not get the amount of meat and potatoes he believes he requires, so when I served him this salad, he was so ecstatic to be eating meat and potatoes, that he didn’t even care there was a bed of lettuce underneath.

The meat and potato mixture is substantial and satisfying, but I really think you need the egg on top to complete the salad. Jenna said it was optional, but I’m not going to tell you that. You need the warm yolk to run out over the salad and serve as a dressing. It really pulls the whole thing together quite nicely.

Warm Chorizo & Potato Salad

Printable recipe
Printable recipe with picture

1.5 lbs new, red, or gold potatoes (I used gold)
Salt and pepper to taste
15 oz chorizo sausage
16 oz mixed salad greens or shredded lettuce
1 lemon
4 poached or over-easy eggs

Bring a pot of salted water to a boil. Meanwhile, cut the potatoes into bite-size chunks; add to the water and once boiling, reduce heat a bit and continue to boil until fork-tender, but not mushy. Meanwhile, start your sausage to cooking. Add to a skillet and cook over medium heat, breaking it and crumbling with a spatula as you go. Remove from heat if it gets done before your potatoes are ready. Once the potatoes are tender, drain and add to the sausage. Stir well and cook another minute or two. Season with salt and pepper. Divide salad greens among four plates, then divide sausage and potatoes on top of each. Top with a poached or fried egg and serve immediately.

Recipe source: slightly modified from Jenna’s Everything Blog

Beef and Cheese Enchiladas & How to shred lettuce or cabbage

Posted on

I often say that I was raised in a “health food only home,” but that isn’t completely true.  If it were, I would have starved to death before I ever started kindergarten.  The sad fact is that as a child, I hated everything healthy and loved everything else.  My Mom still has a note from me, written in third grade, in which I thanked her for being a wonderful Mommy but asked if we could please have pizza sometimes.  LOL!  Needless to say, I went hungry most nights and gorged myself when we were allowed to have spaghetti (this was junk food to us), cheese sandwiches, or Mom made enchiladas.  She didn’t do it often, but it was one of my favorite meals that she made. To this day, enchiladas are my favorite meal.

Mom made them very simply.  She made taco meat and rolled it up with cheddar cheese in corn tortillas.  She made red enchilada sauce from a mix and always stirred in a liberal amount of cilantro.  She dipped each tortilla in the hot sauce before filling them, which made it a very messy procedure.  She poured the leftover sauce over the top, topped with more cheese, and that was it.

I updated the recipe to simplify things, using canned sauce and stirring the cilantro into the beef mixture instead, and decided to top them with lettuce because my husband has always insisted this is the proper way to serve enchiladas.  I fought this for a long time, because Mom knows best and she never served hers with lettuce, but I finally saw the light.  Lettuce really freshens up this cheesy dish.  Even with the changes, these are still very much like my Mom’s enchiladas, which makes me happy.  Don’t we all love foods that remind us of our childhood homes?

Beef and Cheese Enchiladas

Printable recipe
Printable recipe with picture

1 lb. lean ground beef
1 medium onion, diced
2 tablespoons homemade taco seasoning (or a packet of store-bought)
½ cup cilantro
2 (8 oz) packages sharp cheddar cheese
16 corn tortillas
2 cans red enchilada sauce
½ head lettuce, shredded
Sour cream to garnish (optional)

Preheat oven to 350 degrees. Spray a large baking dish with cooking spray, then cover the bottom with a thin layer of enchilada sauce, about half a can. Set aside.

Cook beef and onion together in skillet over medium-high heat until meat is browned. Do not drain. Stir in taco seasoning and cook another minute, until liquid is absorbed. Remove from heat and stir in cilantro. Shred both packages of cheese and set half aside in the refrigerator. Dampen a paper towel and squeeze out water; wrap around a stack of five tortillas and microwave one minute or until hot and pliable. Place stack on a plate. Now you have everything you need to put the enchiladas together.

Place about two tablespoons of cheese down the middle of a tortilla, then top with 3 tablespoons of the beef mixture.  The temptation is always to overfill them, but you must resist.  Overfilled enchiladas means unsightly enchiladas that won’t close, and we want to keep things nice, tidy, and appealing.

Roll tightly and place in prepared dish.

Repeat, heating fresh stacks of tortillas as necessary, until all ingredients are used and dish is full of enchiladas.  I always have to scooch my enchiladas to make them fit, but scooch they will. :)

Pour remaining sauce over the top, then sprinkle on reserved cheese. I was short on cheese but if you follow the recipe, yours will be fairly smothered with cheese.  Which is proper.  This sad amount of cheese is sacrilege.

Cover with foil and bake 30 minutes. Remove foil and bake another 5-10 minutes, until cheese is melted.

After plating, sprinkle with lettuce and add sour cream, if desired.
Devour.

**********************************************

I’m sure many of you know how to shred lettuce, but I get very basic questions about cooking from time to time, including how to prep veggies, and thought I’d give a quick tutorial on this for those who don’t.  You can also use this method to shred cabbage for coleslaw.

Cut thin slices of lettuce starting from the outside edge, working your way towards the center.  Do not go all the way to the core.

Once you are getting close, turn the lettuce and start from the opposite side.

It is very important that you wear your Tweety bird pajama shorts during this process.  Arg!  I changed my shirt so you guys wouldn’t know I wore my PJ’s all day (it was my day off and I spent it cleaning), and didn’t think that my shorts would show above the table.  On the plus side, I guess I’m taller than I thought I was. :)

Continue until you have sliced away on all sides, then do the top.  Discard the core.

I didn’t cut very much off the core because I didn’t need a ton of lettuce.  Usually I would cut down a lot more.

You should have a row of sliced lettuce.  Chop along the row in 1/2″ increments, or smaller.

Turn your cutting board/sheet and repeat in the perpendicular direction, slicing every 1/2″ or so.

If you want your lettuce shredded even more finely, mix the lettuce with your hands, spread out in a line again, and repeat the cutting in both directions.

Voila!  Shredded lettuce.

Corn, Avocado, and Black Bean Tostadas

Posted on

For some reason, before I made these tostadas, I had an aversion to chipotle peppers that came canned in adobo sauce.  I think I made one bad dish with them that turned me off, and I was hesitant to use them in anything again.  This recipe has completely turned me around!  These are the absolute best tostadas I’ve ever made.  I love how the sweet corn balances the smoky and spicy flavor of the chiles.

I really love it when I can find vegan meals that don’t require a lot of fake ingredients, and love it even more when those meals are just as delicious as a meat-centric meal.  I have to say that these tostadas beat the pants off of any tostada I’ve made with meat to date.  Although I did put cheddar cheese on these, you can leave it off for a vegan meal because you get plenty of (healthy) fat from the avocado.

This is a great summer meal because it comes together really quickly and only requires a few minutes of heat on the stovetop.  Enjoy!

Corn, Avocado, and Black-Bean Tostadas

Printable recipe
Printable recipe with picture

1 large zucchini, diced
2 cups frozen corn kernels
2-3 medium tomatoes, diced
1/3 cup red onion, chopped
¼ cup cilantro, chopped
2-3 chipotle chiles in adobo sauce, minced
2 tablespoons fresh lime juice
½ teaspoon kosher salt
8 tostada shells
1 cup refried black beans*
Shredded lettuce
1 avocado, peeled & sliced
1 cup shredded cheddar cheese

Spray a large nonstick skilled with oil and heat over medium-high head. Add zucchini and sauté 3 minutes. Add corn and cook until heated through. Remove from heat and stir in tomatoes, onion, cilantro, chipotle chiles, lime juice, and salt. Spread each tostada shell with 2 tablespoons of heated beans and top with shredded lettuce. Spoon corn mixture over lettuce, then top with shredded cheddar and slices of avocado.

*To make your own quick refried black beans, drain a can of black beans and reserve the liquid. Place beans in a food processor fitted with the blade attachment, along with 1 teaspoon cumin, 1/2 teaspoon onion powder, and 1/4 teaspoon garlic powder. Process, adding in liquid through the feeding tube as necessary to obtain your desired texture. Taste and add salt, pepper, and additional seasonings if desired.

Makes 8 tostadas.

Per tostada: 235 calories; 11.6 g fat; 27.5 g carbohydrates; 5.4 g fiber; 8.6 g protein; 6 Points Plus

Recipe source: adapted from Redbook, October 2010

Secret Recipe ClubThis recipe has actually been recreated twice by the SRC. Here is the first blogger who made it (click the box above for the second): Thru the Bugs on My Windshield