RSS Feed

Tag Archives: vegetarian

Curried Red Lentil Soup


Yes, this really is a soup recipe, despite the thick chili-like images accompanying my post. This is what happens on day two to the soup, which I couldn’t photograph when it was still soup-like, because I made it at night and when I take photos of soup at night, I end up with freaky purple beans…

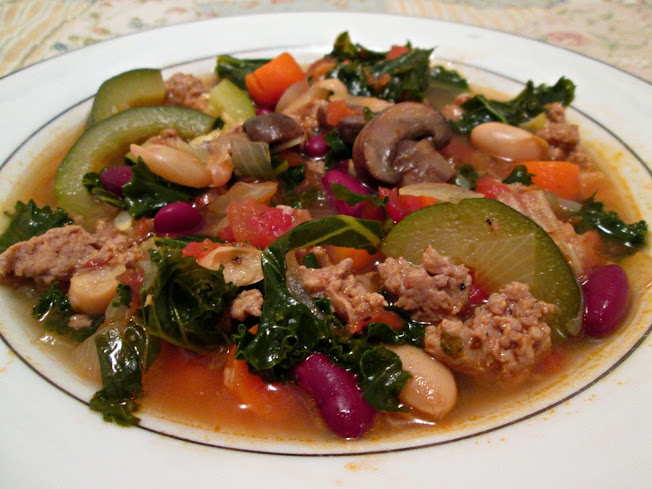
This chili-looking soup is so delicious, and easy enough that you can make it with an infant vying for your attention. Which is what I did last June. And I photographed it on the concrete rather than the grass (I’m all about simple backgrounds), because I knew I was going to blog it during the winter, and didn’t want the green grass to alert you guys that I’ve turned into a hot soup in summer person.  But now I’ve gone and told you anyway. Secrets can be so hard to keep. ;)

I used to detest hot soup in the summer, but it seems my pregnancy changed that permanently for me. I also continue to enjoy mustard more than ketchup, which is way cray. I never understood mustard people, and now I’m one of them. No one warned me that having a baby might make me join the mustard people for good. I still don’t know how I feel about this.

Anyway, this is a really good soup. And easy. And you should make it.

Curried Red Lentil Soup

Printable recipe
Printable recipe with picture

1 cup red lentils, rinsed
2 (14 oz) cans (3 ½ cups) chicken or vegetable broth
2 tablespoons butter
1 onion, chopped finely
3 cloves garlic, minced
1 tablespoon grated fresh ginger
1 tablespoon curry powder
1 (14.5 oz) can roasted diced tomatoes, undrained
2 tablespoons minced cilantro
½ cup plain yogurt
Salt and pepper, to taste

Microwave the lentils and 2 cups of broth about 8 minutes, until liquid is mostly absorbed.

Melt the butter in a large pot. Add the chopped onion and cook for 5 minutes, until softened, stirring occasionally and adding salt and pepper as it cooks. Add the garlic, ginger and curry powder, and stir for 30 seconds.

Add the microwaved lentil mixture to the pot along with the rest of the broth and the tomatoes. Simmer for 15 minutes. Taste and re-season as needed.

Serve the individual portions with a dollop of yogurt and a sprinkle of cilantro. Enjoy!

Recipe source: slightly adapted from Jenna’s Everything Blog

Some more Indian-ish faves…

Bean Curry – really so good! I don’t know why I never remember to make my black eyed peas this way on New Years day, it’s one of the most delish ways to enjoy them.

Dal Makhani with Baked Saffron Rice – another goodie I nabbed from Jenna’s blog.

Lighter Chicken Tikka Masala – can’t tell you how many times I’ve made this one. One of my all-time favorites!

Sweet Potato Pizza

Posted on

Although my favorite pizza isn’t fancy or interesting (supreme with regular ol’ pizza sauce), I do love to try new things and this recipe, found in the latest Taste of Home magazine, called to me.  My husband doesn’t like sweet potatoes and I have this weird thing where if he doesn’t like something, I try to find a way that he will enjoy it.  I want everyone to like the things I like – I’m a control freak like that. ;)

Anyway, he hates eggplant even worse than he dislikes sweet potatoes, and I once got him to enjoy it on a pizza, so I figured it would work with sweet potato too.  I was right!  He might not have enjoyed it as much as our mutually loved supreme pizza, but he gobbled it up and said “it’s good” when I asked what he thought, so I count this as a success.  :)

Sweet Potato Pizza

Printable recipe
Printable recipe with picture

2 tablespoons extra virgin olive oil, plus extra for pan
1 clove garlic, minced
1 medium sweet potato, about 10 oz.
2 tablespoons water
1/4 teaspoon salt
1/4 teaspoon coarsely ground black pepper
1 tube (13.8 oz) refrigerated pizza dough*
8 oz. mozzarella cheese, shredded*
1/4 cup grated Parmesan cheese
1/4 teaspoon dried thyme
1/4 teaspoon dried rosemary, crushed

In a small microwave-safe bowl, stir the olive oil and garlic together; microwave for 30 seconds and set aside to infuse while preparing pizza. Preheat oven to 450F. Rub plain olive oil over a large 14″ pizza pan; set aside.

Peel the sweet potato and cut into 1/4-inch slices. Cut each slice into 1/2-inch wide strips; place in a microwave-safe dish and add the water. Cover and microwave on high 3-4 minutes, or until potato is almost tender. Drain; sprinkle with salt and pepper and toss together gently.

Unroll pizza dough and press to fit prepared pan. If desired, pinch edge to form a rim. Sprinkle with the mozzarella cheese and one tablespoon of the garlic olive oil. Top with sweet potato and sprinkle with the herbs. Drizzle with remaining tablespoon of garlic oil and sprinkle on the Parmesan cheese. Bake on lowest oven rack 12-15 minutes or until crust is golden and cheese is melted.

*Veronica’s notes: if you prefer to make your own crust, go for it! This is my favorite whole wheat crust. The original recipe called for 1 cup of mozzarella and 1 cup of fontina cheese, but I couldn’t find the latter and went with all mozzarella.  I’d definitely encourage you to try it with fontina if you can find it – I’m sure it’s even better that way!

Recipe source: adapted from Taste of Home Feb/March 2014, sent in by Libby Walp of Chicago, IL

Lookin’ for more pizza with pizzaz? Here are a few of my personal favorites:

Shrimp & Bacon Ranch Pizza

Fresh Vegetable Pizza

Cheeseburger Pie

Barley with Butternut Squash, Apple & Onion

Posted on

This is one of the “meals” (it’s really a side dish but I like to eat it as a meal) I’ve been making for years and usually resurrect come fall/winter.  My family absolutely loves it too, even my little nephew (or at least he did at 4 years old, the last time he ate it)!  I appreciate delicious vegetarian meals that satisfy me and this one fits the bill fo sho. The combination of the creamy squash, chewy barley, crisp red pepper & apple, and the contrasting savories and sweetness–it’s all just magic to me.  And I guess if a four year old boy will relish something that only contains unrecognizable healthy ingredients, it is pretty magical.

Barley with Butternut Squash, Apple & Onion

Printable recipe
Printable recipe with picture

3/4 teaspoon salt, divided
1/2 cup uncooked barley
1 tablespoon olive oil
2 cups butternut squash, peeled & diced
1 cup onion, chopped
1/2 cup sweet red pepper, diced
1 medium apple, peeled, cored, diced
1 1/2 teaspoons garlic, minced
3/4 teaspoon dried thyme
1/4 teaspoon black pepper
1/3 cup fat-free chicken or vegetable broth

Bring 3 cups of water and 1/2 teaspoon of the salt to a boil in a medium saucepan; add barley. Cover saucepan and simmer barley until tender, about 30 to 35 minutes; drain.

Meanwhile, heat oil in a large nonstick skillet over medium-high heat; add squash and cook, stirring often, until it’s starting to soften–about five minutes. Add the onion and red pepper and cook for an additional 3 minutes.

Stir in apple, garlic, thyme, black pepper and remaining 1/4 teaspoon of salt. Cook, stirring, until apple is almost tender, about 2 minutes; stir in broth, scraping bottom of skillet with a wooden spoon to loosen any browned bits. Stir in cooked barley; toss over low heat to mix and coat. Remove from heat and serve.

Serves 4, about 1 cup per serving.

Per serving: 192 calories; 4.2 g fat; 0 g cholesterol; 37 g carbohydrate; 8 g fiber; 5 g protein; 5 Points Plus

Recipe source: WeightWatchers.com

Corn, Avocado, and Black Bean Tostadas

Posted on

For some reason, before I made these tostadas, I had an aversion to chipotle peppers that came canned in adobo sauce.  I think I made one bad dish with them that turned me off, and I was hesitant to use them in anything again.  This recipe has completely turned me around!  These are the absolute best tostadas I’ve ever made.  I love how the sweet corn balances the smoky and spicy flavor of the chiles.

I really love it when I can find vegan meals that don’t require a lot of fake ingredients, and love it even more when those meals are just as delicious as a meat-centric meal.  I have to say that these tostadas beat the pants off of any tostada I’ve made with meat to date.  Although I did put cheddar cheese on these, you can leave it off for a vegan meal because you get plenty of (healthy) fat from the avocado.

This is a great summer meal because it comes together really quickly and only requires a few minutes of heat on the stovetop.  Enjoy!

Corn, Avocado, and Black-Bean Tostadas

Printable recipe
Printable recipe with picture

1 large zucchini, diced
2 cups frozen corn kernels
2-3 medium tomatoes, diced
1/3 cup red onion, chopped
¼ cup cilantro, chopped
2-3 chipotle chiles in adobo sauce, minced
2 tablespoons fresh lime juice
½ teaspoon kosher salt
8 tostada shells
1 cup refried black beans*
Shredded lettuce
1 avocado, peeled & sliced
1 cup shredded cheddar cheese

Spray a large nonstick skilled with oil and heat over medium-high head. Add zucchini and sauté 3 minutes. Add corn and cook until heated through. Remove from heat and stir in tomatoes, onion, cilantro, chipotle chiles, lime juice, and salt. Spread each tostada shell with 2 tablespoons of heated beans and top with shredded lettuce. Spoon corn mixture over lettuce, then top with shredded cheddar and slices of avocado.

*To make your own quick refried black beans, drain a can of black beans and reserve the liquid. Place beans in a food processor fitted with the blade attachment, along with 1 teaspoon cumin, 1/2 teaspoon onion powder, and 1/4 teaspoon garlic powder. Process, adding in liquid through the feeding tube as necessary to obtain your desired texture. Taste and add salt, pepper, and additional seasonings if desired.

Makes 8 tostadas.

Per tostada: 235 calories; 11.6 g fat; 27.5 g carbohydrates; 5.4 g fiber; 8.6 g protein; 6 Points Plus

Recipe source: adapted from Redbook, October 2010

Secret Recipe ClubThis recipe has actually been recreated twice by the SRC. Here is the first blogger who made it (click the box above for the second): Thru the Bugs on My Windshield

Bean Curry

Posted on

I have secrets.  Delicious secrets.  There are many recipes I’ve made, a few that I’ve won ribbons for, that I’ve never shared.  (Not on purpose, mind you, I just forget!)  But I can hide this one from you no longer.  I stumbled across this old picture in my Garam Masala post while I was indexing all my recipes, and since it seemed so bright and cheerful I thought it would be a nice one to share with you now that the weather is bright and cheerful.

This was one of the first Indian dishes I ever made.  In fact, I think it was THE very first.  I can still remember the delicious flavor and how taken I was with the dish at first bite.  I know it seems strange to use black-eyed peas in a curry dish, but I promise you, it works.  I may keep secrets, but I wouldn’t lie to you.  This curry is fantastic!

Bean Curry

Printable recipe
Printable recipe with picture

1 tablespoon canola oil
1 onion, chopped
3 cloves garlic, finely minced
1 teaspoon freshly grated ginger
1 large tomato, chopped
1/2 teaspoon turmeric
pinch cayenne, or to taste
1/2 teaspoon salt
1 teaspoon paprika
1 teaspoon Garam Masala
3/4 cup half and half
1 cup vegetable stock or chicken broth
1 can black-eyed peas, lightly drained
2 tablespoons chopped fresh cilantro

Heat oil in a large skillet over medium heat. Add onion; saute 5 minutes or until translucent and slightly browned. Stir in garlic and grated ginger root; stir constantly for 30 seconds. Add tomato; cook for 2 minutes. Stir in turmeric, cayenne, salt, paprika, and garam masala; stir constantly for 30 seconds. Add half and half, stock, and black-eyed peas. Reduce heat and simmer 5 minutes, stirring occasionally. Stir in cilantro. Serve immediately with rice, chapati, or naan. Although it doesn’t show in the picture, the curry has plenty of sauce to go over your rice.  I recall draining it off for this plate to make a better picture.  That doesn’t count as a lie…does it? ;)

Makes 4 servings.  

Per serving (calculated with 1 cup white rice): 188 calories; 9.5 g fat; 23 g carbohydrates; 5 g fiber; 5 g protein; 10 Points Plus

Recipe source: Mel’s Kitchen Cafe

Mediterranean Veggie Sandwich with Pesto Hummus

Posted on

Another mouth-watering Mediterranean sandwich, bursting with fresh flavor! This recipe comes from the lovely Debbi, who was inspired by a Panera sandwich. I haven’t tried the original, but I know I like this one!

I messed up my bread (only about half my loaves ever come out right–I’m still learning) and it baked up pretty flat and wide instead of round, but if done properly with enough flour (I’m always scared to add too much), you will have a nice sandwich bread.

I know this recipe seems like a lot of work for a sandwich, but if you break down the process into steps, it’s not so bad. Make your bread one day, and make your hummus while you’re roasting the eggplant the next. Plus, it makes lots of sandwiches!

Mediterranean Veggie Sandwich with Pesto Hummus

Printable recipe
Printable recipe with picture

Tomato Basil Bread
2 1/4 teaspoons (1 package) yeast
3/4 cup warm water (110 – 115 degrees)
1/4 cup minced fresh basil, packed
1/4 cup grated Parmesan cheese
2 tablespoons tomato paste
1 tablespoon sugar
1 tablespoon olive oil
1 teaspoon salt
1/4 teaspoon crushed red pepper flakes
2 1/4 to 2 1/2 cups bread flour (I used AP)

Pesto Hummus
1 can chickpeas, rinsed and drained (water reserved)
3 tablespoons lemon juice
3 cloves garlic
1 1/2 tablespoons tahini
1/2 teaspoon salt
3 tablespoons extra-virgin olive oil
Pepper, to taste
1/2 cup (packed) fresh basil leaves
1/4 cup pine nuts, lightly toasted and cooled

Garlic-Roasted Eggplant (optional)
8 cloves garlic, minced
2 to 3 tablespoons extra-virgin olive oil
2 lb. eggplant (about 2 globe or 4 Italian)
Kosher salt
8 fresh thyme sprigs

Make the bread: In a large bowl, dissolve yeast in water. Stir in basil, Parmesan cheese, tomato paste, sugar, oil, salt, pepper flakes and 2 cups of flour. Stir in enough remaining flour to form a stiff dough. Turn onto a floured surface, knead until smooth and elastic, about 3 – 5 minutes. Place in a greased bowl, turning once to grease top. Cover and let rise in a warm place until doubled, about an hour. Punch down dough, knead for 1 minute. Shape into a round loaf. Place on a greased baking sheet. Cover and let rise until doubled about 1 hour. With a sharp knife, cut a large X in top of loaf. Bake at 375 for 35 minutes or until golden brown.

Make the hummus: In a food processor, combine all the ingredients. Add in reserved bean water slowly until desired consistency is reached.

Make the eggplant:
Mix the minced garlic and oil together in a small bowl and set aside. Slice the eggplant into rings and toss with 1 teaspoon salt. Place in a colander and allow to drain for 30 min. Heat the oven to 400°F. Line a baking sheet with parchment.
Over the sink, gently squeeze the eggplant to extract the salty juice and wipe them dry with a paper towel. Brush each half thoroughly with the garlic olive oil. Arrange in a single layer on the baking sheet. Roast for 30 minutes-1 hour. The eggplant will collapse and the bottoms will be a deep brown caramel color. Let cool considerably before handling, at least 20 min. Gently turn the cut side up. If serving as a side dish, serve with a lemon wedge for squeezing or drizzle with vinaigrette. If using in other recipes, scoop the flesh from the skin with a spoon.

For the sandwich: Spread two slices of tomato-basil bread with Pesto Hummus, then top with  lettuce, red onions, tomatoes, cucumbers, feta, and Garlic-Roasted Eggplant (if using).

Recipe source: adapted from Debbi Does Dinner and Fine Cooking

Masoor Dal with Cauliflower and Kale

Posted on

Before we get to some major Indian yumminess, I wanted to mention two things.  First, you may notice things look a bit different around here.  I changed my theme and I like it but I’m not sure it’s “the one.”   I think the header is very plain…but I’m cheap and I don’t want to pay to get fancy so this is probably as good as it gets. :) Let me know what you think!

Second, I think I caused some confusion with my post on the cake decorating competition at work.  I’m not sure how many of you saw that, but I wanted to clarify that the date on it is correct.  I wrote it two years ago on my MySpace blog, and newly copied it to Recipe Rhapsody so that I could link to it in reference to how to make a tiered cake in an upcoming post.  I posted it with the original date I wrote it, so I didn’t think any one would see it, but I started getting some comments on it so apparently it came across some of your radars!  Just wanted to clarify that it’s now old news, but I appreciate your kind words and congratulations.

Red Lentils

<image source>

Although I still have a large backlog of recipes to post, the weather is heating up again and it looks like the casseroles, soups, and pumpkin recipes will probably have to wait until next year, so I thought I’d gush (or perhaps rhapsodize would be a more appropriate word for this blog!) about the lunch I made today instead.  I’m on a mission to spring-clean my wreck of a house into sparkling submission, and I started eying the red lentils I’d purchased at a Lebanese market over a month ago while I was organizing the kitchen.

I decided I was (finally) going to make something with them, but by the time I took a break to cook,  I was starving and didn’t want to bother with looking up any recipes.  I needed a quick meal and I threw this one together in just over half an hour, so it would be great for a busy day.  While I’m usually not a good enough cook to come up with anything edible without using a recipe, I think I knocked this one out of the park, if I do say so myself!  Becoming familiar with the cuisine by cooking several Indian dishes over the last few months helped a lot.

I made a masoor dal (a thick stew made of red lentils) that is almost vegan, and could certainly be turned so by using vegetable stock in place of the water and chicken bullion.  It is spicy in the full sense of the word–with plenty of Indian aromatics and and a moderate heat index, though you can certainly reduce or increase the spiciness to your tastes.

I’m usually not a fan of lentils, but I liked this more than any lentil dish I’ve made before.  I’m not sure if red lentils have a better flavor (which I do suspect, because I detected none of the usual musky lentil flavor in this dish), or if the spices just overwhelmed it.  The tender cauliflower pieces were a perfect accompaniment, but I don’t think the kale is absolutely necessary.  I couldn’t really detect any of its flavor, and it got kind of dull & ugly during the cooking process, but I don’t think it hurts to have all that extra nutrition!  Kale has powerful  antioxidant properties and is considered an anti-inflammatory so if you have it on hand, throw it in!  If not, don’t sweat it.  The only thing I didn’t have that I really felt it needed was a little cilantro to sprinkle over the top.  I had to make do with some dried parsley.  Bummer!

I served mine with whole wheat couscous since I was in a hurry to eat (it only takes 5 minutes to make), but you can serve it with rice or bulgar or even pasta.  Whatever floats your boat!

Masoor Dal with Cauliflower and Kale

Printable recipe
Printable recipe with picture

2 cups water
2 chicken bullion cubes
1 cup red lentils
1/2 cup chopped onion
2 cloves garlic, minced
2 (8 oz) cans tomato sauce
2 teaspoons garam masala
2 teaspoons curry powder
1 teaspoon sriracha hot chile sauce, or to taste
1/2 teaspoon cumin
1/2 head cauliflower, separated into florets
2 cups loosely packed kale
2 tablespoons extra-virgin olive oil
Fresh cilantro, for garnish

In a large 3-quart saucepan, combine water, bullion, lentils, onions, and garlic; cover and bring to a boil over high heat.  Reduce heat to medium and cook for ten minutes.  Stir in the tomato sauce, garam masala, curry powder, sriracha, and cumin.  Add the cauliflower and kale, stir & cover.  Cook for 20 more minutes, stirring often to make sure the dal isn’t sticking, or until the lentils are tender.  Stir in the olive oil during the last five minutes of cooking and serve with a sprinkle of cilantro over rice or couscous.

Serves 4

Per serving: 231 calories; 8 g fat; 40 g carbohydrates; 15 g fiber; 13 g protein

Dal Makhani with Baked Saffron Rice

Posted on

I have a folder on my computer called “future blog” wherein lies all the pictures of food I’ve made that I want to post recipes for.  There are currently 150 pictures in it, which may explain why it has taken me so long to post this recipe!  I have less time time to post recipes than I used to, so I usually just scan the folder when I have a minute and pick whatever picture stands out.  Today, this one winked at me, reminding me how much I enjoyed it and how sorry I should be for having forgotten to post it sooner.

Sorry, dal makhani. You deserve better.  I’m not worthy!

Dennis (the picky eater) and I both enjoyed this Indian dish so much the first time that I ended up making it two weeks in a row, which is rare since I like to try new things constantly.  It’s a very simple recipe, but it is bursting with flavor!

Dal Makhani with Baked Saffron Rice

Printable recipe
Printable recipe with picture

Dal Makhani:
1 cup dried lentils
1 (15 oz) can tomato sauce
1 tablespoon grated fresh ginger
2 large cloves garlic, minced
1/2 teaspoon cayenne pepper, or more to taste
2 tablespoons butter
3 tablespoons heavy cream
fresh cilantro for garnish

Saffron rice:
1 cup long grain white rice
1 tablespoon butter
2 chicken bouillon cubes
½ teaspoon saffron threads
2 cups water

Place the dried lentils in a medium pot and add cold water to cover them by 2 inches. Bring to a boil and then simmer over medium heat for 20 minutes, or until the lentils are soft but not mushy. Drain and return to the pot. Place the pot on the burner again.  Add the tomato sauce, ginger, garlic, cayenne pepper, and butter. Stir and let the mixture simmer over low heat, covered, for 1 hour.

Meanwhile, make the rice: Spray a 1 ½ quart casserole dish with cooking oil and measure rice and butter into it. Heat the bouillon, saffron and water together until boiling and pour over the rice. Cover and bake 30 minutes.

Taste the dal makhani mixture and adjust the seasoning as needed, adding more cayenne if you’d like it spicier. Remove the pot from heat and stir in the cream. Serve with minced fresh cilantro over saffron rice.

Recipe sources: Jenna’s Everything Blog and ifood.

Spinach & Black Bean Enchiladas

Posted on

https://i0.wp.com/a3.ec-images.myspacecdn.com/images02/52/cdbddfcdab6646fe81ccada85d000b92/l.jpg

It seems the older I get, the less meat appeals to me.  Thus, Meatless Mondays were born into our household–my sneaky way of making a day without meat sound fun so Dennis plays along. :)

This recipe made both of us happy–the enchiladas are filling, have good flavor, and are figure-friendly.  I do realize the picture isn’t too appetizing, but they really are good, I promise!

If you have any favorite vegetarian dishes and are willing to share the recipe, please leave it in a comment or message me!

https://i0.wp.com/a2.ec-images.myspacecdn.com/images02/96/145155a1d8b64483b90a825964be0e2e/l.jpg

Spinach & Black Bean Enchiladas
from The New Holly Clegg Trim & Terrific Cookbook

makes 8 enchiladas

1 (10 oz) pkg. frozen chopped spinach, thawed
1 (15 oz) can black beans, rinsed & drained
1 (1 1/4 oz) pkg. taco seasoning mix (or 3 tablespoons homemade)
1 c water
1 c fat-free sour cream, divided
8 (6-8 inch) flour tortillas
1 (10 oz) can enchilada sauce
1 1/2 c shredded reduced-fat Cheddar cheese
2 T sliced green onions

Preheat oven to 375 degrees.

In a non-stick skillet, heat the spinach, black beans, taco seasoning mix, and water.  Bring to a boil, reduce heat, and cook for 8-10 minutes, or until the mixture is thickened.  Remove from the heat, and stir in 1/2 c sour cream.

In each tortilla, spread 1 T enchilada sauce, about 1/3 c spinach mixture, and 1 heaping tablespoon cheese.  Roll up each tortilla placing the seam-side down in an oblong baking dish coated with nonstick cooking spray.  Spread the remaining enchilada sauce over the filled enchiladas, cover, and bake for 15-18 minutes.

Uncover and garnish with the remaining cheese.  Continue baking for 5 minutes longer, or until the cheese is melted.  Serve with the remaining sour cream, and sprinkle with the green onions.

Veronica’s notes: I felt the filling was creamy/liquid enough without putting the enchilada sauce on the inside, so I just poured it over the top.

Nutritional info per serving: 266 cal, 14 g protein, 39 g carbs, 3 g fat, 5 g fiber, 11 mg cholesterol, 1198 mg sodium
Diabetic exchanges: 1.5 very lean meat, 2.5 starch