RSS Feed

Category Archives: Pie

Strawberry Cream Cheese Pie

Posted on

I was challenged by a former co-worker years ago (five years ago, to be exact), to reproduce the Strawberry Cream Cheese Pie you could get at Long John Silvers.  He was slightly obsessed.

Although I didn’t duplicate it exactly, the crust is almost spot-on (it’s an unbaked graham cracker crust, unusual but so good), and it’s fairly close.  It has taken me this long to share the recipe because I couldn’t share the first one with you – I used wild strawberry essence in it, and not many people would have that on hand to use in a humble pie, such as this.  But I remembered how good it was and wanted to see if I could recreate my recreation of Mrs. Smith’s pie by concentrating the strawberry flavor in another way.  Then I made jam a few weeks ago, inspiration hit.  Jam, to me, is the essence of the fruit used to create it.

So I tried it, replacing the gelatin and fresh strawberries in my original recipe with the homemade jam, and it was perfect. It’s not as light as the original*, but so good in it’s own right. So thick and creamy, so cream cheese-y, so strawberry-y. And so perfect for summer because, unlike most of my recipes this summer, no part of it requires an oven. You’re welcome.

Strawberry Cream Cheese Pie

Printable recipe
Printable recipe with picture

Crust
1 ½ envelopes graham crackers (13 1/2 sheets)
6 tablespoons butter, melted
2 tablespoons sweetened condensed milk
2 tablespoons brown sugar
1 tablespoon water

Filling
1 (8 oz) package cream cheese
1 heaping cup (13 oz jar) good quality strawberry jam
1 (14 oz) can (minus 2 tablespoons for the crust) sweetened condensed milk
2 cups whipped topping or homemade (sweetened) whipped cream

Garnish
Leftover whipped topping or 1-1 1/2 cups homemade sweetened whipped cream
Leftover crust crumbs

While still in the package, smash up the graham crackers a little bit, then empty into the bowl of a food processor fitted with the blade attachment. Pulse & process until fine crumbs. Add the butter, sweetened condensed milk, brown sugar & water and process until thoroughly combined. Set aside 1/2 cup of the crumbs and press the remaining crumbs into a 9” pie plate. Place in fridge.

Wipe out the food processor. Add the cream cheese, jam, and sweetened condensed milk, and process until smooth. Add the whipped topping or whipped cream and pulse until mixed. Pour into prepared pie plate, cover with plastic wrap, and refrigerate overnight. Pipe whipped cream around the edge in stars or rosettes using Wilton tip 2110 (1M). Garnish with whipped cream & the remaining crumbs before serving.

Veronica’s notes: If you’d like a lighter pie, you could use 3 cups of whipped cream, or the entire carton of whipped topping, and use another cup or two for garnish. You will have too much pie filling, but I doubt you’ll complain about eating the extra. ;) Also, it’s important to use the best jam possible, as this is what gives the pie its strawberry flavor. If you buy cheap Walmart jam, it will taste like you bought a Great Value frozen pie, not made it yourself. I’ve actually tried this using Walmart strawberry jam, so I unfortunately speak from experience (it was bad).  Homemade is ideal, and Bonne Maman is the only brand I can put my own stamp of approval on if you go with store-bought.

Classic Cherry Pie

Posted on

If you had trouble accessing the Preacher Tuna Salad recipe yesterday, I apologize. I accidentally posted it twice and deleted the original, making the link most everyone got lead to nowhere.  You can click here to view the recipe.With the 4th of July holiday quickly approaching, I thought it was about time I shared my favorite cherry pie recipe.  Maybe it’s all the red, but it just seems very festive to me! :)  There’s nothing fancy about it, unless you consider a lattice top crust fancy, but it’s a very good pie and excellent with a scoop of vanilla ice cream.  I love the flavor the almond extract adds, to me it is the essential key to a good cherry pie.

I love my Perfect Pie Crust above all others, and is the crust pictured here.  I highly recommend it for any and all pies, but truth be told, I just as often use a box of Pillsbury refrigerated pie crusts.  Judge me if you must, but it saves so much time!  If you buy pre-made crusts, don’t bother with generic/off-brands, they are awful. Pillsbury is pretty good if you don’t have time to make your own.

Classic Cherry Pie

Printable recipe
Printable recipe with picture

Pastry for a two-crust pie
1 cup granulated sugar
¼ cup cornstarch
2 (14.5 oz) cans tart cherries in water
2 tablespoons butter
1 teaspoon almond extract
½ teaspoon red food coloring (optional)
Milk & coarse sugar for top crust

Preheat oven to 375 degrees. Roll out one pie crust and line a 9” pie plate; place in refrigerator. In a large saucepan, combine the sugar & cornstarch and mix well. Drain the juice from the cherries into the pan with the sugar & cornstarch; set the cherries aside. Stirring constantly, cook the juice mixture over medium heat, until bubbling and thickened. Remove from heat and stir in butter, almond extract, and food coloring, if desired, until butter is melted. Stir in the cherries. Spoon into prepared pie plate. Roll out second disc of dough and cut into strips with a pastry wheel or pizza cutter. Arrange strips on top of filling to make a lattice design. Seal and flute edges. Brush milk over crust and sprinkle with sugar. Place on middle oven rack and put a cookie sheet below to catch any spillover. Bake 30 minutes, then put a pie shield on the pie to protect the crust from over-browning. Bake another 15 minutes, or until crust is golden brown and filling is bubbling. Cool at least two hours or overnight before serving.

Veronica’s note: I tend to cook my fruit pie filling until extremely thick, as I prefer my pies not to run at all when cut, as you can see in the photos. If you like yours to run a little, just follow the directions and you’ll be fine. My weirdness for cooking it until nearly cement is not included in them. :)  Also, I have a step-by-step video tutorial on another pie that includes how to make a lattice design here.

**Be sure to visit my “Current Favorites” in the sidebar at the right for other recipes that would be a great addition to your July 4th menu.**

Nutter Butter Banana Cream Pie

Posted on

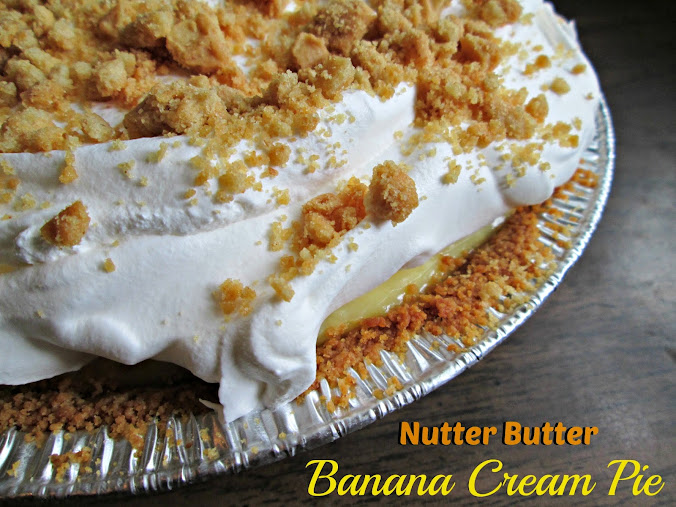
This month for the Secret Recipe Club I was assigned to Our Eating Habits – pretty nifty considering I had Jamie’s blog last month!  Jamie called my blog “pay dirt” and I’d have to say the same of hers – there were just so many comfort food recipes (my favorite kind!) that I had a blast browsing through them.  I decided to make something for our annual Mother’s Day picnic from her blog and ended up making two things, this delicious pie and Smoky Baked Beans – both fabulous!

There was only one piece of pie left when we arrived late to the picnic (the pie preceded us in my IL’s van), but I had a good excuse to make it again in order to get pictures of the inside – my Father-in-law’s birthday was coming up, and he just so happens to adore banana cream pie.  Turns out so do I. It was so hard not to hog the pie all to myself but I took my single slice and let him have the three pieces that were left after we’d all had one.  He raved, everyone raved, and the pie is an official success.  Thank you, Jamie, for sharing such a fun and delicious recipe! I never would have thought to use Nutter Butters for a pie crust but it is the perfect compliment to the banana cream filling.

Nutter Butter Banana Cream Pie

Printable recipe
Printable recipe with picture

Crust
12 nutter butter cookies
1- 1/2 tablespoons cream cheese, softened

Banana Cream Filling
3/4 cup white sugar
1/3 cup all-purpose flour
1/4 teaspoon salt
2 cups milk
3 egg yolks
2 tablespoons cold butter
1 1/4 teaspoons vanilla extract
3-4 bananas, sliced

Topping
1 (8 oz) tub frozen whipped topping, defrosted
4 Nutter Butters, crushed
Place 12 Nutter Butters in food processor and pulse until fine crumbs. Add cream cheese and process until completely incorporated. Press into 9″ pie plate (not deep dish) and bake at 350F for 12 minutes. Set aside to cool while you continue with the recipe.

In medium-sized saucepan whisk together white sugar, flour, and salt.  Whisk in the milk and cook over medium heat, whisking constantly, until bubbles form. Cook for additional 2 minutes, whisking constantly to avoid scorching. Remove from heat.

Place egg yolks in a small bowl and whisk. Whisk in a small amount of milk mixture to egg yolks, then repeat a second time.  Pour egg yolk mixture into remaining milk mixture in pot and whisk to combine. Return to burner and heat again over medium heat for about 2 more minutes. Remove from heat and stir in butter and vanilla. Slice bananas into the pudding and stir gently to combine well, then pour and smooth into prepared crust.  Place plastic wrap directly on top of the pie to seal out air and refrigerate until ready to serve, at least four hours.  Before serving, spread whipped topping over the top and sprinkle on the crushed Nutter Butters.

Recipe source: Our Eating Habits

Lemon Meringue Pie

Posted on

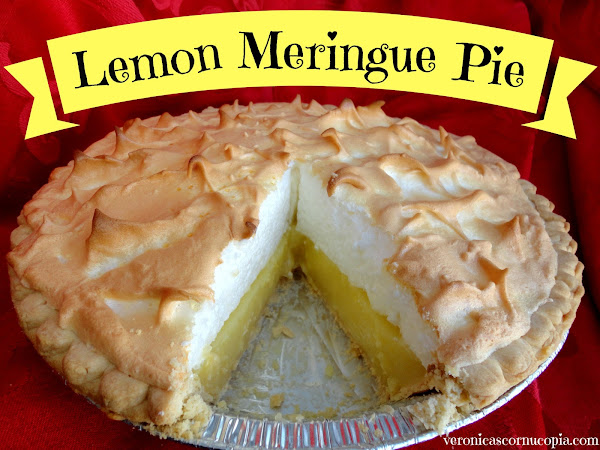
I don’t know about you but once spring arrives (even if the weather doesn’t quite agree), I’m in the mood for lemon!  Lemon bars, lemon cake, lemon cookies…just bring on the lemon.

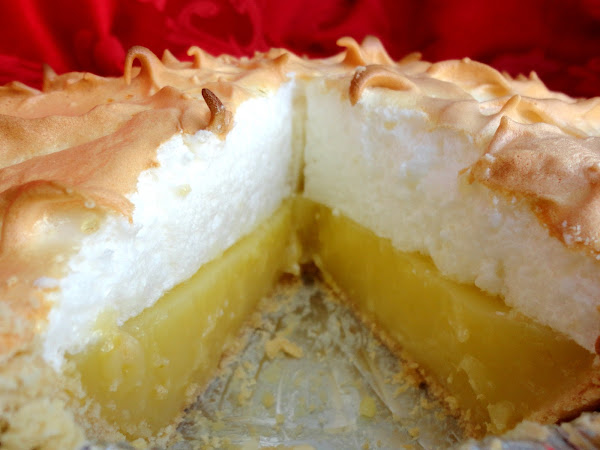
I thought the week of Easter would be a great time to share a recipe for lemon meringue pie, which I just started making a few months ago.  My SIL, Joan, loves lemon meringue pie and I made her one for Christmas (everyone got a home made pie for Christmas last year since we were too po for many store-bought ones).  It was my first ever lemon meringue pie, and as firsts sometimes go, it was bad.  I didn’t read the instructions close enough and the filling never set up.  It was lemon soup pie.  Thankfully, I had enough time to make a second, which turned out well.

My beautiful sister-in-law with her pie.

To my surprise, after licking the spoon which I used to scrape the filling into the crust, I found I really liked lemon meringue pie, or at least the filling.  You’d think a person who enjoys lemon desserts would assume that lemon meringue pie was the bomb-diggity, but no, I never had tasted a single bite because I was somehow sure it wasn’t worth eating.  I know, right?  I suddenly found myself dying to have a slice of lemon meringue pie, to taste it in its full glory, so I made it to bring to a dinner party in January.  That single small slice was so good, I needed more, and made a whole pie just for Dennis and I.  And together, we managed to eat the entire thing in a shamefully small period of time.

Personally, I would prefer this pie with a whipped cream topping.  However, using the egg whites works so perfectly since you have them leftover after using the yolks in the filling.  If you don’t mind using your egg whites for another purpose, feel free to use whipped cream here.  I think that would be the magics.

Lemon Meringue Pie

Printable recipe
Printable recipe with picture

4 egg yolks, room temperature (reserve whites for meringue)
1 1/3 cups granulated sugar
1/3 cup cornstarch
¼ teaspoon salt
1 ½ cups water
1 tablespoon lemon zest (1-2 lemons)
½ cup freshly squeezed lemon juice (2-3 lemons)
2 tablespoons unsalted butter
1 prebaked pie shell in a 9″ plate (deep dish if using a frozen crust)

Meringue
4 egg whites, room temperature
1/4 teaspoon cream of tartar
1/4 cup sugar

Preheat oven to 350F. Stir the egg yolks together in a heatproof bowl and set aside. In a medium saucepan, whisk together the sugar, cornstarch, and salt. Whisk in the water and turn on the heat to medium. Bring the mixture to a boil while stirring, boiling until it is quite thick, at least one minute. Remove from heat.

Add a spoonful of the hot mixture to the egg yolks at a time, stirring in between additions, until 1/3-1/2 of the hot mixture has been added. Scrape the egg yolk mixture into the pan and whisk it all together. Return to the heat and cook for another minute while stirring. Remove from heat and stir in the butter until melted. Add the lemon zest and lemon juice, stirring until combined. Scrape into the baked pie crust; set aside.

For the meringue, combine the egg whites and cream of tartar in a stainless steel or glass bowl that is completely grease free and beat with completely grease-free beaters on medium speed for about a minute, or until soft peaks form. Increase speed to high and beat in sugar gradually until glossy stiff peaks form and sugar is dissolved. Spread over hot filling all the way to the edge, making sure the meringue touches the pie crust all the way around, to prevent shrinkage.

Bake in preheated oven 12-15 minutes or until meringue is light golden brown. Cool completely before slicing, about 4 hours.

Recipe source: adapted from the recipe on the back of a Pillsbury Pet-Ritz frozen pie crust package.

If you’re in a lemon mood, check the other lemon sweets on my blog:

Blueberry-Lemon Upside Down Cake

Blueberry-Lemon Pound Cake

Blueberry-Lemon Trifle

Easy Lemon Cookies

Lemon-Basil Peach Dumplings

Lemon Blossoms

Lemon Curd

Lemony Orange Cake

Lemon Squares

Strawberry Lemonade Layer Cake

Sunshine Bars

Triple Lemon Cake

Zesty Lemon Pound Cakes

Key Lime Pie


So happy to return today for the Secret Recipe Club‘s Group C reveal day!  Life has been keeping me pretty busy, but I’ll talk about life another day.

Today I need to tell you about this Key Lime Pie.  This amazing key Lime Pie.  I was assigned to Mother Thyme‘s blog this month, which is a new-to-me blog, and I was really excited to peruse it.  Jennifer’s blog is attractive, organized (yay for a recipe index!), and her photos are beautiful, so it was a real treat!  Not to mention that most of the recipes are her own creations!  I truly admire bloggers like Jennifer who mostly post their original creations, since I find that difficult, personally.  My creations are very rarely blog-worthy. LOL!

So when I ran across this key lime pie recipe, I was excited because Dennis loves Key Lime Pie and I’ve been wanting to make him one for a long time, but I was also very skeptical.  The main ingredients are sweetened condensed milk and lime juice.  And it only calls for for 9 minutes of baking.  I thought it was mis-typed, and eggs and extra baking time were missing.  I mean, how can two very liquid hardly-baked ingredients make a thick, creamy filling?

So I searched online recipes and found some similar ones that didn’t even require any baking.  What?  Really?  Wouldn’t this make soup pie?

I decided to give it a go, and I’m so glad I had faith in Mother Thyme!  This is kitchen science, folks, and utterly fascinating.  Apparently when the acidic lime juice is combined with the condensed milk, it thickens it, because as soon as I whisked it in, the two liquids turned into a thick, pudding-like filling.  Amazing!  After just two hours, it was ready to slice, and I didn’t even bake it at all!

The taste?  Just as amazing as the magical thickness.  Perfect balance of sweet and tart!  I’m just so excited by this pie, you guys, you don’t even know.  It’s so easy to make, so magical, and so delicious.  You could even say…it’s magically delicious.  :)

I made it a little festive by adding some food coloring to intensify the green (it’s really more ivory without the food coloring), and added shamrock sprinkles for a St. Patrick’s Day look.  This would make a nice change for a St. Patty’s day dessert since most of them feature booze and/or mint.  But even if you don’t try it for a holiday (would also be cool for Christmas with red sprinkes!), it’s great any time of year–especially spring and summer.  Dig in!

Key Lime Pie

Printable recipe
Printable recipe with picture

Crust
1 1/2 cups crushed graham crackers
5 tablespoons melted butter
4 tablespoons granulated sugar

Filling
3 (14.5 oz) cans sweetened condensed milk
2 drops green food coloring + 1 drop yellow (optional)
1/2 cup sour cream
1 cup key lime juice (or regular lime juice)
2 tablespoons freshly grated lime zest (from about 2 large limes)

Garnish
Whipped cream or Cool Whip
Extra lime zest or sprinkles

Preheat oven to 350 degrees. Mix crumbled graham crackers, butter and sugar in a 9” spring form pan or a deep dish pie plate and firmly press evenly over bottom and sides of pan. Bake for 8 minutes. Let cool before adding filling.

Meanwhile, combine sweetened condensed milk and food coloring if desired, mixing until totally blended. Add the sour cream, lime juice and lime zest and whisk until thickened and completely incorporated. Pour mixture in to cooled crust and refrigerate 2 hours or until ready to serve.

If desired, just before serving, pipe whipped cream around the edge of the pie (I used Wilton tip 1M) and garnish with some extra lime zest or festive sprinkles of your choice.  Or you can just serve with a dollop of whipped cream on top.  Refrigerate leftovers.

Veronica’s note: never mind my shallow pie dish, do not use a regular pie dish or you will have too much crust and filling, as I did (I made a second small dish of pie with my leftovers). Do as I say, not as I do. ;)

Recipe source: Mother Thyme

You can see all the other Group C SRC recipes by clicking the linky man below:


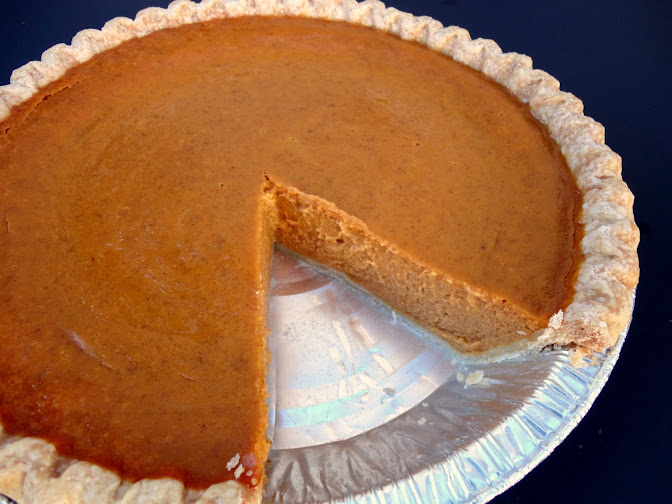
Perfect Pumpkin Pie


I make this pie every year for Thanksgiving and every year I forget to blog it when Thanksgiving rolls around again.  Well that ain’t happenin’ this year!  I need this sucker on my blog for next year when I make the pie and need to look up the recipe.  It will be so much easier to find it where I keep all my favorites. :)

This is all you need to make the pie. How simple could this be?

If you’re looking for a simple traditional pumpkin pie recipe, this one has got you covered.  I prefer pumpkin gooey butter cake to pumpkin pie, but I have to provide a real pumpkin pie for those who actually enjoy it in my family, namely our oldest nephew, who is a pumpkin pie purist.  This simple recipe has a traditional taste, but comes together quickly with a purchased crust, and because it combines two ingredients (milk & sugar) into one (sweetened condensed milk), and uses pumpkin pie spice, there is much less measuring than with a traditional recipe.

Despite my yearning to add more ingredients (sweet potatoes! cream cheese! vanilla bean! booze!) to change things up, I always resist this since I know my oldest nephew wouldn’t touch anything but a real pumpkin pie.  And I’m always pleasantly surprised at how wonderful it tastes without any extra additions.  Great texture with a perfect balance of spices & sweetness.  May the pumpkin pie purists in your family rejoice & be thankful.

Perfect Pumpkin Pie

Printable recipe
Printable recipe with picture

1 (9″) unbaked pie crust (frozen deep dish, refrigerated or homemade)
2 large eggs
1 can (15 oz) unsweetened pumpkin puree
1 can (14 oz) sweetened condensed milk
2 teaspoons pumpkin pie spice
OR 1 teaspoon cinnamon + 1/2 teaspoon ginger + 1/2 teaspoon nutmeg
1/2 teaspoon salt
1 egg white, for brushing onto the crust
Preheat oven to 425 degrees. If you’re using refrigerated or homemade crust, roll it out and fit it into a 9″ pie plate (not deep dish–you only want deep dish if using a frozen crust).

In a medium bowl, lightly beat eggs, then add the remaining ingredients, except for the egg white, and beat to combine.  Do not go crazy with the beating, you just want everything mixed without excessive air bubbles.  Set filling aside and brush the egg white over the bottom and sides of the pie crust.  This will create a seal & help prevent the crust from becoming soggy.  Pour the filling into the pie crust.

Bake 15 minutes at 425 degrees. Reduce oven temperature to 350 and continue baking 35-40 minutes or until knife inserted in center comes out clean. I don’t like to mar the pretty surface, so I bake the pie until it is mostly set but still a little jiggly in the center because the residual heat will continue baking it after you remove it.  Cool pie completely before cutting. Garnish with whipped topping, if desired. Refrigerate any leftovers.

Makes one 9-inch pie.

Recipe source: adapted from Eagle Brand Perfect Pumpkin Pie

Lemon-Basil Peach Dumplings

Posted on

So this recipe is totally crazy.  Just wanted to warn you before you got too involved and the list of ingredients sent you reeling.  I’m just going to put it out there.  Right here and now.

This recipe has two whole sticks of butter in it.  And 1 1/2 cups of sugar.  Both are poured/sprinkled over only sixteen itty bitty peach “dumplings” which are really only slices of peach wrapped in crescent roll dough.  And you know what else I  poured over the top along with the butter and sugar?  Sprite.  Yup.

But here’s the deal.  These dumplings are so good and totally worth the butt dimples you will get after the little artery-cloggers work their way through your system and your body decides to skip the digesting part and just add them straight to your butt.

I made this for a cooking challenge on Facebook to make a recipe using fresh peaches, Sprite or 7-Up, and fresh basil.  So this is what I came up with, based on a cooky Midwestern recipe for apple dumplings (see it on PW’s blog here).

I still have yet to make the original version, but now I know I have to come fall because you would not believe how good this summery version is.  Sweet, yes, but not too sweet, incredibly.  And the juicy peach is the star, somehow not overpowered by the lemon & basil*, or all that sugar and butter. When I took them out of the oven, the liquid was pretty sloshy but thickened up and seemed to absorb a little more after 10-15 minutes, making the dumplings crispy with sugar on top and gooey on the bottom, but definitely not soggy, which is what I had feared.

They are best warm, but I served the leftovers (after Dennis and I had our way with a few) at room temperature to my family after a barbecue and they went crazy for them.  Even my sister, Danielle, who refuses to eat my (beloved) pumpkin gooey butter cake because it has two sticks of butter in it (light weight!), and generally only takes a few bites of my desserts, not only ate one ( a whole one!) but also took one home with her for later. Miracle!

*The fried basil does add a nice color and the mildest of flavor, which I thought was perfect, but if you’re really hoping for a huge pop of basil, I’d double (or more) what the recipe calls for.  Or just make extra to munch on–they are even crispier than potato chips!

Fried basil is so cool-it gets transparent and shatteringly crisp. Would also make a great garnish on soup!

While making these, I admit I cringed the whole time I was pouring and sprinkling sugar over the top.  I tried to stop myself several times.  How could sixteen little bitty teeny weeny dumplings need that much butter and sugar?!  But I had to go with the original measurements in the end, and I’m glad I did.  Because they are perfect.  Besides, divided between 16 servings, it’s really not too bad and actually lower in fat/sugar than most of the cakes I make.  Or at least, that’s what I was telling myself when I helped myself to seconds. >:)

Lemon-Basil Peach Dumplings

Printable recipe
Printable recipe with picture

3 medium fresh peaches
2 (8 oz) cans refrigerated crescent roll dough
1 lemon
2 sticks unsalted butter
1 ½ cups granulated sugar
1 cup Sprite
½ cup fresh basil leaves (not packed)
Coconut or vegetable oil for frying

Fill a pot that is big enough to fit three peaches with water high enough to cover them. Bring to a boil. Meanwhile, fill a large bowl with ice and water to have ready to cool the peaches. When the water is boiling, add the peaches and boil for 1-2 minutes, until the skin is easy to remove. Remove with a slotted spoon and add to ice water. Once they are cool to the touch, take them out to peel off the skins. If the skins don’t peel easily, boil again for a minute.

Preheat oven to 350F. Slice the peeled peaches in half around the pit, separate the halves and remove the pit. Slice each half into thirds. You will only need 16 of the slices so feel free to nibble on two of them as you continue with the recipe.

Butter a 9×13 baking dish. Wrap each peach slice in a crescent roll and place in prepared dish. Grate the zest from the lemon and sprinkle over the dumplings (reserve the lemon), then sprinkle 1 cup of the sugar over the top. Melt the butter and pour over the top, then sprinkle the remaining sugar over. Juice the reserved lemon, then add the juice into the Sprite.  Pour over everything, then bake for 40 minutes.

Meanwhile, heat ½ inch of coconut or vegetable oil in a small skillet or saucepan to 360F. If you don’t have a thermometer, you can test it by throwing a basil leaf in.  If it is ready it will pop and spatter big time so be ready to cover it with a splatter screen or jump away. When the oil is ready, throw the basil in the hot oil, then IMMEDIATELY cover with the splatter screen. Fry until crisp, then remove to a thick layer of paper towels to drain. Once cool to the touch, about a minute or two, crumble up with your fingers and set aside. The oil makes the basil stick to your fingers so just get as much off as you can.

Remove the dumplings from oven and sprinkle the fried, crushed basil over the top. Serve the dumplings warm with ice cream, spooning the sweet sauce from the pan over the top.

Creamy Chocolate-Mint Pie

Posted on

I know, I know.  I’m supposed to be on vacation.  What am I doing blogging, right?  Thanks to the miracle of scheduled posting, I wrote this blog last week and scheduled it to publish today.  I’m so tech-savvy!  (And I’m a big liar because I can barely even text, but I’m glad I at least have this one thing figured out.  It helps me a lot!)

So last month our friend, Joe, came over with a tractor to help us level out our back yard so the water wouldn’t collect in the middle and run up against our house and under the back door, flooding the basement.  Yay for no more basement flooding!!!

Like my husband, Joe loves mint desserts, and as part of my thanks for his help, I made him a creamy chocolate-mint pie.  Actually, I made two, because my husband deserved a “thank you” too. :)  Also, you deserved the recipe, and how could I share it without cutting up a pie to show you the inside?  And how could I do that to Joe’s pie?  I could not.  So I made Dennis a pie and butchered his pie up for you.  And for me, because I ate this piece.

This pie is creamy, fudgy, smooth, and minty.  I don’t know why, but mint desserts just aren’t my number one choice, and I’d probably never make them if it weren’t for Dennis and Joe (Joe is also responsible for these peppermint patties I posted a while back), but I thoroughly enjoyed my half of this pie.  Yes, my husband let me have half the pie!  I will not overshare how fast I ate that half, however.  That would be my version of TMI. Hey, a girl has to have some secrets.

Creamy Chocolate-Mint Pie

Printable recipe
Printable recipe with picture

1 1/4 cups milk
1 package (4-serving size) chocolate pudding and pie filling mix (not instant)
1 cup semisweet chocolate chips
4 oz cream cheese, softened
1/2 cup powdered sugar
1/4 teaspoon peppermint extract
1-2 drops green food color
2 cups frozen (thawed) whipped topping, divided
1 Oreo cookie crust
2-4 thin rectangular chocolate and green mints, unwrapped

In 2-quart saucepan, stir together milk and pudding mix; cook as directed on package. Continue cooking over low heat while adding chocolate chips, stirring until melted. Set aside.

In medium bowl, beat cream cheese, powdered sugar, peppermint extract and green food color until smooth. Gently fold in 1 cup of the whipped topping.  Spread cream cheese mixture in the Oreo crust, then top with chocolate mixture, spreading it smooth. Spread remaining 1 cup whipped topping over the top, then either chop mints or use a vegetable peeler to shave off curls, and sprinkle over whipped topping. Cover and refrigerate at least two hours before serving.

Recipe source: tweaked from Pillsbury.com

Dixie Pie


This is one of the pies my friend, Teri, and I made during our pie-palooza, which is why the pie pictured is so small.  We made each recipe into two small pies so each of us could have one to keep.

This pie was the most popular of the four we served before a Bible study at her house that night.  It was gone in a flash!  It’s similar to a pecan pie, but it has chocolate chips (or raisins, if you prefer) and coconut in it too, so it’s even richer.

Which brings me to the reason I’m sharing it with you now instead of back in July, when we made it.  Something this rich is what I deem a winter holiday dessert, and it certainly fits the bill!  It would be a great addition to your Thanksgiving and Christmas spreads.

*Note:  I cut this pie when it was still warm, hence the gooey runniness.  It will set up nicely if you give it time!

Dixie Pie

Printable recipe
Printable recipe with picture

1 9-inch pie crust
3/4 cup chocolate chips or raisins
1/2 cup (1 stick) butter
1/2 cup granulated sugar
1/2 cup packed brown sugar
3 eggs
1 teaspoon vanilla
1-2 teaspoons cinnamon
1/2 cup chopped nuts
1/4 cup flaked coconut
Whipped cream, for serving

Bake pie crust at 450 degrees F for 10 minutes; remove to cool on a wire rack and reduce oven temperature to 350.

If using raisins, place in a saucepan, cover with water, and bring to a boil. Remove from heat and set aside. In a mixing bowl, cream butter and sugar. Beat in eggs, vanilla, and cinnamon until smooth. Drain raisins. Stir Raisins, coconut, and nuts into creamed mixture ( mixture will appear curdled). Pour mixture into crust, and bake for 30-35 minutes or until set. Cool completely, ideally 6-8 hours to allow it to completely set up, before serving. Serve with whipped cream.

Recipe Source: adapted from Desserts In My Kitchen

Brown Sugar Peach Pie

Posted on

This was another of the pies Teri and I made during the great pie making adventure several weeks ago.  I’ll let the photos speak for themselves, but will add that yes, it’s every bit as good as it looks.  And the crust recipe makes a lot, so you will have some leftover for pie crust cookies.  Or do what my nephew and I did: cut animal shapes out of it, fill with jelly, press another shape on top and bake!

Brown Sugar Peach Pie

Printable recipe
Printable recipe with picture

Crust
2 2/3 cups flour
1/4 cup brown sugar, packed
1 teaspoon salt
1 teaspoon cinnamon
1 cup vegetable shortening, chilled in freezer
6-8 tablespoons ice cold water
1 egg, beaten, for brushing on the crust
1 teaspoon white sugar, for sprinkling on top

Filling
7-8 large fresh ripe peaches
1 tablespoon lemon juice
1/2 cup brown sugar, packed
3 tablespoons flour
1 teaspoon vanilla
3 teaspoons butter

In bowl of food processor, combine flour, brown sugar, salt, and cinnamon; pulse until combined.  Scoop out the shortening and add it to the flour mixture; pulse until mixture resembles large peas.  Add water, one tablespoon at a time, until the dough comes together.  Form into two discs, wrap in plastic wrap and refrigerate until ready to use.

Preheat oven to 425.   Peel*, pit and slice peaches; place in a large bowl.  Add lemon juice, brown sugar, flour, and vanilla, and mix well; set aside.  Roll out one pie dough disc on a floured counter and fit into pie plate.  Brush with egg to create a barrier between it and the filling and keep it from becoming soggy.  Pour peach mixture into crust and dot with butter. Roll out second disk for the top of pie and place on top. You can make a lattice design or just make slits in top crust. Brush with egg & sprinkle with sugar.

Bake for 10 minutes. Turn temperature down to 350 and bake approximately 40 minutes longer, or until filling is bubbling and crust is golden brown.  Halfway through, or when it starts browning on the edges, cover edges with aluminum foil or a pie shield to keep it from burning.

*To easily peel peaches, score an X into the bottoms, drop them 2-3 at a time into boiling water, let boil for 30 seconds – 1 minute, then remove and place in a bowl of ice water.  The skins will just slip off when you rub it away from the cut.

Recipe source: Foodin Life in New England

Owen with his butterfly pie crust cut out.

285531_10150332893336480_2129814_n

After the filled cookies were baked, I spread more jam on top instead of making a glaze because it was easier. :)

285083_10150332893431480_1999788_n