RSS Feed

Category Archives: Pie

Cool Strawberry Pie

Posted on

A couple weeks ago, my friend, Teri, came over to learn how to make pretty pies.  Being the organized (except when I’m not) person I am, I developed a pie lesson that included pies that required all four types of crust: single crust, single pre-baked, double crust, and double crust with a lattice top.

I saved a recipe for cool strawberry pie from a myspace friend, Kim D., in 2009, and was so ecstatic to finally have an excuse to make it!  It’s the pie I chose for the single pre-baked pie crust.  Instead of making a regular-sized pie, we made two smaller pies for most of the recipes so that we could each have one for ourselves to take (or keep) home.

The recipe, like many pie recipes, is very simple with only a few ingredients.  But it’s utter magic!  This was my favorite pie of all four that we made.  It is just perfect for summer–cold, sweet, and refreshing.  It even seems light, though I don’t dare calculate the calories.  :)

I want to note that making your own pie crust does take the recipe from simple to time-consuming, so if you’d rather stick with simple, buy Pillsbury refrigerated pie crusts or a frozen pie crust in a tin and follow the directions on the package for a pre-baked crust. My favorite pie crust recipe does not work well for a pre-baked crust, as there is a large ratio of butter and shortening to flour, which causes it to shrink substantially if baked without filling. I modified a shortening pie crust recipe from the back of a Kroger flour sack to include butter, and it worked much better.

Cool Strawberry Pie

Printable recipe
Printable recipe with picture

2 cups all-purpose flour
1 teaspoon salt
1/3 cup butter, cold
1/3 cup shortening, chilled in freezer
5-6 tablespoons ice-cold water
1 egg white, beaten

6 cups strawberries (about 2 containers), sliced
1 cup sugar
3 tablespoons cornstarch
1/2 cup water

1 cup heavy whipping cream
2 tablespoons powdered sugar

Preheat oven to 400 degrees F. Combine flour and salt in bowl of food processor fitted with blade attachment. Pulse a couple times to combine. Cut butter into cubes and add to flour along with the shortening. Pulse until until mixture resembles a coarse meal. Add water, a tablespoon at a time, pulsing until all the flour is moistened. Form dough into ball; divide in half, shape into two discs, and wrap one in plastic wrap to freeze for later use. Sprinkle counter with flour and roll pie dough out toto 1/8 inch thickness. Fit pastry into pie plate, leaving a 1/2″ overhang. Tuck overhand under until edge is even with plate, then flute the edges. Prick bottom and sides with fork and place a sheet of parchment or wax paper over the bottom, cut so that it sticks up well above the sides. Fill with dry beans and bake 10 minutes. Gather the corners of the parchment and pull out the beans. Return crust to oven to bake for another 5-10 minutes, or until golden brown. Allow to cool for a minute, then lightly brush beaten egg white over the bottom and sides of the crust to create a seal. The residual heat will bake the egg white. Allow to cool while you prepare the filling.

Mash enough berries to measure 1 cup. Mix sugar and cornstarch in 2-quart saucepan. Stir in the water and mashed berries. Cook over medium heat, stirring constantly, until mixture thickens and boils. Boil and stir 1 minute; cool.

Fill shell with remaining berries; pour cooked strawberry mixture over top. Refrigerate until set, at least 3 hours.

Just before serving, beat cream in a chilled metal or glass bowl with chilled beaters on high speed until soft peaks form. Add powdered sugar and continue beating until stiff peaks. Pipe or spread onto pie.

Recipe source: Kim D.

Since I’ve already shared the recipe for Triple Berry Pie and won’t need this picture for a post on it, I thought I’d just share it with you anyway!  The Triple Berry is the pie I chose to teach the lattice-top crust.  As you can see below, Teri did a fabulous job on hers!  We had so much fun.

Advertisement

Grandma’s Pie Crust Cookies

Posted on

Lacey, Mom, Me, Dad, and Grandma Davis, 1997

We all had a special someone or someone’s on our minds and hearts on Memorial Day and for me, that was my Grandma Davis, my paternal Grandmother.

Grandma and Grandpa Davis with their eight children. My Dad (front middle) was the surprise, born when Grandma was 45 and most of the other children were grown.

As a kid, I remember being annoyed when she telephoned because she would talk our ears off and at that age, I didn’t have the patience for it.  I remember listening to stories from her childhood while visiting her, often wishing I was outdoors playing instead.  I now wish I could do those years over and spend the time with her that she craved and that I long for now that it is too late.

Grandma (left) and a friend in 1961

I want to ask her what life was like during her childhood, during the Depression, and how she felt the first time she rode in a car.  (She was born in 1904.)  I want to hear more about the years when they had a farm and ranch in Nebraska and she cooked for all the ranch hands.  I vaguely recall a story she told me about stuffing mattresses with human hair, and now I burn with curiosity about it.  Was it hair from concentration camp victims during World War II?  Why was she stuffing mattresses with it?  I think I remember her saying that the government was letting poor people do it for free so they had something to sleep on.  Could this really be true?  At the time, all that really made an impression was the way she pronounced mattresses.  How sad, when obviously there was quite a compelling story there if I’d just had the interest to ask.

In Grandma Davis's arms the week of my birth, with Grandma Millner on my left and cousin Tammy on my right.

There were a few stories she told that did pique my interest, and they were usually the ones in which she was being ornery or rebellious.  I guess I held her up as a hero for these instances, like when she set her mother’s kitchen on fire as a child because she didn’t like the new curtains.  I thought that was brilliant, because I would have loved to take revenge on my mother for all manner of wrongs (mostly imagined) that she committed against me.  I also loved the story of how she punched her future husband when he tried to be a gentleman and pick her up and carry her over a puddle.  She was indignant because she was a self-sufficient woman that could walk over the puddle on her own two feet and didn’t need a man to show off for her in such a silly manner.  That really tickled me!  Or the story about when she punched him years later when she thought he was asleep, (apparently she had waited for this moment to punch him because he had made her mad!) and he bit her thumb when the punch landed.  Or the time when she found him gambling with his friends and started throwing rocks at them in a fury.

Meeting my Great-Grandma Gailey. Looks like we don't quite know what to make of each other! Grandma Davis, her daughter, is behind her and my Mom is holding me.

I guess my Grandma was a feisty lady!  But she also was incredibly loving.  She cried every time it was time for me and my sisters to go home and she loved having us stay with her.  Although I had no patience for her stories, I loved staying with her too because she let us watch all the TV we wanted, she always had tins of cookies and peanut butter crackers that I liked to sneak into, and I loved her cooking!  She made us things like pigs in blankets, macaroni and cheese, fried chicken, and let us have angel food cake with whipped cream for dessert.  This was AMAZING food to a child that frequently dined on baked fish, plain salads (dressing was a no-no), lentils, and tofu sandwiches on Ezekiel 7-grain bread.

Grandma's yard in the 80s. Can you find the wind catcher she made out of a 7-up bottle?

Here it is, as clear as I can get it. She used to make a lot of these.

One of the things Grandma Davis taught me was not to waste anything, and that almost everything can be put to use.  She made rugs out of empty plastic bread sacks.  She made quilts out of old jeans.  She took empty 2-liter pop bottles and turned them into hanging ornaments that caught the wind and turned on her front porch. She also taught me to make little cinnamon roll cookies with leftover pie dough, rather than throwing it away.

Photograph courtesy of Upscale Downhome. This is exactly how my grandma’s bread sack rugs looked!

Grandma made this blanket for us with old jeans. As for the identity of the naked child, I plead the fifth.

RE: Plastic Soda Bottle Wind Chimes

Photo source. My Grandma’s wind spinners were always made with 7-Up bottles and looked very similar to this, though she made smooth cuts instead of wavy.

I’m thankful for every story that I can still remember, and for this lesson in waste that she passed on.  Sure, it can get me into trouble, because I tend to hoard things (for starters, I have a sack full of clean, empty food jars in my basement, waiting for an opportunity to be useful), but when it comes to these cookies, I feel the lesson is a blessing!

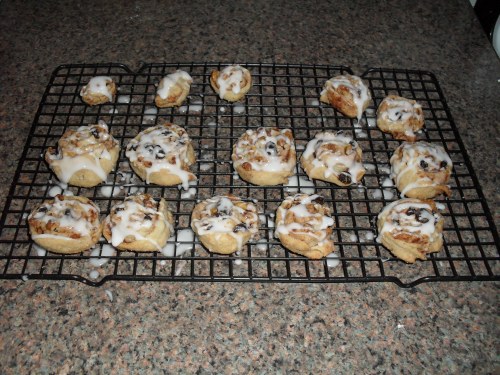
These cookies are delicious and so simple to make.  Flaky, buttery pie pastry layered with cinnamon, sugar, raisins, and nuts makes for something nearly akin to a kicked up cinnamon roll, and I like to go ahead and drizzle a simple glaze over the top of mine since I keep the sugar on the inside pretty low.  It makes them even more like a cinnamon roll in appearance, which I like.

I think many Grandmas taught their grandchildren to make these cookies, though my Grandma’s way seems to be a little different from the other recipes I’ve seen online.  Those call for cinnamon and sugar only, but that’s not the way Grandma Davis rolled (if you’ll pardon the pun).  She sprinkled on the raisins and nuts too!  Maybe it’s only because it’s the way my Grandma made them, but it’s the way I like them best.

Cinnamon Roll Pie Crust Cookies

Printable recipe
Printable recipe with picture

Leftover pie pastry (I recommend this recipe–it stays tender and flaky, even after gathering up the scraps, pressing together and re-rolling)
Sugar
Cinnamon
Raisins
Nuts
Powdered sugar & milk for optional glaze

Gather up your pie dough scraps and press together to form a new ball and flatten into a disc.  Wrap in plastic wrap and place in refrigerator until ready to use. If you aren’t making the cookies for a day or two, you’ll want to remove the pie dough from the refrigerator and leave at room temperature for half an hour to an hour so that it is soft enough to roll out.

Preheat oven to 375. Line a cookie sheet with parchment paper, a silpat mat, or spray with cooking oil.

Roll out the leftover pie pastry on a floured surface.

Sprinkle sugar over the top.  This amount won’t make the cookies very sweet, but that’s OK if you plan on using a glaze.  If you’re skipping the glaze, you’ll probably want more sugar.

Sprinkle on the cinnamon!

You could stop there, but I like to add some raisins and nuts, because Grandma said so.  And Grandma knows best.

Roll into a tight log, like so:

I didn’t get any pictures of this because my hands were busy doing this step, but use a piece of waxed floss to cut 1/2″ cookies from the log. To do this, run the floss under the log, then cross the ends of the string over the top, and pull the ends in opposite directions until the string passes through and makes a cut. This will be messy and you’ll have nuts and raisins popping out which you can then pop back in before placing on prepared baking sheet. Some of the cookies will have to be rewrapped completely, especially those on the end that are smaller. Place all the cut cookies on the baking sheet.  I like to use parchment paper, but would like to get a silpat mat soon since it’s reusable.

Bake for 15-20 minutes, depending on the size of your cookies. Cool on a wire rack. I just slid the entire sheet of parchment paper off the cookie sheet and onto a cooling rack.  Handy dandy.

Once cool, you can make a glaze by mixing powdered sugar with a little milk until it is a drizzling consistency. I think I used like 1/2 a cup of powdered sugar and a teaspoon or two of milk. Use a spoon to drizzle the glaze over the top.

If you aren’t serving these right away, let them sit out until the glaze hardens, then you can store them in an airtight container or Ziploc bag. Will keep for at least a week but they won’t last that long!

In loving memory of Alta Davis.  1904-2001

Heavenly Peanut Butter Pie

Posted on

If you’ve been around for a while, you’ve heard me mention my foodie mama, Marina, before.  We met on MySpace three years ago, and she took me under her baking wing, sharing her wisdom and fabulous award-winning recipes with me and all those lucky enough to befriend her.  I like to think of myself as a baker, but Marina is a pro, having won literally hundreds of ribbons for her baked goods and recipes over the years, and is also a field editor for Taste of Home.  This pie is one of the first recipes I ever made of hers, and I took all these pictures at that time–nearly three years ago now.  Since she gave me permission to share the recipe, I thought it was about time I did so!

Marina has won a blue ribbon for this pie every year for the past 11 consecutive years, so that should give you an indication of how good it is.  I have to agree with the judges, because the creamy peanut butter filling is just to die for, and the cinnamon-scented graham cracker crust, chocolate drizzle, and crunchy nuts really puts it over the top.  The bonus is that it’s a chilled pie, and thus  a perfect treat to enjoy during these warmer months.

Heavenly Peanut Butter Pie

Printable recipe
Printable recipe with picture

12 whole graham crackers, crushed
1/2 cup melted butter
1/2 teaspoon cinnamon
1 tablespoon granulated sugar
1 (3 oz) package cream cheese, softened
1 cup powdered sugar, sifted
1/4 cup milk
1 cup smooth peanut butter
2 teaspoons vanilla
1 1/2 cups chilled heavy cream
1 cup chopped peanuts (I used walnuts and peanuts)
Hot fudge sauce (I used ganache; recipe follows)

For the crust, mix graham cracker crumbs, butter, cinnamon, and 1 Tablespoon sugar. Pack into 9-inch pie plate.Bake at 375 degrees F for 6 minutes. Cool completely.

For the filling, in large bowl, beat cream cheese and sugar until fluffy. Beat in milk, peanut butter, and vanilla.

In chilled bowl, beat heavy cream until stiff peaks form.

Fold in one third of it into peanut butter/cream cheese mixture.

Fold in remaining whipped cream.

Spoon filling into prepared crust.

Give your nuts a good chop.

And sprinkle over the top and refrigerate overnight.

Drizzle hot fudge sauce or ganache over the top just before serving.  I went with ganache.

To make the ganache, place 4 ounces of semisweet chocolate chips in a heat-proof bowl; set aside. Heat 1/2 cup whipping cream until boiling and pour over the chocolate.

Let sit for a minute, then stir until mixture is smooth and shiny.

Allow to cool completely before using. It will get thicker as it stands, eventually becoming the consistency of frosting, and if it gets too thick you can heat it for just a few seconds in the microwave to make it liquid again. It liquefies very fast so you really shouldn’t need more than 5 seconds.

*Note: although the pictures show two pies, I did not double the recipe.  I used pie tins, which are smaller than a regular pie plate, and the recipe made a perfect amount to fill both tins.

Recipe source: Marina C.

Check out other recipes I’ve shared from Marina:

Triple Berry Pie

Posted on

This was one of the pies I brought to the Memorial Day barbecue at my preacher’s home and it was a big hit!  Although I really prefer to make cakes, what I do appreciate about pie is how simple it is.  Just a few ingredients turn into utter magic in a Pyrex dish.  Essentially pie crust, fruit, and sugar and you’ve got the perfect summertime dessert.  This one really is all about the sweet berries, gently complimented by flaky pastry!

Triple Berry Pie

Printable recipe
Printable recipe with picture

Pastry for a 2-crust pie (I cheated and used Pillsbury)
1 cup sugar
1/3 cup cornstarch
1/8 teaspoon salt
6 cups frozen mixed berries, thawed & drained
Milk & coarse sugar for top crust

Preheat oven to 450 F. Roll out one disc of dough, line pie plate with pastry, leaving a 3/4″ overhang, and place in refrigerator. In a large bowl, mix sugar, cornstarch, and salt together. Gently toss with the berries and let stand for 15 minutes. Spoon into crust-lined pie plate. Roll out second dough disc and cut into strips with a pastry wheel or pizza cutter. Arrange the strips to make a lattice design over filling (I have a tutorial on this process here). Trim, fold overhang from bottom crust over the ends of the lattice top crust, seal, and flute edges (I have a video tutorial on working with pie crust here, in which I include a demonstration on fluting edges). Brush crust with milk (I used my finger) & sprinkle with sugar. Place pie on middle oven rack; place large cookie sheet on rack below pie pan in case of spillover. Bake pie 15 minutes. Reduce temperature to 375 and place a pie shield on the crust to prevent overbrowning. Bake another 40-45 minutes, or until crust is golden brown & filling is bubbling. Cool at least two hours before serving.  (I always make fruit pies a day in advance and they are always nicely set up by the time I serve them.)

*Veronica’s Notes: the original recipe calls for fresh OR frozen berries so I guess this recipe will work with fresh berries too, but I haven’t tried it yet.  The original recipe also calls for ½ cup more sugar than mine, which you may need if your fresh berries are very tart.  Frozen berries are packaged at their peak and are usually quite sweet, so 1 cup of sugar was plenty and more would have been overkill.

Recipe source: adapted from the Three Berry Pie recipe on the side of my Pillsbury refrigerated pie crusts box.

Making a Lattice Top Crust {Step-by-Step Tutorial}

Posted on

Today is my 11th wedding anniversary and Dennis and I are gallavanting around Wichita during the annual River Festival to celebrate, but thanks to the magic of prescheduled blogging, I am able to instruct you on how to make a lattice top crust for a pie despite my absence!  This would be even cooler if I could preschedule my hair to get cut and dyed at the same time, but I’ll take what I can get.

OK, I know I promised a pie recipe next, but since the recipe instructs you to make a lattice top crust, I thought it was high time I broke out my ancient step-by-step lattice top crust photos to explain how to do it.

Making the nifty woven lattice top crust only seems complicated but the process is quite simple.  See for yourself!

Step 1: Lay 5-7 strips of pie dough on top of pie in one direction.

Step 2: Lift every other strip and pull back half-way.

Step 3: Lay a strip down across the middle in the opposite direction.

Step 4: pull folded strips back down over the horizontal strip.

Step 5: pull back the strips that weren’t folded back the first time.

Step 6: lay down another horizontal strip.

Step 7: lay the folded strips back down over the horizontal piece.

Repeat, repeat, repeat, alternating the strips you lift, and then spinning the pie plate around when you finish the first side to do the other.

Looking dandy!  Time to give her a spin and repeat on the other side.

Like so.

Until…

Voilà! Your lattice top crust is complete.

‘Tis a thing of beauty, my friend.

Now.  I must tell you, I do not have pictures of how to properly do the fluted edge for a pie with a lattice top crust.  On this particular one, which happens to be a Razzcherry Pie, I didn’t leave an overhang on the bottom crust so I chose to simply tuck the lattice pieces underneath the scant edge that remained.  Which is perfectly fine and much easier than making a fluted edge.  However, if you want a fluted edge, such as I have here on this cherry pie:

…this is what you do: leave a 3/4″ overhang on the bottom crust.  After finishing the lattice strips, trim them just beyond the inner edge of the pie, then fold the overhang over the strips and press to seal.  Then you can flute the edges using the technique I demonstrated in this video, and you’ll have a gorgeous pie!  I will update this post with pictures to accompany these instructions on finishing the edge when I make my next lattice top crust, but for now, I hope the instructions alone will suffice.

Happy pie making, my lovlies!

Working with Pie Dough {Video Tutorial}

Posted on

Photos by me, made into a collage by Laura Flowers.

Although pies certainly have their place in the fall and winter, I find myself making more of them during the warmer months, when fruit is plentiful, and my family begins to favor it over cake.  I’m getting ready to post another summer pie recipe, but thought I’d first share a video tutorial on working with pie dough that I made last summer for The Cooking Photographer and never got around to sharing on my own blog.

I  can hardly claim to be a pie master, but with as many pies as my family demands, I do feel pretty comfortable by now when working with pie dough.  I realize pie dough scares some people the way yeast bread used to scare me, and I hope that this video might help you with whatever difficulty you have had in the past.  This is just the way I do it, and it works for me, but once you try it you will realize in time what works for you.  If at first you don’t succeed, try, try again!

I used this recipe for the pie dough in this video.  It is my favorite and the one I use if I have time to make my dough from scratch, otherwise I go for Pillsbury!

Plum Lovin’ Pie

Posted on

If you’re a fan of Janet Evanovich, you might have recognized the “Plum Lovin'” part of the pie title.  I just couldn’t help myself!  I’ve read every one of the Stephanie Plum novels!  I’m kinda addicted to them the same way I’m addicted to sugar.  Epic, brain-stimulating meat and potatoes novels have their place, but we all need book desserts once in a while too, and this series is mine.

This gorgeous dish belongs to my Mother-in-Law, who got it indirectly from her own Mother-in-Law.

Anyway, I thought I’d get this recipe up in honor of mothers since I first made this pie for Mother’s Day last year.  It disappeared so fast that I didn’t realize I failed to get a picture until it was too late.  It got high praise at my husband’s family’s annual Mother’s Day barbecue and again this year on Easter.  It’s a very simple pie that doesn’t disappoint.    Do ma a favor and make her one yourself!  And get her a copy of One for the Money while you’re at it!

This pie is best with my favorite pie pastry, which I used the first time, but pictured is the pie I made in a pinch with Pillsbury refrigerated pie dough.  Although I could never condone such methods (do as I say and make your own crust, not as I do), it works and the pie doesn’t suffer much for the added convenience.

Plum Lovin’ Pie

Printable recipe
Printable recipe with picture

2 (15 ounce) cans whole plums in heavy syrup (I used a 30 oz can from Aldi)
1 cup granulated sugar
1/3 cup flour
Pinch of salt
1 teaspoon almond extract
Butter for dotting pie
Pastry for a two-crust pie
1 egg white, beaten

Place the oven rack in the lower third of the oven and preheat to 400 degrees. Strain the juice from the plums into a large saucepan. Cut the plums in half, then half again, pitting as you go. Set plums aside. Mix together the sugar, flour and salt in a bowl. Do not skip this step or you’ll have flour lumps. Pour the mixtures into the saucepan with the plum juice. Cook the mixture over medium heat stirring often at first, then constantly as the mixture heats. Cook and stir, scraping the bottom of the pan with a wooden spoon until the mixture is very thick and gooey. Turn off the heat from under the sauce pan. Add the almond extract and sliced plums and stir to combine. Set aside. Line a 9″ pie plate with pastry and brush lightly with egg white. Pour the hot filling into the pie dish, arranging the plums around if needed. *Don’t overfill the pie. Leave out a little of the juice if it gets too full.* Dot with butter and top with the top crust. Flute, brush the top with some of the remaining egg white, and cut vents into the dough. Place a pie shield over the crust and bake pie for 30 minutes, then remove the pie shield and bake for about 10 more minutes, or until golden brown and done on the bottom. Remove from the oven and cool on a cooling rack for several hours or overnight.

Recipe source: The Cooking Photographer

My Favorite Cheesecake and BSI: Cream Cheese Announcement

Posted on

Fact: I don’t have a sweet tooth, I have 24 sweet teeth and if I hadn’t had my wisdom teeth and first molars removed to make more room in my tiny sugar-addicted mouth, I have no doubt they would be sweet too.  Fact: Despite my sweet teeth, there are certain things I make or buy very rarely because I like them so much that my self-control us utterly nill when in their general vicinity.  These things are: any kind of cookies, but particularly homemade chocolate chip, chocolate éclairs, pecan pie, and cheesecake.

Prior to giving in and making this particular recipe, I hadn’t made a cheesecake in seven years.  But a friend requested one last year and I chose this recipe since I found it through one of my most trusted sources.  After raving over it for two days, my friend let me have a piece while I was at her house (it was a gift to her in exchange for a favor she paid me), and I’ve never made another cheesecake recipe since.  I have now made her three of these cheesecakes, which is a perfect arrangement because she always lets me have a slice and I don’t have to worry about going crazy and eating the whole thing in one sitting since it is not my cheesecake to dominate.  But I totally would if I could, which is why I will never make this cheesecake only for myself.  Never say never, but I’m saying it.  NEVER.  It is just too risky.  (Full disclosure: the last cheesecake I possessed that was only for the two of us was ten years ago.  It was about two-thirds the size of this one, and I ate it all by myself.  In one day.  And now you understand why I make them so rarely.)

This cheesecake comes out perfectly creamy with the best sweet-tangy flavor, enhanced by lemon zest.  Due to the minimal mixing time, it is not prone to cracks caused by air bubbles in the batter.  This doesn’t matter to me since I usually cover my cheesecake with a fruit topping anyway, but if you’re a cheesecake purist, you might dig the perfect top that comes out without doing anything special to achieve it.  No water baths, no pan of hot water sitting in a rack below the cheesecake, no baking it at super-low temps or leaving it in the oven an hour after you turn it off.  It’s a very simple, straight-forward recipe that yields a superior result, far better than any other I’ve tried.  Try it for yourself and you be the judge.

Favorite Cheesecake

Printable recipe
Printable recipe with picture

Crust:
1 1/2 cups finely ground graham crackers (about 25 squares)
2 tablespoons sugar
1/2 cup butter, melted

Filling:
2 (8-ounce) blocks cream cheese, room temperature
1 cup sugar
3 large eggs
1 teaspoon vanilla extract
1 lemon, zest finely grated
1 (16 oz) tub of sour cream

To prepare crumb crust: In a mixing bowl, combine the crust ingredients together with a fork until evenly moistened. Lightly coat the bottom and sides of a 9-inch springform pan with non-stick cooking spray. Firmly press the mixture over the bottom and about halfway up the sides of the pan, using your fingers or the smooth bottom of a glass. Refrigerate the crust while preparing the filling.

To prepare filling: In a large bowl, beat the cream cheese on low speed for 1 minute just until smooth and free of any lumps. Gradually add the sugar and beat just until incorporated.  Periodically scrape down the sides of the bowl and the beaters. Add the eggs, 1 at a time, and continue to slowly beat until combined. Stir in the vanilla and lemon zest. Blend in the sour cream. The batter should be well mixed but not overbeaten. Overbeating incorporates too much air and will cause the cake to puff when baking, then fall and crack when cooling. Pour filling into the crust-lined pan and poke any air bubbles you see with a toothpick.  Smooth the top with a spatula.

Bake in a preheated 325 degree oven for 50-55 minutes (mine usually takes a little more than an hour, but I think my oven runs cooler than most). The cheesecake should still jiggle slightly, it will firm up after chilling. Be careful not to overcook! Do not do a toothpick test in the cake’s center, this will make a crack. Loosen the cheesecake from the sides of the pan by running a thin metal spatula around the inside rim. Let cool in the pan for 30 minutes. Chill in the refrigerator, loosely covered, for at least 4 hours to set up. Demold and transfer to a cake plate. Slice the cheesecake with a thin, nonserrated knife that has been dipped in hot water and wiped dry after each cut.

Recipe source: adapted slightly from Tyler Florence’s Ultimate Cheesecake

BSI Announcement

I’ve chosen CREAM CHEESE for this week’s Blogger Secret Ingredient contest.  You can use regular, low-fat, homemade, or even vegan.  Sweet or savory, snack or main course, you choose!  I know you guys probably have a lot of great recipes using cream cheese and I can’t wait to see what you submit!

How to enter:

  • Make a recipe using the secret ingredient and write a blog post about it.
  • Include a link back to this post.
  • Add your entry to the comments section at the bottom of this post (permalink to your entry, not homepage, please).
  • Older/archived posts may be used as long as they’re updated with a link to this post.
  • If you don’t have a blog, but would still like to enter, please email me your entry (w/ photo) to vraklis (at) yahoo (dot) com

Deadline for submissions is Sunday, April 17th at 9pm (Central).  I will post the roundup and the winner the following day and send a prize to the person whose recipe I like best.  Please let me know if you are interested in hosting next week’s BSI.

For a list of all the previous hosts/choices, check out Biz’s BSI page.

If you have any questions please leave them in the comment area or send me an email and I’ll get back to you ASAP.

Working With Pie Dough


My friend, Laura, The Cooking Photographer, asked me to do be a guest host on her blog for a post on pie crust and I hope you’ll go check it out!  I even made an instructional video and you can see the post here: http://www.thecookingphotographer.com/2010/09/perfect-pie-crust.html

Enjoy!

Veronica

Perfect Blueberry Pie

Posted on

This must be the longest I’ve ever gone without posting a recipe!  Did you miss me?  I missed you!  I don’t really have an excuse, other than life getting hectic.

I have a treat for you since you’ve waited for so long with bated breath for my next recipe.  ;)  Well, ever since I’ve known my husband, he has sworn that his favorite pie is blueberry, but he’s never had one he liked.  How you could think something is your favorite when you’ve never liked it is beyond me, but it has always been my goal to make a blueberry pie that he could finally say, “Yes, this is the way I’ve always imagined a blueberry pie should taste!”

After handing him a slice of this pie, I indiscreetly watched him with bated breath for his reaction and was rewarded with a big, blue smile.  He finished the entire slice (in just a few seconds) before he said, “It’s perfect.”

This is a simple combination of berries, sugar, and a bit of lemon juice to offset the sweetness, in a flaky & buttery crust.  With something as naturally delicious as blueberries, you don’t need a lot of complexity to get a great taste.  Simplicity is key–you want the blueberry flavor to shine and it really does here.

Perfect Blueberry Pie
Printable recipe
Printable recipe with picture

1 recipe Perfect Pie Crust
2/3 cup granulated sugar
1/3 cup cornstarch
6 cups frozen blueberries
2 tablespoons lemon juice
Butter for dotting pie and brushing bottom crust
Milk for brushing pie and granulated sugar for sprinkling top

Make the crust at least an hour in advance so it is chilled beforehand. Roll out half the dough 1/8″ thick on a floured surface and line a pie plate, trimming the edges. Brush softened butter over the bottom and place the dish in the fridge. Place the oven rack on the lower 3rd of the oven and preheat to 425 degrees.

Mix together sugar and cornstarch. Don’t skip this step, as it gets the lumps out of the cornstarch & helps the pie consistency. In a large bowl, toss together the blueberries, sugar mixture, and lemon juice.  Pour mixture into the crust-lined pie plate and spread out evenly. Dot the mixture with little bits of butter here and there. Roll out the top crust on a floured surface and cover the pie with it. Seal & flute the edges. Brush the pie with milk, sprinkle with a little granulated sugar, and either poke holes or cut a design for venting.

Bake for 50 to 60 minutes or until the filling is bubbling. Remove the pie from the oven and set on a cooling rack to set up overnight before serving. Place in a box or paper sack if you wish, but do not put in an airtight container or cover with plastic wrap or the crust will absorb moisture from the filling and lose its flakiness. You want your pie to be able to breathe a little.  Serve with cool whip or vanilla ice cream.

Recipe source: adapted from The Cooking Photographer

%d bloggers like this: