RSS Feed

Tag Archives: dessert

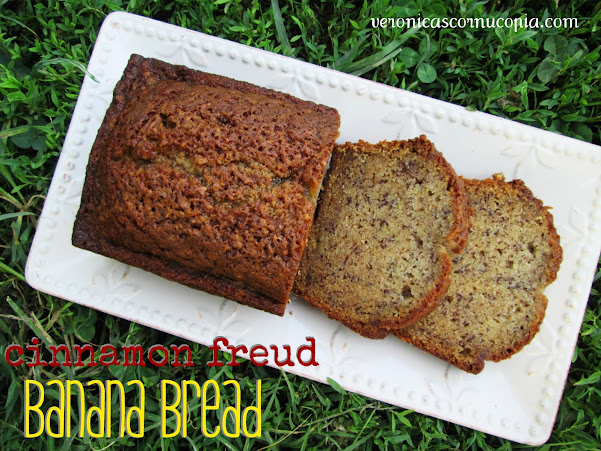
Cinnamon Freud Banana Bread

Posted on

I was assigned to Karen’s blog, Cinnamon Freud, for the Secret Recipe Club this month. She’s a counseling psychology doctoral student who also loves to cook and bake. How genius is her blog name?! I know she must get that a lot, but it’s true. Genius.

So anyway, last month I chose banana bread for my SRC assignment and Debra suggested I do banana bread every month because of my outrageous obsession with it. Although I didn’t intend to take her up on that challenge, as soon as I received my SRC assignment, I looked to see if Karen had a banana bread recipe, because I had a bunch of bananas that were really overripe and needing to be used. And she did – this recipe, in fact.  I made this bread the same day I received my assignment – the quickest I’ve ever done it!
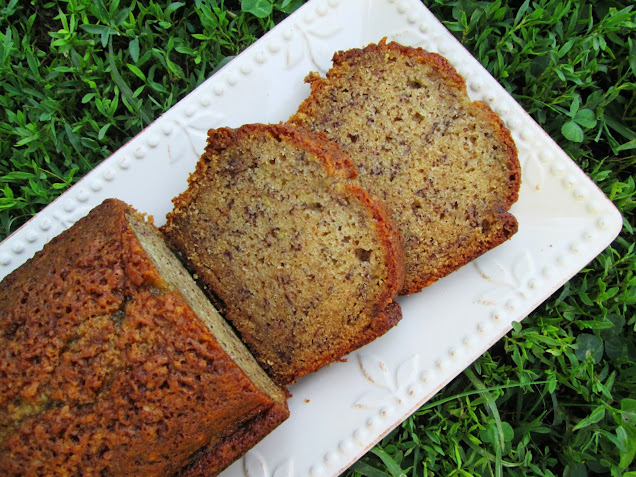
Since she simply called it banana bread, and I have way too many banana recipes on my blog to call it just banana bread, I added her blog name into it.  I couldn’t resist – it’s just so catchy!  :)  My second choice for this bread’s name would be “Dessert Banana Bread.”  This bread has more sugar than normal (which I totally am on board with – the more sugar the better, as far as I’m concerned), making it a bit more indulgent and appropriate for dessert…with a scoop of ice cream and caramel sauce on top, of course. haha! ;)  Oh and I have to tell you this bread is excellent with black walnuts. I made one plain, one with black walnuts. They were beautiful – sweet, dense, soft & velvety, just perfect.  These disappeared FAST – a definite winner!
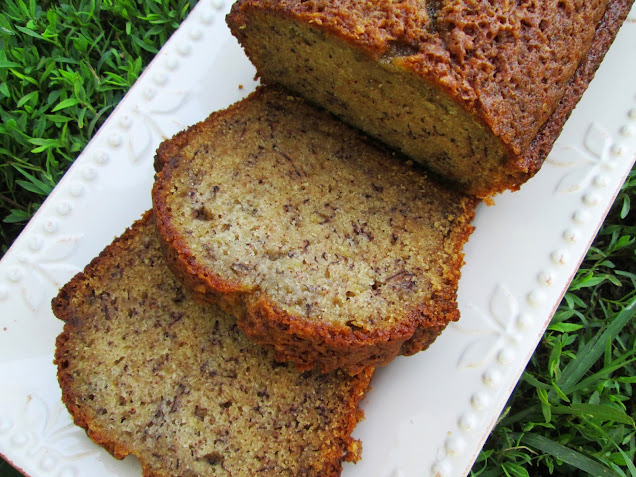
Cinnamon Freud Banana Bread

Printable recipe
Printable recipe with picture

3 1/2 cups all purpose flour
3 cups granulated sugar
1 teaspoon salt
2 teaspoons baking soda
1 teaspoon ground nutmeg
1 teaspoon cinnamon
1-2 cups mix-ins (nuts, chocolate chips, etc)
4 eggs, room temperature
1 cup vegetable oil
2/3 cup water
1 1/2 cups mashed bananas (about 3 bananas)

Preheat oven to 350°F. Grease 2 loaf pans and set aside.

In a large bowl combine flour, sugar, salt, baking soda, nutmeg, cinnamon, and any mix-ins you want to add. In a separate bowl, whisk eggs until blended, then add the remaining ingredients, beating until combined. Add approximately 1/4 cup dry ingredients into the wet. Mix until just combined. Repeat with remaining dry ingredients.

Spread into prepared loaf pans & bake for 55-70 minutes, until golden brown and a toothpick inserted in center comes out clean or with a few moist crumbs. Remove from pans and cool completely on wire racks.

Recipe source: Cinnamon Freud

***

I usually keep my recipe posts and baby posts totally separate, but since I haven’t been posting very much period, I just can’t resist including some baby love. :)  Here he is being a cloth diaper and baby leg warmers model. :D

Be sure to check out the other Group C Secret Recipe Club contributions this month by clicking the linky frog below!

Key Lime Pie


So happy to return today for the Secret Recipe Club‘s Group C reveal day!  Life has been keeping me pretty busy, but I’ll talk about life another day.

Today I need to tell you about this Key Lime Pie.  This amazing key Lime Pie.  I was assigned to Mother Thyme‘s blog this month, which is a new-to-me blog, and I was really excited to peruse it.  Jennifer’s blog is attractive, organized (yay for a recipe index!), and her photos are beautiful, so it was a real treat!  Not to mention that most of the recipes are her own creations!  I truly admire bloggers like Jennifer who mostly post their original creations, since I find that difficult, personally.  My creations are very rarely blog-worthy. LOL!

So when I ran across this key lime pie recipe, I was excited because Dennis loves Key Lime Pie and I’ve been wanting to make him one for a long time, but I was also very skeptical.  The main ingredients are sweetened condensed milk and lime juice.  And it only calls for for 9 minutes of baking.  I thought it was mis-typed, and eggs and extra baking time were missing.  I mean, how can two very liquid hardly-baked ingredients make a thick, creamy filling?

So I searched online recipes and found some similar ones that didn’t even require any baking.  What?  Really?  Wouldn’t this make soup pie?

I decided to give it a go, and I’m so glad I had faith in Mother Thyme!  This is kitchen science, folks, and utterly fascinating.  Apparently when the acidic lime juice is combined with the condensed milk, it thickens it, because as soon as I whisked it in, the two liquids turned into a thick, pudding-like filling.  Amazing!  After just two hours, it was ready to slice, and I didn’t even bake it at all!

The taste?  Just as amazing as the magical thickness.  Perfect balance of sweet and tart!  I’m just so excited by this pie, you guys, you don’t even know.  It’s so easy to make, so magical, and so delicious.  You could even say…it’s magically delicious.  :)

I made it a little festive by adding some food coloring to intensify the green (it’s really more ivory without the food coloring), and added shamrock sprinkles for a St. Patrick’s Day look.  This would make a nice change for a St. Patty’s day dessert since most of them feature booze and/or mint.  But even if you don’t try it for a holiday (would also be cool for Christmas with red sprinkes!), it’s great any time of year–especially spring and summer.  Dig in!

Key Lime Pie

Printable recipe
Printable recipe with picture

Crust
1 1/2 cups crushed graham crackers
5 tablespoons melted butter
4 tablespoons granulated sugar

Filling
3 (14.5 oz) cans sweetened condensed milk
2 drops green food coloring + 1 drop yellow (optional)
1/2 cup sour cream
1 cup key lime juice (or regular lime juice)
2 tablespoons freshly grated lime zest (from about 2 large limes)

Garnish
Whipped cream or Cool Whip
Extra lime zest or sprinkles

Preheat oven to 350 degrees. Mix crumbled graham crackers, butter and sugar in a 9” spring form pan or a deep dish pie plate and firmly press evenly over bottom and sides of pan. Bake for 8 minutes. Let cool before adding filling.

Meanwhile, combine sweetened condensed milk and food coloring if desired, mixing until totally blended. Add the sour cream, lime juice and lime zest and whisk until thickened and completely incorporated. Pour mixture in to cooled crust and refrigerate 2 hours or until ready to serve.

If desired, just before serving, pipe whipped cream around the edge of the pie (I used Wilton tip 1M) and garnish with some extra lime zest or festive sprinkles of your choice.  Or you can just serve with a dollop of whipped cream on top.  Refrigerate leftovers.

Veronica’s note: never mind my shallow pie dish, do not use a regular pie dish or you will have too much crust and filling, as I did (I made a second small dish of pie with my leftovers). Do as I say, not as I do. ;)

Recipe source: Mother Thyme

You can see all the other Group C SRC recipes by clicking the linky man below:


Lemon-Basil Peach Dumplings

Posted on

So this recipe is totally crazy.  Just wanted to warn you before you got too involved and the list of ingredients sent you reeling.  I’m just going to put it out there.  Right here and now.

This recipe has two whole sticks of butter in it.  And 1 1/2 cups of sugar.  Both are poured/sprinkled over only sixteen itty bitty peach “dumplings” which are really only slices of peach wrapped in crescent roll dough.  And you know what else I  poured over the top along with the butter and sugar?  Sprite.  Yup.

But here’s the deal.  These dumplings are so good and totally worth the butt dimples you will get after the little artery-cloggers work their way through your system and your body decides to skip the digesting part and just add them straight to your butt.

I made this for a cooking challenge on Facebook to make a recipe using fresh peaches, Sprite or 7-Up, and fresh basil.  So this is what I came up with, based on a cooky Midwestern recipe for apple dumplings (see it on PW’s blog here).

I still have yet to make the original version, but now I know I have to come fall because you would not believe how good this summery version is.  Sweet, yes, but not too sweet, incredibly.  And the juicy peach is the star, somehow not overpowered by the lemon & basil*, or all that sugar and butter. When I took them out of the oven, the liquid was pretty sloshy but thickened up and seemed to absorb a little more after 10-15 minutes, making the dumplings crispy with sugar on top and gooey on the bottom, but definitely not soggy, which is what I had feared.

They are best warm, but I served the leftovers (after Dennis and I had our way with a few) at room temperature to my family after a barbecue and they went crazy for them.  Even my sister, Danielle, who refuses to eat my (beloved) pumpkin gooey butter cake because it has two sticks of butter in it (light weight!), and generally only takes a few bites of my desserts, not only ate one ( a whole one!) but also took one home with her for later. Miracle!

*The fried basil does add a nice color and the mildest of flavor, which I thought was perfect, but if you’re really hoping for a huge pop of basil, I’d double (or more) what the recipe calls for.  Or just make extra to munch on–they are even crispier than potato chips!

Fried basil is so cool-it gets transparent and shatteringly crisp. Would also make a great garnish on soup!

While making these, I admit I cringed the whole time I was pouring and sprinkling sugar over the top.  I tried to stop myself several times.  How could sixteen little bitty teeny weeny dumplings need that much butter and sugar?!  But I had to go with the original measurements in the end, and I’m glad I did.  Because they are perfect.  Besides, divided between 16 servings, it’s really not too bad and actually lower in fat/sugar than most of the cakes I make.  Or at least, that’s what I was telling myself when I helped myself to seconds. >:)

Lemon-Basil Peach Dumplings

Printable recipe
Printable recipe with picture

3 medium fresh peaches
2 (8 oz) cans refrigerated crescent roll dough
1 lemon
2 sticks unsalted butter
1 ½ cups granulated sugar
1 cup Sprite
½ cup fresh basil leaves (not packed)
Coconut or vegetable oil for frying

Fill a pot that is big enough to fit three peaches with water high enough to cover them. Bring to a boil. Meanwhile, fill a large bowl with ice and water to have ready to cool the peaches. When the water is boiling, add the peaches and boil for 1-2 minutes, until the skin is easy to remove. Remove with a slotted spoon and add to ice water. Once they are cool to the touch, take them out to peel off the skins. If the skins don’t peel easily, boil again for a minute.

Preheat oven to 350F. Slice the peeled peaches in half around the pit, separate the halves and remove the pit. Slice each half into thirds. You will only need 16 of the slices so feel free to nibble on two of them as you continue with the recipe.

Butter a 9×13 baking dish. Wrap each peach slice in a crescent roll and place in prepared dish. Grate the zest from the lemon and sprinkle over the dumplings (reserve the lemon), then sprinkle 1 cup of the sugar over the top. Melt the butter and pour over the top, then sprinkle the remaining sugar over. Juice the reserved lemon, then add the juice into the Sprite.  Pour over everything, then bake for 40 minutes.

Meanwhile, heat ½ inch of coconut or vegetable oil in a small skillet or saucepan to 360F. If you don’t have a thermometer, you can test it by throwing a basil leaf in.  If it is ready it will pop and spatter big time so be ready to cover it with a splatter screen or jump away. When the oil is ready, throw the basil in the hot oil, then IMMEDIATELY cover with the splatter screen. Fry until crisp, then remove to a thick layer of paper towels to drain. Once cool to the touch, about a minute or two, crumble up with your fingers and set aside. The oil makes the basil stick to your fingers so just get as much off as you can.

Remove the dumplings from oven and sprinkle the fried, crushed basil over the top. Serve the dumplings warm with ice cream, spooning the sweet sauce from the pan over the top.

Lemon Blossoms

Posted on

I made these for Mother’s Day, intending to give pretty little baggies of them as gifts to all the mothers at the annual Mother’s Day picnic on Dennis’ side of the family.  It didn’t quite work out that way.  The first pan, which was half the batch, I didn’t grease well enough and they all stuck horribly so guess where those ended up?  Yup, in our bellies.  Can’t say we were too sad that only half the batch was pretty enough to share.  But then we couldn’t keep our hands off those either, and in the end, there were only enough to give to two mothers: his and mine.

Our mothers loved these little beauties, and we loved them.  Way too much.  They are really delicious, but most of the lemon flavor comes from the glaze, and I would suggest trying this with a lemon cake mix instead of a yellow if you can find one.  That would really intensify the lemon flavor.  They are wonderful as is, but can you get enough lemon flavor in the summer?  I think not.

Lemon Blossoms

Printable recipe
Printable recipe with picture

1 (18.5 oz) box yellow or lemon cake mix
1 (3.5 oz) box instant lemon pudding mix
4 large eggs
3/4 cup vegetable oil

Glaze:
4 cups confectioners sugar, sifted
1/3 cup fresh lemon juice
Lemon zest from 1 lemon
3 tablespoons vegetable oil
3 tablespoons water

Preheat oven to 350 degrees. Spray miniature muffin tins thoroughly with cooking spray.

Combine cake mix, pudding mix, eggs and oil and blend well with an electric mixer until smooth, about 2 minutes. Batter will be quite thick. Using a cookie scoop, divide the batter between the muffin wells, filling each halfway. Bake for 12 minutes.

While the blossoms are baking, make the glaze. In a mixing bowl, whisk together the sugar, lemon juice, zest, oil, and 3 tablespoons water. Whisk until smooth.

Remove the blossoms from the oven when they are done and turn out onto a tea towel. You might have to run a butter knife around the edges of the cupcake wells to loosen them before turning out. While they are still warm, dip the blossoms into the glaze, covering as much of the cake as possible, or spoon the glaze over the warm cupcakes, turning them to completely coat. Place on wire racks with waxed paper underneath to catch any drips. (I did this over the sink.) Let the glaze set, about 1 hour, before storing in airtight containers or covering with plastic wrap on a platter.

Makes 48 mini-cakes

Recipe source: Paula Deen, as seen on Minda’s Cooking

Avocado Chocolate Pudding

Posted on

You may have noticed I’m no longer posting regularly.  I have a feeling that’s how VC will be from now on, with periodic posts when I have the time.  While I hope my sporadic posting doesn’t bother any of my readers, I likely wouldn’t begin to post regularly for your sake at the expense of my own, so it would help my conscience out a lot if you would just be OK with it.  Thanks. :)

Onto the pudding.  I know it sounds weird, but you just have to try this to believe it how good it is.  Even my avocado-hating husband loves this pudding!  Basically it’s just avocado blended up with cocoa powder and agave nectar to create a sweet, silky, perfectly chocolate-y pudding.  No dairy, no refined sugar, no gluten, no cooking, just blending and eating of the most delicious & wholesome dessert ever…refrigeration totally optional.  We couldn’t wait and ate ours as soon as it was blended and it was fabulous.  But I bet it would be even better cold.

Chovocado Pudding

Printable recipe
Printable recipe with picture

1 ripe avocado
1/4 cup cocoa powder
1/4 cup raw agave nectar
1/4 cup almond milk
1 teaspoon vanilla extract

Peel and quarter the avocado. Put all the ingredients in a Magic Bullet or food processor and blend until smooth. Serve and enjoy!

Recipe source: Forgiving Martha

Andes Mint Cupcakes

Posted on

Guess what???  It’s Monday and I have the day off with my husband.  I’m SO excited!  Before I became permanent and my schedule changed, we had the weekends off together, but now we only get one day off together once every five weeks so it’s cause for celebration.  I’m going to relish it.

Speaking of my husband and celebrations, I made these cupcakes for his birthday in December, and everyone at the party fell in loveMel calls these “over-the-top” and I’d have to agree.  It starts with a moist, deep chocolate cupcake.  Then there’s the cool & creamy mint frosting.  Garnished with peppermint ganache and an Andes mint.  But there’s more to these cupcakes than what meets the eye, and my only regret is that I did not have the chance to snap a photo of the inside to show you they are also filled with the same peppermint ganache that is drizzled over the top.  Making them, you might say, over the top. :)

These would be great for your St. Patrick’s Day festivities!

Andes Mint Cupcakes

Printable recipe
Printable recipe with picture

1 recipe of your favorite chocolate cake*, baked into 24 cupcakes and cooled completely

Chocolate Mint Filling:
1 cup semisweet chocolate chips
6 tablespoons heavy cream
2 teaspoons peppermint extract
2/3 cup powdered sugar

Mint Buttercream:
1 cup (2 sticks, 16 tablespoons) butter, softened to room temperature
8 ounces cream cheese, softened to room temperature
2 lbs. powdered sugar
1/2 cup heavy cream
1 teaspoons pure vanilla extract
2 teaspoons peppermint extract
Green food coloring

24 Andes mints for garnish

For the mint filling, place the chocolate chips and heavy cream in a small microwave-safe bowl and heat for 1 minute at 50% power. Stir. Repeat the process until the mixture is smooth. Stir in the peppermint extract and powdered sugar, whisking until smooth. Let the mixture cool to room temperature (but don’t let it get too stiff) and pour it into a disposable pastry bag fitted with a small round tip, or a squeeze bottle with a tip.

Insert the decorating tip or tip of the squeeze bottle into the center of the cupcake and press gently to fill the middle of the cupcake with the mint ganache.  You can be pretty generous, squeezing until you see the top of the cupcake start to rise a little. Repeat with the remaining cupcakes.

For the frosting, in a large bowl, beat the cream cheese and butter until light and fluffy. Add the powdered sugar and mix until smooth. Add the heavy cream and peppermint and vanilla extracts. Beat until light and fluffy. Add green food coloring until the color you like is achieved.

Frost the cooled, filled cupcakes with frosting (using a large star tip, I used Wilton # 1M) or simply spread the frosting in a large dollop (again, you can be generous-there is plenty) with a butter knife or flat spatula. Garnish with a drizzle of leftover ganache (make sure the ganache is completely cool or it will melt the frosting when you drizzle it on top of the cupcake), and an unwrapped Andes mint.  Serve at room temperature.

*I used a devil’s food cake mix, but this is my favorite from-scratch chocolate cake recipe.

Recipe source: adapted from Mel’s Kitchen Cafe

***

I had to share a few more photos from his party, which was actually only half for his birthday (our preacher and his wife had a holiday dinner/birthday party combo).  One of the games we played was holding paper plates on top of our heads and trying to draw a picture of Dennis playing his guitar without looking.  You have no idea how difficult this is until you try to do it!  This is what I ended up with:

https://i0.wp.com/sphotos.xx.fbcdn.net/hphotos-ash4/s720x720/375983_10150501251206480_541706479_10934912_410175853_n.jpg

However, this is what his best friend, Jack, came up with:

https://i0.wp.com/sphotos.xx.fbcdn.net/hphotos-ash4/s720x720/386399_10150501252261480_541706479_10934919_836445075_n.jpg

Highly suspicious.

Here’s Dennis and Jack trying to look natural after I urged them to try embracing each other for a photo.  I don’t think this is natural for most men, but they pulled it off better than I expected. :)

https://i0.wp.com/sphotos.xx.fbcdn.net/hphotos-snc7/s720x720/384593_10150501252876480_541706479_10934928_1748743330_n.jpg

And here’s Dennis practicing his Kung Fu moves with our preacher’s bat’leth (a Klingon weapon…as in something a Trekkie would totally recognize but me, not so much) shortly before we left (and yes, this thing is super sharp and dangerous! Yet he was swinging it like the pro he is.):

https://i0.wp.com/sphotos.xx.fbcdn.net/hphotos-ash4/s720x720/382966_10150501256611480_541706479_10934943_332731381_n.jpg

Your Klingon Kung Fu is strong, honey.

***

Reminder: this is the last week to get your postcards out to Beverly! You can get the deets here if you missed the announcement: Operation Postcard for Beverly.

Dixie Pie


This is one of the pies my friend, Teri, and I made during our pie-palooza, which is why the pie pictured is so small.  We made each recipe into two small pies so each of us could have one to keep.

This pie was the most popular of the four we served before a Bible study at her house that night.  It was gone in a flash!  It’s similar to a pecan pie, but it has chocolate chips (or raisins, if you prefer) and coconut in it too, so it’s even richer.

Which brings me to the reason I’m sharing it with you now instead of back in July, when we made it.  Something this rich is what I deem a winter holiday dessert, and it certainly fits the bill!  It would be a great addition to your Thanksgiving and Christmas spreads.

*Note:  I cut this pie when it was still warm, hence the gooey runniness.  It will set up nicely if you give it time!

Dixie Pie

Printable recipe
Printable recipe with picture

1 9-inch pie crust
3/4 cup chocolate chips or raisins
1/2 cup (1 stick) butter
1/2 cup granulated sugar
1/2 cup packed brown sugar
3 eggs
1 teaspoon vanilla
1-2 teaspoons cinnamon
1/2 cup chopped nuts
1/4 cup flaked coconut
Whipped cream, for serving

Bake pie crust at 450 degrees F for 10 minutes; remove to cool on a wire rack and reduce oven temperature to 350.

If using raisins, place in a saucepan, cover with water, and bring to a boil. Remove from heat and set aside. In a mixing bowl, cream butter and sugar. Beat in eggs, vanilla, and cinnamon until smooth. Drain raisins. Stir Raisins, coconut, and nuts into creamed mixture ( mixture will appear curdled). Pour mixture into crust, and bake for 30-35 minutes or until set. Cool completely, ideally 6-8 hours to allow it to completely set up, before serving. Serve with whipped cream.

Recipe Source: adapted from Desserts In My Kitchen

Brown Sugar Peach Pie

Posted on

This was another of the pies Teri and I made during the great pie making adventure several weeks ago.  I’ll let the photos speak for themselves, but will add that yes, it’s every bit as good as it looks.  And the crust recipe makes a lot, so you will have some leftover for pie crust cookies.  Or do what my nephew and I did: cut animal shapes out of it, fill with jelly, press another shape on top and bake!

Brown Sugar Peach Pie

Printable recipe
Printable recipe with picture

Crust
2 2/3 cups flour
1/4 cup brown sugar, packed
1 teaspoon salt
1 teaspoon cinnamon
1 cup vegetable shortening, chilled in freezer
6-8 tablespoons ice cold water
1 egg, beaten, for brushing on the crust
1 teaspoon white sugar, for sprinkling on top

Filling
7-8 large fresh ripe peaches
1 tablespoon lemon juice
1/2 cup brown sugar, packed
3 tablespoons flour
1 teaspoon vanilla
3 teaspoons butter

In bowl of food processor, combine flour, brown sugar, salt, and cinnamon; pulse until combined.  Scoop out the shortening and add it to the flour mixture; pulse until mixture resembles large peas.  Add water, one tablespoon at a time, until the dough comes together.  Form into two discs, wrap in plastic wrap and refrigerate until ready to use.

Preheat oven to 425.   Peel*, pit and slice peaches; place in a large bowl.  Add lemon juice, brown sugar, flour, and vanilla, and mix well; set aside.  Roll out one pie dough disc on a floured counter and fit into pie plate.  Brush with egg to create a barrier between it and the filling and keep it from becoming soggy.  Pour peach mixture into crust and dot with butter. Roll out second disk for the top of pie and place on top. You can make a lattice design or just make slits in top crust. Brush with egg & sprinkle with sugar.

Bake for 10 minutes. Turn temperature down to 350 and bake approximately 40 minutes longer, or until filling is bubbling and crust is golden brown.  Halfway through, or when it starts browning on the edges, cover edges with aluminum foil or a pie shield to keep it from burning.

*To easily peel peaches, score an X into the bottoms, drop them 2-3 at a time into boiling water, let boil for 30 seconds – 1 minute, then remove and place in a bowl of ice water.  The skins will just slip off when you rub it away from the cut.

Recipe source: Foodin Life in New England

Owen with his butterfly pie crust cut out.

285531_10150332893336480_2129814_n

After the filled cookies were baked, I spread more jam on top instead of making a glaze because it was easier. :)

285083_10150332893431480_1999788_n

Raw Double Chocolate Brownie Bites

Posted on

I joined The Secret Recipe Club at the end of May, which was too late to participate in June, so I was super eager to finally get my assignment for July.  In this club, each month the participating bloggers make a recipe from another participant’s blog.  The blog is assigned secretly and at random, so no one else knows who’s making something from their blog that month.  I found the whole idea really fun and exciting!  (Don’t judge me.)

I was assigned to make a recipe from Ginger Lemon Girl’s blog, and my first reaction was a mixture of both trepidation and anticipation.  Carrie follows a gluten-free diet, and since I don’t have any dietary restrictions, I wasn’t sure if the recipes would appeal to me, but I knew I could adapt them if necessary and was ready for the challenge.  Once I started browsing her archives, I quickly realized that her recipes were good, wholesome foods that anyone could enjoy, and some of them were naturally gluten-free because no flour was involved.  Like this one!

When I came across Carrie’s recipe for Raw Chocolate Brownie Bites, I immediately thought of my love for Fudge Babies, and knew it was the one I’d have to make.

I made the recipe as it was written the first time (pictured above) and really liked it (maybe that’s an understatement, seeing as how I ate half the batch the first day!), though adding as much agave nectar to sweeten them as I liked (2 T) made them too soft for me. I wanted them chewier and a little sweeter (i.e. more dates!). I also wanted more of the chocolate dough so that it would completely cover the bottom of a loaf pan. The first batch, spreading it to the thickness I wanted, filled only 2/3 of the bottom of the pan. So I took Carrie’s rockin’ recipe and tweaked it a bit, and couldn’t help adding some mini chocolate chips to make them doubly chocolatey!  The chocolate chips only add 16 calories per Brownie Bite and don’t change the points, so I really recommend you put them over the top to make these bites, well, over the top. :)

For those unfamiliar with raw desserts, they are a lot like Larabars, but better (at least I think these are).  If you’ve never had those either, now’s your chance to see what all the fuss is about.  This isn’t like eating a candy bar or any sort of processed sweet, because it’s all-natural, raw, and much healthier (not to mention allergy-friendly), but they are very good!  I bet even your kids will love them.  Give them a try and see if you don’t agree.

Raw Double Chocolate Brownie Bites

Printable recipe
Printable recipe with picture

1 cup pitted dates
1 1/3 cups raw nuts (I used 2/3 cups each almonds & pecans)
¼ cup cocoa powder
½ teaspoon Fleur de Sel or kosher salt
~or ¼ teaspoon table salt
1 teaspoon vanilla
1/3 cup mini semisweet chocolate chips

Soak the dates in a bowl of hot tap water for five minutes; drain well. (Skip the soaking step if you are using Medjool dates.) In a food processor fitted with the blade attachment, grind the nuts until very fine. Add the drained dates, cocoa powder, and salt. Process for a minute or two, until nuts are very fine and the mixture sticks together quite easily, if it’s not already coming together in the bowl. With the food processor running, add the vanilla through the feed tube and continue processing until the mixture starts to form a ball. Just run it for another 10-30 seconds and if it doesn’t form a ball, check the consistency and see if it will stick together when pinched. If not, add a teaspoon of water and continue processing, adding more water if necessary (it shouldn’t be) until the mixture is sticky. Pat the chocolate dough into a loaf pan. It is OK if oil separates a little and forms a layer on top; it will soak back down into the brownie dough while it sits in the refrigerator.   Sprinkle the chocolate chips over the top and pat them down into the surface so that they will stick. Cover the pan with plastic wrap and refrigerate for 2-3 hours. Cut into 18 squares (6 rows x 3 rows) and enjoy cold.

Makes 18 Brownie Bites

Per Brownie Bite: 107 calories; 7 g fat; 1.1 g saturated fat; 1.6 g polyunsaturated fat; 3.8 g monounsaturated fat; 0 g cholesterol;  33.2 mg sodium; 151 mg potassium; 12 g carbohydrates; 2.4 g fiber; 2.1 g protein; Vitamin B-6 2%; Vitamin E 8%; Calcium 2.2%; Copper 10%; Iron 4%; Magnesium 8.4%; Manganese 21.3%; Phosphorous 5.6%; Riboflavin 3.6%; Thiamin 3.3%; Zinc 3.6%      3 Points Plus

Recipe source: adapted from Ginger Lemon Girl


Fudge Babies

Posted on

I’ve been seeing raw desserts around the blogosphere for a while now and am kind of late in joining in on this remarkable food trend.  I finally made the first raw dessert recipe I ever saved after I started seeing it in varied forms on other blogs.  And I was blown. away.  I’ve made other raw desserts since, and these are still my favorite.

These things are called Cocoa Nibbles on the blog I nabbed them from, but I think Katie’s name for them, Fudge Babies (same ingredients, slightly different recipe), is much more apt.  Because they really do have the consistency of fudge!  And they’re healthy.  Gluten-free.  Fruit-sweetened with no added sugars.  Vegan.  Simple.  Easy.  Perfect for a summer treat because there’s no cooking involved, and they’re served cold.  And did I already say they’re amazing?

Fudge Babies

Printable recipe
Printable recipe with picture

½ cup raw cashews (or any other nut you love)
1 ¼ cups Medjool dates, chopped
2 tablespoons cocoa powder
Optional add ins: vanilla, 6 leaves mint, chopped; ¼ – ½ tsp chili flakes; 1 tbsp chopped candied ginger; 1 tbsp raw cocoa nibs; 2 tsp freshly grated orange rind; ½ tsp cinnamon, or play with other spices of your choice

In a food processor, process the nuts, dates and cocoa until you have what looks like a fine meal. Sprinkle with optional add-ins, if using, and continue to process until the mixture comes together as a ball that rolls around the edge of the processor bowl.  The “dough” is ready when, if you pinch some and press it between your fingers, it sticks together readily and looks a bit shiny. (If you are using regular dates, the mixture might be too dry to produce this type of dough, in which case you can sprinkle up to 2 teaspoons water and proceed as above).

Pull off pieces of dough and roll into truffle-like balls, placing on a plate.   Go ahead and eat one while they’re room temperature and give a little sigh of pleasure.  Cover with plastic wrap and refrigerate  at least two hours or overnight.  They are much better cold, as they firm up considerably and will attain the texture of a dense fudge.

Makes 16 fudge babies

Per fudge baby: 61 calories; 2 g fat; 12 g carbohydrates; 1.3 g fiber; 1 g protein; 2 Points Plus

Recipe source: slightly tweaked from The Copycat Cook, while the name came from Chocolate-Covered Katie, who uses a similar recipe.