RSS Feed

Tag Archives: sweet

Sweet Salsa Slow Cooker Meatballs

Posted on

I hope everyone had a wonderful and safe Independence Day!  It was the best 4th of July of my whole life, and hands-down the best day Joshua’s ever had period. I want to share some photos but will be doing that tomorrow.

Today I have a simple crockpot meal that is great any time of year, because in summer, it doesn’t heat the kitchen, and in winter, it’s just nice to have something hot and ready at the end of a cold day.  I got this recipe from my friend, Holly, who actually had posted it in response to a mutual friend’s request for crockpot recipes on Facebook. I nabbed it and made it soon after because I’d just made my own apricot jam.  These were very satisfying and tasty.  Hope you enjoy, and stay cool!

Sweet Salsa Slow Cooker Meatballs

Printable recipe
Printable recipe with picture

1 (26 oz) bag frozen meatballs
3 bell peppers in different colors, sliced (optional)
1 (24 oz) jar salsa
1 (18 oz) jar apricot preserves

Place the meatballs in the bottom of your slow cooker and layer the bell peppers over, if you’re using them.  Whisk the salsa and apricot preserves together in a bowl, and pour over the top.  Cover and cook on low until heated through, 6-8 hours. Holly suggests serving over rice or with mashed potatoes and green beans.

Recipe source: adapted from Holly W.

Advertisement

Cinnamon Freud Banana Bread

Posted on

I was assigned to Karen’s blog, Cinnamon Freud, for the Secret Recipe Club this month. She’s a counseling psychology doctoral student who also loves to cook and bake. How genius is her blog name?! I know she must get that a lot, but it’s true. Genius.

So anyway, last month I chose banana bread for my SRC assignment and Debra suggested I do banana bread every month because of my outrageous obsession with it. Although I didn’t intend to take her up on that challenge, as soon as I received my SRC assignment, I looked to see if Karen had a banana bread recipe, because I had a bunch of bananas that were really overripe and needing to be used. And she did – this recipe, in fact.  I made this bread the same day I received my assignment – the quickest I’ve ever done it!

Since she simply called it banana bread, and I have way too many banana recipes on my blog to call it just banana bread, I added her blog name into it.  I couldn’t resist – it’s just so catchy!  :)  My second choice for this bread’s name would be “Dessert Banana Bread.”  This bread has more sugar than normal (which I totally am on board with – the more sugar the better, as far as I’m concerned), making it a bit more indulgent and appropriate for dessert…with a scoop of ice cream and caramel sauce on top, of course. haha! ;)  Oh and I have to tell you this bread is excellent with black walnuts. I made one plain, one with black walnuts. They were beautiful – sweet, dense, soft & velvety, just perfect.  These disappeared FAST – a definite winner!

Cinnamon Freud Banana Bread

Printable recipe
Printable recipe with picture

3 1/2 cups all purpose flour
3 cups granulated sugar
1 teaspoon salt
2 teaspoons baking soda
1 teaspoon ground nutmeg
1 teaspoon cinnamon
1-2 cups mix-ins (nuts, chocolate chips, etc)
4 eggs, room temperature
1 cup vegetable oil
2/3 cup water
1 1/2 cups mashed bananas (about 3 bananas)

Preheat oven to 350°F. Grease 2 loaf pans and set aside.

In a large bowl combine flour, sugar, salt, baking soda, nutmeg, cinnamon, and any mix-ins you want to add. In a separate bowl, whisk eggs until blended, then add the remaining ingredients, beating until combined. Add approximately 1/4 cup dry ingredients into the wet. Mix until just combined. Repeat with remaining dry ingredients.

Spread into prepared loaf pans & bake for 55-70 minutes, until golden brown and a toothpick inserted in center comes out clean or with a few moist crumbs. Remove from pans and cool completely on wire racks.

Recipe source: Cinnamon Freud

***

I usually keep my recipe posts and baby posts totally separate, but since I haven’t been posting very much period, I just can’t resist including some baby love. :)  Here he is being a cloth diaper and baby leg warmers model. :D

Be sure to check out the other Group C Secret Recipe Club contributions this month by clicking the linky frog below!

Sweet Buttermilk Cornbread

Posted on

I’m a newly established fan of sweet cornbread, and although I have some good recipes for sweet cornbread in my arsenal, I was lacking one that called for buttermilk.  I do have one with buttermilk for the hard-core Southern cornbread fans, but since I like sweet cornbread, I had to make one for the folks like me who’d like to have a sweet cornbread recipe that calls for buttermilk when that’s the only kind of milk they have on hand.

As was the case a last week when I made a big pot of spicy chili and wanted some sweet cornbread to go with it.  This is perhaps the most tender cornbread I’ve ever made, and when fresh from the oven, is so close to the texture of a cake.  The next day it’s more sturdy, but still the crumb is quite delicate compared to regular cornbread.  I loved it!  Balanced our spicy chili perfectly. :)

Sweet Buttermilk Cornbread

Printable recipe
Printable recipe with picture

1 cup (4 1/4 oz) all-purpose flour
1 cup (4 7/8 oz) cornmeal
2/3 cup (4 3/4 oz) granulated sugar
1/2 teaspoon baking soda
1/2 teaspoon salt
2 eggs
1 1/4 cups buttermilk
1/2 cup vegetable oil

Preheat oven to 350 degrees. Grease an 8×8 square pan (I used bacon grease) or a 10 inch cast iron skillet; set aside.

In a medium mixing bowl, whisk together flour, cornmeal, sugar, baking soda, and salt until combined. In a separate smaller mixing bowl, beat the eggs, then whisk in the buttermilk and oil. Pour into the cornmeal mixture and stir together until mostly blended but a few lumps remain. Let the batter rest for five minutes, then pour into prepared pan and bake for 30 minutes (start checking at 20 minutes for a cast iron skillet) or until a toothpick inserted in the center comes out clean. Serve warm with butter.

Recipe source: a marriage of my Favorite Cornbread and Grandmother’s Buttermilk Cornbread from allrecipes.com

Soup & chili weather is upon us, and cornbread is the perfect accompaniment!

Favorite Cornbread – my pictures don’t do this cornbread justice.  It is my favorite and probably will always be my favorite.

Homestead Cornbread – no flour, no sugar! Naturally gluten-free.

Lighter Northern Cornbread – great cornbread doesn’t have to cost the calorie bank an arm and a leg.


Favorite Blueberry Muffins

Posted on

These are currently my favorite blueberry muffins.  For me, the best blueberry muffins are stark white (no brown sugar or cinnamon, please) to contrast the pretty purplish blue of the bursting berries, a little dense, and quite sweet.  My perfect blueberry muffin is also leavened with baking powder, as baking soda tends to give the blueberry juice a greenish tinge and the color appeal is very important to me in a blueberry muffin.  In essence, my ideal blueberry muffins are blueberry cupcakes disguised as breakfast by the heaviness of the crumb and a lack of frosting.  Though a nice crumb topping is certainly not out of the question. :)

Thanks to Carolyn of Inner Chef for introducing me to this fabulous recipe!  It’s now my go-to, though I desperately need to make a batch with the crumb topping, as I’m sure I’ll love it even more.  Thanks for helping me using up some of my Grandpa’s blueberries, Carolyn!  (I inherited 16 pints back in March in a very strange way–I really need to share the story!)  Thankfully, between several batches of these muffins, eating the blueberries straight, and this pound cake, not a single pint had to go to waste. :)

Favorite Blueberry Muffins

Printable recipe
Printable recipe with picture

1½ cups all-purpose flour
¾ cup granulated sugar
½ teaspoon salt
2 teaspoons baking powder
⅓ cup vegetable oil
1 egg
⅓ cup milk
1 cup fresh blueberries*

Crumb Topping (optional)
½ cup granulated sugar
⅓ cup all-purpose flour
¼ cup butter, cubed
1 ½ teaspoons ground cinnamon

*I used 1 1/2 cups fresh blueberries, which made each muffin bursting with berries (we loved this). 1 cup will give you a more typical blueberry muffin.

Preheat oven to 400 degrees F (200 degrees C). Grease muffin cups or line with paper liners.

Combine 1 ½ cups flour, ¾ cup sugar, salt and baking powder. Place vegetable oil into a 1 cup measuring cup; add the egg and enough milk to fill the cup. Mix this with flour mixture. Fold in blueberries. Fill muffin cups right to the top, and sprinkle with crumb topping mixture.

To Make Crumb Topping: Mix together ½ cup sugar, ⅓ cup flour, ¼ cup butter, and 1 ½ tsp. cinnamon. Mix with a fork, and sprinkle over muffins before baking.

Bake for 20 to 25 minutes in the preheated oven, or until a toothpick inserted in center (not into a blueberry) comes out clean.

Recipe source: Inner Chef

Note: I photographed my muffins the day after I baked them, so the blueberries had withered up a little as the juices absorbed into the muffins, making them crazy moist. Although we enjoyed them more after storing 8 hours in an airtight container (I baked them the night before), rest assured they will be beautiful and not withered when you take them out of the oven.

Favorite Cornbread


With three different cornbread recipes on my blog already, you might think I was cornbread crazed since I’m adding another.  Well, I guess maybe I am.  Growing up, we practically lived off of beans and cornbread during the winter months.  Plain pinto beans with no spices save salt, and whole wheat cornbread that was dry, not sweet at all, and was perfect for absorbing copious amounts of salty butter.  It might not sound particularly tasty, but we loved it.  I think it was the magic of butter, which we surprisingly were allowed to consume without limits since Grandpa deemed it a healthy fat and Mom learned all her health-nut ways from  him.  So we loved our beans and butter, er, cornbread.

This cornbread is the antithesis of the cornbread I was raised on, and truth be told, the first time I made it I was completely aghast that Mel dared to call it cornbread.  This wasn’t cornbread, this was cake.  And her whipped honey butter? The frosting!

But everyone (I brought it for a chili day at work) loooved it.  I didn’t bring the honey butter the first year and at first, some were disappointed, but after tasting it said, “This doesn’t even need butter!”  It really doesn’t.  It practically melts in your mouth, it is so soft and moist.  I noticed when I brought the honey butter last year they barely touched it.  The cornbread is perfect on its own but if you really think you need some sweet butter, go to Mel’s blog for her unique recipe, which includes marshmallow fluff and is very good.

Anyway, after making this for others for two years and taking little tastes, I finally made it just for us for the first time last week when the temps were cooler and I wanted something to go with some ham & bean soup.  I have to say, I’m a convert.  Sorry, Mom.  This is definitely my new favorite and I have to tell you, Dennis is gaga for this stuff and he would never eat any of my cornbread before, not even Jiffy mix, which is similar to this, just not as soft.  The Lighter Northern Cornbread recipe on my blog is also crazy good, but it’s lower in fat and sugar so it’s not quite as melt-in-your mouth.  If you’re looking for some full fat goodness, I gotcha covered.

Favorite Cornbread

Printable recipe
Printable recipe with picture

1 ½ cups (6 ¼ oz) all-purpose flour
½ cup (3 oz) corn meal
2/3 cup (5 oz) granulated sugar
1 tablespoon baking powder
½ teaspoon salt
1/3 cup vegetable oil
3 tablespoons butter, melted
2 eggs, beaten
1 ¼ cups milk

Preheat oven to 350F.  Spray an 8×8 baking dish with oil; set aside.  Whisk together dry ingredients in a medium mixing bowl, make a well and add oil, butter, eggs, and milk into the center. Stir well until mixed (batter will be runny – don’t be alarmed!). Pour into prepared pan and bake for 35 minutes. This doubles perfectly for a 9X13-inch pan, but will have to be baked longer (start checking after 45 minutes-I can’t remember how long it took when I doubled it in previous years).

Recipe source: Mel’s Kitchen Cafe

My Week as a Farmer, part II: When Arliss Attacks

Posted on

Continued from My Week as a Farmer, Part I.

Last week, I introduced you to all the animals on the Allen family’s farm, except for one.  There is one canine that they couldn’t leave out with the others.  Because he’s a menace and a danger.  A chicken murderer, and as we would soon discover, a thief to boot.  Meet…ARLISS! (Cue scary music.)

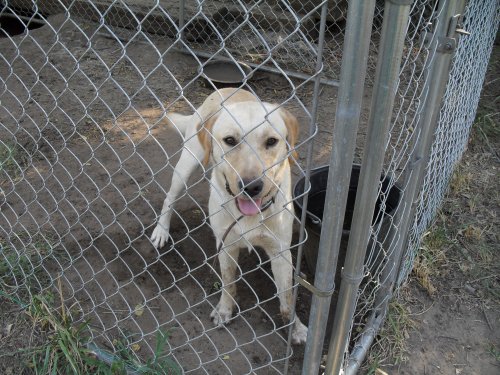
Don’t let the smile fool you.  This boy is a trained killer and is frequently unleashed to go hunting.  Failure to recognize the danger could result in serious mayhem and injury.  Knowing the risks, we disregarded our better judgment and let him out every day to get his exercise.  The first sneak attack came when Dennis decided to rest in the hammock.  Arliss went straight for the jugular.

He didn’t count on Dennis knowing kung fu and putting up a fight, however.

So Arliss changed tactics and decided to come at him from the other side.

But Dennis was ready for him and put up a good defense.

The battle was fierce, but the match so even that in the end, they called a truce.

Trouble started again when Dennis picked the summer squash and threw it to dislodge the bugs that were crawling on it.  Arliss saw his opportunity and went in for the kill.

Utterly thrilled with his catch, he proceeded to roll on his back with the squash in delight.

After his victory roll, he wasted no further time in devouring the squash.

“I is Arliss…”

“I crush mines enemies…”

“I takes no survivors.”

Later in the week, he managed to paw an egg that Dennis had placed on the other side of fence so he could roll it in closer to eat it!

His next attack was focused at a female of his species.  Unfortunately for him, it was our Jessie!  He was determined to pick up a scent on her that she has never had, since she is spade, but he wouldn’t give up trying and things got ugly fast.

It started in the pool.  They circled each other, forming a yin yang in the murky water as his nose grew ever nearer to her butt and she went ever faster to avoid his invasion of her personal space.

Arliss made no bones about what he was after.

The constant presence of his nose in a private area started to irk our girl.  She promptly jumped from the pool and he chased after her tail.  Pun intended.  And we soon had to break up a dog fight!
Sorry, Arliss, this is one battle you will never win with a spade female.
Jessie found a private corner to herself and the peace was restored.
Feeling pretty pleased with himself, Arliss rewarded a hard day’s work with a soak in the pool as I filled it with fresh water.
 Until I made the mistake of putting myself in a prone position.  And again, he goes in for the kill!
After taking a siesta in the sandbox.  Of course.
Wet dog + sand box = messy human that receives his love.  I went home each night covered in mud, dog hair, and scratches.

And I wouldn’t trade my week as a semi-farmer for the world!  I hope one day we will have a little farm of our own so I can come in each night covered in mud and poo, feathers and fur, thorns and blisters, each blissful, horrible, exhausting day.  God love the farmers.

Lighter Northern Cornbread

Posted on

The civil war may have ended over 100 years ago, but there are still some battles between the north and south that continue to rage.  The cornbread issue, for instance.  It basically boils down to unsweetened (the south) versus sweetened (the north).  (Isn’t it ironic that the issue of the iced tea is the opposite, the south preferring sweetened?)  I was raised on a hearty whole wheat, unsweetened variety, and loved smothering it with butter and eating it with pinto beans during the cold winter months.  But now that I’m an adult and making my own cornbread, I most often make the northern kind since my hubby won’t eat the other.   I’m Switzerland–a fan of both, which is apt since we live in the middle of the US and aren’t really in the north or the south.

For you that enjoy northern-style cornbread, you can find the absolute best recipe here, but if you’re looking for something a little lighter, I’ve come up with a great one for you that won’t disappoint!

Lighter Northern Cornbread

Printable version
Printable version with picture

1 cup all-purpose flour
1 cup fine yellow cornmeal
½ cup sugar
1 tablespoon baking powder
1 teaspoon salt
1 cup nonfat milk
½ cup canola or vegetable oil
2 eggs, lightly beaten

Preheat oven to 350; grease a 9×9 pan and set aside.  Combine dry ingredients in large bowl and stir.  Add wet ingredients and stir just until mixed (it’s OK if there are some lumps).  Bake 30-40 minutes or until toothpick inserted in center comes out clean or with a few moist crumbs. Cut into rows of 4 x 4 to make 16 squares.

Per square: 137 calories; 5.5 g fat; 19 g carbohydrate; .8 g fiber; 3 g protein

Recipe by Veronica Miller

Out of curiosity, how do you prefer your cornbread and tea?  Sweet or not?

Incredible Dinner Rolls (bread machine)


It took countless batches of dinner roll failures over the course of two years to finally perfect a recipe to my tastes. This one has everything I love in a dinner roll: soft, light, slightly sweet, and simple to make. They are just incredible, especially when warm and served with butter.

Incredible Dinner Rolls
Printable recipe

1 egg
3 Tablespoon butter
1 cup milk
1 teaspoon salt
4 cups all-purpose flour
¼ cup sugar
2 ¼ teaspoon (1 package) bread machine yeast*

Crack the egg into a Ziploc bag and place it in a bowl of hot tap water, so that it will come quickly to room temperature.

Melt the butter in a small saucepan over medium heat, then stir in the milk and heat the mixture until it reaches 110-115 degrees, or until it feels very warm to the touch.

Squish the egg while it’s inside the bag until it looks lightly beaten. Empty it into the bread machine pan; add the milk mixture, and then top with the remaining ingredients in the order listed. Set the machine to the dough cycle.

When the machine starts to mix the dough faster, check on it and, if necessary, use a spatula to help incorporate the flour. I always have to do this, but that may be because my machine is old and sub-par.

Once the cycle is complete, remove pan and punch down dough. If you’re making 12 large rolls, spray a 9×13 pan with cooking spray. If you’re making 20 standard-size rolls, spray two 9-inch round cake pans.

Divide the dough in half, and then divide each half into 6-10 pieces, depending on the amount you want to make. Shape each piece into a ball as you pull off the dough, and place in pan(s), spacing evenly.

Cover with clean cloth(s) and allow to rise in a warm place for about 30-45 minutes, or until rolls are doubled in size.** Preheat oven to 375 while your dough is rising.

Bake for 15-18 minutes or until golden-brown. When done, remove from oven and rub the end of a cold stick of butter over the tops of the rolls. Serve warm & with lots of butter.  :)   If making in advance, store them in an airtight container (I always use a gallon-size Ziploc bag) and reheat them in the oven when you’re ready to serve them (be sure to remove them from the bag first!)

*Also marketed as “rapid-rise” and “instant” yeast.
**I most often use my oven for rising bread. I preheat it to its lowest setting (170 degrees) once the dough begins its first rise in the bread machine and turning it off when it’s done preheating, that way it’s warm but not too hot once I place the pans in to rise. That works the best. (If you use this method, you’ll have to remove them after they’re done rising, preheat the oven, and let the rolls rest on the counter until it reaches 375.) If the top of your oven gets warm when you preheat it, you could also set your pans up there. The last trick I use is to place the pan on a heating pad set to low.
***You could also make these by hand or using your stand mixer with dough hooks, letting the dough rise in an oiled bowl for one hour or until doubled after kneading. I don’t know how long you’d have to knead it, though. I’d estimate 10 minutes.

%d bloggers like this: