This is a very simple chocolate cake but I daresay it might be even better then my previous favorite. It is incredibly moist and so tender, with the perfect amount of chocolate flavor. It is a perfect cake to whip up when you don’t have time for a fussy recipe, and who needs fussy when simplicity brings such deliciousness? I hope you try it.
Preheat oven to 350°. Grease a 13×9-in. baking pan, or spray with cooking oil. In a large bowl, whisk the first six ingredients. Stir in eggs, oil and buttermilk. Add water; stir until combined.
Transfer batter to prepared pan. Bake 35-40 minutes or until a toothpick inserted in center comes out clean. Cool completely in pan on a wire rack. Frost cake. If desired, decorate with sprinkles.
Chocolate Buttercream Frosting: In a large bowl, beat 1/2 cup softened butter until creamy. Beat in 2 cups confectioners’ sugar, 1/4 cup baking cocoa, 1-1/2 teaspoons vanilla extract and 3-4 tablespoons 2% milk (I used heavy cream) to achieve desired consistency.
*Veronica’s notes: I sifted my dry ingredients since my cocoa powder was really lumpy. If you find yourself in the same boat, with big clumps of cocoa powder in the dry ingredients that won’t mix out, I would suggest sifting so you don’t have any clumps.
Welcome to another edition of Things I Like Thursday (TILT)! Today begins a series containing the many things I love to use to make cake & cupcake decorating quick and easy.
I’m going to start with just TWO piping tips, because I use them for nearly every cake, and/or cupcake I make. They are very inexpensive, and worth the small investment. Each of these have had about twenty five years of use between my Mother and I, and have stood the test of time. I would not be nearly so fond of making cakes and cupcakes if it weren’t for these tips.
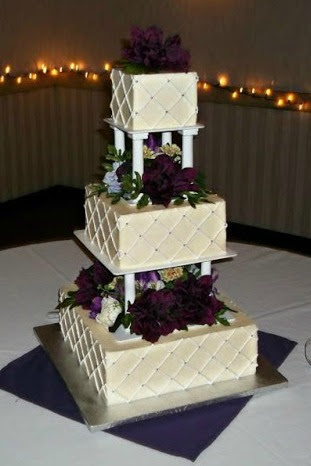
The first is Wilton’s “Icer Tip” #789. I used it to frost both wedding cakes above, and nearly every other cake I’ve ever made. It’s wide and flat and you use it to pipe frosting in an even layer in stripes all over your cake. This means you don’t have to crumb coat it, it means that once you stripe your cake, all you have to do is smooth the lines. (Don’t forget my water bottle trick for a perfectly smooth finish on your frosted cake!) You can see me in action using my trusty icing tip in the video below.
The second is just as invaluable to me, as I now go the easier route of cake-making, doing cupcakes instead. All it takes is 1-2 seconds per cupcake to pipe on a pretty swirl and voilà! You’re done. It’s probably the fastest thing you’ll ever do with this nice a result.
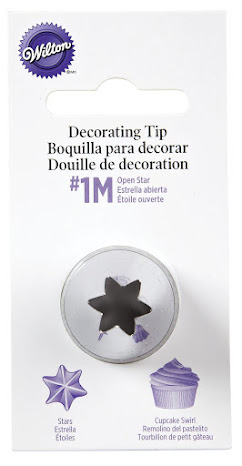
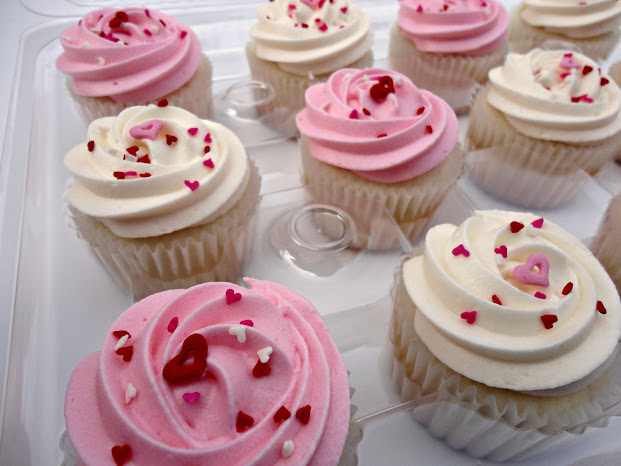
I use Wilton’s Tip 2110 (1M) for nearly all my cupcakes, as I just prefer the size of swirl it makes, and I also use it to decorate my most popular cake on this site, the Cookies ‘n Cream Cake, along with CW’s Strawberry Shortcake, and many pies, like Key Lime Pie, and yesterday’s Strawberry Cream Cheese Pie. Pretty much anything requiring a swirl of whipped cream, this is the tip I use. I have a video tutorial on how to use it to frost cupcakes here if you want to see this tip in action.
I hope this TILT was helpful, and that you haven’t been overwhelmed with the sheer amount of links I was able to provide in just one post. Ha! Catch you next week with another cake-y edition of Things I Like Thursday.
Some links are affiliate. All opinions are my own, I wouldn’t recommend something I didn’t stand behind 100%.
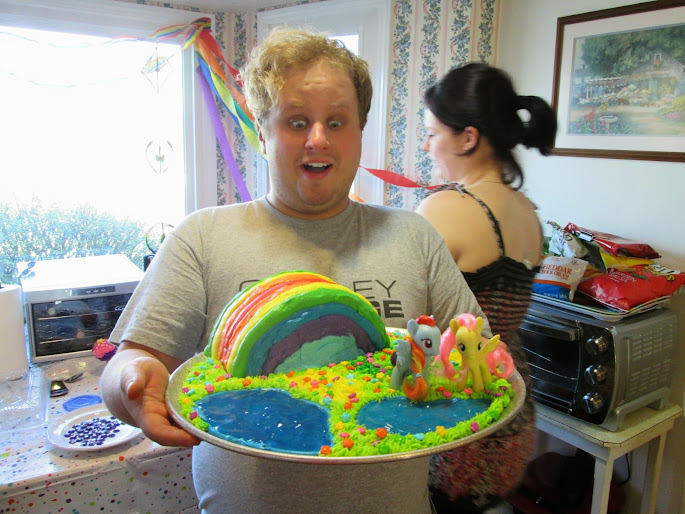
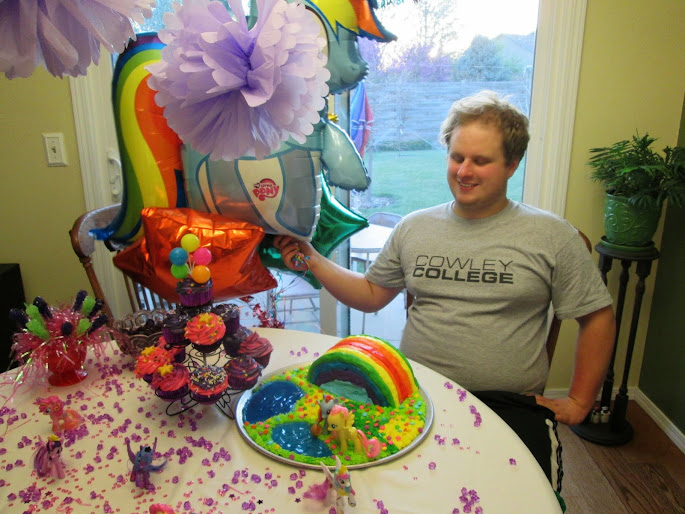
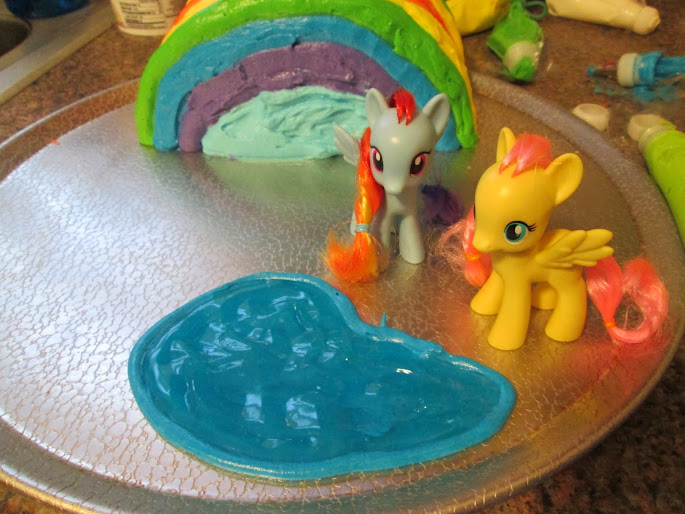
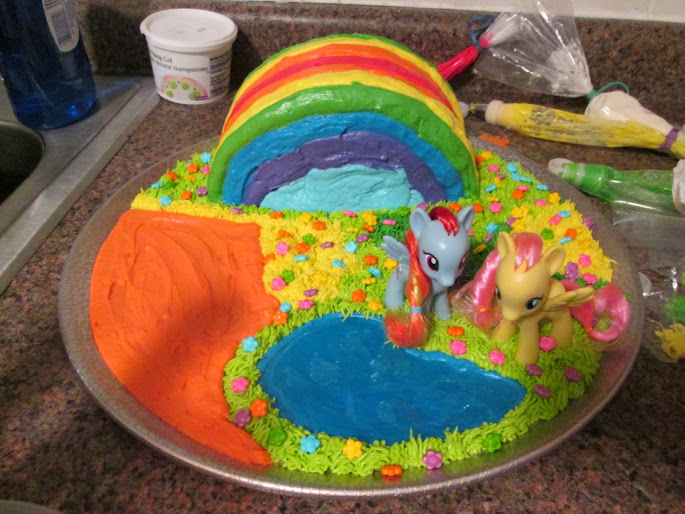
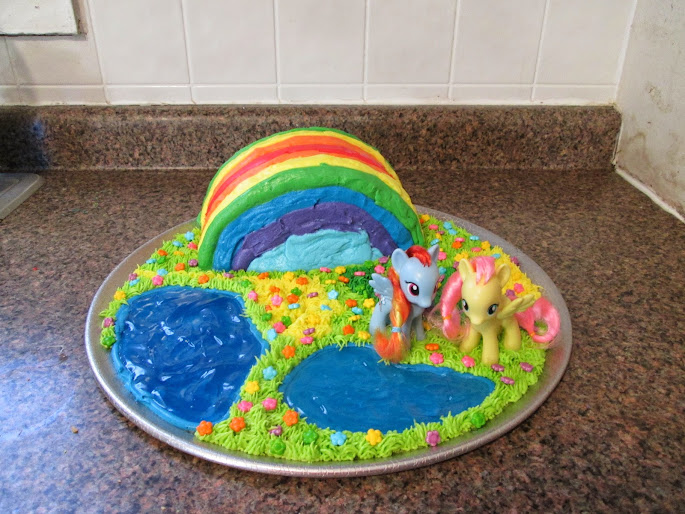
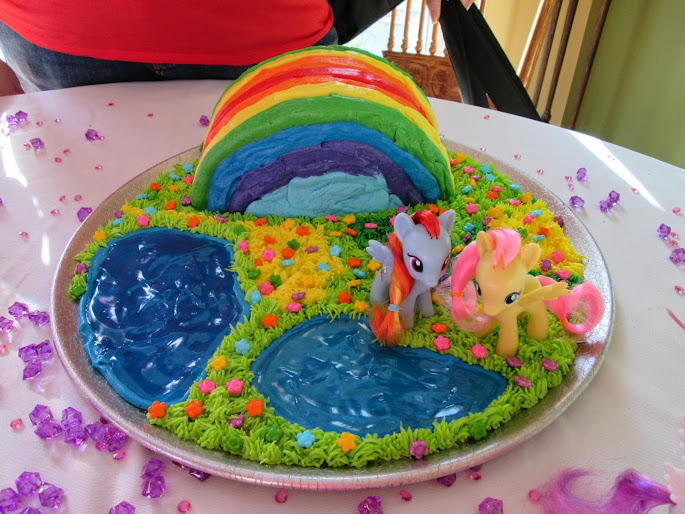
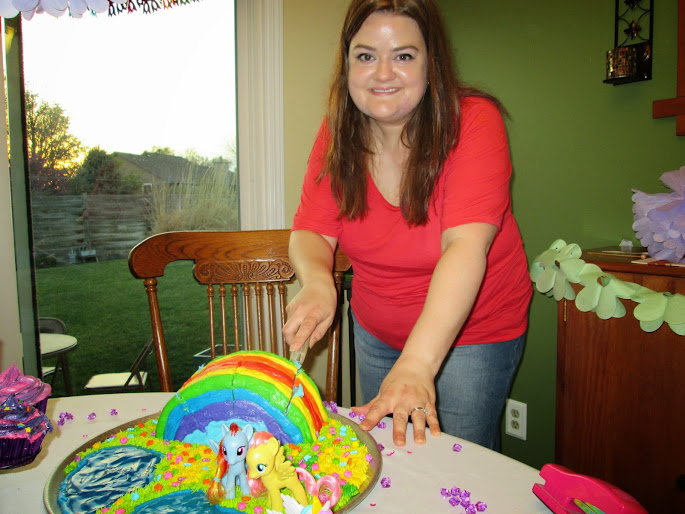
My little sister (that’s her with the black ponytail) threw a My Little Pony birthday party for her boyfriend last week. That’s right, he’s a Brony. A brother who likes My Little Pony. I love that he’s secure enough in his masculinity not to have any shame about it! He was so excited about the party and while she was taking millions of pictures of him posing with ponies, he declared it to be the best birthday party of his life.
Although I’ve sworn off decorated cakes (multiple times), she talked me into making the cake for his party. (What convinced me was her offering a really strange amount of money – not like $20 or $30, but $32.73. It was so weird and funny I had to say yes! lol) It was a super-simple cake and I thought I’d share how to make one if you ever have need of a rainbow or MLP cake.
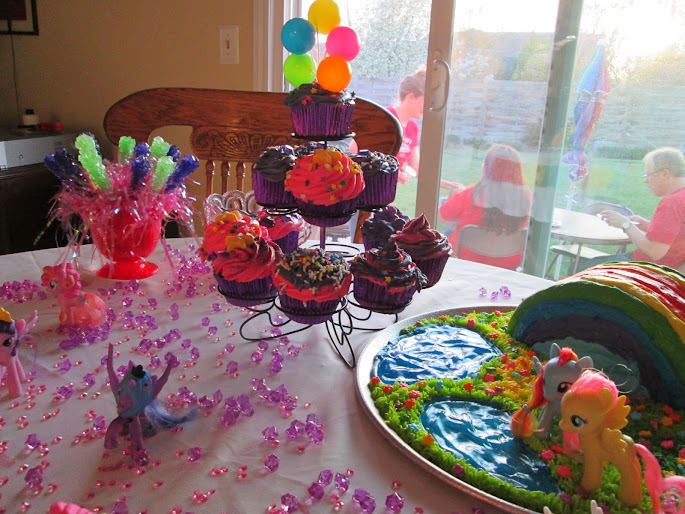
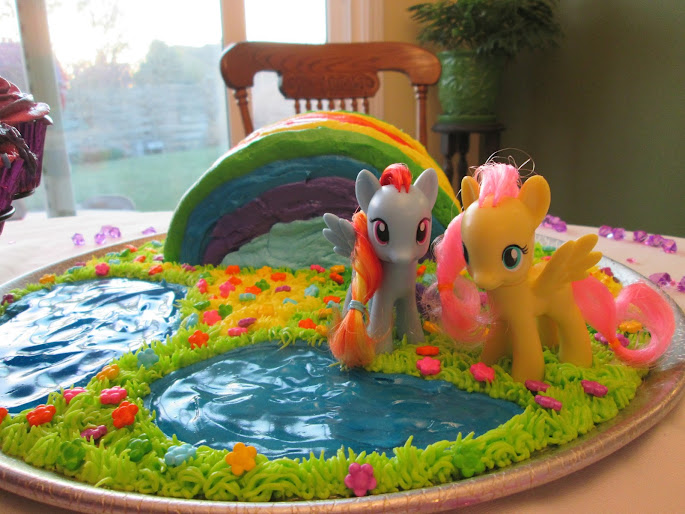
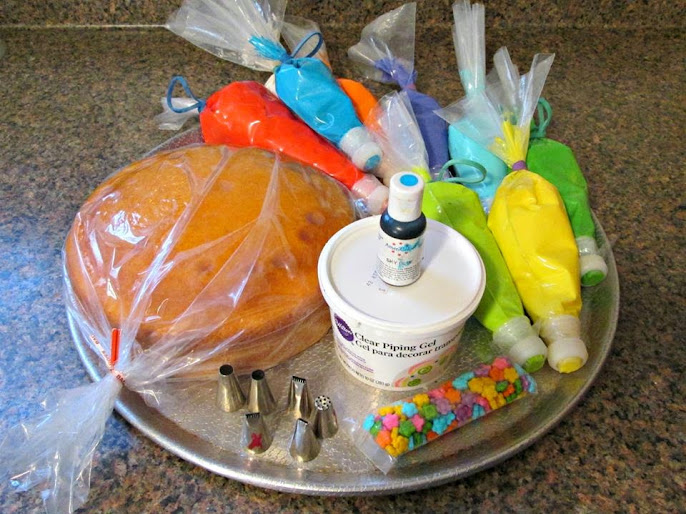
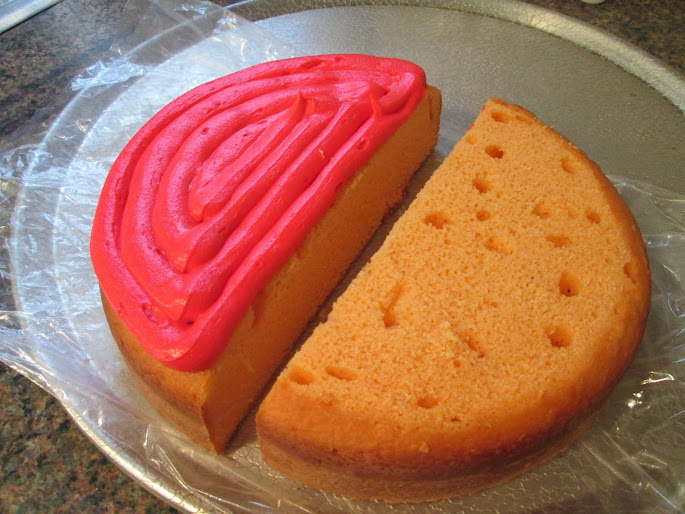
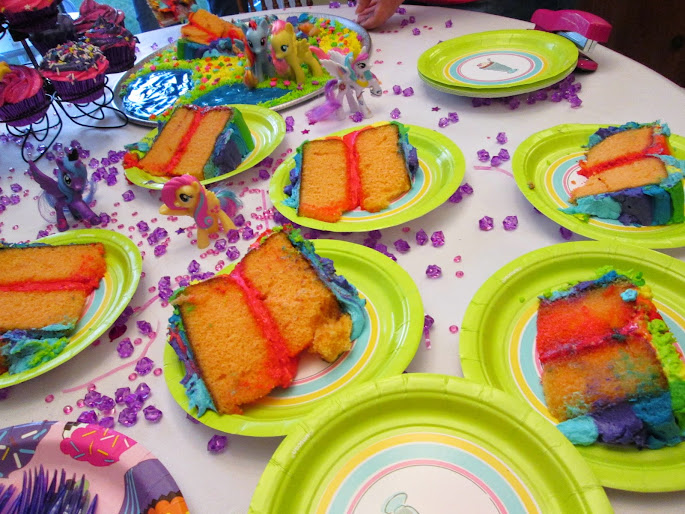
You only need a round single layer of cake. If you make it in a 10″ pan, a cake mix will fit in it and the finished cake will serve up to 16 people, although it will be pretty difficult to serve. I made mine in an 8″ pan and baked the rest of the batter into cupcakes, so this cake only served 8 but with the cupcakes it would have served 20. You will also need red, orange, yellow, green, blue, purple, and sky blue frosting for the rainbow. Pack the frosting into disposable pastry bags, preferably fitted with couplers, though you can just slice the tip off the bag to pipe the frosting directly onto the cake out of the bag if you don’t own a lot of couplers or don’t want to buy them. If you are going to make this into a My Little Pony cake, you will also need extra green for the grass (I used a lighter green than in the rainbow). You’ll need some flower sprinkles (I used these) and a grass tip (Wilton #233, and ignore all the other tips – I didn’t end up using them). If you want to make a pond, you’ll need some clear piping gel and sky blue gel coloring (available at Walmart by the cake decorating supplies in the arts & crafts section).
Slice your cake in half and squeeze/spread frosting onto one side. I made too much red so that’s the color I chose to use.
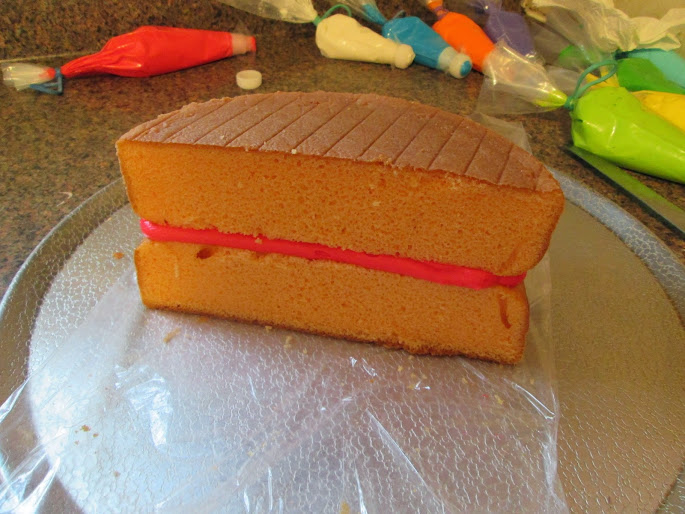
Sandwich the halves together.
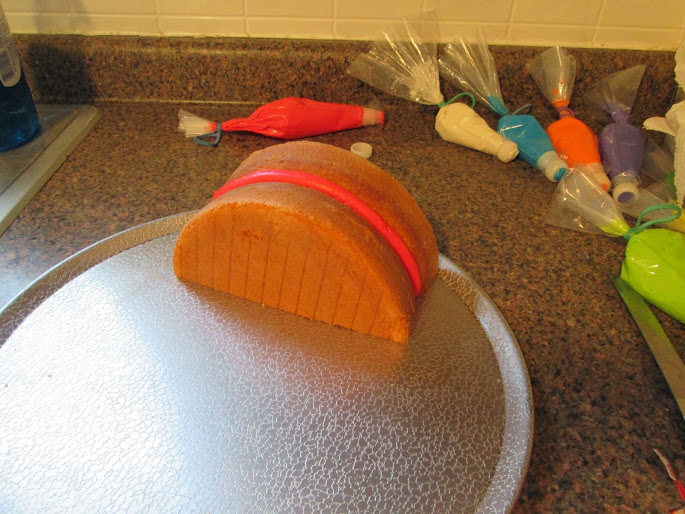
Place the cake cut-side down to your platter or cake board.
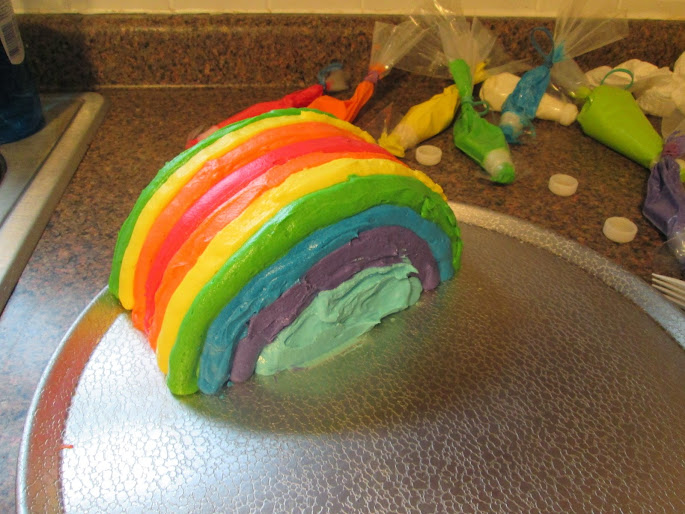
Squeeze frosting onto the cake, starting at the middle with the red (I had to build it up a little to make it higher since it dipped down), making stripes in this order: red, orange, yellow, green, blue, and purple. I just squeezed it out from my coupler without a tip and I thought this made the perfect width of frosting for each stripe.
Repeat down the other side and fill in the bottom of both sides with sky blue frosting to make it look like you’re looking through to the sky underneath the rainbow.
If you’re going to make a MLP cake, figure out where you’re going to put the ponies, then pipe a blue border to outline where your pond(s) will be. Using your (clean) finger, spread a thin layer of blue frosting over the platter or cake board so that the silver (or other color of the board) doesn’t show through the piping gel. Tint enough piping gel to fill the pond(s) with sky blue gel color and spread into the pond, creating some ripple effects with your spoon.
Pipe grass onto the rest of the platter and when you run out of light green, use up the rest of your darker green, then panic and use up your yellow. Then realize there is no other color left that is suitable for grass so be really strange and spread some orange over the rest of the platter, hoping it won’t look too weird if you write a birthday message across it. Sprinkle your flower sprinkles all over the grass.
Realize the orange is just wrong, and scrape it all off, rejoicing that you found some extra blue you had set aside in a bowl. Use it to pipe a border for another lake and repeat the steps to create a second lake. Rejoice that you saved a little bit of white frosting and tint it green to go around the lake, then steal some of the flower sprinkles to put on the new grass. Much better.
To serve, cut it in half down the middle, then cut each half in half, angling toward the center. Essentially, you are cutting it the way you would if it was right-side up, but from the side instead of the top. Cut each thick slice in half and use a spatula or cake server to draw out one of the bottom pieces (most likely two pieces will come out and you’ll have to pull the top piece off onto another plate. Once the first piece is out, serving the others is pretty easy as they just start falling onto your spatula.
I don’t usually post on Saturdays, but I’ve had the honor of being a guest contributor for whattoexpect.com, a site I go to every week to see my baby’s progress! I really hope you will visit to check out my recipe for Iron Woman Ginger Cake. It’s so nice to have healthier options (especially ones that taste good) during the holidays, and this cake definitely fits the bill!
So I’ve turned into a food blogger rebel. I don’t cook or bake, and when I do its favorites I’ve alreadypostedrecipesfor. Also, I’ve been eating a lot of Taco Bell. Bad food blogger!
Speaking of Taco Bell, I can’t believe I’ve managed to keep it under wraps for so long, but I think I might have ITBES. I may or may not drink the sauce packets to get me through to my next Taco Bell fix. I even put the sauce on my hard boiled eggs and I can almost pretend I’m eating real Taco Bell when I’m snacking at work. I feel a Taco Bell intervention coming my way, so I’m packing my bags, ready to flee to the nearest Taco Bell to set up permanent residence. Pretty sure the employees will protect me from you crazy non-ITBES people. YOU CAN’T MAKE ME QUIT TACO BELL!
So while I’m totally out of control when it comes to doing all the things a good food blogger should do, I at least have a few photos saved from the days when I was a good girl and taking photos of things I’d baked and cooked. Such as this Raspberry Zinger Poke Cake.
I made this for Den’s birthday last December, right about the time the last Raspberry Zingers were disappearing off store shelves. Sad times for Raspberry Zinger lovers. Well cry no more, for you can still get your fix with an easy poke cake! It’s not exactly the same, but it’s good stuff, nonetheless.
I created this with help from Suzie’s recipe and Renee’s recipe, and it couldn’t be easier. Poke cakes are especially good for warmer weather (if you are fortunate enough to be enjoying some right now) because they are served cold, and are really refreshing on a warm day! Or, let’s be honest, it’s also quite nice on a cold December day as well. At least we thought so. :)
1 white or yellow cake mix* (also water, vegetable oil and eggs/eggs whites as instructed on box)
1 box (3 oz.) raspberry-flavored gelatin
1 c. boiling water
1/2 c. cold water
1 container (8 oz.) Cool Whip, thawed
¾ cup shredded sweetened coconut
Bake cake according to package directions and cool completely. Pierce cooled cake all over with a fork. In a small bowl, stir gelatin and boiling water until sugar is dissolved. Stir in cold water. Pour over cake, cover, and refrigerate 2 or more hours (overnight is fine). Frost with whipped cream and sprinkle coconut over the top. Keep refrigerated until ready to serve. Serve cold and refrigerate any leftovers.
If you don’t know about and who CW is, check out Monday’s post: Meet CW.
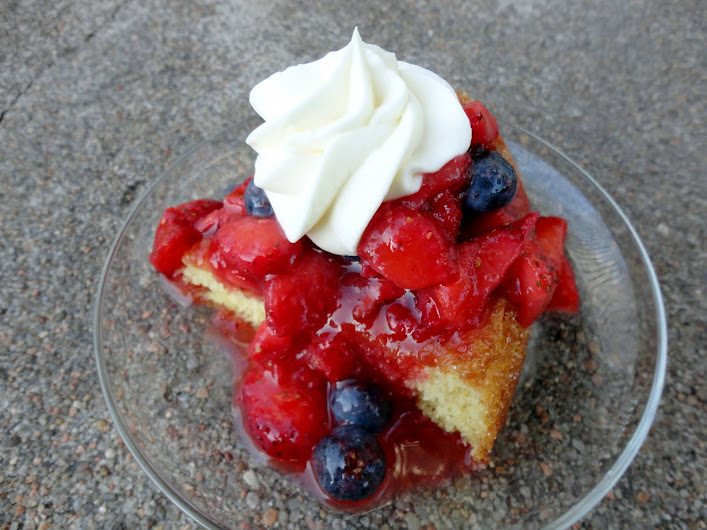
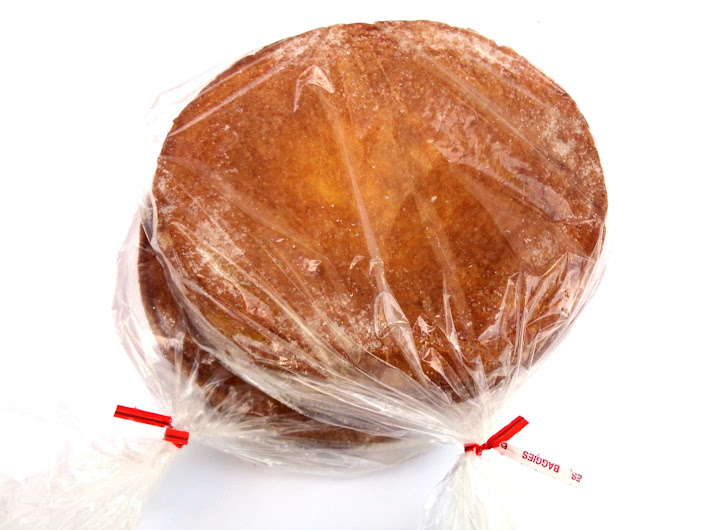
Growing up, Mom would make a very particular kind of strawberry shortcake at least once every summer. She would buy a “Family Style Shortcake” from Dillons, like this:
Then she mixed the tar out of sliced strawberries with honey (to help the strawberry juice come out to play with the honey) and poured that on top, put Dream Whip over that, and served it up once a year in summer after picnics in the park. Don’t know why, but that’s always when we had strawberry shortcake–after picnics in the park. Anyway, since we very rarely had anything sweet, this was such a lovely treat and I particularly loved the flavor of the ripe berries with the local, raw honey.
Mom’s simple strawberry shortcake was so delicious, and just the idea of it brings back fond and mouth-watering memories. But I wanted to be able to create it at home because, although we can still find the exact same shortcake at Dillons that Mom bought twenty years ago, who knows how long they’ll continue to make these and when they stop, I still want to be able to enjoy CW’s shortcake. And I want my grandchildren, or great nephews and nieces at the very least, to be able to enjoy this shortcake. And their grandchildren after that. CW’s shortcake must live on!
Since my youngest sister, Lacey, manages a Dillons deli, I first checked with her to see if she could possibly snag the recipe for me. In a way, I was happy to hear they weren’t baked in house but shipped in. That meant it was experimentation time! I’m not always in the mood to create a recipe from scratch, but I was definitely up for this challenge since the shortcake holds a special place in my heart.
So here’s what I had to go off of to recreate the recipe (yes, I totally stood two inches from the ingredients list to take this picture and yes, I might have gotten some strange looks):
Based on the cake’s texture, flavor, and the ingredients, I decided this cake was pretty much a low-fat sponge cake so I Googled a lot of recipes to create my own that reflected these ingredients as closely as possible. I did omit the buttermilk since it seemed too fussy to have two different kinds of milk, but did add in some vinegar to replace the acidity lost. I also didn’t mess with any ingredients cooks normally wouldn’t have in their kitchens, like whey and dextrin. What is dextrin anyway?
I’m happy to report that while I don’t think I got it spot on, it was close enough that when Lacey tasted it, although she claimed to not remember eating CW’s strawberry shortcake growing up, she looked up with big eyes and said, “I totally remember this taste. I don’t remember eating it, but I remember this taste!”
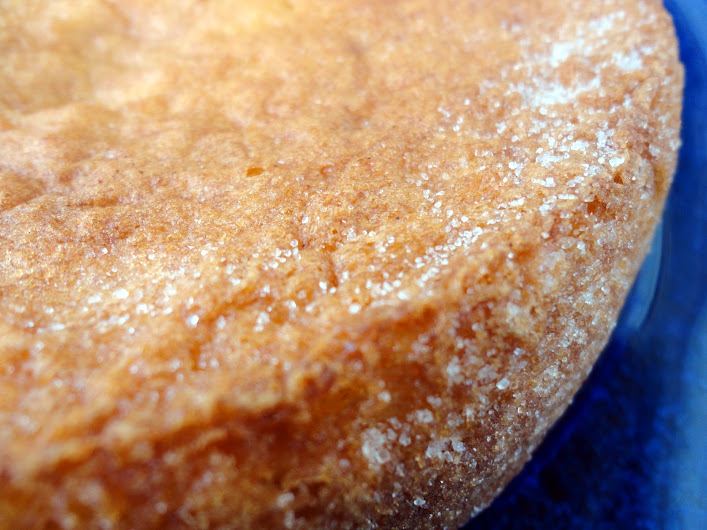
The cake from Dillons is crusted with sugar so I did that with mine, though it’s not necessary. It’s just kinda pretty. :) The cake I created is very spongy and dry, perfect for absorbing the delicious honeyed strawberry juice. Because of its texture, I really wouldn’t recommend using it in any recipe that doesn’t have a juicy topping–that juice is really needed to soften the cake. While the cake is very soft and bouncy to the touch, the texture is tough to cut because it’s so spongy, and it’s hard to cut with a fork until the juices have flowed down into the nooks and crannies of the cake. Once that happens though, you have tender, strawberry cake magic.
I was pretty impressed with the response I got from this cake. I shared it with my family twice, serving one cake at our Independence Day barbecue, then froze the second cake (the recipe makes two) and broke it out a week and a half later for our dessert after a barbecue at the lake. I usually have to ask my family what they think to get any feedback but all I had to do this time was sit back and let the accolades rain down. Adjectives such as amazing, best ever, and incredible were used liberally. Honestly, I’m pretty sure this cake now beats out THE Mocha Crunch Cake for favorite family cake. Check out my nephew gobbling it up at the lake (unless you’re averse to messy kid eaters, then you might want to steer clear):
I stuck with CW’s recipe for the strawberry topping, only using the berries and honey, and it’s just so stinkin’ good. Please try this topping, even if you buy your cake. Just make sure your honey is local and raw to get the best flavor. Also, local raw honey can help with allergies! Bonus!
For the whipped cream, you can use whatever you prefer–Cool Whip, Dream Whip, real whipped cream, or you can use the recipe for stabilized whipped cream I shared yesterday. I first made it with the stabilized whipped cream and the second time with Cool Whip and it was loved both ways. The strawberry topping is the star of this cake and I don’t think you can go wrong as long as you’ve got that. Who would have thought that honey and strawberries could create such magic?
Cake
½ cup whole milk
1 cup sifted all-purpose flour
1 tablespoon cornstarch
1 teaspoon baking powder
½ teaspoon baking soda
1/8 teaspoon salt
3 eggs
½ teaspoon cream of tartar
1 ¼ cups granulated sugar, divided
1 teaspoon vanilla extract
1 teaspoon white vinegar
Berry Topping
1 lb. fresh strawberries
¼ cup local raw honey
Optional: for a patriotic dessert, add 1 cup fresh blueberries
For the cake, in small saucepan, heat milk until bubbles form around edge of pan. Remove from heat; set aside.
Preheat oven to 350 F. Grease and flour two 8” round cake pans; set aside.
Sift flour with cornstarch, baking powder, baking soda, and salt; set aside. In small bowl of electric mixer, at high speed, beat eggs and cream of tartar together five minutes on high speed, until light and foamy. Gradually add 1 cup of the sugar, beating for an additional five minutes, or until ribbons form. Add vanilla and vinegar and mix just until combined. Blend in flour mixture on low just until smooth. Add warm milk and beat just until combined.
Immediately pour batter into prepared pans. Bake 25-30 minutes, or until cake tester inserted in center comes out clean. Turn the cakes out onto cooling racks. Place the racks over the sink and while they are still hot, using the remaining ¼ cup sugar, sprinkle sugar over the tops and rub it along the sides of the cakes. Allow to cool completely before wrapping in plastic wrap or putting in gallon-sized Ziploc bags until ready to use. You will only need one cake for this recipe so you can either freeze one for later, or double the berry topping and whipped cream and serve both cakes at once.
For the berry topping, combine the strawberries and honey in a medium bowl and stir for about 2-5 minutes, until the strawberries start to release their juices and the sauce gets thinner and takes on a red color. Cover and refrigerate until ready to use. If adding blueberries, stir them in before refrigerating or right before topping the cake.
To assemble the cake for serving, place cake on a plate, then cover with the berry mixture, including the juices so they can seep down into the cake. Allow to sit for at least 5 minutes so the juices can soak in, then top with whipped cream, slice, and serve.
Veronica’s note: I originally used nonfat milk since that’s what is used in the Dillon’s cake. The last time I made it, I only had whole milk and it made the cake so much better for it to have a little fat, so I updated the recipe. You can still use nonfat, it’s good that way, but better, more tender, with the whole milk.
Guess what??? It’s Monday and I have the day off with my husband. I’m SO excited! Before I became permanent and my schedule changed, we had the weekends off together, but now we only get one day off together once every five weeks so it’s cause for celebration. I’m going to relish it.
Speaking of my husband and celebrations, I made these cupcakes for his birthday in December, and everyone at the party fell in love. Mel calls these “over-the-top” and I’d have to agree. It starts with a moist, deep chocolate cupcake. Then there’s the cool & creamy mint frosting. Garnished with peppermint ganache and an Andes mint. But there’s more to these cupcakes than what meets the eye, and my only regret is that I did not have the chance to snap a photo of the inside to show you they are also filled with the same peppermint ganache that is drizzled over the top. Making them, you might say, over the top. :)
These would be great for your St. Patrick’s Day festivities!
1 recipe of your favorite chocolate cake*, baked into 24 cupcakes and cooled completely
Chocolate Mint Filling:
1 cup semisweet chocolate chips
6 tablespoons heavy cream
2 teaspoons peppermint extract
2/3 cup powdered sugar
Mint Buttercream:
1 cup (2 sticks, 16 tablespoons) butter, softened to room temperature
8 ounces cream cheese, softened to room temperature
2 lbs. powdered sugar
1/2 cup heavy cream
1 teaspoons pure vanilla extract
2 teaspoons peppermint extract
Green food coloring
24 Andes mints for garnish
For the mint filling, place the chocolate chips and heavy cream in a small microwave-safe bowl and heat for 1 minute at 50% power. Stir. Repeat the process until the mixture is smooth. Stir in the peppermint extract and powdered sugar, whisking until smooth. Let the mixture cool to room temperature (but don’t let it get too stiff) and pour it into a disposable pastry bag fitted with a small round tip, or a squeeze bottle with a tip.
Insert the decorating tip or tip of the squeeze bottle into the center of the cupcake and press gently to fill the middle of the cupcake with the mint ganache. You can be pretty generous, squeezing until you see the top of the cupcake start to rise a little. Repeat with the remaining cupcakes.
For the frosting, in a large bowl, beat the cream cheese and butter until light and fluffy. Add the powdered sugar and mix until smooth. Add the heavy cream and peppermint and vanilla extracts. Beat until light and fluffy. Add green food coloring until the color you like is achieved.
Frost the cooled, filled cupcakes with frosting (using a large star tip, I used Wilton # 1M) or simply spread the frosting in a large dollop (again, you can be generous-there is plenty) with a butter knife or flat spatula. Garnish with a drizzle of leftover ganache (make sure the ganache is completely cool or it will melt the frosting when you drizzle it on top of the cupcake), and an unwrapped Andes mint. Serve at room temperature.
*I used a devil’s food cake mix, but this is my favorite from-scratch chocolate cake recipe.
I had to share a few more photos from his party, which was actually only half for his birthday (our preacher and his wife had a holiday dinner/birthday party combo). One of the games we played was holding paper plates on top of our heads and trying to draw a picture of Dennis playing his guitar without looking. You have no idea how difficult this is until you try to do it! This is what I ended up with:
However, this is what his best friend, Jack, came up with:
Highly suspicious.
Here’s Dennis and Jack trying to look natural after I urged them to try embracing each other for a photo. I don’t think this is natural for most men, but they pulled it off better than I expected. :)
And here’s Dennis practicing his Kung Fu moves with our preacher’s bat’leth (a Klingon weapon…as in something a Trekkie would totally recognize but me, not so much) shortly before we left (and yes, this thing is super sharp and dangerous! Yet he was swinging it like the pro he is.):
Your Klingon Kung Fu is strong, honey.
***
Reminder: this is the last week to get your postcards out to Beverly! You can get the deets here if you missed the announcement: Operation Postcard for Beverly.
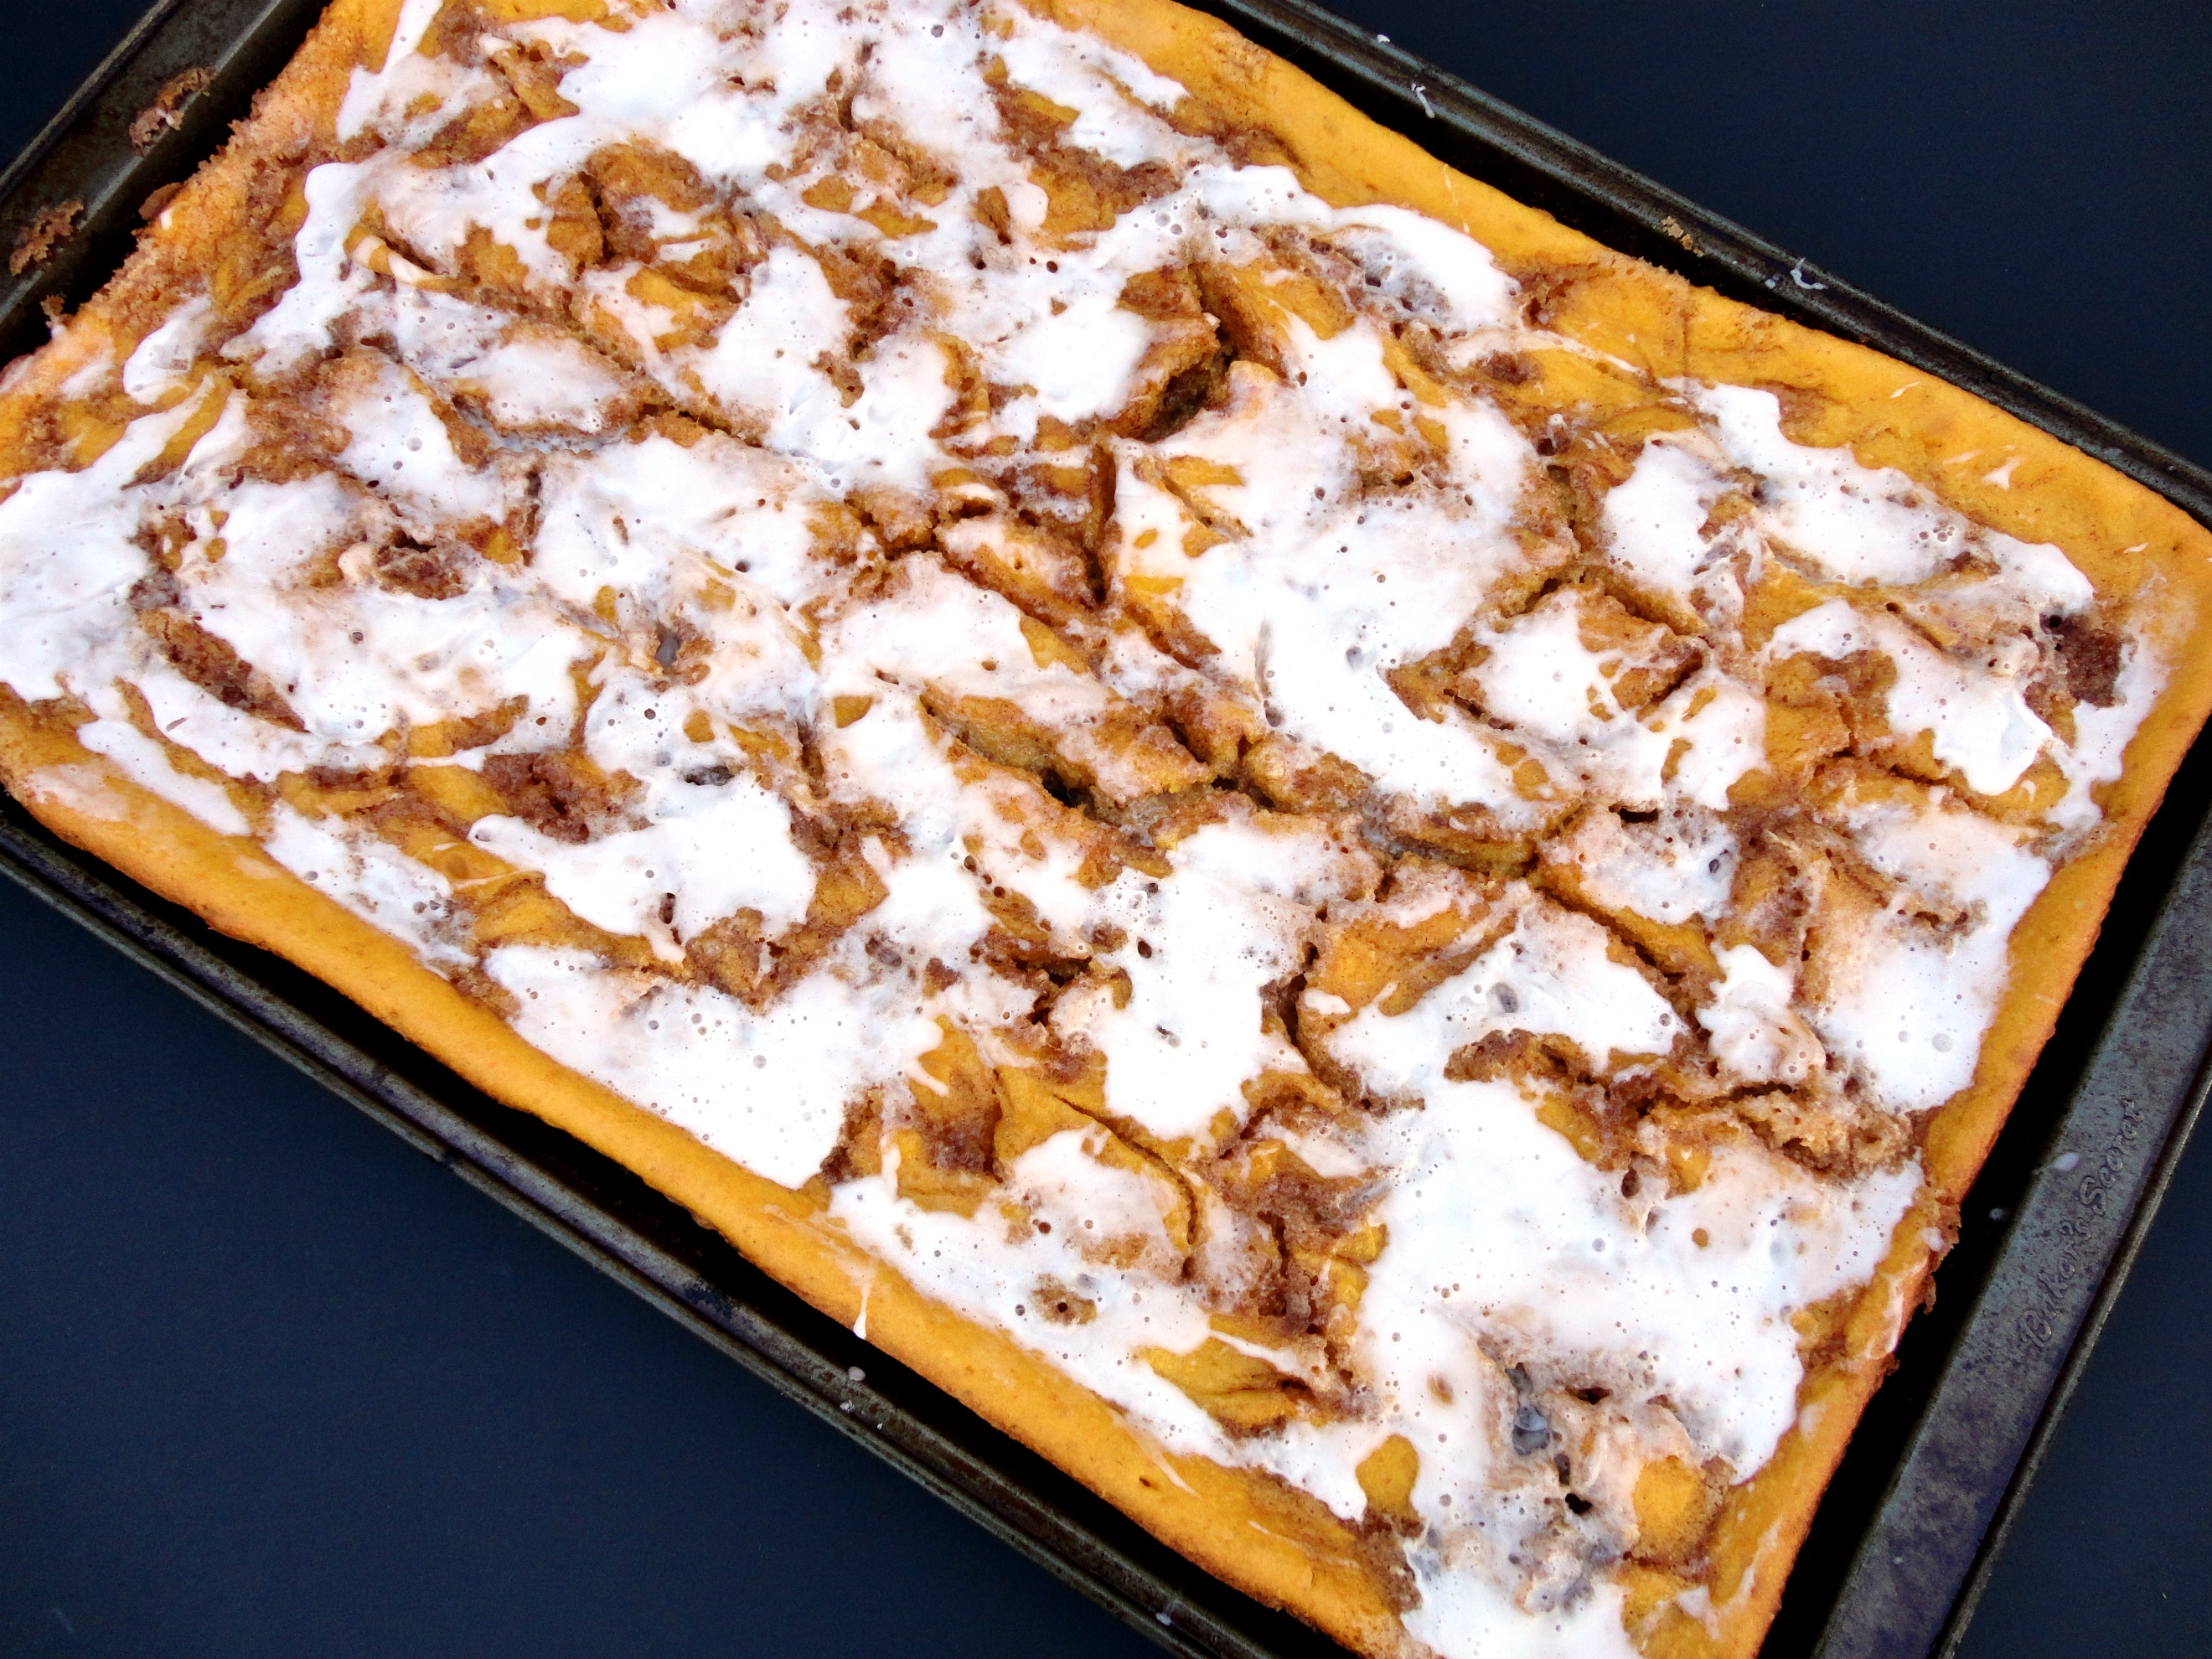
I found this recipe on Picky Palate and saved it for Thanksgiving, but wanted to give it a trial run beforehand. I do crazy things like enter pumpkin bread into state fair competitions without ever having made the recipe before or since, but I try not to pull surprises on my family. I can deal with not winning a ribbon, but I have a reputation to uphold when it comes to loved ones! ;)
I ended up making this for the CFC bake sale at work and my co-workers raved! After sampling a piece myself, I had decided it wasn’t that exciting and I wasn’t going to bring it to Thanksgiving dinner at my in-law’s, but after all the raving, I gave it a second chance and tried another piece. Maybe it was the power of suggestion, or maybe my palate just wasn’t ready to handle cake for breakfast when I tried the first piece, but I enjoyed the second piece so well that I’m now reconsidering this for turkey day.
The cake is very, extremely, uber moist, and the swirls of cinnamon filling are very complimentary to the pure pumpkin flavor. The color is a very nice orange, which I liked, and the simple glaze is a perfect compliment, really finishing off the “cinnamon roll” feel of the cake. The size of the cake makes it great for a big family gathering because it can easily be cut into 24 slices or more, whereas a normal layer cake would only be 16 pieces at best. It’s nice to have a “small dessert” option after filling up on turkey and stuffing! Or, let’s be honest, so you can enjoy more than one dessert. :)
Cake
1 (18.25 oz) box yellow cake mix
4 eggs
1/2 cup canola or vegetable oil
1/2 cup milk or buttermilk (I used water)
1 (3.4 oz) box vanilla instant pudding mix
1/2 cup sour cream
1 (15 oz) can pumpkin
Cinnamon filling
1 stick (8 tablespoons) unsalted butter, melted
3/4 cup packed light brown sugar
1/2 teaspoon ground cinnamon
Glaze
3/4 cups powdered sugar
1/2 cup heavy cream
Preheat oven to 350 degrees F. and spray a jelly roll pan with non stick cooking spray. Set aside.
Combine all cake ingredients in a large bowl and beat until well combined, about 2 minutes. Pour into prepared pan, spreading evenly. Mix the filling ingredients together, then drizzle mixture evenly over cake. Take a knife and run it through to swirl the filling into the batter.
Bake cake for 30-35 minutes, until cooked through and remove. Mix glaze ingredients until creamy and smooth. Drizzle over warm cake then let cool for 20 minutes before cutting into squares. Store covered until ready to serve, refrigerating if not serving within the next day.
“This cake is my favorite way to eat chocolate. It is easy to make and contains only three essential ingredients: the very best chocolate, for a full, rich flavor and smooth, creamy texture; unsalted butter to soften the chocolate and release the flavor; and eggs to lighten it. The result is like the creamiest truffle wedded to the purest chocolate mousse. It is chocolate at its most intense flavor and perfect consistency.” -Rose Levy Beranbaum, creator of the Chocolate Oblivion Truffle Torte
That pretty much says it all! I would like to add that although it seems there are many steps to the recipe, it is very simple to make. Think of it this way: all you have to do is melt the butter and chocolate together, beat the eggs to death and fold them into the chocolate mixture and bake. The reason the instructions are so long is that they are very detailed so you are sure to have success with this cake. Enjoy!
1 lb. semisweet chocolate
1 cup unsalted butter
6 large eggs
Preheat oven to 425 degrees. Butter the bottom and sides of an 8″x2″ cake pan and place a circle of parchment or wax paper in the bottom, then butter the top of it.
In a large metal bowl set over a pan of hot, not simmering, water (the bottom of the bowl should not touch the water), combine the chocolate and butter and let stand, stirring occasionally until smooth and melted. (The mixture can be melted in the microwave on high power, stirring every 15 seconds. Remove when there are still a few lumps of chocolate and stir until fully melted.)
In a large bowl set over a pan of simmering water, heat the eggs, stirring constantly to prevent curdling, until just warm to the touch. Remove from the heat and beat with an electric mixer until tripled in volume and soft peaks form when the beater is raised, about 5 minutes.
Using a large wire whisk or rubber spatula, fold half the eggs into the chocolate mixture until almost incorporated. Fold in the remaining eggs until just blended and no streaks remaining. Finish by using a rubber spatula to ensure that the heavier mixture at the bottom is incorporated. Scrape into the prepared pan and smooth with the spatula. Set the pan in a larger pan and surround it with 1 inch of very hot water. Bake 5 minutes. Cover loosely with a piece of foil and bake 10 minutes. The cake will look soft, but this is as it should be.
Let the cake cool on a rack for 45 minutes. Cover with plastic wrap and refrigerate until very firm, about three hours.
To unmold, have ready a serving plate and a flat plate at least 8 inches in diameter, covered with plastic wrap. Wipe the sides of the pan with a hot, damp towel, then run a thin metal knife around the sides of the cake. Submerge the bottom in hot water for 10-20 seconds, then invert onto the plastic wrap-lined plate. Remove the parchment from the bottom, then invert onto the serving plate and peel off the plastic wrap.
If desired, you can spread good-quality raspberry or strawberry jam over the top of the cake. (I have an excellent recipe for raspberry jam here.) Allow to come to room temperature before serving. Serve with whipped cream, if desired.
Today is the day to return to the Postcard Project spreadsheet and make sure you report how many pieces of mail you sent this week. I will be drawing only from the names that have a number in the “completed” column for this week (not last week). I’m SO thrilled that so many more have signed up and hope you will be able to return to report your goal completed before I draw for the cookies tonight at midnight. Good luck and thank you!
We celebrated my birthday yesterday and the day was just so busy I didn’t have time to do the recap that I had planned for today (I usually schedule my blog posts the night before because I don’t have time to do them before work the next day). Instead, I’ll leave you with a little teaser of things to come. This was a piece of my “birthday cake,” a Chocolate Oblivion Truffle Torte. It was every bit as delicious as it sounds!!


 Welcome to another edition of Things I Like Thursday (TILT)! Today begins a series containing the many things I love to use to make cake & cupcake decorating quick and easy.
 The first is


