RSS Feed

Tag Archives: birthday

Thomas the Cupcake Train!

Posted on

Oh boy, time has really gotten away from me. I can’t believe my last post was in September!  I wanted to post our professional photos we had done for Christmas, then realized I hadn’t even shared about Joshua’s birthday so I better do that first. He turned two on November 23rd!

This little guy is very into trains. I can’t even tell you the number of times I hear “choo choo!” a day, either because he hears a train, sees a train track, is playing with trains, or sees Thomas on his socks & pajamas, or on TV. He finds trains everywhere, like on a Christmas tree figurine I never even noticed a train was at the base of, or in the background of pictures in books. You never know how surrounded you are by trains until you have a toddler signaling their presence once every few minutes. Needless to say, we went with a Thomas the Train theme for his birthday this year.

This was his Halloween costume, and the photos worked nicely for his birthday invitations.

I saw a really cool cupcake train idea on A Britt Without Boys (see her post for a much better train, and tutorial), and was really excited to make it. It was very simple to put together and while mine didn’t look as great as Brittney’s, everyone loved it and it was a hit!

Basically you need a large engine to start the train off with, if you want to go with Thomas I’d look into the “My First Thomas” set you can get at Target for around $20. I went with a projector toy I found on eBay that was a bit too small, and I’m not sure the My First Thomas is bigger but it seemed to be in the online pictures. Then you need cupcakes, the number is up to you. You need half as many graham crackers as cupcakes, and 4 large marshmallows and Oreo’s per graham cracker.

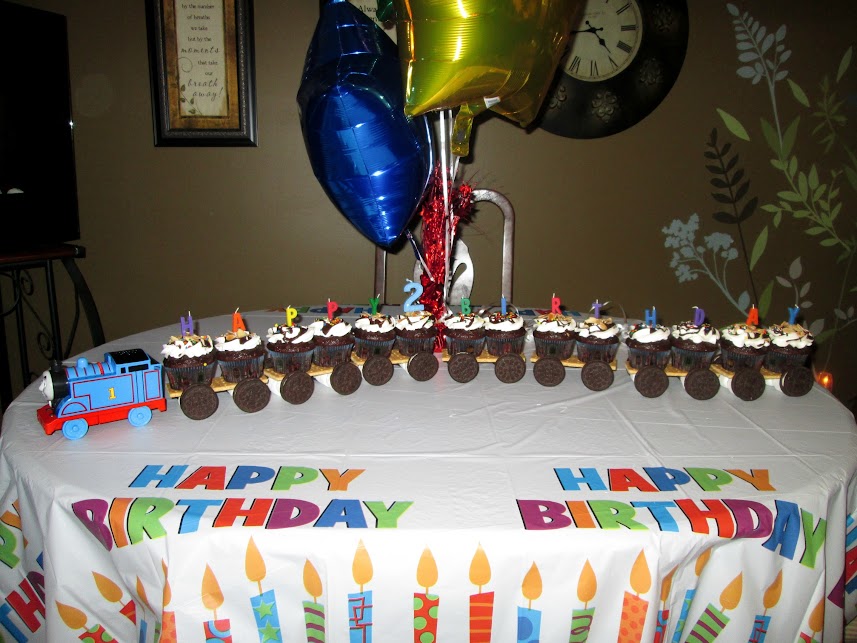
“Glue” marshmallows with melted chocolate (I used a disposable piping bag that I melted white chocolate chips in the microwave) onto the bottom of the graham crackers where you want the tires to be. Place them marshmallow side down and then glue Oreo’s over the outside of each marshmallow to make them look more like train wheels.  To set up the train, arrange two cupcakes per graham cracker and set up in a line behind the engine. Add candles and you’re done! I got the “Happy Birthday” candle set for $1 at Dollar Tree.

He started out dressed in his train engineer costume but HAD to put on the Thomas jammies from Auntie Joan as soon as they were out of the gift bag! 

I didn’t get too crazy with the decorations, just cheap stuff in basic colors that went with the Thomas theme, but I did put some creativity into the favor bags.  I got blue paper bags 3/$1 at Walmart, then designed my own labels for them and stuck them on with double sided tape. I include a wooden train whistle ($1 at Dollar Tree), Train Smoke (Vanilla Snow Cotton Candy, $1 from Dollar Tree, filled 6 bags), bubbles (8-pack of wedding bubbles $1 at Dollar Tree, printed out my own Thomas’s and taped them on), and a few fun-size candy bars that I got half price after Halloween. What can I say, I’m thrifty!

And this was the front of the thank-you cards I designed and mailed to those who gave him a gift. I print my “cards” at Walmart as 4×6 photos for about a quarter each with tax (for 1 hour, only 9 cents if you can wait for home delivery). If it’s just a card front like this, I cut out some card stock to size, fold it, and tape the picture to the front, then write a message inside. Can’t beat a personalized card for a quarter!

Oh and one more cute thing from the party, my Mother-in-Law, with the help of her artistic sister, made this Thomas veggie train with a cardboard Thomas they made “from scratch” and long baskets (I’ve seen these at Dollar Tree, like MIL, like DIL!) filled with veggies. It looked much cooler spread out until I pushed it aside to make way for my big crock pot full of Easy White Chicken Chili, but you get the idea.

I didn’t do any games but had a coloring table set up just in case there were slow points and children got bored, but it actually ended up being filled with all adults! My sisters joined after I took this picture. I printed this Thomas Birthday Express coloring sheet and they went to town while they waited for everyone to finish eating and the presents to begin.

I purposely kept the decorating and prep to a minimum to avoid stress and it was a really enjoyable party!  I wonder how many more years I’ll be able to continue my cake strike before this little boy starts working on me and convinces me to make a dragon cake like his cousin did once upon a time. For now, I’m enjoying cupcaking it up! hehe.


Cake Batter Lovins

Posted on

Remember the “Cake Batter Everything” craze that swept over the food blog world in 2011? Yeah, I hopped on that and enjoyed it to the fullest.  I shared only one of my cake batter explorations with you, the Cake Batter Crispy Treats, which were my favorite cake batter flavored treat, but do you think I let the remainder of my bag of yellow cake mix go to waste? No way, Jose.

Here’s a few ideas if you need some ways to use up extra cake mix.

Cake Batter Oats. This is actually a pretty healthy recipe, considering there’s cake mix in it. And tasty too!

Cake Batter French Toast. What can I say, cake batter is such a great way to start the day. And sprinkles just make everything so happy.  This one would be fun for a birthday breakfast! I made a simple icing glaze by mixing like 1/4 cup powdered sugar with just enough milk to get it a drizzling consistency.

Cake Batter Candies. For these, I just melted some vanilla almond bark and added enough yellow cake mix to make it taste like cake batter, but not so much it got too thick.  I poured most of it in a chocolate bar mold (like the one I used for this Vegan White Chocolate), but I didn’t get a picture of that before I gave it to a friend as part of a thank you gift for turning a stain on my jeans into a work of art. The rest of it I poured into peanut butter cup molds and put sprinkles over the tops while it was still setting up.  Kids went crazy for these at a get together, even more so than my Cupcake Bites!

Have you made any cake batter flavored yums?

Meatloaf PupCakes with Mashed Potato Frosting

Posted on

Jessie turned ten earlier this month and I decided that I was finally, finally, going to throw her the birthday party I’d always wanted to throw her ever since we got her.  I had invitations I meant to use for it so long I finally ended up selling them at our garage sale last year, thinking I would always have too much going on to actually do it.  Ironically, I ended up throwing her a birthday party the year I’m most busy, with a little human puppy taking up most of my time.  Just goes to show, you always have enough time for whatever you put your mind to.

I plan to do a whole separate blog post about the party because it was the sauce, if I do say so myself, but first I wanted to share the recipe I made for the PupCakes.  Rather than make something flour-based, I decided I wanted to go with meat-centric PupCakes because, let’s get real here, it’s a rare dog that prefers a flour & fruit-based treat over a meaty one.  Jessie is alll about the meat.

So I just threw together a bunch of stuff that seemed like it might make good dog-friendly (i.e. no onions) meatloaf into a bowl, mixed it up, and took a tiny taste test after baking.  Wow, I was impressed!  The only salt in the recipe comes from the ketchup, so I thought it would be rather bland, but these are so good I wished I’d made extra to enjoy along with the pups!  I added a mashed potato “frosting” that I thinned with yogurt.  So healthy and delicious, and the dogs devoured them! (Don’t be fooled by Doc giving up his to Jessie in the video, he’s so sweet that if Jessie even looks at him when he has a treat, he drops it so she can have it.  Kind of breaks my heart, actually! lol)  Even the little tiny dogs ate an entire PupCake by themselves. I’d say they are definitely dog-approved. :)

Meatloaf PupCakes with Mashed Potato Frosting

Printable recipe
Printable recipe with picture

1 ½ teaspoons extra-virgin olive oil
½ cup finely diced red bell pepper
½ cup finely diced zucchini
1 egg, beaten
1 lb 93% lean ground beef
½ cup quick oats
1 teaspoon parsley flakes
1 teaspoon rubbed sage
1/2 cup ketchup

Frosting
2 large russet potatoes, peeled
1 cup plain yogurt
Milk to thin

Optional garnish: real bacon bits

Remove ground beef from refrigerator to allow the chill to come off while you begin the recipe. Heat oven to 350°F. Line 9 muffin cups with foil liners; set aside.

Heat a skillet over medium-high heat. Add olive oil, red pepper, and zucchini, and sauté until softened, about 5-10 minutes. In large bowl, combine the cooked veggies with the remaining pupcake ingredients until well combined. Roll mixture into 9 large balls and place in prepared muffin cups.

Bake 35 to 40 minutes or until meat thermometer inserted in center of loaves reads 160ºF. Cool slightly in muffin cups.

While loaves are baking, cut potatoes into large chunks. Place in 3-quart saucepan, cover with water, and heat to boiling. Reduce heat; cook potatoes until fork-tender. Drain; return to saucepan. Add yogurt and beat with an electric mixer, adding milk as necessary, until creamy and smooth like frosting.

Place potatoes in a 10-inch decorating bag and snip the tip as large as you want it to come out. Alternatively, you can place them in a Ziploc bag and snip the corner. Remove the pupcakes from the muffin pan and place on serving plate. Starting at outside of each cake and in a circular motion, pipe potatoes onto each meat loaf. If desired, garnish with bacon bits. Serve warm or room temperature.

A Veronica’s Cornucopia original

Teaser Tuesday

Posted on

We celebrated my birthday yesterday and the day was just so busy I didn’t have time to do the recap that I had planned for today (I usually schedule my blog posts the night before because I don’t have time to do them before work the next day).  Instead, I’ll leave you with a  little teaser of things to come.  This was a piece of my “birthday cake,” a Chocolate Oblivion Truffle Torte.  It was every bit as delicious as it sounds!!

Dairy-Free White Cupcakes

Posted on

My husband and I don’t have an allergy to dairy, but we typically don’t keep milk in the house because we prefer coconut or almond milk beverages.  So when I decided to send some cupcakes to work with my husband to welcome his boss, who lives in Colorado and was coming to Wichita for the first time to stay for a week, I decided just to make them completely dairy free and see how they turned out.  I was really impressed with the results!  I’ve never made white cake without using a box mix, and I was quite pleased with how crazy moist these were, and they did not have a hint of coconut flavor, despite all the “dairy” coming from coconut.  They tasted just like regular white cake, and they were a hit with the boss and co-workers.

I wasn’t sure if these would turn out, so I made this recipe for a dozen cupcakes instead of the usual two dozen.  If you would like to make two dozen, or a two layer cake, just double the recipe.

Dairy-Free White Cupcakes

Printable recipe
Printable recipe with picture

½ cup coconut milk beverage*, room temperature (I used Silk Pure Coconut Original)
3 large egg whites, room temperature
2 teaspoons vanilla extract
1 teaspoon almond extract
1 ¼ cups all-purpose flour
1 cup granulated sugar
2 teaspoons aluminum-free baking powder*
½ teaspoon salt
½ cup refined coconut oil, room temperature*

Preheat oven to 350 degrees.  Line cupcake tin with paper liners; set aside.

In a 1-cup measure, mix together the milk, egg whites, and extracts; set aside.  In large bowl, mix remaining ingredients, except for the oil. Add the oil and mix until incorporated and there are moist crumbs, with no powdery streaks remaining.. Add all but ¼ cup of the milk mixture and beat at medium speed for 1 ½ minutes. Add remaining milk mixture and beat 30 seconds more.  Stop mixer to scrape the sides of the bowl, then beat again on medium for 20 more seconds.

Using an ice cream scoop, divide batter between prepared muffin cups.  Bake for 15-17 minutes, or until toothpick inserted in center comes out clean or with a few moist crumbs.  Cool in tin on a wire rack.  I prefer to turn mine out onto the rack after a few minutes to finish cooling so the pan doesn’t bake them too much by retaining the heat.

Once cupcakes are completely cool, frost with White Celebration Frosting, or your favorite dairy-free frosting.

Makes 12 cupcakes.

*Notes: you can use canned coconut milk and unrefined coconut oil, but this will give your cupcakes a distinct coconut flavor. If you want them to taste like white cake, please follow the recipe as written. Also, I recommend using Rumford, or another aluminum-free baking powder in recipes calling for more than a teaspoon, as the aluminum can give a very strong, unpleasant aftertaste.  This is especially true in cakes with milder flavors, like white or yellow.

Recipe source: adapted from Cook’s Illustrated

Cake Batter Crispy Treats

Posted on


If you’re like me and need a little help getting through your Mondays, I’ve got a happy fix right here!  I’m a fan of crispy treats, especially those that are a little different, like my favorite Salted Brown Butter Crispy Treats and Gingerbread Crispy Treats, and now I have a third unique and fun recipe to add to my growing list of favorites.  Cake batter flavored crispy treats!

Come on, get up, throw your hands in the air, squeal a little “Yay!” and do a happy dance for technicolor sprinkles.  OK, now your Monday is already off to a better start!

Cake Batter Crispy Treats

Printable recipe
Printable recipe with picture

1 stick (1/2 cup) butter
1 (10.5-ounce) bag of mini marshmallows
1/2 cup yellow cake mix
6 cups Rice Krispies cereal
1 (1.75-ounce) container of sprinkles

Melt butter in a large saucepan over medium heat and add marshmallows. Stir until they begin to melt, then add cake mix and stir until combined and marshmallows are completely melted. Stir in cereal until it is completely coated with marshmallow mixture.  Add half of the sprinkles and mix. Press into a 8 or 9” square baking dish and top with remaining sprinkles.  Let sit for at least 30 minutes before cutting.

Recipe source: adapted from Dana’s Food for Thought who snagged it from How Sweet It Is

So if you’re like me, you’re wondering what to do with the nearly full bag of cake mix that will remain after making this recipe.  Don’t fret, there are plenty of things that you can easily add it to for more delicious cake batter flavor.  So far I have made cake batter oatmeal (I subbed wheat bran for oat bran and more cake mix for the vanilla protein powder but did everything else the same and felt I was eating a fairly nutritious, not to mention delicious, breakfast), cake batter candy (stirred some mix into leftover white candy coating from a batch of cupcake bites and poured the chocolate into candy cups molds, then topped with sprinkles–tasted fantastic!), and here are a few more ways to use up your extra mix: Cake Batter Pancakes, Cake Batter Cinnamon Rolls, or how about mixing some into a vanilla milkshake to magically turn it into a sprinkle-licious cake batter milkshake?  The possibilites are endless!  Wheeeee!

Cow Pies Candy

Posted on

I got the above Hallmark (because I care enough to send the very best, lol!) card for my Mother-in-Law’s birthday.  Most of my husband’s family lives a couple hours north of us and I usually mail some sort of edible goodies to them on their birthdays.  Since I haven’t figured out how to ship a cake without destroying it, I thought this would be a great card to send  to her along with some cow pies candy.  Cute, if a little gross, right? :)

I’m not sure where this recipe originated but you can find it all over the web.  Mine is a little different from the others, which only call for almonds and raisins with the chocolate.  Because cow pies have grass in them (OK, maybe I’m getting a little too graphic here!), I like to add coconut to mimic that.

Although I went with sliced almonds this time (it was all I had on hand), my favorite way to make these is with roasted, salted peanuts, raisins, and coconut.  If you like Chunky candy bars, you’ll like that version too because it is very similar in taste.  (I also have an award-winning recipe for cookies that are based off the flavor profile of the Chunky Candy bar, if you’re interested in that!)

It’s best to use salted nuts to counteract the super-sweetness of the candy.  If you only have unsalted, just add some salt to the mixture before stirring. Kids love these things (apparently the idea/grossness as much as the taste–KIDS!), and they would be great for Halloween…and maybe even Easter.  We usually think of barn animals (OK, barn animal babies) in correlation to Easter, so I guess cow pies fits, right?  Or maybe I’ve grown a little twisted over the years.  I blame my husband.  He is the King of Strange.  I mean, remember those horrific-looking no bake cookies he made? Yeah.  He totally started it.

Cow Pies Candy

Printable recipe
Printable recipe with picture

1 (12 oz) bag milk chocolate chips
1 tablespoon vegetable shortening
2/3 cup roughly chopped salted nuts*
1/2 cup packed raisins
1/3 cup packed shredded coconut
*Add 1/4 teaspoon salt to the recipe if not using salted nuts.

Gently melt chocolate and shortening together in double boiler or in microwave, stirring frequently until smooth. Stir in remaining ingredients. Drop spoonfuls onto a wax paper lined baking sheet and let sit until firm, about an hour.

Veronica’s Note: If you want to add more mix-ins, decrease the amounts of the other mix-ins accordingly (for instance, decrease nuts to ½ cup and raisins to ⅓ cup in order to add an additional ⅓ cup mix-ins). Ideas for mix-ins: toffee bits, crushed pretzels, bacon bits, crumbled potato chips, additional types of nuts or dried fruits.

Makes 24 candies. Per serving: 121 calories; 7.6 g fat; 12.7 g carb; 1.1 g fiber; 2.2 g protein

Recipe source: adapted from Taste of Home

Secret Recipe Club

Chocolate Decadence


This is a dessert served on the Carnival Cruise ships (or at least it used to be in the late 90s), which I have made several times for my Mother as her birthday cake.  It is one of her favorite cakes, right up there with THE Mocha Crunch Cake, and just as rich…and decadent.  They aren’t kidding when they named this dessert, it really is chocolate decadence.  No better way to describe it.

I originally made this according to their recipe, which is actually broken up into parts, referring to basic recipes in the “Chef’s Notes” in the back of the Carnival Creations cookbook for everything but the mousse layer.  The cake consists of four recipes all combined to make one dessert: the cake layer, the mousse layer, the thin ganache layer, and the strawberry sauce.  I felt that the chocolate sponge cake they used was much too dry for the dessert, and lacked in chocolate flavor since it contained only a few tablespoons of the good stuff.  So I replaced it with my own simple one-bowl deep chocolate cake layer and was pleased with the result.  It’s my first attempt at my own cake recipe and while it’s probably not perfect, it was perfect for this dessert.  Moist, rich and fudgy, nicely complementing the rich rum-infused chocolate mousse.

I stuck with the recipe for the mousse, as that was always lovely and really is the star of the dessert.  It firms up in the fridge and when you take a bite, it’s akin to eating a lightly textured truffle with cake underneath.  Superb.  My middle sister says it almost seems like you’re eating candy rather than cake but I say…it’s the best of both worlds!

When it came to the ganache layer, I considered making a real ganache, using heavy cream, but realized that since this dessert is served from the refrigerator and real ganache gets rock hard when chilled, it would be prudent to stick with this thinner ganache (or what I’ll now call a chocolate sauce) which thickens a little in the fridge but it still nice and soft when you cut into it.

As for the strawberry sauce, their recipe doesn’t make nearly enough (individual tastes may vary, but my family enjoyed having a large puddle of sauce on their plate beneath the small slices I served.  Although the cake is wonderful alone, every bite seems improved when accompanied by a good dose of strawberry sauce!) and I wanted to use a bag of frozen strawberries I had in the freezer rather than buy fresh out of season, so I made my own recipe.  You can use any recipe you like for the sauce, but if you want to use mine, you can click the link to it below.

This cake went over very well with my family.  Although my Mom has always liked it, even in the days when I made it with the dry sponge cake underneath, the rest of my family never got very excited about it until I replaced the cake this time.  Apparently that was the only change it needed, besides the increased amount of sauce.  My little sister usually prefers citrus cakes (preferably unfrosted), but she proclaimed this “the best chocolate cake I’ve ever had.”  I have to admit, I felt a little piqued at this since her devotion previously belonged to my beloved Mocha Crunch Cake, the cake I prize most…but I got over it because ultimately she still giving high praise to something I created.  I’ll take it. :)

The recipe is a bit time-consuming since there are so many parts, but you can pace yourself and make the sauce several days in advance, the cake the day before (wrapping it in plastic wrap and refrigerating in the mean time), and since the cake needs to sit in the fridge overnight after you make the mousse and place the cake on top (which will later be flipped over), you can wait until the next day to make the ganache if you want.  Take it little by little and it won’t seem so overwhelming.

I hope you give this one a try for a special occasion–it is worth the effort and sure to impress!

Chocolate Decadence

Printable recipe
Printable recipe with picture

Cake
1 cup all-purpose flour
1 cup sugar
½ cup cocoa powder
1 teaspoon baking powder
½ teaspoon salt
1 cup milk (I used coconut milk beverage)
¼ cup vegetable or canola oil
¼ cup warm water
1 egg
1 teaspoon vanilla

Mousse
1 lb. semisweet chocolate, chopped
2 tablespoons heavy whipping cream
6 tablespoons unsalted butter, softened
¼ cup Myers rum
6 egg yolks
½ cup granulated sugar
1 ½ cups heavy whipping cream

Chocolate Sauce
1/3 cup whole milk
3 ounces semisweet chocolate, chopped (about 1/2 cup chips)
1 teaspoon butter, softened

For serving:
Strawberry Sauce
Whipped Cream

Make the cake: Sift dry ingredients into a bowl, stir, and then add the remaining ingredients. Beat with a whisk until smooth, scraping down bowl. Pour into a greased and floured round 8” pan. Bake at 350 for 40 minutes or until tester inserted in center comes out clean or with a few moist crumbs. Cool five minutes on rack in pan, then remove from pan to cool completely, about 1-2 hours.

Make the mousse*: gently melt semisweet chocolate in a double boiler or microwave; stir in whipping cream. Cool. When cool enough that butter will not melt, beat in butter. Stir in rum. In large bowl beat egg yolks and sugar on high speed for 5 minutes or until very light; fold into chocolate mixture. In large bowl beat whipping cream until soft peaks form; fold into chocolate mixture. Line an 8” round baking pan with enough plastic wrap that it comes over the sides; spread mousse into pan. Place cake top side down on top of the mousse and press down to make sure that every part of the cake is in contact with the mousse and that the top is flat. Cover with plastic wrap and refrigerate overnight.

Make the chocolate sauce: Place the chocolate in a food processor or blender. Heat the milk until steaming hot, then turn on the food processor and, while running, pour the hot milk through the feed tube. Blend until smooth and allow to cool.

To serve: Place cake plate upside down on top of the cake, then flip over. Lift the cake pan off the cake (you may have to wiggle it or have someone hold down on the plastic wrap “handles” while you lift the pan).  Remove plastic wrap; spread chocolate sauce over the top and refrigerate for at least ten minutes. Cut into 16 slices; serve with a dollop of whipped cream and strawberry sauce.

*Veronica’s note: I only make this cake once every three or so years, so I can’t recall my previous experiences with the mousse very well, but this time I had problems with the mixture wanting to get too thick every time I let it sit so I could beat eggs or beat whipped cream. To soften it back up before adding those elements, I just rebeat it with the same hand-held mixer I had just used on the eggs or whipped cream, then folded them in. I’m not sure if this is usual or if I overheated my chocolate (which can make chocolate thicker if it doesn’t altogether seize up) so I wanted to mention it just in case others had this difficulty. It is surmountable so do not despair! :)

Per serving (without sauce or whipped cream): 473 calories; 30.5 g fat; 50.5 g carb; 3.2 g fiber; 5 g protein

2 tablespoons strawberry sauce: 42 calories; 0 g fat; 11 g carb; .6 g fiber; .1 g protein

Recipe source: cake and strawberry sauce recipes by Veronica Miller; mousse recipe, dessert concept, and chocolate sauce adapted from Carnival Creations.

THE Mocha Crunch Cake


Although I have made this recipe my own, I must give credit where it is due.  Early in my cake-making days, I purchased Rose Levy Beranbaum’s Cake Bible and used recipes out of it to make the first stages of this cake.  I’ve continually changed and evolved the recipe since then, and while I always ultimately preferred to use a Betty Crocker devil’s food cake mix rather than bake the cake from scratch, I have now found THE chocolate cake recipe that I actually prefer over the mix, and I have Mel of My Kitchen Cafe to thank for that.

Let’s talk about the current stage of this cake.  The cake itself is light, moist, deeply chocolatey.  An excellent crumb.  Really, the best texture I’ve ever gotten from a chocolate cake recipe, except for this one.  It’s perfect.  The cake is enveloped in a  buttercream that is deceptively light and almost mousse-like with a great balance of sweet coffee and chocolate flavor.  The flavor combined with the velvety smooth texture makes it so good that I have been known to scoop the leftover frosting into a bowl and eat it straight.  I chose to press chopped toffee into the sides of the cake because, to me, the flavor of toffee has always been a perfect compliment to chocolate and coffee, and it adds a nice contrast of texture to the bite.  Finally, I eventually began smothering the whole finished cake in ganache to make it more visually appealing and to intensify the chocolate flavor.  It is an immensely pleasurable treat that can be dangerous because it doesn’t feel fattening when it’s in your mouth and it’s easy to overindulge because it is so light.  Do not be decieved!  My thighs are a testament to the immense caloric level of each bite.

This cake is time consuming to prepare, but very much worth the effort, especially if you are making it for a birthday.  And fear not that the little ones won’t enjoy it.  My nephew has been devouring it since he was old enough to be allowed chocolate.  And one of the ladies present at a birthday party where it was served told me that her daughter hates chocolate and she ate an enormous piece all by herself.  I had to laugh, because that little girl is not the only one who has enjoyed the cake despite their aversions to aspects of it.

My Dad is a dessert hater.  Honestly, I don’t know how he could have spawned me, the Dessert Queen, but it doesn’t change the fact that he doesn’t have a sweet tooth.  But he loves this cake.  My youngest sister is a frosting hater.  She scrapes it off the cake.  When I make this one she gets excited if I put extra frosting in the middle.  And she licks the plate clean, frosting and all.  My middle sister is a cake hater, and really just a hater of all things not raw and rich in antioxidants.  But she scarfs this cake every time I make it and it is the only cake she will let me make for her birthday.  My husband?  A coffee hater.  An intense coffee hater.  And yet he perks up on the rare occasion I make a morning cup of Joe, hoping the smell means I’m making this cake.  My Mom likes everything I make, but this is her favorite cake and also the one she prefers on her birthday.  And not to toot my own horn or anything, but Michael Jackson left instructions in his will to be buried with three of these cakes.  Or at least, I think he would have if he’d ever tried one. :)

A friend recently told me that this cake would be one of the only things she thought she would miss in heaven.  Of course she said it to be funny since I doubt we’ll miss anything in heaven, but if were possible to miss something…I think I would miss it too.

THE Mocha Crunch Cake

Printable recipe

Printable recipe with picture

Cake
1 ¼ cups unsweetened cocoa powder
2 ½ cups all purpose flour
2 ½ cups sugar
2 ½ teaspoons baking soda
1 ¼ teaspoons baking powder
1 ¼ teaspoons salt

2 large eggs plus 1 large egg yolk
1 ¼ cups warm water
1 ¼ cups buttermilk
½ cup plus 2 tablespoons vegetable oil
1 ½ teaspoons pure vanilla extract

Mocha Buttercream

¼ cup Kahlua
1 tablespoon instant coffee crystals
10 oz semisweet chocolate
6 large egg yolks
¾ cup granulated sugar
½ cup corn syrup

1 lb (4 sticks) unsalted butter

Ganache
4 oz semisweet chocolate
½ cup heavy cream

Additional

1-1  ½ cups toffee bits
2 toffee candy bars (such as Heath)

Make the cake: Preheat the oven to 350 degrees, making sure the baking rack is in the middle of the oven. Prepare two 9” round cake pans by cutting out a piece of parchment or wax paper to line the bottom of them. Grease the pans, place the parchment or wax paper in the bottoms and lightly grease again. Dust the pans with flour (or cocoa powder if you don’t want the white dusting on the finished cakes). Set the pans aside.

Sift together the cocoa, flour, sugar, baking soda, baking powder, and salt into a large bowl. Add the eggs, yolk, warm water, buttermilk, oil and vanilla. Mix on low speed until smooth, about 3 minutes.

Divide the batter evenly between the prepared pans. Bake the cakes for about 32-35 minutes, until a toothpick inserted into the middle comes out clean or with moist crumbs. Do not overbake! Remove the pans from the oven and set the pans on a wire rack to cool for 15 minutes. Gently run a thin knife around the edges of the pans and unmold the cakes, removing the parchment paper liners from the bottom of the cakes. Let them cool completely, top sides ups, on a wire rack.  Trim the tops of the cake layers with a long serrated knife to make them level.

Make the buttercream: Put Kahlua in a microwave safe dish and heat until boiling.  Remove and add instant coffee.  Mixture will immediately boil up high and once it goes back down, gently stir it until the coffee is dissolved.  Set aside to come to room temperature.  Place the chocolate in a microwave-safe dish and heat for 30 seconds and stir.  Continue heating in 15-second intervals, stirring in between, until the chocolate is almost melted.  Stir and allow the residual heat to melt it completely.  Set aside and allow to come to room temperature.

Beat the egg yolks until light and mixer blades make tracks in them.  Spray a 1-cup glass measure with cooking spray and set beside the stove.  Combine sugar and corn syrup in a saucepan and cook over medium heat, stirring constantly, until it comes to a full rolling boil.  Immediately remove from heat and pour into the prepared measuring cup to stop the cooking.  While mixer is running, pour the syrup in a steady stream into the egg yolks, careful not to pour it onto the beaters.  Continue beating until mixture is room temperature.  Beat the butter in a small bowl until fluffy, then begin adding it to the egg mixture a tablespoon or two at a time, beating until incorporated after each addition.  Once the chocolate is cooled, turn the mixer back on and add the chocolate to the buttercream, beating until smooth.  Add the cooled Kahlua mixture and beat until uniform & smooth.

Make the ganache: Place the chocolate and cream in a microwave safe dish and heat for a minute; stir.  Continue heating in 15-30 second intervals until the chocolate emulsifies and the mixture is shiny, dark, uniform, and smooth.  Allow to come to room temperature.

Assemble: Place one cake layer on plate and spread about 1 cup of mocha buttercream over the top.  Put second cake layer on top and frost the top and sides with the remaining buttercream.  Take handfuls of toffee bits and press them into the sides of the cake.  Chop the candy bars into four pieces each and place with a pointed side up around the edge of the cake.  Slowly pour the cooled ganache over the top of the cake and use a spatula to spread to the edges so that it will ooze out between the candy bars and down the sides a little.  Sprinkle some toffee bits in the middle of the cake.  Serve at room temperature.

Veronica’s notes: As many people have had trouble with the cake batter overflowing the pans during baking, I recommend you do what I did and only fill your pans 1/2-2/3 full and use the extra batter for cupcakes.

Recipe by Veronica Miller, with help from this recipe, and The Cake Bible.

And now, a photographic timeline to show the evolution of the Mocha Crunch Cake.

1st stage: three layers of (from scratch) devil’s food cake with mocha frosting and chocolate curls.

https://i0.wp.com/a4.ec-images.myspacecdn.com/images01/95/f9cd0f2d1d22fe34c95e7de7b9c8609b/l.jpg

Stage 2: same as stage 1, except with toffee on the sides.

https://i0.wp.com/a1.ec-images.myspacecdn.com/images01/38/ac907196cb9ff40fb9a696bab3be4fca/l.jpg

Stage 3: using a cake mix and with much shorter layers to make the frosting to cake ratio more equal, as my sister likes it.  Mom wasn’t complaining! (On a side note, this is before I learned how to pipe roses and I was holding the tip upside down so the petals are backwards, which makes them look too fluffy–LOL!)

https://i0.wp.com/a1.ec-images.myspacecdn.com/images01/42/7494dfe1bcacea15227f7e59dd603eb1/l.jpg

https://i0.wp.com/a3.ec-images.myspacecdn.com/images01/8/32c4e9c0f2c65d00f1bc4cc169013511/l.jpg

https://i0.wp.com/a3.ec-images.myspacecdn.com/images01/54/3394fe553e4f8a1b0c76b7d1c1efaec8/l.jpg

Stage 4: toffee removed and baked in a sheet pan to turn into a baby shower cake.

https://i0.wp.com/a1.ec-images.myspacecdn.com/images02/112/aa921b50709e40e7a982e13f6bf80c84/l.jpg

Stage 5: a ganache drizzle is added.

https://i0.wp.com/a2.ec-images.myspacecdn.com/images02/10/96fffba6177c4c18b674f57653b3be75/l.jpg

Stage 6: no more pussyfooting around.  I slathered on a whole cup of ganache and embellished with candy bars!

And everyone rejoiced.  The end.

Celebration Frosting & A Giveaway! {CLOSED}

Posted on

***The giveaway is now closed.  Congratulations to Jenna, Suzie, Biz, Cheryl, and Kim~the lucky winners!***

Celebration Frosting | veronicascornucopia.com

Wedding and birthday cakes from good bakeries, at least here locally, have a certain evasive flavor in the icing that I’ve always mentally defined as “celebration.”  I am still unable to describe the flavor any other way, but I learned the secret of that flavor and have been using it in the frostings for my own homemade celebration cakes ever since.

It is a flavor emulsion called “Crème Bouquet.”  This is wonderful stuff.  It is an oil-based flavoring with lemon and other essential oils that aren’t listed on the label (because they are sneaky and don’t want us to figure out how to duplicate it at home!).  Believe me, I’ve tried, but I can’t make anything that tastes even remotely as wonderful as this emulsion.  It doesn’t taste like lemon to me, although that’s the only essential oil listed, and it doesn’t taste like anything else I’ve ever had.  Well, besides wedding and birthday cake.  I have relatives that call it “that sweet flavor.”  But that is not an apt description, either.  You just have to try it for yourself!

Since I’m so in love with this flavoring and know it’s not a common household ingredient, I am going to give five lucky readers a 2-ounce bottle from Cake Stuff!  To enter, just leave me a comment on this post and I will draw the winners using Random.org on Friday, November 5th .  Simple as that.  For those interested in purchasing crème bouquet, you can order by phone from Cake Stuff–just call the number on their website.   It is very reasonably priced at $2.50 for a 2-ounce bottle, and they also have two larger sizes available.

You can turn any vanilla frosting into celebration frosting by adding crème bouquet to it, and I’ll share the two that I use it in.  Enjoy!

White Celebration Frosting

I try to avoid this one since it’s kind of a non-food, one but sometimes, you just need a good, bright white frosting and the only way to achieve that is with shortening. And believe me, it does not taste like non-food. It is utterly delicious. I promise. The meringue powder is essential in this recipe to eliminate the greasy mouth-feel that shortening frostings usually have. It is also important to use good shortening because cheaper brands tend to be clearish, off-colored, and slimy. You want one that is an opaque white, like Crisco.
Printable recipe
Printable recipe with picture

2 cups Crisco vegetable shortening
2 tablespoons meringue powder
2 teaspoons crème bouquet
1 teaspoon clear vanilla extract
1 teaspoon butter flavoring
Pinch of salt
2 lbs. (8 cups) powdered sugar
1/3-1/2 cup water

Put the Crisco in the bowl of an electric mixer and beat on medium a few seconds, until creamy. Add in the meringue powder, flavorings, and salt and beat until smooth. Slowly add in the powdered sugar, alternating with water when it becomes too thick. Add more or less water to get your desired consistency. Once it is all added, beat on medium-low speed for four minutes. This frosting will keep for up to a month, tightly covered, at room temperature, or several months in the refrigerator.

Cream Cheese Celebration Frosting

This is my favored celebration frosting. This frosting on white cake, for me, makes the ultimate celebration cake. And be sure to try it on red velvet as well–divine!
Printable recipe
Printable recipe with picture

1 (8 oz) package cream cheese, room temperature
1/2 cup (1 stick) unsalted butter, room temperature
2 pounds powdered sugar
2 teaspoons crème bouquet
2 teaspoons clear vanilla extract*
Pinch of salt
Milk, if desired

Beat the cream cheese and butter until smooth. Add the remaining ingredients and beat on low, scraping the sides, until all the sugar is incorporated, then turn to medium/high and beat for another two minutes. I prefer not to add any extra liquid because I find it easier to get a perfectly smooth cake with thick frosting**, but you can add milk as needed to make it creamier. Refrigerate or freeze if you won’t be using it within a few days.

*You can use regular vanilla but the color will turn more yellowish-ivory (like Mom’s birthday cake above), which is fine unless you are aiming for a lighter color.  To illustrate, I made the following two wedding cakes with the same recipe for cream cheese celebration frosting, but used clear vanilla on the first and regular on the second:

**To get my icing perfectly smooth, I use a straight-edged offset spatula and the water bottle trick: fill a clean (ideally, brand new or designated for water only) squirt bottle with water and spray the frosted cake all over.  This allows the spatula to glide over the surface and smooth it easily.  I recommend placing the cake, uncovered, in the refrigerator for an hour or overnight to allow the water on the surface to evaporate completely before decorating.  You can see me demonstrating the “water bottle trick” in this video: How to Make a Layer Cake part 3: stacking and frosting.

~Disclaimer: I was not compensated for this blog or sponsored by Cake Stuff to promote them.  That is the store where I’ve always purchased my crème bouquet and it is consistently delicious.  So I decided to buy some to share with my readers so you can experience the awesomeness for yourselves!~