RSS Feed

Tag Archives: oatmeal

Cake Batter Lovins

Posted on

Remember the “Cake Batter Everything” craze that swept over the food blog world in 2011? Yeah, I hopped on that and enjoyed it to the fullest.  I shared only one of my cake batter explorations with you, the Cake Batter Crispy Treats, which were my favorite cake batter flavored treat, but do you think I let the remainder of my bag of yellow cake mix go to waste? No way, Jose.

Here’s a few ideas if you need some ways to use up extra cake mix.

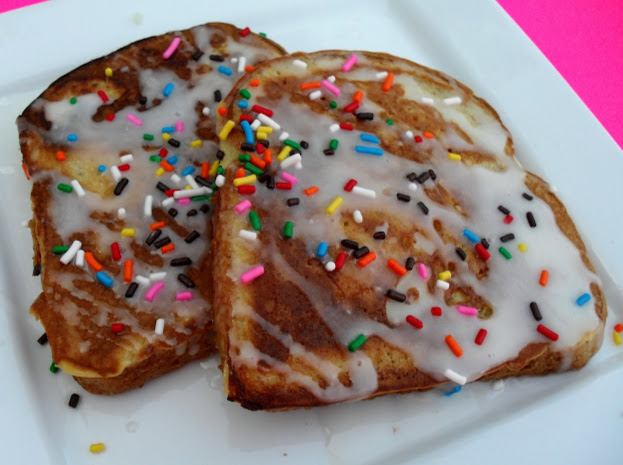
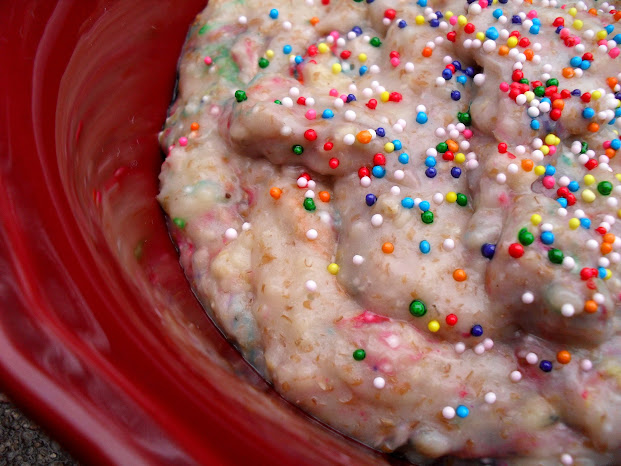
Cake Batter Oats. This is actually a pretty healthy recipe, considering there’s cake mix in it. And tasty too!
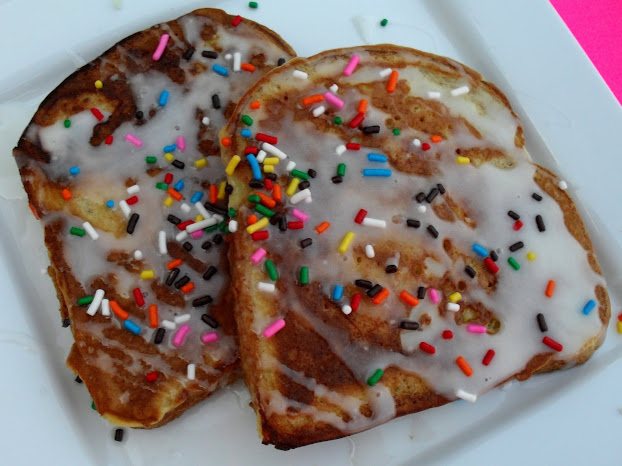
Cake Batter French Toast. What can I say, cake batter is such a great way to start the day. And sprinkles just make everything so happy.  This one would be fun for a birthday breakfast! I made a simple icing glaze by mixing like 1/4 cup powdered sugar with just enough milk to get it a drizzling consistency.

Cake Batter Candies. For these, I just melted some vanilla almond bark and added enough yellow cake mix to make it taste like cake batter, but not so much it got too thick.  I poured most of it in a chocolate bar mold (like the one I used for this Vegan White Chocolate), but I didn’t get a picture of that before I gave it to a friend as part of a thank you gift for turning a stain on my jeans into a work of art. The rest of it I poured into peanut butter cup molds and put sprinkles over the tops while it was still setting up.  Kids went crazy for these at a get together, even more so than my Cupcake Bites!

Have you made any cake batter flavored yums?

Advertisement

Peanut Butter Cookie Dough Baked Oatmeal

Posted on

I like keeping things simple and easy at meal time, especially breakfast, so when I discovered how much Joshua enjoys baked oatmeal, I decided to make more of it.  A pan lasts several days and it’s so nice to be able to just take out a square and heat it in the microwave. Bam. Breakfast is done. He takes care of the rest.

I made this in an attempt to make a baked oatmeal that really would be reminiscent of cookie dough, since the pumpkin didn’t really have that feel to me (granted, I may have over baked it a tad, as I tend to do a lot these days). And wow, you guys, I nailed it.  *pats self on shoulder* ;) This stuff is warm and gooey and melty and soft and creamy and really, a lot like a thick, warm cookie dough. Dennis even ate it for dessert after dinner one day, with some whipped cream on top. It’s that good. And low in sugar, or sugar-free if you want to leave the chocolate chips out. You would never guess, it’s just so good, but feel free to use sugar if you prefer. This one is definitely worth a try.

Peanut Butter Cookie Dough Oatmeal

Printable recipe
Printable recipe with picture

2 cups quick-cooking oats
4 packets stevia*
½ teaspoon salt
1/3 cup peanut butter
2/3 cup milk
1 (4 oz) snack cup of unsweetened applesauce (heaping 1/3 cup)
1 egg
2 tablespoons oil or melted butter
2 teaspoons vanilla
½ cup chocolate chips, plus more for top if desired

Mix all ingredients together well until blended. Pour batter into an 8×8 pan sprayed with oil. Bake at 350F for 30 minutes.

*If you want to use sugar, I’d recommend brown sugar for a more cookie dough-like flavor. I’m not certain on the amount, but I’d try 1/3 cup and add more to your taste if needed.

***

I have to show you guys what this looks like with the flash – the photo is cheaper-looking but this really shows off how cookie dough-like it is. It’s soooo soft and I just couldn’t capture that gooey softness as well with natural light. Honestly, sometimes the flash is the only way to show the true colors & textures. Amateur photographer problems. :)

Oatmeal Peanut Butter Dog Treats


It has been way too long since I’ve shared a recipe for our furry friends!  This recipe is similar to the other biscuit recipe I have on my blog, except the liquid is chicken broth instead of milk, and it bakes up a bit softer, even if you go the route of leaving them in the oven overnight to dry out, and perhaps it is both those reasons combined that my Jessie loves them even more than the Peanut Butter Dog Biscuits.

These bake up soft like cookies, but you can leave them in the oven overnight to make them crunchy.

Full disclosure: I totally tried one of these in the soft-baked state, and I even thought it was pretty tasty! :)

Another advantage, at least for those of us with…shall we say “husky” dogs, is that there is less than half as much peanut butter in this recipe, therefore it is lower in calories.  There are also more oats (more fiber) and less sweetener, which helps the calories as well. A treat that Jessie loves, and that is lower in calories than her former beloved treats is a win-win in our house.

Peanut Butter Oatmeal Dog Treats

Printable recipe
Printable recipe with picture

1 cup whole wheat flour (I used WW pastry flour)
1 cup all-purpose flour
1 cup quick oats
¼ cup wheat germ
2 teaspoons aluminum-free baking powder, such as Rumford
1 cup chicken broth
½ cup peanut butter
¼ cup honey
1 tablespoon olive oil

Preheat oven to 350 degrees F and line two large cookie sheets with parchment. Set aside. In a large bowl, whisk together the flours, oats, wheat germ, and baking powder. In a small bowl, whisk together the chicken broth, peanut butter, honey, and olive oil. Stir the wet mixture into the dry mixture until incorporated. Cover and let sit at room temperature for 15 minutes or up to an hour. This gives the flour and oats time to absorb moisture and it will become thicker and easier to work with as it stands. Roll out to ¼ inch thick on a floured surface and cut into shapes. Place treats on prepared baking sheet. You can pop the first one in the oven as you cut out shapes and place them on the second sheet. Bake cookies for 15 minutes.

If your dog prefers softer cookie-type treats, cool the treats at this point and package in airtight containers. If you want to bake them into hard biscuits, which stores better and has the added benefit of helping clean your dog’s teeth, simply turn off the oven with the cookies still inside and leave them in overnight, or until the oven is cool. If you bake them in batches, remove each tray as they finish, and let them sit on the sheet until all the batches are baked, then turn off the oven and return all baking sheets to the oven to sit overnight, or until the oven is cool.

Recipe source: Shared Sugar

So I’m trying not to use my voice right now, and Dennis is loving it.  I’m recovering from the flu (yeah, that’s what I get for bragging on Friday night that I’ve never had it before…guess what I woke up with?) and my throat hurts too much to talk any more, so I am communicating mainly in gestures.  He helped me choose the photos for this blog in the usual way, except that I asked him to help me with pointing and shoulder shrugging to indicate I couldn’t decide between two photos.  Since I couldn’t argue vocally with his choice, I did a lot of fist-shaking and going back to the one that I preferred and he just laughed and asserted that his choice was the right one.  Well, I went with the one I liked, the one right before the recipe, but I’ll let you guys decide.  He like this fancier one.  But I liked the former because it was easier to read and more simple. But  now you get them both since I had to share our antics with you. :)

Oatmeal Sandwich Bread


This isn’t my favorite bread, but it does have a great, wholesome & hearty flavor. It is an excellent loaf for slicing and making sandwiches. My favorite use for it is making grilled cheese sandwiches, and I also made some yummy ham and cheese melts (with apricot preserves spread on the insides) that this bread was wonderful with. This makes a very large, tall loaf, so if you prefer you can make two smaller, shorter loaves with the dough as I chose to, which makes the bread go further, although your sandwiches will be smaller.  I’m on a mission to lose these last 15 pounds so the smaller sandwiches totally fits in with my plan!  I love it when I can eat real food (read: non-“free” stuff.  Free is good as long as it’s not associated with fat or sugar!) and stay within my calorie budget.

Be sure to check out the recipe source at the end–this gal has tons of healthy, delicious recipes!  I won her low-fat cinnamon rolls in an online bake sale auction and I have to say they are crazy good.  I never thought to replace butter in the filling with applesauce–brilliant!

Oatmeal Sandwich Bread

Printable recipe
Printable recipe with picture

2 cups warm water
1 tablespoon yeast
3 tablespoon molasses
2 1/2 cups whole wheat flour
2 cups all purpose flour
2 tablespoons vital wheat gluten
1 cup rolled oats
4 tablespoon butter, melted and cooled slightly
1 tablespoon salt

For optional topping
1 egg, beaten with a teaspoon of water
2 tablespoons rolled oats

Butter a large bowl and a 9″ loaf pan and set aside. In a large mixing bowl or food processor fitted with a dough hook, mix together water, yeast and molasses. Allow the yeast to stand for 5 minutes until it begins to bubble. Add the whole wheat and bread flour, the oats and the melted butter. Stir to combine. Cover with towel and let rise for 30 minutes. Add in salt and then mix until dough pulls away from sides and becomes a ball. You can add a tablespoon or two of flour or water if necessary. Scrape dough onto a lightly floured surface and knead 5-10 times. Place into the large, buttered bowl. For the first rise, scrape the dough onto a lightly floured work surface and knead it a few times. Put the dough into the buttered bowl, cover with a towel, and leave it to rise for about 1 hour or until it doubles in size. Turn dough out onto floured surface after first rise. Shape by folding into a square, folding top down towards center and bottom up towards the center. Pinch the new top and bottom together to seal, roll to shape and place in the loaf pan, seam side down. Allow to rise in a warm place, covered with a towel for one hour or until dough rises an additional half its size. Preheat oven to 400° F. Right before placing in oven, brush egg wash over the top of the loaf and sprinkle on the rolled oats. Bake for 40 minutes or until the loaf sounds hollow when tapped on the bottom. Remove from pan and cool on wire rack. The loaf slices best when at room temperature.

Veronica’s notes: I substituted rapid-acting yeast as usual, so I mixed it in with the dry ingredients and then added the wet–no proofing necessary.  You don’t technically have to do two rises when you use rapid-acting/instant yeast, so you can just shape it into a loaf and let it rise once before baking, but I usually go ahead and do two rises anyway to develop a more yeasty flavor.

I calculated the nutritional information based on making two loaves and dividing each into 14 slices.  Per slice: 111 calories; 2.7 g fat; 21 g carbohydrate; 2.2 g fiber; 3.4 g protein

Recipe source: From Apples to Zucchini

Whole Wheat Banana Pancakes

Posted on

Saturday is the one day of the week when I have all the time I want to prepare breakfast, so I tend to make them a little more special.  I created these pancakes to use up one of the quickly blackening bananas in my fruit basket, and they were just wonderful, especially with the addition of fresh banana slices on top.  The bonus is that they’re so light that you can have a stack of two or three without busting your calorie budget, if you care about such things.

Whole Wheat Banana Pancakes

Printable recipe
Printable recipe with picture

¾ cup quick-cooking oats
¾ cup whole wheat flour
¼ cup buttermilk powder*
1 tablespoon Truvia, or sweetener of choice
1 tablespoon flax seeds
1 teaspoon baking soda
1 teaspoon baking powder
½ teaspoon cinnamon
¼ teaspoon nutmeg
¼ teaspoon salt
1 cup water*
1 medium banana
1 egg
1 teaspoon vanilla extract

Measure oats, flour, buttermilk powder, Truvia, flax seeds, baking soda, baking powder, cinnamon, nutmeg, and salt into a medium mixing bowl and whisk to combine. Mash banana with a fork into a separate bowl and whisk in the egg. Add to dry mixture along with water and vanilla. Let rest for at least five minutes while you heat a skillet/griddle. Measure out batter using ¼ cup for each pancake and cook until dry around edges on first side before turning to finish cooking.

*You can use 1 cup regular buttermilk in place of the buttermilk powder and water.

Makes 12 pancakes. Per pancake: 71 calories; 1.3 g fat; 12.5 g carb; 2 g fiber; 3 g protein

Recipe by Veronica Miller

Don’t forget to check out  Steph’s online bake sale today (January 31)!  It’s running from 7AM-9PM EST and this is your big chance to get your paws on a batch of my Mocha Toffee Brownies.  Good luck!

Banana Oatmeal Bake

Posted on

It has been months since I made this and I can still remember how creamy and delicious it was! I just bought some more agave nectar after using the last bottle up on Double Chocolate Banana Muffins, so I’m ready for another round of this hearty and warming breakfast.  I think you will like this one.  It’s both  nutritious and delicious!

Banana Oatmeal Bake

Printable recipe
Printable recipe with picture

2 cups old-fashioned oats
1/4 cup Bob’s Red Mill 10 Grain Hot Cereal (or Bob’s Red Mill 7 Grain Hot Cereal, another 1/4 cup oats, flax meal, wheat germ or bran)
1 teaspoon baking powder
1/4 teaspoon salt
1/4 cup agave nectar (or brown sugar, sugar or honey)
1-1/2 cups fat free milk (or any milk)
2 small bananas, mashed
1 large egg, lightly beaten
1 teaspoon vanilla extract
1/4 cup chopped walnuts or pecans

Combine oats, 10 Grain cereal, baking powder and salt.  Set aside. In another bowl, combine agave nectar, milk, egg, vanilla extract and bananas.  Combine the wet with the dry ingredients. Lightly spray an 8 x 8 inch pan with cooking spray and pour in banana-oats mixture.  Bake at 375 degrees for 15 minutes.  Add walnuts to the top and bake for another 5 minutes to toast them. Serve warm.

Recipe source: The Noble Pig

Cookie Mondays: Peanut Butter Sandwich Cookies

Posted on

As part of my New Year’s Resolution to lose a significant amount of weight by the end of the year, I’ve cut my baking back to just once per week.  Not only have I cut down the amount of time I spend baking, but I’m baking for my husband’s co-workers instead of myself and my family.  Inspired by my friend, Laura, who sends cookies to work with her husband every Monday, I’ve begun doing the same thing.  This keeps me from going through baking withdrawal, and allows me to have a treat once a week before sending the bulk of them out of the house for others to enjoy (thus freeing me from the constant temptation that having them in the kitchen would present).

For “Cookie Monday” this week, I whipped up some absolutely delicious peanut butter sandwich cookies.  And then proceeded to eat 13 of them (that’s over 1,000 calories, in case you were wondering) in under five minutes.  And then I squirted the leftover peanut butter filling from the pastry bag directly into my mouth.  So much for keeping to my calorie limit for the day! 

These cookies are too addictive to eat just one…or twelve.  Well, they are for me, anyway. They are a Girl Scout’s “Do-Si-Dos” knock-off and while I don’t love the Girl Scout’s version, I could practically live off these cookies if I had no concern for my health or waistline.  They are wonderful.

Next week I will work on my self-control and see if I can keep it to just 1 or 2 cookies.  Considering how many sweets I was consuming before the new year, however, I have to admit that even 13 cookies in a week is an improvement.  So at least I’m moving in the right direction.

Peanut Butter Oatmeal Cookies
Recipe modified from All Recipes

Cookies
1/2 cup butter, softened
1/2 cup peanut butter
1/2 cup white sugar
1/2 cup packed light brown sugar
1 teaspoon vanilla extract
1 egg
3/4 cup all-purpose flour
1/2 teaspoon baking soda
1/4 teaspoon baking powder
1/2 teaspoon salt
1 cup quick cooking oats

Filling
3 tablespoons butter, softened
1 cup confectioners’ sugar
1/2 cup smooth peanut butter
2 1/2 tablespoons heavy whipping cream

Preheat oven to 350 degrees.  Line a baking sheet with parchment paper or grease it.  Set aside.

In a large bowl, cream together the butter, peanut butter, sugars, and vanilla. Add egg and beat well.

In another bowl, whisk together the flour, baking soda, baking powder, and salt. Add these dry ingredients to the creamed mixture and beat until combined, then add the oatmeal and continue beating until incorporated.

Roll teaspoonfuls of dough into balls and place on prepared baking sheet.  Press each mound down with your fingers or a fork, depending on the appearance you’d like, to form 1/4 inch-thick cookies. Bake 5 minutes, or until cookies have just begun to set around the edges.  (My cookies were exactly 1 tsp each, so if yours are larger, they will obviously require more baking time.) Remove and allow to cool 3 minutes on the baking sheet before removing them to a wire rack.  Repeat with the remaining dough.

To Make Filling: Cream the filling ingredients until well blended. Spread or pipe filling on to half of the cooled cookies, then top with the other half to form sandwiches.  Don’t be stingy with the filling like I was at first–there is quite enough for all the cookies.  Of course, the benefit of being stingy with it is that you’ll have some left to squirt into your mouth when you have finished. Heaven.

Makes 60 sandwich cookies, if you can keep from eating a single speck of dough, scrape every last speck of it from the bowl to form the cookie balls, and you measure each ball of dough to be exactly 1 teaspoon.  I actually managed to do this and then went wild once the beautiful completed cookies were in front of me.  Oh yeah, and in case you’re counting your calories, each cookie clocks in at 80 calories.  Not too bad if you can keep from eating more than one or two! :)

I used my fingers to press these cookies down, so they weren't quite as flat and made a smaller, chubbier cookie. I had no preference as to which I liked better because they both tasted equally delicious!


My husband modeling the latest cookie fashion in the Miller household.


I had used Dennis for the former picture after taking this one b/c I realized how disgusting my nail polish was. But now I'm posting it anyway b/c I remembered seeing Lindsay Lohan with similar-looking nails. I'm not lazy, I'm just impersonating the stars! OK, fine. I'm just lazy. And apparently I need some lotion, too.

Easy Buttermilk Oatmeal Bread

Posted on

It started with Red’s white bread and now I can’t stop.  Once I realized just how easy making bread with my own hands can be, I haven’t been able to keep them out of the dough!  I haven’t had to buy bread at the store for a month now and I really don’t ever want to again.  This loaf is my latest bread victory.

https://i0.wp.com/a2.ec-images.myspacecdn.com/images02/26/bb89bc00548f4552adda41acd10d97c1/l.jpg

Easy Buttermilk Oatmeal Bread
Adapted from http://www.thecookingphotographer.com

Ingredients
1 cup oats (I used old-fashioned rolled oats)
3 cups flour, divided
1 teaspoon salt
1 ½ teaspoons rapid acting/instant dry yeast
1 1/3 cups warm buttermilk
2 Tablespoons honey
1 Tablespoon butter or margarine, melted

Instructions
In a large mixing bowl, whisk together the oats, 2 cups of the flour, salt and yeast.

Measure the wet ingredients over the dry and stir until well incorporated.  Slowly stir in the remaining flour until the dough is too thick to stir, then commence kneading in the flour.  You can turn it out of the bowl, but I always leave it in the bowl and knead it that way so as not to dirty another surface.  Knead for five minutes.

Shape the dough into a loaf, place in a greased bread pan, and spray the top with oil.  Cover loosely with plastic wrap and let rise in a warm place for one hour.

Meanwhile preheat the oven to 350 degrees. After the dough has doubled in size, remove the plastic wrap and bake for 30 minutes until browned.

After baking, remove the bread from the pan onto a cooling rack. Brush the top with melted butter and cool completely.

Honey Oatmeal Bread


**Note: This post is an eyesore but I don’t want to change the content because I’m keepin’ it real.  This is how the original post looked and read, and I want to be able to read it again ten years from now and cringe as much as I’m cringing now. :)  (Although I am adding a new photo of this in rolls-form, and plan to add more next time I make this into bread again.)

I will let you in on the people I’m identifying here.  This was back in my MySpace days, where I originally posted this, when I was friends with a couple gals who went by Red (Kim) and Kitchen Bitch (Krista).  Red’s white bread was the first yeast bread that required kneading that I’d ever made.  This was the second one and it is still my favorite after three years of baking with yeast.  It has the best, softest, texture and an incredible taste.  I hope you overlook the bad photos and delirious writing and make it!**

Well I’ve made Red’s bread which got me over my fear of making it, so I decided to tackle the Bitch’s bread…Kitchen Bitch, that is!  :)  Kim can have “Red’s Bread” and Krista can have “Bitchin’ Bread”–am I a great marketing schemer or what?  If you guys ever do open bread shops, I want 10% of your profits. Ha!

(It’s after 1 AM and I’m sleep-deprived.  In case you didn’t notice.)

OK, so Krista sent me this recipe quite a while back, but since the directions called for a stand mixer with dough hooks (which I don’t have) and I was scared to make bread in the first place, let alone try to modify a recipe to suit my lack of kitchen apparatus, I saved it for a later date.

The date came today.  Emboldened by my most recent success with the white bread, I decided I was going to go for the Honey Oatmeal Bread, despite my lack of dough hooks and despite the fact that it was nearly 11 PM.  It was a huge success and totally worth staying up for–even better than my first bread attempt!  The taste is unbelievable and the texture is crazy soft.  I’m in love.  I wish I had a good camera to show off the beauty of these loaves, but you can get a general idea from the back-up camera that I’m using.

Honey Oatmeal Bread
from KitchenAid

1 1/2 c water
1/2 c honey
1/3 c butter or margarine
5 1/2 to 6 1/2 c all-purpose flour
1 c quick cooking oats (Krista says rolled oats work fine too)
2 t salt
2 pkgs active dry yeast or 4 1/2 tsp jarred yeast
2 eggs
1 egg white
1 T water
Additional oatmeal for decoration (optional)

Place water, honey, and butter in small saucepan. Heat over low heat until mixture is very warm. (120-130 F)

First place oats, then 5 c flour, salt, and yeast in mixer bowl. Attach bowl and dough hook to mixer. Turn to Speed 2 and mix about 15 seconds.

Continuing on Speed 2, gradually add warm mixture to flour mixture and mix about 1 minute. Add whole eggs and mix about 1 minute longer.

Continuing on Speed 2, add remaining flour, 1/2 c at a time, and mix about 2 minutes or until dough starts to clean the sides of bowl. Knead on Speed 2 about 2 minutes longer.

Place dough in greased bowl, turning to grease top. Cover (I use plastic wrap) and let rise in a warm, non-drafty place (I use my oven with the light on) about 1 hour or until doubled in bulk. Sometimes this takes longer than 1 hour. Let it go until it has doubled.

Punch dough down and divide in half. Shape each half into a loaf and place in greased bread baking pans. Cover (I use a clean dish cloth for this) and let rise again in a warm, draft free place (oven again) until doubled in bulk…usually an hour, sometimes a bit more.

Beat the egg white and water and brush the tops of loaves GENTLY. Sprinkle with oatmeal if desired. Bake at 375 F (preheat the oven so it is up to temp) for 30-40 minutes. Remove from pans immediately and cool on wire racks.

Krista recommends brushing the crust with butter or margarine after removing from pans and so do I.

Yields 32 servings (16 slices per loaf). Nutritional info per slice: 134 cal, 4 g pro, 24 g carb, 3 g fat, 13 mg chol, 162 mg sod

Veronica’s Notes:  To make this by hand, mix the dry ingredients together in a large bowl.  Beat the eggs in a small bowl.  Pour in warm liquid and mix with a spoon until blended, then dump in the beaten eggs and fold the dough over and over until all the egg is incorporated and you’ve got a ridiculously sticky mass attached to your hand.  Add the remaining flour 1/2 cup at a time, kneading it in.  I just knead my bread dough in the bowl to keep from dirtying another surface.  Once you have kneaded in all the flour and continued to knead for a few minutes, follow the instructions on the recipe.   I used instant yeast so I was able to skip the first rising and go straight to shaping the halves into loaves and sticking them in the pans.  Krista wouldn’t recommend this and she’s probably right that using regular yeast and allowing the bread to rise longer develops a fuller flavor, but I seriously can’t imagine bread getting any better than this.  If it’s better her way, the taste would probably give me a heart attack so it’s partly in the interest of my own health that I’m sticking to my own method.

%d bloggers like this: