RSS Feed

Tag Archives: fast

One-Bowl Chocolate Cake

Posted on

This is a very simple chocolate cake but I daresay it might be even better then my previous favorite. It is incredibly moist and so tender, with the perfect amount of chocolate flavor. It is a perfect cake to whip up when you don’t have time for a fussy recipe, and who needs fussy when simplicity brings such deliciousness? I hope you try it.

One-Bowl Chocolate Cake

Printable recipe

Printable recipe with picture

2 cups all-purpose flour

2 cups sugar

1/2 cup baking cocoa

2 teaspoons baking soda

1 teaspoon baking powder

1/2 teaspoon salt

2 large eggs, lightly beaten

1 cup canola oil

1 cup buttermilk

1 cup hot water

Frosting of your choice

Colored sprinkles, optional

Preheat oven to 350°. Grease a 13×9-in. baking pan, or spray with cooking oil. In a large bowl, whisk the first six ingredients. Stir in eggs, oil and buttermilk. Add water; stir until combined.

Transfer batter to prepared pan. Bake 35-40 minutes or until a toothpick inserted in center comes out clean. Cool completely in pan on a wire rack. Frost cake. If desired, decorate with sprinkles.

Chocolate Buttercream Frosting: In a large bowl, beat 1/2 cup softened butter until creamy. Beat in 2 cups confectioners’ sugar, 1/4 cup baking cocoa, 1-1/2 teaspoons vanilla extract and 3-4 tablespoons 2% milk (I used heavy cream) to achieve desired consistency.

*Veronica’s notes: I sifted my dry ingredients since my cocoa powder was really lumpy. If you find yourself in the same boat, with big clumps of cocoa powder in the dry ingredients that won’t mix out, I would suggest sifting so you don’t have any clumps.

Recipe source: Taste of Home

Low Country Boil {Northern Stovetop Version}

Posted on

I got this recipe from my friend, Suzie, who ironically lives up North, so I don’t know how authentic this is to the “low country” but it’s really good!  I actually ate this whole recipe by myself over the course of several days while pregnant because Den hates shrimp. Usually I avoid shrimp dishes because I don’t like to prepare myself a separate dish, but this is so worth the minimal effort.  So flavorful! The second best part is, this is an indoor version you can make on your stovetop any time of year.

Low Country Boil

Printable recipe
Printable recipe with picture

4 cups red potatoes, quartered
4 ears corn on the cob, cut in half
1 (14-16 oz) package polish sausage or kielbasa, cut into bite-size pieces
2 lbs. of uncooked large shrimp

For the stock:

12 cups water
1 package Zatarain’s crab boil
1/4 cup Old Bay Seasoning
1 lemon, quartered
1 large onion, quartered
9 whole cloves of garlic (or to taste)
3 tablespoons kosher salt (or 1 1/2 tablespoons table salt)

Add all stock ingredients to a large stock pot or Dutch oven and bring to a boil. Once boiling, add potatoes and corn and boil for 15 minutes. Add kielbasa or polish sausage and cook for 5 more minutes. Turn down heat to medium and add the uncooked shrimp. Cook for 3-5 minutes, until shrimp turns orange, and drain into a serving dish. Serve with butter and old bay seasoning mixed together and/or cocktail sauce. Enjoy and have plenty of napkins ready!

Veronica’s note: you can use frozen “mini” corn on the cob, and add along with the shrimp at the end.

TILT: My two favorite cake piping tips

Posted on

Welcome to another edition of Things I Like Thursday (TILT)! Today begins a series containing the many things I love to use to make cake & cupcake decorating quick and easy.

I’m going to start with just TWO piping tips, because I use them for nearly every cake, and/or cupcake I make. They are very inexpensive, and worth the small investment. Each of these have had about twenty five years of use between my Mother and I, and have stood the test of time. I would not be nearly so fond of making cakes and cupcakes if it weren’t for these tips.

The first is Wilton’s “Icer Tip” #789. I used it to frost both wedding cakes above, and nearly every other cake I’ve ever made. It’s wide and flat and you use it to pipe frosting in an even layer in stripes all over your cake.  This means you don’t have to crumb coat it, it means that once you stripe your cake, all you have to do is smooth the lines.  (Don’t forget my water bottle trick for a perfectly smooth finish on your frosted cake!)  You can see me in action using my trusty icing tip in the video below.

The second is just as invaluable to me, as I now go the easier route of cake-making, doing cupcakes instead.  All it takes is 1-2 seconds per cupcake to pipe on a pretty swirl and voilà! You’re done. It’s probably the fastest thing you’ll ever do with this nice a result.

white cupcakes 6-27-11

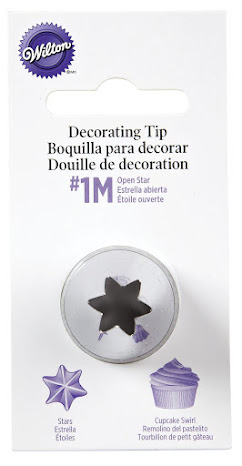
I use Wilton’s Tip 2110 (1M) for nearly all my cupcakes, as I just prefer the size of swirl it makes, and I also use it to decorate my most popular cake on this site, the Cookies ‘n Cream Cake, along with CW’s Strawberry Shortcake, and many pies, like Key Lime Pie, and yesterday’s Strawberry Cream Cheese Pie. Pretty much anything requiring a swirl of whipped cream, this is the tip I use.  I have a video tutorial on how to use it to frost cupcakes here if you want to see this tip in action.

I hope this TILT was helpful, and that you haven’t been overwhelmed with the sheer amount of links I was able to provide in just one post. Ha! Catch you next week with another cake-y edition of Things I Like Thursday.

Some links are affiliate. All opinions are my own, I wouldn’t recommend something I didn’t stand behind 100%.

Easy White Chicken Chili


Nana D brought us a batch of her White Chicken Chili last winter when we were sleep-deprived new parents, and let me tell you, not having to cook and eating this chili was a big slice of heaven.  It’s now one of my favorite winter meals, it’s just so ridiculously over-the-top delicious.  The big bonus is that it’s so easy to make – the only prepwork is opening cans and chopping an onion. Can’t beat that!

Easy White Chicken Chili

Printable recipe
Printable recipe with picture

3 (10 oz) cans chicken chunks
1 (15 1/2 oz.) can great Northern beans, drained and rinsed
1 (15 oz) can cannellini beans, drained and rinsed
1 (15 oz can chickpeas, drained and rinsed
1 (15 oz.) can corn, drained
2 (4 oz.) cans chopped green chilies, undrained
1 medium onion, chopped
2 teaspoons garlic powder
2 cups chicken broth
1 teaspoon salt
1 teaspoon cumin
1 teaspoon oregano
1/2 teaspoon pepper
1/4 teaspoon cayenne pepper
1 cup sour cream
1 cup Monterrey Jack cheese, shredded
1/2 C. whipping cream
1/4 C. Pepper Jack cheese, shredded
Cilantro for garnish (optional)

In large soup pot, combine all ingredients except sour cream, whipping cream and cheeses. Bring to a boil over medium high. Reduce heat to simmer and cook for 30-40 minutes. Remove from heat and stir in sour cream, whipping cream and cheeses. Ladle into bowls and garnish with cilantro, if desired.

Serves 6

*Veronica’s notes: I use bouillon cubes plus water for the broth, which adds a little more flavor. Donna’s recipe called for 2 teaspoons chili powder, which I omitted to keep the color white (hers has an orange hue), and the flavor didn’t suffer, but it’s really good with the chili powder too if you’d like to add it. If you like things spicy like we do, you can use all Pepper Jack cheese, and half an 8 oz block is plenty, so that you can have enough to make another batch, or a double batch. :)

Recipe source: Donna B.

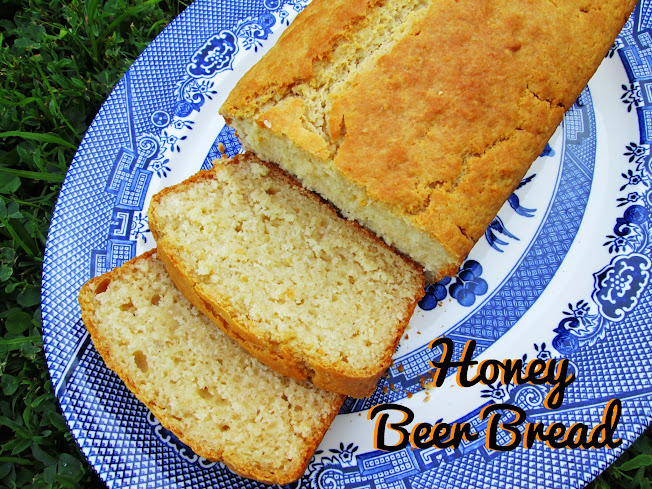
I served this and the Curried Red Lentil Soup with Honey Beer Bread – so delish!

Chicken and Dumpling Casserole

Posted on

Chicken & Dumpling Casserole | veronicascornucopia.com

Although the first day of spring has come and gone, it’s been chilly and blustery here in Kansas, so I thought I’d share this warm and delicious casserole for everyone that’s still eagerly awaiting spring before it’s hot and sweltering and nobody wants to bake a casserole. This is pure comfort food and perfect to warm the soul on a chilly day.  It’s very quick and simple to make, which is good if you have a baby that has decided that if you aren’t holding him or playing with him or taking him on a stroller ride, he isn’t happy, because you won’t have to listen to him scream for very long  before dinner is in the oven. ;)

Chicken and Dumpling Casserole

Printable recipe
Printable recipe with picture

3 – 4 cups cooked chicken, cut into bite sized pieces (use rotisserie chicken if desired)
4 tablespoons butter
1 cup milk
1 cup all-purpose flour
1 1/4 teaspoons baking powder
1/4 teaspoon salt
2 cups chicken broth
1 (10.75 oz) can cream of chicken soup

Preheat oven to 400F. Place butter in 9″ X 13″ baking dish and place in oven while it’s preheating. Once butter is melted, you can remove the pan to continue with the recipe, or let it cook a little to brown it and add an extra dimension of flavor. Be sure to watch it if you decide to let it brown because it can go from nutty to burnt pretty quickly.

Remove pan from the oven and sprinkle prepared chicken over the top of the butter. In a medium bowl, whisk together milk, flour, baking powder and salt. Pour over the chicken, but do not stir. In same bowl, after scraping out as much flour mixture as possible, whisk together chicken broth and cream of chicken soup. Pour that over top of casserole; do not stir.

Bake uncovered for 35 – 45 minutes. When done, the top will be beautifully browned and bubbly around the edges.

Yield: about 6 servings

Veronica’s notes: I boiled a whole chicken for this recipe. It was about 5 lbs and I covered it with water in a stock pot and added a teaspoon of salt, boiling for an hour or two. I forgot to set the timer so I really don’t know how long I boiled it because I was so busy with the baby- lol. If you make it this way, it’s very economical, and you automatically make your own broth to use in the recipe.

Recipe source: The Better Baker

Tiger Butter


If you need an idea for last-minute Valentine’s Day treats for your loved ones, I gotcha covered!  I’ve made four batches of this Tiger Butter fudge since Christmas and everyone has been so impressed with it, I don’t know whether to be proud or ashamed of how easy it is to make!  Three ingredients, melt, stir, and swirl, and you’re done.

And if you’re wondering about the taste, it is oh so good.  The peanut butter layer is incredibly creamy and of course the chocolate is the perfect complement.  Need I say more?

Tiger Butter

Printable recipe
Printable recipe with picture

1 (24 oz) package vanilla almond bark candy coating
1 (1 lb 2 oz) jar creamy peanut butter
1 1/4 cups milk chocolate chips

Line a rimmed baking sheet with foil; set aside.

In a microwave-safe bowl, microwave the chocolate chips for one minute and stir well. Microwave in 15-second intervals, stirring well in between, until completely melted. This takes 2 intervals for my microwave. Be careful not to overheat the chocolate and stir well after each interval, allowing the residual heat to melt the chips before microwaving again. If you overheat them, they will get too thick and you won’t be able to use the melted chocolate for swirling. Once melted, set aside.

Melt the almond bark according to package directions. Usually that would be to place them in a microwave safe bowl, microwave for 1-1 1/2 minutes, stir well, and microwave in 15 second intervals, stirring in between, until melted and smooth. Once melted, stir in the peanut butter until creamy and smooth. Spread into prepared baking sheet.

If the melted milk chocolate has become too firm with standing, microwave for ten seconds, stir, then pour it over the peanut butter mixture in long horizontal lines. Drag a spatula through the lines in a vertical pattern, going up on one line, then down on the next, repeating until the pan is swirled. Allow to set for several hours or overnight before cutting. You may refrigerate the fudge to set it up quickly.

Stores great at room temperature, and you don’t even have to cover it. Great shelf life. I’ve left some uncovered for up to two weeks with no spoiling.

Veronica’s notes: although I haven’t tried it, you should be able to substitute 1 1/2 lbs white baking chips for the candy coating if you can’t find it in your area, or even real white chocolate if you don’t mind the big price tag. I like to use milk chocolate with peanut butter, but semisweet chocolate is perfectly fine and would create a more dramatic stripe effect.

Recipe source: adapted from The Better Baker

Easy Salisbury Steaks with Onion Gravy

Posted on

This is how you know that food might be way too important to you.  You make a bucket list.  Which entirely consists of recipes you want to make before you die.  Or in my case, before I turn 40.  Lots of young food bloggers have a 30 Before 30 list, but since I’m older I made a 40 Before 40.  I don’t turn 40 for another 8 years (OK, 7 years and 2 months if you want to get all technical and make me feel even older) so I should totally be able to do it, right?

Check out my 40 Before 40 list here.

Salisbury steak just so happens to be one of the recipes on my bucket list.  Number 13 to be exact.  I don’t know what it is about the number thirteen this year but it, and three (I just realized while talking about my age that I’ll be 33 when Joshua is born-more three’s!), just keep showing up!  Anyway, I made the list several months ago and am happy to finally be able to cross off one of the recipes on it.

And what a delicious one it was!  This is another goodie from The Better Baker, who makes a lot of “my kind” of foods (comfort food) but usually they are healthier options.  My ultimate comfort food is meatloaf with mashed potatoes and gravy and Salisbury steak is sort of like little individual meatloaves with gravy so this was just a big plate of comfort for me.  These were so good!  So good.  Like so good, guys.  And unlike some more complicated recipes (which I’m sure are even more delish, however), they come together really quick and easy.  I had my Salisbury steaks and mashed potatoes from scratch ready in half an hour.  Dinner time!

Easy Salisbury Steaks with Onion Gravy

Printable recipe
Printable recipe with picture

1 egg
1 medium onion, finely chopped
1/2 cup crushed saltine crackers (about 15 crackers)
1/2 teaspoon pepper
1 lb. lean ground beef
1 tablespoon canola oil
1 (1 oz) envelope beefy onion soup mix*
2 tablespoons all-purpose flour
2 cups cold water

In large bowl, combine egg, onion, saltines and pepper. Crumble beef over mixture and mix well. Shape into 5 oblong patties.

Heat the oil in a large skillet over medium-high heat. Add the patties and sear each side until browned, about 3 minutes per side. Remove patties to a platter and cover with foil to keep warm.

In small bowl whisk together soup mix, flour and water; stir into skillet. Bring to a boil, stirring often. Return patties to skillet. Reduce heat; cover and simmer 5 – 7 minutes or until meat is no longer pink.

Serve with mashed potatoes and a veggie. I served mine with sour cream and chive mashed potatoes.

*The original recipe calls for regular onion soup mix, but I found a beefy version available for a limited time at Aldi.  If you can’t find the beefy kind, I’m sure it’s just as good with regular!  The color of your gravy will just be lighter.

Recipe source: adapted from The Better Baker

KFC Coleslaw

Posted on

I put random photos throughout the introduction that have nothing to do with anything except the happenings in my life. Hover over for a brief description

I haven’t been blogging much and at first that was really nice, deciding not to blog when all I wanted to do was sleep, clean, spend time with the hubs, play Wii with my nephew, go to the lake with my family, etc.  It was very freeing, recognizing that it was my choice.  But last week, though I didn’t post at all, I really missed it!

I finally got a “permanent” schedule at work (“permanent” because it is still subject to change, based on the demands of the PO), 2:30-11 PM M-F with weekends off (praise God for that!) and I’m trying to go to bed right after getting home each night so that it won’t be as hard to get up early on Sunday mornings for worship.  So that was the main reason I held off blogging, because my intentions were good, to go to bed early, but then I’d get caught up in email/Facebook/Pinterest and I still ended up staying up till 3-4 AM each day, making it also impossible to blog in the morning since I slept through it.  And yes, Sunday was a very tired day for me, as always. Week 1 of trying to go to bed early: FAIL.

So I still don’t know how regular I”m going to be while I’m trying to get on a schedule that will allow me to get up at 8 AM each day with 8 hours sleep, but ultimately my posting time will likely start to be in the late morning/early afternoon as I switch from scheduling my posts for 8 AM the night before, to publishing after typing them each day before work.

Anyway, I’m happy to share something with you today and sorry for the rambling personal introduction that has nothing to do with coleslaw!  Oh wait!  If you can wait one more second, I have something else to share.  When I came home from work after a really bad day almost two weeks ago, I found a package waiting for me on the kitchen table.  It was the kitchen tile I won from Kudos Kitchen by Renee!  It was the happy ending I really needed that day.

She painted it from this image I sent her that I found on Pinterest:

I was pretty demanding for someone who won something (i.e. got it for free!), asking if she could make the colors a deeper red, green and blue to match the colors in my kitchen, and I even went so far as to ask her to change the font to a fancier one.  She didn’t complain at all and I’m totally thrilled with the tile and with Renee.  If you want to check out her work, visit her Etsy shop here.

Thanks for putting up with me today–it’s hard trying to write a short blog when you’ve been silent for so long!  Onto the coleslaw.  Finally!

I’m not a huge coleslaw fan, but I have always liked KFC’s coleslaw.  Have you met my sweet teeth?  (I usually claim they’re all sweet, but a few of my molars are actually partial to savory foods. ;))  Yeah, I think they enjoy the sweetness to it.  So when I volunteered to bring the coleslaw to our family’s July 4th celebration, I searched for a KFC copycat recipe and found one on Amanda’s Cookin’.  I was pretty stoked to find it there, because I already follow Amanda’s blog and have much love for her since she started the Secret Recipe Club, which I enjoy participating in every month.

This coleslaw is just like KFC coleslaw!  So good!  And if you have a food processor, man, this comes together in 10 minutes or less.  Even easier, you could just buy that bagged coleslaw mix and use the dressing on it.  Either way, this is a winner and my family raved over it.  Dennis and I ate an entire batch of it last week, so you know we love it too.
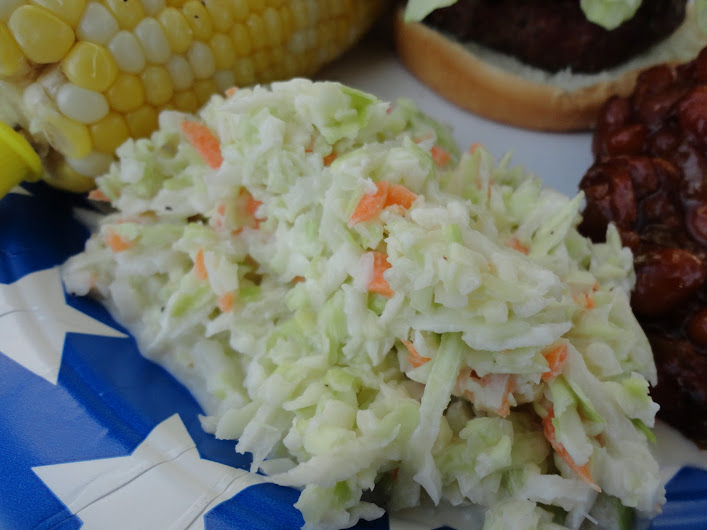
KFC Copycat Coleslaw

Printable recipe
Printable recipe with picture

Slaw
1 head of cabbage
2 medium carrots, peeled (about 1/2 cup shredded)
2 tablespoons dried minced onion

Dressing
1/2 cup mayonnaise
1/3 cup granulated sugar
1/4 cup milk
1/4 cup buttermilk
2 1/2 tablespoons lemon juice
1 1/2 tablespoons white vinegar
1/2 teaspoon salt
1/8 teaspoon pepper

Chop cabbage into chunks, discarding the core, and run through your food processor using the shredding blade, or chop fine.  Empty into a large bowl.  Chop the stems off the carrots and shred them too, then add to the cabbage along with the minced onion.  Combine all of the dressing ingredients in a large bowl, whisk well, and pour over the slaw.  Stir well, then cover and refrigerate at least 4 hours, preferably overnight, before serving to allow the flavors to marry.  Serve cold.

Recipe source: slightly tweaked from Amanda’s Cookin’

Tostada Pizzas

Posted on

These are an insanely quick & easy lunch, coming together in less than 5 minutes start to finish.  And so delicious, you will be amazed!

I was craving pizza but didn’t want to deal with rising dough or a hot oven on a sweaty summer day, so I came up with these when I spied the tostada shells on my counter.  You only need your broiler on in the oven for a couple minutes and you’ve got hot, melty, crispy pepperoni pizzas.  I bet these would be a huge hit with the kiddos, too.  Bonus for those with gluten sensitivity: they’re gluten-free! Score.

Tostada Pizzas

Printable recipe
Printable recipe with picture

You will need:
Tostada shells
Pizza sauce (here‘s a quick and easy recipe that requires no cooking)
Mozzarella cheese, shredded
Pepperoni
Other toppings of choice*

Line a baking sheet with foil and set aside. Spread a tablespoon of pizza sauce over each tostada shell, then sprinkle with cheese and toppings. Broil on high for 1-2 minutes, keeping the oven light on so you can remove them before they burn. They cook quickly so do keep an eye on them-mine took just a little over a minute to get melty and hot. Serve immediately.

*Be careful with adding too many veggies as they could water out and make the crispy tostada shells soggy.

A Veronica’s Cornucopia original

Cheddar Bacon Dip

Posted on

I can’t believe it has been a month since I last shared a recipe!  After my blogging hiatus, I’m feeling refreshed and ready to return to my online cornucopia of recipes, life adventures, and Thankful Thursdays.  Thank you for bearing with me through January, and thank you to the wonderful guest posters that kept my blog alive in my stead. I now have a clean, OK, cleaner house, have worked my way up to Judges in my quest to read the Bible from cover to cover, have gotten enough sleep almost every night for a month, have spent valuable time with my nephew, and have taken up a new hobby of funky manicures (you can see some of them here), which will probably die hard now that I’m back to blogging.  But as one of my co-workers said, “Who cares about your nails? We need to EAT!”  Enough said–here we go! :)

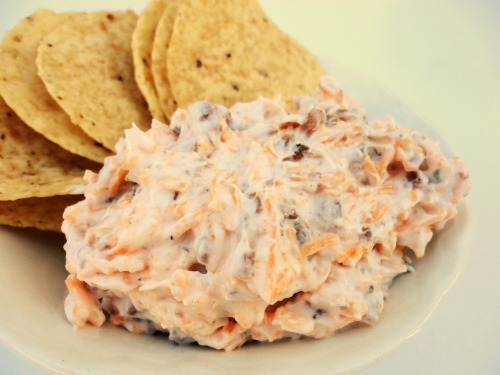
I have so many recipes to share with you guys, and most of them savory if you can believe it.  Since the Super Bowl* is next Sunday, I figured I’d start with something football party-appropriate: a fattening dip!  This was my least favorite recipe I made while I was away (though you wouldn’t know it by the ungodly amount I ate), but it’s tasty, it’s fast, it’s easy, and it’s a man-pleaser so I’m sharing it for those of you who need a quick man-pleasing dip to add to your Super Bowl party spread.

For other party food ideas, check out my index of snacks and appetizers here.

Cheddar Bacon Dip

Printable recipe
Printable recipe with picture

16 oz sour cream
1 packet Ranch dressing mix
3 oz bacon bits (in the bag not jar)
1 cup shredded cheddar cheese

Mix together and refrigerate 24 hours. Serve with chips and/or veggies.

Recipe source: Plain Chicken

*True fact: at the age of 12, when a convenience store clerk asked if I was looking forward to the Super Bowl, I replied, “No, I don’t really like bowling that much.”  My younger sister gave me a cringing look and after we left the store, she explained that the Super Bowl is the NFL’s championship football game. Shows you how much I know about sports!  The only difference is now I love bowling.  I still am clueless about football.