RSS Feed

Tag Archives: breads

Things I Like Thursday: USA Pans

Posted on

I’m starting something new!  Things I Like Thursday. TILT.  I like it. :)  I hope you like it too.

First off, I’m a thrifty person, as we are a family of four (don’t forget the dog – she is almost as expensive than the toddler!) living on one small income, so I try to buy things that are lower in price.  However, I am also willing to save and pay more for something that is really good quality because I’ve learned over and over, the hard way, that you almost always get what you pay for.  Not always, but usually.  And you actually do end up saving money, and getting better results, by paying more for high quality pans that last a lifetime than paying for $5 pans over and over and over.

Which leads me to my favorite pans.  I have bought a lot of cheap pans and the results I got with them were OK, not great, but I’m a good baker, so it wasn’t terrible.  I finally decided, after the state fair judges told me for the millionth time not to grease the sides of my pans (and finally disqualified me for doing so after many warnings), that it was time to buy some really killer pans that baked goods would actually come free of, even if I didn’t grease the sides.

I did some research, comparing different brands, and I was swayed by the overwhelmingly positive reviews on Amazon for the USA pans.  So despite them costing more than I’d usually like to pay, I used some of my state fair winnings money several years ago to purchase a loaf pan and two muffin pans.

USA Pans 6-Piece Bakeware Set

Oh my wow, people.  These pans are amazing.  I actually had previously purchased an even higher priced Williams-Sonoma Goldtouch Nonstick Loaf Pan with a gift card I got for a birthday, and these pans beat the pricey Goldtouch pans out of the park.  Yes, the Goldtouch pans are nicely nonstick, and they give breads and muffins an excellent rise, but they also consistently over-browned the sides and bottom of my baked goods.  And dark brown on the sides, golden on the top is just not a good look for baked goods.  State Fair judges are definitely not fans of that look. The pans also tend to collect yucky stuff in the corners that was a lot of work to get out with a toothpick.


USA Pans 9 x 5 x 2.75 Inch Loaf Pan, Aluminized Steel with Americoat

The USA Pans are not only fabulously nonstick, and give your baked goods an excellent rise, but they do not over-brown the bottom and sides of your baked goods, and do not collect gunk in the corners.  I have also had no problems with rust, and my pans are still in the same condition they were when I bought them two years ago.


USA Pans 8.5 x 4.5 Inch Aluminized Steel Loaf Pan with Americoat Loaf Pan

I can now present my quick breads to the judges without having the “fry line,” as they call it, on the sides, and last year I was not disqualified.  In fact, my Black Walnut Banana Bread got third place. (Yes, the blue ribbon STILL eludes me! One day, people, one day. Here is the main part of my Banana Bread adventures if you’re unfamiliar with my epic quest for a blue ribbon and want to catch up.)

USA Pans 5-1/2 by 3-Inch Mini Loaf Pan, Set of 4

I will say that the one drawback with the muffin pans is that they won’t fit side by side in a regular-sized oven if you want to bake two dozen muffins or cupcakes at once. Which I often do.  It hasn’t slowed me down though, I just put one in the middle rack on the far right, and one on the very top, far left. The bottom one gets done first and I move the top one down to finish, or sometimes just leave it up there to slowly finish.  It really upset me when I discovered they wouldn’t fit side by side, but I don’t mind it at all now.  Since it bothered me so much, though, I wanted to make sure to mention it so you guys don’t have any surprises if you decide to buy them!  They are definitely my favorite muffin pans, even with the unfortunate size problem.


USA Pans 12 Cup Cupcake/Muffin Pan, Aluminized Steel with Americoat

I highly recommend USA pans to anyone that enjoys baking.  They are definitely “Things I Like.” :)

Check back next Thursday for another kitchen edition of TILT! After that I might get all wild and crazy with posts on cloth diapers and essential oils. I be so crunchy! :D

Full disclosure: I’m not being paid to provide this review, nor was I provided with anything free to do it.  I just really LOVE these pans and want to spread the word.  There are affiliate links contained in this post, and I will earn a commission if you decide to purchase any of these items through the links I provide, but again, the thoughts and opinions stated here are 100% my own. Thank you for supporting my blog! :)

Tips for Shipping Food Items

Posted on

Many participants in the online bake sale have asked me for tips on shipping baked goods, and since there will also be many needing this information for the cookie swap, and probably others reading who would like to ship food items at some point in their life, I figured it behooved everyone for me to share my tips.  I’ve shipped a lot of food items, and have always had success getting my goodies from one place to another, fresh and (mostly) unbroken.  You may find a way that suits you better, but this is how I do it.

1.  Wrap/package the baked goods very well so that they are air tight.  For soft/chewy cookies, I put them together in a Ziploc bag and press the air out before sealing. For more fragile cookies, wrap individually in plastic wrap before putting in a tub or tin.  If you are shipping something that will smash or break easily (delicate cookies, marzipan, etc), it is best to place it inside a sturdy container, within the box you are shipping it in.

2. If you put your cookies or other goodies in a tub or tin, fill it to the top or so there’s no room for the goodies to move around in.  If you don’t have enough to fill up the tub or tin, fill the empty space with wadded up waxed paper, parchment paper, or plastic wrap.  The goal is to be able to shake the tin and not hear or feel anything moving around.  No movement equals no breakage.

Notice I filled this tin all the way to the top with cookies (Chocolate Chip Coconut Macaroons).  I did have to rearrange them to make sure I could close the lid without smashing them, but when I closed it, there was no room for the cookies to move around when shaken.  I shipped this all the way to Afghanistan with no problems.  If you need to ship to a very far away place, coconut macaroons are a great cookie to choose as they get better with age, stay moist, and are sturdy.

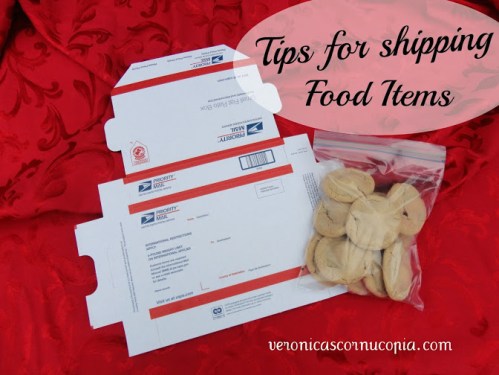
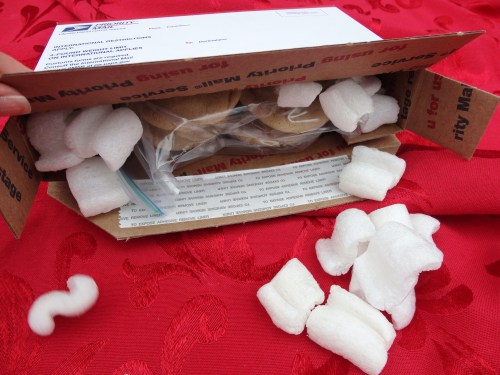
3.  Once the baked goods are in the shipping box, pack well around the them so that they will not shake inside the box.  Use packing peanuts, wadded up newspaper, bubble wrap, etc.  Fold the box flaps down and shake it to test and make sure that the goodie package within the box does not move around.  I find it best to use a box closest to the size of the baked goods possible, so there isn’t much packing necessary.  A dozen cookies fits perfectly in a small Flat-Rate Priority box (offered for free at Post Offices everywhere) and you will only need a few peanuts to fill in the open space between your bag of cookies and the box. I have shipped many cookies this way and have seen photos of them after arrival, and they look just as good as the day I baked them.  Packing them tight so that they don’t move around during shipping is key.

After taking this photo, I made sure to fill in every gap with peanuts, closed the flaps, shook the box, and put in more peanuts if anything shifted.  By the time I sealed the box, those cookies were completely stable inside their box.   And as you can see, below, they arrived in the same condition they left in (minus the eaten part, lol). Julie described the cookies favorably as chewy, salty, and sweet (they were Sneaky Snickers Cookies, peanut butter cookies with mini Snickers hiding inside), so they also arrived tasting the same as they left.


4. For bread, wrap well in plastic wrap, making sure it is air tight.  You can then place it inside a plastic tub if you can find one that fits, or just put it right inside the box you are mailing it in, preferably one not much larger than the bread.  Pack with bubble wrap or peanuts to ensure the bread does not jostle during shipping.  Have the postal clerk mark “This Side Up” if you don’t want your box being turned upside down.

5. For glass jars, wrap each jar in bubble wrap before placing in box, secure the bubble wrap with tape, and fill in the empty space in the box very well with wadded newspaper, peanuts, or more bubble wrap.  Have the postal clerk mark “Fragile” on your box.

6.  Use Priority Mail (2-3 days delivery) or Express Mail (overnight) service.  Parcel Post is used a lot by companies shipping heavier items and if you choose this service, which will only be a little cheaper than Priority Mail, not only will it take longer to arrive, it may be placed beneath a heavier package and crushed.

7.  Request delivery confirmation.  (You will have to fill out a little slip that you can find usually while you are in the Post Office line and fill out the address while you wait.)  This allows you to track the progress of your package online and make sure it gets delivered.  This really helps when someone wants to know where their package is, then you can just provide a tracking number if need be.  It does cost 75 cents extra (free when you ship online with Priority Mail) but it is worth the peace of mind.

There are also a lot of tips here that I did not mention, but are very important to know, such as waiting for your baked goods to cool completely before wrapping/packing, and much more.

What NOT to do…

I once received a package of cookies in a Tyvec bag with no padding.  Notice the price she paid to ship it was more than it would have cost to use a small flat rate priority mail box, and the cookies would have been in better condition if she had mailed them that way.

She also would not have had to buy a container if she’d used a flat rate box, just a Ziploc bag.  The container had cracked during shipping because of the lack of padding, so it wasn’t air tight.  You can see that the cookies got beat up because the tub had a lot of extra room for them to move around in during shipping.  Despite all this, the cookies weren’t completely dried out yet and were still very good.  But they could have been wonderful if more carefully packaged.

Also, please do not try to ship a frosted cake.

whites_bakery_cake-10

So sad.  :(  I got this photo here, and you can read the lovely story of how a mother shipped her daughter a birthday cake.  Unless you don’t mind your cake arriving in a heap of crumbles like the thankful daughter who received this cake, please leave it to the professionals. (How DO they get them delivered in one piece?! I really wish I could figure that out.  But I don’t want to pay the price of delivery to find out for myself-lol.)

I hope this helped you with any concerns you might have had and if you have any questions, just leave me a comment below.