I’m ba-ack! My husband, sister, and I had a fabulous time with our friends in Texas and I put together a slideshow if you are interested, which you can view here.
I had planned to share my favorite basic cheesecake recipe with you upon my return, but you will have to wait until Monday for that one because I’m on a deadline to get a mango recipe posted for BSI (Blogger Secret Ingredient). Trust me, I’m doing you a favor! This salad is so delicious and you don’t risk gaining ten pounds if you go wild and eat the entire recipe. Which you might be tempted to do with the cheesecake.
OK, so I’m a mango purist. Mangoes are my absolute favorite fruit and I find them so delicious as they are, with nothing added, that it’s hard for me to make a recipe with them. There is, however, a lovely salad that I make with them from time to time (usually when I have a mango surplus, because using my only mango for anything other than eating plain would be sacrilege) that is so simple and pure in itself, I don’t feel like I’m adulterating the fruit by including it in the salad.
There are only three ingredients and they marry so well together that in the past I have been inspired to give the salad names that would usually be associated with cocktails, like Hawaiian Sunrise and Tropical Paradise. To keep things simple and pure, in keeping with the recipe itself, I decided to just go with Pineapple & Mango Salad for it’s official title.
I’ve made this salad with parsley, mint and cilantro and I usually prefer the parsley, though any of them will work. If you think another sounds better, go with that. I think it is a matter of personal taste, or perhaps even occasion, as when I’m serving it as dessert after a Mexican meal, the cilantro seems best. And if you want to give it a little more tropical feel, add in some sweetened coconut. I did that this morning on my second bowl and thought it was nice, though being a mango purist I can’t exactly condone the behavior. ;)
1 ripe pineapple
4 ripe mangoes
1/2 cup fresh parsley, mint, or cilantro, chopped fine
Cut a slice off the bottom of the pineapple and cut the top off as well. Sit the pineapple up on on its now-flat end and slice down around the sides to remove the outside. Keep cutting until you have no pits remaining in the flesh. Cut the pineapple into quarters, then slice the middle off of each to remove the pit. Lay each quarter on its back, cut into thirds length-wise, then chop into chunks. Place the pineapple chunks in a large bowl. Peel the mangoes and cut the flesh away from the seed. Chop the flesh into chunks and add to the bowl. Add the parsley and stir until combined. Cover and refrigerate overnight, or at least until well chilled, before serving.
Veronica’s notes: this salad is perfectly delicious when the fruit is ripe, but if yours is a little under-ripe, you can add in some agave nectar or other sweetener of your choice. If you don’t feel like cutting up a pineapple, you can usually find fresh cut pineapple at salad bars at supermarkets, or even in the refrigerated produce section. There is a simpler way to cut the flesh from a mango, which is depicted here (I don’t use this method because I feel like I can’t cut the cubes close enough to the skin and I waste too much of the mango), and to see a tutorial on cutting pineapple, click here.
Recipe source: CW (that’s my Mom. Dad calls her CW, which stands for Crazed Woman, and she calls him “crazy man.” Gotta love my dysfunctional family! :) )
This is linked with Nutmeg Nanny for BSI: mangoes.
Questions of the day: 1) Is there anything you love so much in its natural state you can’t alter it? 2) What is your favorite fruit? 3) Do you know anyone that has mean/teasing pet names for their significant other?
Hummus and tabouli are my favorite sides to serve with Lebanese fare. Not only are they simple to make, but crazy delicious! My Mom’s tabouli consists predominantly of bulgar wheat, and most recipes I’ve found are the same, but I noticed when I ordered it at restaurants, it was mostly parsley with a tiny bit of bulgar in it. Not only is this lower in calories (bonus!), but I actually prefer the taste. The parsley and lemon make for a very refreshing salad! Here’s my version of restaurant-style tabouli.
3 bunches parsley, chopped
1/3 cup chopped onion
2 medium tomatoes, diced
1/4 cup fine bulgar wheat
1/4 cup lemon juice
1 tablespoon extra-virgin olive oil
1/4 teaspoon salt
Mix all ingredients in a bowl, cover, and let sit overnight before serving. There is no need to cook the bulgar, as it will absorb moisture from the salad and become tender in a few hours.
Makes 6 servings. Per serving: 76 calories; 3 g fat; 12 g carbohydrates; 3.5 g fiber; 3 g protein
Recipe by Veronica Miller
I used red onions in the first picture, and white onions in this one. You can also use green onions, if you prefer.
On a personal note: I’m leaving to visit friends in Texas so this is the last recipe I’ll be posting for a while. I know I’m not a regular poster anyway, so you guys won’t even miss me! Nevertheless, I will return later next week with some sweets & savories for you. You’re in for a few treats! :)
I have a confession to make. I didn’t use vegan white chocolate on my Cinnabon Caramel Corn, despite my recipe calling for it. It was my practice batch and since I was making it with things I had on hand, I used regular white baking chips. I assumed finding vegan white chocolate would be simple and I could go out and buy it when it was time to make the real batch to ship to the winner. Well, a friend of mine asked me where I got my vegan white chocolate because she had not been able to find any in Wichita so I called all the health food stores and none of them sold it. I was shocked! Apparently this stuff is harder to find than I assumed.
To remedy the situation and make sure I had some vegan white chocolate on hand when I needed it for the 100% vegan batch of Cinnabon Caramel Corn next week, I set out to make it from scratch. And I’m happy to report that it is a smashing success. Yowza, this stuff is good! The cost of the coca butter makes it a little pricey, but when you need some vegan white chocolate, you need some vegan white chocolate, and we’re not going to let a $8 jar of cocoa butter hold us back, now are we?
1/2 cup + 2 tablespoons powdered sugar
2 teaspoons soy milk powder (I used raw coconut flour with good results)
1/8 teaspoon salt
4 1/4 ounces food grade cocoa butter
1 vanilla bean (optional)
Measure the powdered sugar, soy milk powder, and salt into a sifter and sift into a bowl; set aside. Measure the cocoa butter into a large microwave-safe bowl and microwave for one minute; stir. Continue microwaving in 30-second intervals, stirring very well in between, until the cocoa butter is melted. If using the vanilla bean, scrape the seeds from the pod and whisk into the melted cocoa butter. Next, quickly whisk the dry ingredients into the cocoa butter until completely smooth. Pour into a chocolate mold (I used an 8-ounce candy bar mold). If you don’t have a mold, paper cups or silicon bakeware will do in a pinch. Gently tap the mold on the counter top a few times to release any excess air bubbles. Allow to sit at room temperature for half an hour before placing in refrigerator to fully harden. Pop the chocolate out of the mold and enjoy. Store any leftovers (yeah, right!) in an airtight container.
Veronica’s notes: I read many first-hand reports of vanilla extract causing homemade white chocolate to curdle and become a vile consistency, so I chose to play it safe with vanilla bean seeds instead. If you would like to try using extract or vanilla bean paste, consider yourself warned. And please let me know if you try it and have success! UPDATE: I have now tried adding vanilla extract and have confirmed that it does indeed ruin the texture. Please do not try it.
Katie from one of my favorite vegan blogs, Chocolate Covered Katie, announced today that she is going to host an online bake sale to raise money for disaster relief in Japan. She grew up in Japan so this cause is near and dear to her heart. I imagine we have all been touched by the disaster in one way or another, and I’m no exception. I have a good friend that lives in Japan, and also have a co-worker whose family lives there, and while all of them came out OK, my heart goes out to those who are suffering from loss and devastation because I know how easily it could have affected someone that I loved.
I had so much fun participating in Stephanie’s bake sale for the Leukemia and Lymphoma Society, so I immediately started brainstorming about what I could donate to Katie’s. I only have two vegan dessert recipes on my blog (Mounds Cake and Black Rice Pudding), and neither would travel very well, so I opted to make something else that would. Caramel corn! I took my favorite Cinnabon Caramel Corn and turned it vegan and I have to say, it’s scrumptious! I will be offering a full gallon-sized bag of it for Katie’s bake sale on April 5th. I will give another announcement the day of the bake sale so you can stop by to bid or see if there’s anything else there you’d like to bid on and help raise money for Japan. If you’d like to donate a vegan baked good, click here to check out the details.
½ cup popcorn kernels or about 12 cups popped corn
½ cup roughly chopped pecans
½ cup roughly chopped walnuts
½ cup Earth Balance
1 cup packed light brown sugar
¼ cup light agave nectar or light corn syrup
1 1/2 teaspoons cinnamon
½ teaspoon salt
½ teaspoon baking soda
1 teaspoon vanilla extract
6 ounces vegan white chocolate, roughly chopped*
1 tablespoon coconut oil
Preheat oven to 200 degrees. Use an air popper to pop corn into a large bowl. Fish out any unpopped kernels, then sprinkle the nuts over the top and set aside. In a large saucepan, melt the Earth Balance over medium heat; stir in the brown sugar, agave nectar, cinnamon & salt. Bring to a boil while stirring constantly (I increase heat to medium-high to achieve this faster, then reduce heat back to medium once it’s boiling), then allow to boil for 4 minutes without stirring. Remove from heat and stir in soda and vanilla (mixture will bubble up and become foamy). Pour over the popcorn and stir well to coat. Spread out on a large rimmed baking sheet and bake in preheated oven for half an hour, stirring halfway through baking time. Remove from oven and scatter onto waxed paper-lined cookie sheets. Place white chocolate and coconut oil in microwave safe bowl and heat for 30 seconds; stir. Heat in 15-second intervals, stirring in between, until smooth. This should only take 1-2 times. Using a spoon, drizzle chocolate over the popcorn and put in refrigerator for ten minutes or until chocolate is firm. Break into pieces and store in an airtight container or Ziploc bags.
*If you can’t find some sort of dairy-free, vegan white “chocolate” in your area, it is available for purchase online or you can make your own. I used this recipe. If you use homemade vegan white chocolate, do not melt it (it becomes too liquid and won’t coat the pieces very well). Instead, chop fine and once the caramel corn is spread on waxed paper lined cookie sheets, scatter it over the top so that the heat from the caramel corn will melt it. Place the sheets in the refrigerator as soon as the chocolate is on top to keep it from melting too fast or it will drain to the bottom instead of staying on top.
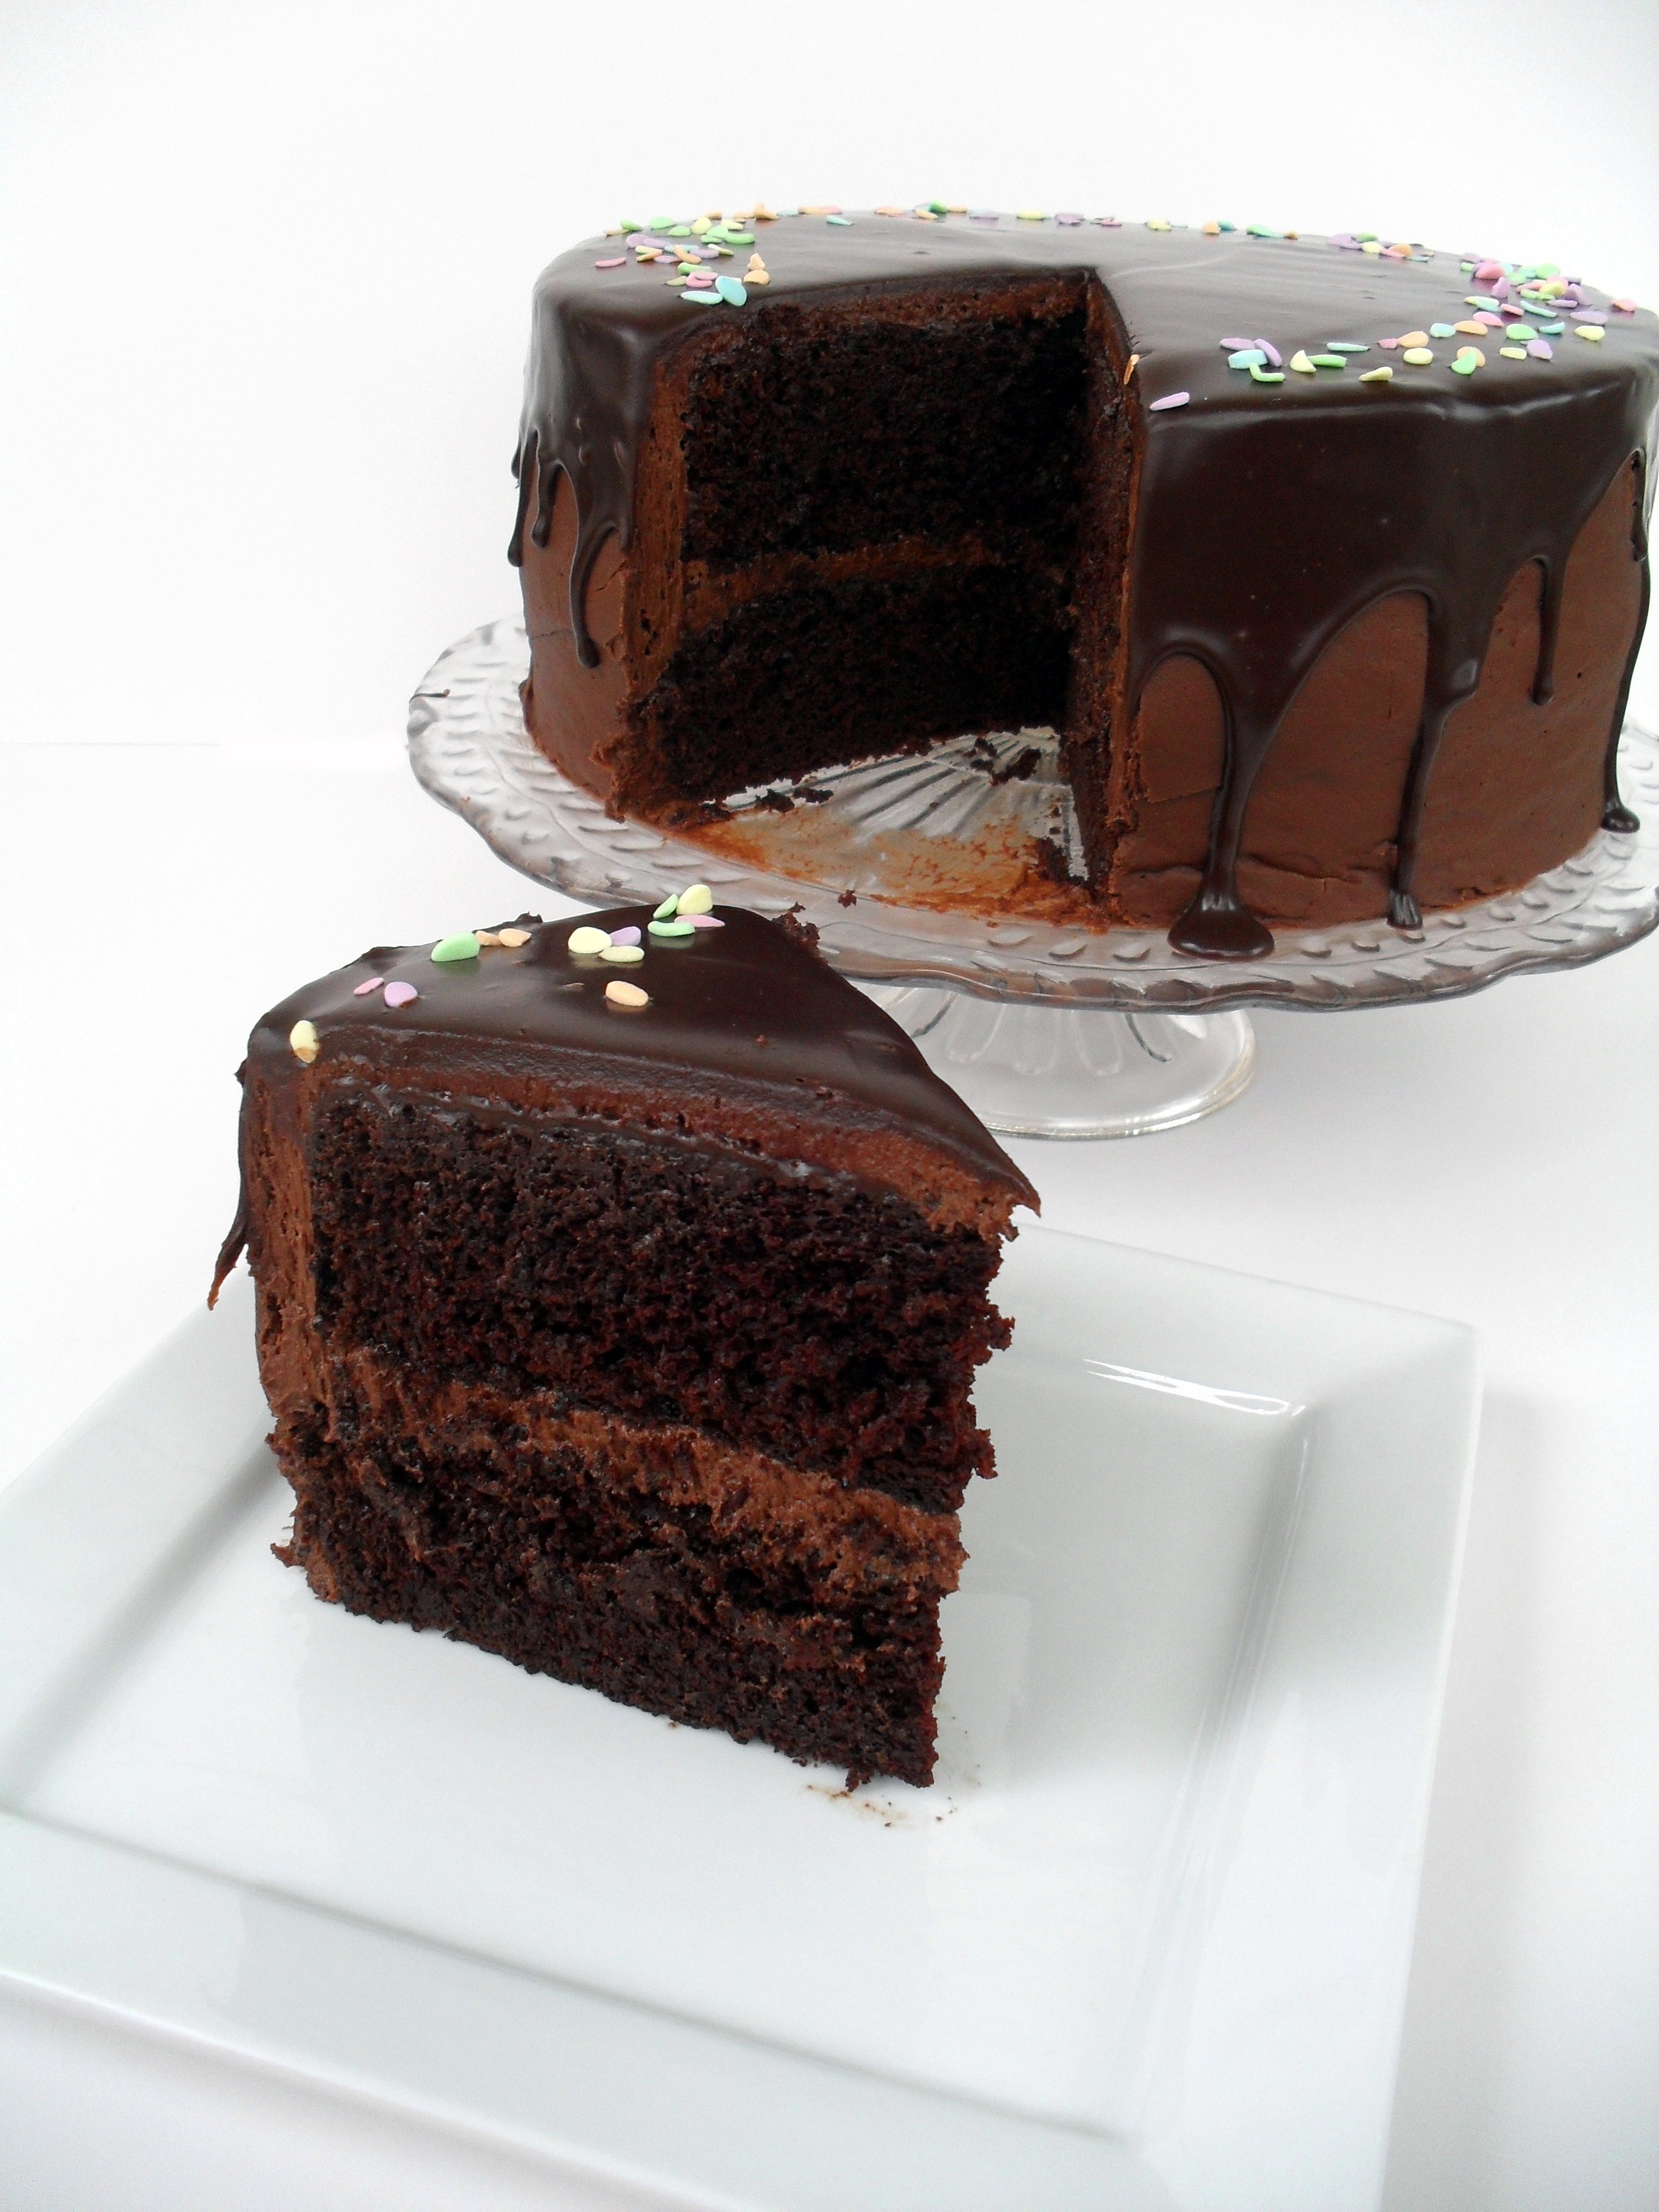
I’ve made several tiered cakes over the last few years (you can see them all here), but a friend’s surprise 40th birthday party last November was my first opportunity to do a really decadent chocolate one. Needless to say, I was extremely excited to try something new!
With my husband, left, and the birthday boy at his party
If I had to pick a single type of cake to eat for the rest of my life, it would be white with cream cheese wedding frosting, but if you are a chocolate lover, this is the cake for you. I know I tend to be quite effusive over most of my cake recipes (I’m effusive by nature, and I can’t help it–my cakes are the bomb! I kid, but really. They are. :) ), but I can tell you that this is the cake that I have gotten the most positive feedback for. That may be in part due to the number of people I served it to, since most of my cakes are only made for groups of about 10 people, but I do think this is probably the best chocolate cake I have in my repertoire, and I have made it several times since the birthday party to great reviews as well. It is my husband’s all-time favorite cake, and although it isn’t my favorite cake, it is my favorite chocolate cake.
If you are thinking about making a tiered cake in the future, but are intimidated, I highly recommend the method I used for this particular cake. If you frost each cake on top of a thick, foil covered cake board that is at least 2″ larger in diameter than the cake itself, then insert four hidden pillars into the bottom two tiers, all you have to do is transport the cake in three tiers to the location where the cake will be set up, and plop each cake on top of the pillars. And you’re done! With the usual way I do it (you can read about that process here), the stress level is considerably higher and there is more chance of messing up the cake. It is almost impossible to mess it up using hidden pillars.
*Hidden pillars aren’t actually invisible, as you can see, but since they are tall you can insert them down into the cake so that each tier is supported from the base of the cake below it. It is the part of the pillar inserted to the cake that is hidden.
Another tip is that once the cakes have been removed from the refrigerator to come to room temperature, make sure they have a way to breathe. After inserting the pillars in the bottom two, you don’t have to worry about them. But you should insert a hole with a skewer through the top of the top tier as well, or choose a place on the least attractive side of the cake (the one you’ll face to the back of the room) to poke a hole into each layer of the cake. This is to prevent air pockets from forming underneath the icing. This is a problem that cake decorators face across the world, and according to the professionals I have consulted, no one knows why it happens. When I make real buttercream with eggs and no powdered sugar, this never happens. So I suspect it has something to do with a reaction between the cake and the powdered sugar frosting on the surface. So if you are using a powdered sugar frosting (aka American buttercream), please make sure there is a place for air to escape so that your frosting job will not be ruined. (I used to be concerned this would make the cake dry out, but an entire day with a hole poked in the cake does not seem to affect it at all. If I’m making the cake 2 or more days in advance, I keep it in the refrigerator to keep it fresh and to keep air bubbles from forming beneath the frosting, and then poke it before I take it out to come to room temperature.)
UPDATE: It has now been explained to me that when you frost a cake cold and refrigerate it, once you bring it to room temperature the air inside the cake expands, causing the icing bulge, aka “icing budge.” While this is the most likely explanation, I have actually had the bulge happen when frosting room temperature cakes and never refrigerating them. So weird!
Here are some pictures of icing eruptions that have happened to my cakes before I figured out I needed to poke them so they could breathe:
You can see the bump on the left side where air or gas is trying to escape.
And this is the view straight on. The bottom two tiers of this cake never gave me any trouble, but the top tier didn’t have dowel rods in it so there was no way for it to breathe and I had to fix probably 10 of these eruptions!
This has been such a pain for me, that I even caught one of the incidents on video! This was before I figured out I needed to poke the cake to prevent the air pockets.
A tip for getting your frosting perfectly smooth is to spray the cake with water after smoothing it out as much as you can with an offset spatula, then going over it again with a clean spatula. The water helps your spatula to glide over the surface and make it very smooth. You can also dip your spatula in water, but I find using a squirt bottle to apply it makes the job much faster.
OK, let’s get to my favorite chocolate cake recipe! I took a bunch of photos of my latest one so I included a few extra for you at the end of the post. You’re welcome. :)
Favorite Chocolate Cake
This recipe makes one 9″ two-layer cake. To make a tiered cake the size pictured above, you’ll need to make about 7 batches of the cake recipe (2 batches for each 14″ layer, 1 batch for each 10″ layer and less than 1 recipe for both 6″ layers combined), 5 batches of the frosting, and 5 batches of the glaze. Printable recipe Printable recipe with picture Printable recipe for cake only
Favorite Chocolate Cake
1 ¼ cups unsweetened cocoa powder
2 ½ cups all purpose flour
2 ½ cups sugar
2 ½ teaspoons baking soda
1 ¼ teaspoons baking powder
1 ¼ teaspoons salt
2 large eggs plus 1 large egg yolk
1 ¼ cups warm water
1 ¼ cups buttermilk
½ cup plus 2 tablespoons vegetable oil
1 ½ teaspoons pure vanilla extract
Favorite Chocolate Frosting
2 sticks unsalted butter, room temperature
½ cup vegetable shortening
2 oz semisweet chocolate, melted and cooled
1 cup unsweetened cocoa powder
¼ cup dutch-process cocoa powder
¼ teaspoon salt
2 lbs (8 cups) powdered sugar
¾ cup milk
2 teaspoons vanilla
Favorite Chocolate Glaze
½ cup heavy cream
4 oz semisweet chocolate, chopped
2 teaspoons corn syrup
½ teaspoon vanilla
Make the cake: Preheat the oven to 350 degrees, making sure the baking rack is in the middle of the oven. Prepare two 9” round cake pans by cutting out a piece of parchment or wax paper to line the bottom of them. Grease the pans, place the parchment or wax paper in the bottoms and lightly grease again. Dust the pans with flour (or cocoa powder if you don’t want the white dusting on the finished cakes). Set the pans aside.
Sift together the cocoa, flour, sugar, baking soda, baking powder, and salt into a large bowl. Add the eggs, yolk, warm water, buttermilk, oil and vanilla. Mix on low speed until smooth, about 3 minutes.
Divide the batter evenly between the prepared pans. Bake the cakes for about 35 minutes, until a toothpick inserted into the middle comes out clean or with moist crumbs. Do not overbake! Remove the pans from the oven and set the pans on a wire rack to cool for 15 minutes. Gently run a thin knife around the edges of the pans and unmold the cakes, removing the parchment paper liners from the bottom of the cakes. Let them cool completely, top sides ups, on a wire rack. Trim the tops of the cake layers with a long serrated knife to make them level.
*Veronica’s notes: Although I have never had a problem with this cake recipe overflowing in my pans, many people have left comments on Melanie’s blog (and once on mine when I used it before for THE Mocha Crunch Cake) that they did, so I recommend either making sure the batter is no more than 2/3 full in your pans or placing a baking sheet below the pans to catch any overflow, just in case. If you have extra batter, make a few cupcakes! Also, please do not skip lining the pans with parchment or waxed paper. This cake is sticky and I learned the hard way that it will stick to the pan even if you grease and flour it.
Make the frosting: Cream butter and shortening together until smooth. Beat in melted chocolate until smooth. Add the cocoa powders, salt, sugar and milk to the bowl and turn the mixer to a very low setting until it’s combined enough to increase the speed. Continue increasing the speed and scraping the sides of the bowl until everything is incorporated, then add the vanilla and continue beating until fluffy. Frost cooled cake and freeze leftovers. This makes a large batch so unless you lay the frosting on super thick, you should have enough leftover to frost a dozen cupcakes, but the batch isn’t quite large enough to cut in half. I know, I make things difficult, but you won’t regret having some extra on hand.
Make the glaze: Gently heat the cream and chocolate together in the microwave or in a double boiler, stirring often until smooth and shiny. Stir in the corn syrup and vanilla. Allow to come to room temperature before pouring over the top of the cake and spreading to the edge with a spatula so that it drips over the sides. If the glaze gets too thick, heat it again for a few seconds (it won’t take long) and stir before pouring over the cake. Serve the cake at room temperature.
Recipe source: cake recipe from My Kitchen Cafe, frosting and glaze by Veronica Miller.
My friend, Suzie, shared this recipe on Facebook a while back, and while alltherecipes I’ve tried from her rock, this was one I never intended to make. I make it a rule to shun or lighten all recipes that call for more than a tablespoon or two of heavy cream (except in desserts, of course!), but I recently went through a low-carb phase and ended up making a lot of yummy rich dishes during the two weeks I masqueraded as a carnivorous beast. I’m usually not a big fan of meat in general, but my husband (the true carnivore between us) and I both loved this dish.
I have to say, the coating (a Suzanne Somers recipe) I used in place of flour on the chicken was tremendous. I made extra so I could use it again because I’m imagining it encrusting pieces of white fish and think it would be great on any cut of meat. It has tons of flavor. Of course the basil cream was incredible, and a very good compliment to the flavor of the “breaded” meat. One portion of this dish is satisfying enough that you shouldn’t need anything else besides some roasted asparagus or a salad…but if you don’t have to worry about your caloric intake, I hate you I think this would be great over linguine!
Although the low-carb phase was temporary, it reminded me that fat is not the enemy and can be included in my dietary plan, even in large amounts if I reduce calories in other ways, such as serving vegetables alongside this chicken instead of pasta and bread. It is definitely worth scrimping on the carbs in order to enjoy a meal like this every so often!
Bake & Fry Mix
1 cup minced onion
1 teaspoons salt
1/4 teaspoon black pepper
1/4 teaspoon ground sage
1/2 teaspoon dried rosemary
1/2 teaspoon dried coriander
1/2 teaspoon dried thyme
1/4 teaspoon dried oregano
1/4 teaspoon paprika
1/4 teaspoon red pepper flakes
1 bay leaves, crushed
1/2 cup grated Parmesan cheese
Chicken and sauce
8 (4 oz) boneless, skinless chicken breasts
1 stick (1/2 cup) unsalted butter
1 cup chicken broth
2 cups heavy whipping cream
1 (4 oz) jar sliced pimentos, drained
1 cup grated Parmesan cheese
2 tablespoon dried basil
1/4 teaspoon pepper
Place minced onion in food processor fitted with blade attachment. Process one minute. Add remaining mix ingredients, except the cheese, and process another minute. Add cheese and pulse until combined. Place in a gallon-sized Ziploc bag. Add chicken to the bag and shake until every piece is coated. On medium-high heat, cook chicken in butter on both sides until juices run clear, about 10 minutes. Remove and keep warm. Add broth to the skillet. Bring to a boil over medium heat; stir to loosen browned bits. Stir in the cream, pimientos and basil; boil and stir for 1 minute. Reduce heat. Add the Parmesan cheese and pepper; cook and stir until heated through. Pour over the chicken and serve.
Makes 8 servings. Per serving: 544 calories; 41 g fat; 2.5 g carbohydrates; 0 g fiber; 36 g protein
Recipe source: adapted from Fast & Easy by Suzanne Somers and Suzie S.
Before we get to some major Indian yumminess, I wanted to mention two things. First, you may notice things look a bit different around here. I changed my theme and I like it but I’m not sure it’s “the one.” I think the header is very plain…but I’m cheap and I don’t want to pay to get fancy so this is probably as good as it gets. :) Let me know what you think!
Second, I think I caused some confusion with my post on the cake decorating competition at work. I’m not sure how many of you saw that, but I wanted to clarify that the date on it is correct. I wrote it two years ago on my MySpace blog, and newly copied it to Recipe Rhapsody so that I could link to it in reference to how to make a tiered cake in an upcoming post. I posted it with the original date I wrote it, so I didn’t think any one would see it, but I started getting some comments on it so apparently it came across some of your radars! Just wanted to clarify that it’s now old news, but I appreciate your kind words and congratulations.
Although I still have a large backlog of recipes to post, the weather is heating up again and it looks like the casseroles, soups, and pumpkin recipes will probably have to wait until next year, so I thought I’d gush (or perhaps rhapsodize would be a more appropriate word for this blog!) about the lunch I made today instead. I’m on a mission to spring-clean my wreck of a house into sparkling submission, and I started eying the red lentils I’d purchased at a Lebanese market over a month ago while I was organizing the kitchen.
I decided I was (finally) going to make something with them, but by the time I took a break to cook, I was starving and didn’t want to bother with looking up any recipes. I needed a quick meal and I threw this one together in just over half an hour, so it would be great for a busy day. While I’m usually not a good enough cook to come up with anything edible without using a recipe, I think I knocked this one out of the park, if I do say so myself! Becoming familiar with the cuisine by cooking several Indian dishes over the last few months helped a lot.
I made a masoor dal (a thick stew made of red lentils) that is almost vegan, and could certainly be turned so by using vegetable stock in place of the water and chicken bullion. It is spicy in the full sense of the word–with plenty of Indian aromatics and and a moderate heat index, though you can certainly reduce or increase the spiciness to your tastes.
I’m usually not a fan of lentils, but I liked this more than any lentil dish I’ve made before. I’m not sure if red lentils have a better flavor (which I do suspect, because I detected none of the usual musky lentil flavor in this dish), or if the spices just overwhelmed it. The tender cauliflower pieces were a perfect accompaniment, but I don’t think the kale is absolutely necessary. I couldn’t really detect any of its flavor, and it got kind of dull & ugly during the cooking process, but I don’t think it hurts to have all that extra nutrition! Kale has powerful antioxidant properties and is considered an anti-inflammatory so if you have it on hand, throw it in! If not, don’t sweat it. The only thing I didn’t have that I really felt it needed was a little cilantro to sprinkle over the top. I had to make do with some dried parsley. Bummer!
I served mine with whole wheat couscous since I was in a hurry to eat (it only takes 5 minutes to make), but you can serve it with rice or bulgar or even pasta. Whatever floats your boat!
2 cups water
2 chicken bullion cubes
1 cup red lentils
1/2 cup chopped onion
2 cloves garlic, minced
2 (8 oz) cans tomato sauce
2 teaspoons garam masala
2 teaspoons curry powder
1 teaspoon sriracha hot chile sauce, or to taste
1/2 teaspoon cumin
1/2 head cauliflower, separated into florets
2 cups loosely packed kale
2 tablespoons extra-virgin olive oil
Fresh cilantro, for garnish
In a large 3-quart saucepan, combine water, bullion, lentils, onions, and garlic; cover and bring to a boil over high heat. Reduce heat to medium and cook for ten minutes. Stir in the tomato sauce, garam masala, curry powder, sriracha, and cumin. Add the cauliflower and kale, stir & cover. Cook for 20 more minutes, stirring often to make sure the dal isn’t sticking, or until the lentils are tender. Stir in the olive oil during the last five minutes of cooking and serve with a sprinkle of cilantro over rice or couscous.
Serves 4
Per serving: 231 calories; 8 g fat; 40 g carbohydrates; 15 g fiber; 13 g protein
I got this idea from my friend, Rossie, who I also adapted my favorite salmon recipe from. Her favorite dinner is taking a salmon fillet, sprinkling salt and pepper (or lemon pepper) on it, slathering mayonnaise on top of that and baking until browned. I love some good salmon, so when I snagged some fresh herbs on sale, I thought of Rossie’s mayo salmon and had a little fun with it.
Dennis and I both loved it! The creamy, crusty herb-infused mayo really complimented the salmon, and was quite simple to throw together. The herbs I used went well with the fish, but I bet you could substitute any others you might have on hand. Have fun!
4 (3-4 oz) skinless salmon fillets
Salt and pepper
½ cup mayonnaise
1 tablespoon fresh rosemary, chopped
1 tablespoon fresh chives, chopped
1 teaspoon dried dill
Preheat oven to 350 and spray a baking dish with oil. Place salmon in baking dish and sprinkle with salt and pepper. Mix the mayonnaise with the herbs, the spread it over the fillets. Bake uncovered for 20-25 minutes, until the mayo gets a little brown crust.
Veronica’s note: When substituting dried herbs for fresh or vice versa, use this general rule of thumb: 1 teaspoon dried herbs = 1 tablespoon fresh.
I didn’t calculate the calories for this recipe and was wondering, as a reader, do you prefer the calorie information to be included or does it matter to you?
I got the above Hallmark (because I care enough to send the very best, lol!) card for my Mother-in-Law’s birthday. Most of my husband’s family lives a couple hours north of us and I usually mail some sort of edible goodies to them on their birthdays. Since I haven’t figured out how to ship a cake without destroying it, I thought this would be a great card to send to her along with some cow pies candy. Cute, if a little gross, right? :)
I’m not sure where this recipe originated but you can find it all over the web. Mine is a little different from the others, which only call for almonds and raisins with the chocolate. Because cow pies have grass in them (OK, maybe I’m getting a little too graphic here!), I like to add coconut to mimic that.
Although I went with sliced almonds this time (it was all I had on hand), my favorite way to make these is with roasted, salted peanuts, raisins, and coconut. If you like Chunky candy bars, you’ll like that version too because it is very similar in taste. (I also have an award-winning recipe for cookies that are based off the flavor profile of the Chunky Candy bar, if you’re interested in that!)
It’s best to use salted nuts to counteract the super-sweetness of the candy. If you only have unsalted, just add some salt to the mixture before stirring. Kids love these things (apparently the idea/grossness as much as the taste–KIDS!), and they would be great for Halloween…and maybe even Easter. We usually think of barn animals (OK, barn animal babies) in correlation to Easter, so I guess cow pies fits, right? Or maybe I’ve grown a little twisted over the years. I blame my husband. He is the King of Strange. I mean, remember those horrific-looking no bake cookies he made? Yeah. He totally started it.
1 (12 oz) bag milk chocolate chips
1 tablespoon vegetable shortening
2/3 cup roughly chopped salted nuts*
1/2 cup packed raisins
1/3 cup packed shredded coconut
*Add 1/4 teaspoon salt to the recipe if not using salted nuts.
Gently melt chocolate and shortening together in double boiler or in microwave, stirring frequently until smooth. Stir in remaining ingredients. Drop spoonfuls onto a wax paper lined baking sheet and let sit until firm, about an hour.
Veronica’s Note: If you want to add more mix-ins, decrease the amounts of the other mix-ins accordingly (for instance, decrease nuts to ½ cup and raisins to ⅓ cup in order to add an additional ⅓ cup mix-ins). Ideas for mix-ins: toffee bits, crushed pretzels, bacon bits, crumbled potato chips, additional types of nuts or dried fruits.
Makes 24 candies. Per serving: 121 calories; 7.6 g fat; 12.7 g carb; 1.1 g fiber; 2.2 g protein
Growing up, I always made goulash with an Italian flare because I did not understand what goulash was supposed to be. (Obviously I was a self-taught cook–Mom and I did not get along well together in the kitchen so I did things my way!) I equated pasta and tomatoes with Italian, so I added in Italian spices and used spaghetti sauce to coat the noodles. I have finally come to understand that goulash has Hungarian roots and although my latest concoction is more how most Americans make it, I can’t claim that it has any resemblance to the original dish it was named for. All I can say is that it’s fast, it’s delicious, and satisfying!
1 cup whole wheat elbow macaroni
1 1/2 lbs 97% lean ground beef
1 onion, chopped
1 green pepper, chopped
2 (14.5 oz) cans stewed tomatoes
1 (8 oz) can tomato sauce
1 (6 oz) can tomato paste
1 teaspoon paprika (Hungarian if you have it!)
1 teaspoon garlic powder
fresh cracked pepper
Boil macaroni until al dente. Meanwhile, cook hamburger along with onion and green pepper in skillet over medium-high heat until cooked through; drain. Add in remaining ingredients, stirring until the tomato paste is dissolved, and stir in macaroni. Serve hot.
Makes 8 servings: 271 cal; 6.8 g fat; 32.3 carb; 5 g fiber; 23.8 g protein


