RSS Feed

Tag Archives: low carb

Paleo Orange Chicken

Posted on

This dish is a revelation for healthy eating.  It has no breading, not even a thickener for the sauce, doesn’t require frying, is naturally sweetened with fresh squeezed juice alone, contains only healthy fat, and yet it is so. delicious.

And guess what?  It is yet another way to use virgin coconut oil!  I’ll be drawing the winner for the Tropical Traditions oil at midnight tonight (click here to enter the giveaway if you haven’t yet), so I decided to sneak in another recipe that uses it before I did.  I myself just got a gallon of it (happy happy, joy joy! Thank you to those who made first-time purchases through my links, that’s how I earned it!), so you can be sure I’ll be posting many more recipes using it.

Full disclosure: for the record, I mainly cook with/eat extra virgin olive oil, just so you don’t think I’ve devoted my life to saturated fat, even if it is a healthy one.  :)  Also, for the record, I am not on the Paleo diet, but am all for eating healthy.  And lastly, this was Den’s plate, as I had no rice on mine because I’m not eating starches right now. </TMI>

As for this chicken, I don’t have much to add beyond that it was incredible.  It is sweet, even without refined sugars of any kind, and packed with flavor.  I have to admit I totally forgot to include the sriracha (*sob* we love spicy, how could I?), which probably would have improved the consistency so that it coated the pieces a little better, but it was still great even without it. Who needs fried chicken pieces drenched in a sickeningly sweet syrup sauce when eating healthy tastes even better?  Move over, take-out!

Paleo Orange Chicken

Printable recipe
Printable recipe with picture

1 lb. boneless, skinless chicken breasts or thighs (cut into bite size pieces)
3 tablespoons virgin coconut oil
juice of 2 oranges*
zest from 1 orange
1 teaspoon grated fresh ginger
3 tablespoons low-sodium soy sauce
1 teaspoon chili garlic sauce or sriracha
3 green onions, sliced (white and green parts)

In a medium-sized saucepan, add the orange juice, zest, ginger, soy sauce, and chili garlic sauce or sriracha. Set over medium-high heat and let simmer to reduce and thicken while the chicken cooks. In a large saute pan, heat the coconut oil over medium high heat. Add the chopped chicken thighs and cook until a nice brown crust has developed on the chicken pieces, about 6 minutes. If your chicken pieces are really close together, you’ll likely have a lot of water in the pan (it doesn’t evaporate as well), and you should drain the excess liquid off to help the pieces brown.  Remove from heat and if the sauce is ready (it will be reduced to very little, coating just the bottom of the pot, thick and almost like a glaze), add the chicken to the saucepan and stir to coat with the orange sauce. Serve topped with sliced green onions.

*Taste your oranges. If they don’t taste orange-y, then neither will this dish. Use tangerines if you need to, or add a teaspoon of sweetener, such as stevia or agave nectar, until you’re satisfied with the flavor.

Recipe source: Health-Bent

Zucchini Spaghetti

Posted on

**I apologize to subscribers for the weird “password protected” post that came to your inbox or feed early this morning!  It was me just being a spaz, but I’ve got this “top secret” recipe now set to public visibility instead of password protected.  Sorry to disappoint if you thought my zucchini spaghetti recipe must contain codes to reveal a huge conspiracy theory, but I hope you’ll find the delicious recipe is quite enough to get excited about in and of itself.  :) **

Have you been wondering what ever happened to the weight loss contract and the 17 Day Diet?  Join the club–I’m wondering too! :D  We did save a good amount of money with the contract, though we only actually stuck to the agreements made in it for like a week.  And we ended up with a bunch of emergencies (car stuff, etc.) that most of the money went toward.  We did much better with the 17 Day Diet and stuck with it for over a month, but soon after got to the third 17-day cycle, which allows for a wider range of foods, we cheated our way into widening the range to all foods, and in great abundance.  Soooo, I think I lost 15 pounds and gained most of it back.  Story of my adult life.  I pretty much diet half the year so I can eat like a pig the other half.  It kind of works for me.

Anyway, this “spaghetti” was the romantic Valentine’s Day dinner I made while we were on the first cycle of the 17 Day Diet, which allows for no starches except for fruit.  The lean meats allowed are minimal as well (turkey, chicken, and fish) and I was challenged to come up with a 17 Day Diet-friendly recipe that would be really delicious and impressive.  Debbi posted her version of Kalyn’s zucchini spaghetti and I knew I had a winner.  And wow, I was right!  This was the most delicious thing we ate during the entire diet, and I would even say it’s one of the most delicious meals I’ve eaten in my entire life.  The sauce is just spectacular (it would be great on real spaghetti, too) and the zucchini is perfect here.  I always have thought zucchini was a vegetable best suited to Italian seasonings and this recipe further proves it.   I can’t even tell you how much I love this dish!

A funny thing about the “spaghetti” strands.  The only julienne slicer I could find was this one, which also has three other cutting blades.  For some reason, I didn’t look at the owners manual and thought that the crinkle cutter was the julienne blade.  I was so frustrated with the slicer, thinking that it was just a poor product, because every time I “julienned” a zucchini, I had to go back and cut the strands apart because the stupid julienning blade was just cutting crinkle-cut slabs.  DUH!  Seriously, I didn’t figure out my mistake until just this week when I finally opened the owners manual and saw that there was another blade that I had missed.  The one for julienning veggies.  DOY.

If you don’t have a julienne cutter, The Pampered Chef has a julienne peeler for $10.50 that I’d recommend–it won’t take up a lot of space and does a fabulous job of julienning your veggies.  I got one and gave the other cutter to Goodwill because, well, you guys know I don’t even have room for my cake pans in this house, so I’m  not about to give up good space for a bulky cutting tool when I could just use Pampered Chef’s fabulous peeler!  Thanks, Tracy (my Pampered Chef consultant)!

Zucchini Spaghetti

Printable recipe
Printable recipe with picture

3 links low-fat turkey Italian sausage, hot or mild
2 tablespoons olive oil, divided
3 large cloves of garlic, minced + 4 more to season the oil
pinch hot pepper flakes (optional)
1 (14.5 oz.) can roasted diced tomatoes with juice
1 (8 oz) can tomato sauce
1 tablespoon dried basil
1 teaspoon dried oregano
¼ teaspoon fennel seeds
2 medium sized zucchini (9-10 inches long)
salt and fresh ground black pepper to taste (for seasoning zucchini)
freshly grated Parmesan cheese for serving, if desired

Heat about 1 tablespoon olive oil in a heavy frying pan, then add turkey sausage, squeezed out of the links, and use a spatula to break the sausage apart and cook until it’s lightly browned, about 5 minutes. When the sausage is browned, add 3 cloves of minced garlic, and hot pepper flakes, if using. Stir together and let cook with the sausage about a minute, then add the tomatoes, tomato sauce, fennel, basil, and oregano. Turn heat down to low and let the sauce simmer while you prep the zucchini.

Use a julienne cutter to cut the zucchini into long spaghetti-like strands. (Cut off the ends, wash and dry the zucchini, and then cut into julienne strands. You can also do this with a knife if you’re patient.)

Heat about 1 tablespoon olive oil over high heat in a very large frying pan, add 3 whole garlic cloves and sauté until you can start to smell garlic, then remove garlic to another dish (you can discard it, but fried garlic cloves are delicious and you can add them to salad or even eat them straight!) Immediately add the zucchini strands to the hot pan and cook stirring a few times just until the zucchini is heated through, about 2 minutes. Season the cooked zucchini with salt and fresh ground black pepper to taste. Divide between 2-4 plates, then ladle sauce over the top. Serve hot, with freshly grated Parmesan cheese if desired.

Recipe source: adapted from Kalyn’s Kitchen, as seen on Debbi Does Dinner

Breadless Breading

Posted on

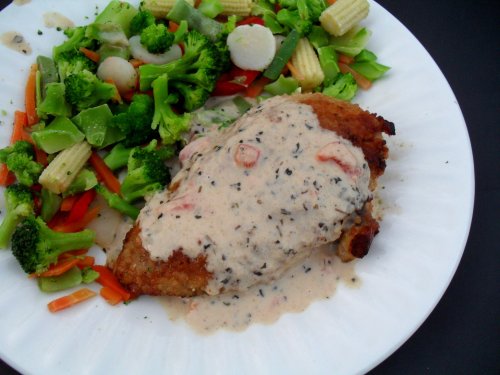
Pictured: Chicken in Basil Cream, using Breadless Breading

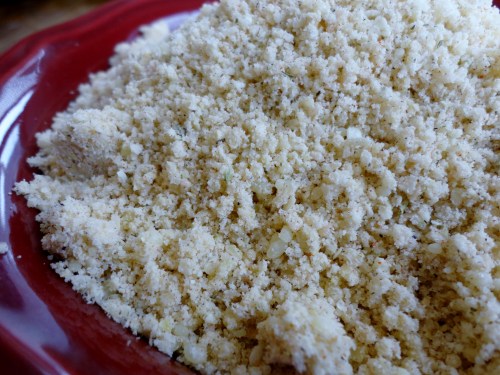
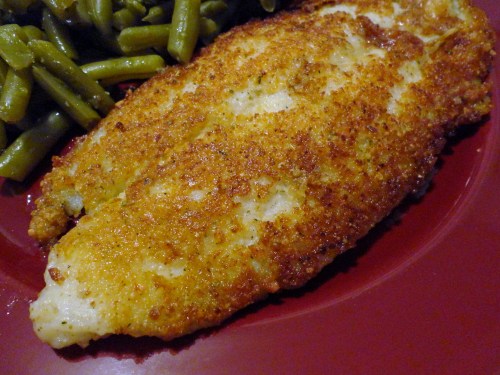
This is a fabulous low-carb, gluten-free substitute for breading that can be used as a coating for things you’re either going to be baking or frying.  I use it on both chicken and fish (it’s best for mild white fish, though it’s pretty good on salmon too) and have even added it to meatloaf*.  I prefer this tremendously over any other coating I’ve used, as it has so much flavor in comparison to even seasoned breadcrumbs.  The first time I used it on fish, my husband said, “this is like…onion ring-fried fish!!”  While this breading isn’t overly onion-y (in my opinion, it is perfectly seasoned), I will say that if you like onion rings, you’re going to love it as it does lend a similar flavor and texture experience to your meal.  I hope you enjoy!

Breadless Breading

Printable recipe
Printable recipe with picture

2 (3.75 oz) jars (2 cups) dehydrated minced onion
2 teaspoons salt
½ teaspoon black pepper
½ teaspoon ground sage
1 teaspoon dried rosemary
1 teaspoon dried coriander
1 teaspoon dried thyme
½ teaspoon dried oregano
½ teaspoon paprika
¼ teaspoon red pepper flakes
2 bay leaves, crushed
1 ¼ cups grated Parmesan cheese

Place dehydrated onion in food processor bowl and process for 1 minute. Add remaining ingredients except the cheese and process 30 seconds. Add Parmesan and pulse to blend. Store refrigerated in an airtight container.

Recipe source: adapted from Suzanne Somers’ Fast & Easy Bake & Fry Mix

*This doesn’t replace bread crumbs in meatloaf because there is nothing in it to absorb moisture the way real bread can, but it does add great flavor!  For a gluten-free meatloaf, you can add in quick-cooking oats along with some of this breadless breading.  You will not need to add onions to your meatloaf if you use this breading because it adds plenty of flavor, but I added a red pepper to mine and it was really good!

A quick and easy meal: coat one side of fish (this is swai) with breadless breading and fry in olive oil until golden.  Flip and cook until the fish flakes easily.  Enjoy your Onion Rings-Fried Fish!

Cauliflower Colcannon

Posted on

I’m linking this post with the GreensLove bloghop.  If you are posting a recipe with any sort of greens this month, check it out and join the party!

A couple years ago I made lasagna and garlic bread for dinner on St. Patrick’s Day and happened to mention it in my Facebook status.  I don’t really celebrate the holiday, so it wasn’t on my radar, but one of my Facebook friends was like, “Hey! Where’s the corned beef and cabbage???”  I’d never made any sort of Irish-type food whether on St. Patrick’s Day or otherwise, and thought I just might try it the following year.

And so I purchased my first beef brisket last year.  It turned out to be the worst brisket in the history of briskets.  It. was. horrid.  I still shudder just thinking about it.  (80% fat, with a foul flavor.)  But, I also made this cauliflower colcannon, which was very good and ended up being the main course rather than our side dish.

The pureed cauliflower serves as a lower-carb, more nutritious replacement for the mashed potatoes that colcannon is usually made with.  I opted for kale instead of cabbage in my colcannon, but it would be good either way.  This made a mighty tasty dish, and a good alternative to traditional colcannon if you are going to be eating a high-calorie dessert afterward.  Kinda helps balance things out.  And I’m a Libra, so I’m all about balance.  Cauliflower Colcannon + 1 dozen Andes Mint Cupcakes = balance.  Right?  Right.  Let’s do this.

Cauliflower Colcannon

Printable recipe
Printable recipe with picture

1 medium head cauliflower
1 tablespoon cream cheese, softened
1/4 cup grated Parmesan
4 tablespoons unsalted butter, divided, plus more for serving
1/2 teaspoon salt
1/8 teaspoon freshly ground black pepper
3 lightly packed cups kale, cabbage, or other greens
½ cup chopped green onions
1/2 teaspoon minced garlic (1 clove)
Milk or heavy cream for thinning, if necessary

Set a stockpot of water to boil over high heat. Meanwhile, clean and cut the cauliflower into small pieces. Cook in boiling water for about 6 minutes, or until very tender. Drain the cauliflower well and pat it very dry between several layers of paper towels, not allowing it to cool.

In the bowl of a food processor, puree the hot cauliflower with the cream cheese, Parmesan, 1 tablespoon of the butter, salt, and pepper until almost smooth. Set aside.

Melt the remaining 3 tablespoons butter in a skillet and add the greens. Cook over medium-high heat for about 5 minutes, until greens have wilted and given off some of their water. Add the onions and garlic and cook one minute more. Stir in the cauliflower mixture and thin with milk or cream, if necessary. Serve hot with a pat of butter, if desired.

Low-Carb Eggplant Parmesan with Fire-Roasted Tomato Sauce & Fried Garlic {gluten-free}

Posted on

Growing up, my Mom made an eggplant dish about once a year that was basically chopped up eggplant mixed with homemade marinara sauce, garnished with Parmesan cheese.  The only way I could swallow the evil stuff was to absolutely drown it in Parmesan–I’m pretty sure I used half a bottle of the grated cheese every time she made it.  It’s not that the taste was terrible, the marinara was always good, as was the Parmesan, but the eggplant itself was spongy and a bit bitter, so I had to distract myself by making it super cheesy in order eat it.

Despite never fully enjoying this dish, I was convinced that I would enjoy eggplant if prepared differently.  I really wanted to try making eggplant Parmesan, sensing that frying eggplant and making it crispy could be the key.  But for some reason, I just never got around to it.  Probably because I had been tainted by a long history of a dish with similar elements that was always abhorrent to me.  I finally tried eggplant on a pizza (click here for the recipe: Eggplant & Olive Pizza) and then in baba ghanoush (a Middle Eastern roasted eggplant dip) and discovered I was right, I did like eggplant!

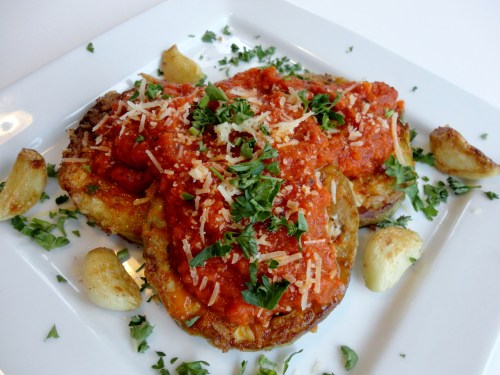
Well, finally, in a lower-carbohydrate phase of our diet last month, I decided to try my hand at eggplant parmesan, using only cheese for “breading” before frying it.  It. was. fabulous.  I’m sure I’d love it with the breading as well, but this was truly delicious and in my opinion, need not be changed.  I seriously can not wait to make this again. I’m now a full-fledged eggplant convert.  They key, it seems, is not so much in the frying, which obviously doesn’t hurt, but in the salting and draining prior to cooking.  This takes away the bitterness and makes the eggplant flavor much more enjoyable.

I also want to take a moment to mention the tomato sauce, which I snagged from Jenna’s blog and kicked up a notch with fire-roasted tomatoes, and a touch of fennel seeds and red pepper flakes.  This is my most favorite marinara sauce I’ve made to date, very flavorful and a great compliment to the eggplant.  It makes a large batch, so you’ll have enough leftover to freeze for future eggplant Parmesan meals, or to ladle over pasta. It gives me such a heady feeling to know this delicious sauce is waiting for me in pre-portioned bags in the freezer, and all I have to do is defrost it in order to enjoy it again. Thanks for the wonderful recipe, Jenna!

One last note: the fried garlic is totally optional but I highly recommend you throw some cloves into the oil while you’re frying your eggplant.  I discovered that frying garlic gives the same flavor as roasting it, sweetening it and making it so delicious you can just pop the whole thing into your mouth without any of the sulphurous burning that usually accompanies such an act with raw garlic.  It is so delicious, I’ve found it to be addictive!  I ended up keeping this part of the recipe secret from my husband, who arrived after I’d eaten an entire bulb of fried garlic because I couldn’t keep my hands off of it after I popped the first clove into my mouth.  What he doesn’t know won’t hurt him. :)

I’m submitting this recipe to Renee for this week’s BSI (Blogger Secret Ingredient contest): Parmesan.
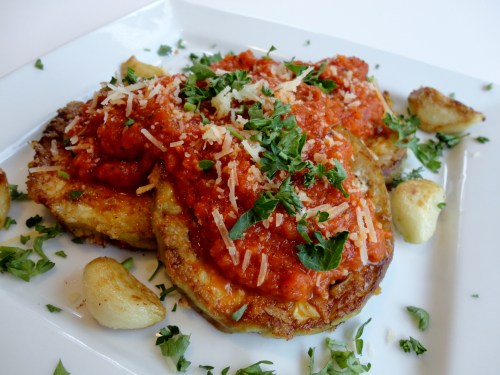
Low-Carb Eggplant Parmesan with Fried Garlic

Printable recipe
Printable recipe with picture

1 medium eggplant, peeled
Salt
2 eggs
¼ cup water
1 cup shredded or grated Parmesan cheese, plus more for garnish
Garlic powder
½ cup olive or canola oil
1 bulb of garlic, peeled
1 ½ cups Fire-Roasted Tomato Sauce, warmed
Fresh parsley, chopped, for garnish

Peel and slice eggplant into ¼” thick slices. Sprinkle both sides liberally with salt and place in a colander set over a bowl. Allow the eggplant to drain for 30-45 minutes or until 2 tablespoons of water have been drawn out from the eggplant. Tear off three sets of two sheets of paper towels (each set of two still connected), stack together, then lay out eggplant slices on top of it. Tear off another three sets of two paper towels, lay on top of the eggplant, and press down firmly on each slice to draw out excess moisture.

In a flat-bottomed bowl large enough in diameter to fit the largest eggplant slices, whisk the eggs and water together until foamy. Put the Parmesan cheese on a plate and have your garlic powder nearby. Line a baking sheet with foil, sprinkle evenly with garlic powder, and set nearby.

Dip each eggplant slice in the egg mixture, shake off, then sprinkle both sides with Parmesan. Lay the slices on the prepared baking sheet as you finish them. Once all slices are coated, sprinkle garlic powder on top.

Heat a cast iron or other heavy-duty skillet over medium-high heat. Add enough oil to cover the bottom well and come up about 1/8”. Place as many eggplant slices in the skillet as will fit, and tuck as many of the cloves of garlic in between them as you can. Fry the eggplant until the first side is golden brown, about 2 minutes, then flip. Flip the garlic cloves when then skin is golden brown and bubbled. Once the second side is golden brown, remove to a cooling rack lined with paper towels to drain. Remove the garlic as it is finished cooking as well. Continue cooking eggplant in batches until all is fried. If the first batch of eggplant has cooled too much by the time you are finished frying it all, pour out the oil in the skillet and add them back in to reheat for a minute. Alternately, as the eggplant is drained, you can add them to a foil-lined baking sheet and keep them in a warm oven until ready to serve.

To serve, arrange eggplant slices on plates with fried garlic scattered around. Scoop tomato sauce over the top and garnish with Parmesan and parsley, if desired. Serve hot.

Fire-Roasted Tomato Sauce

Printable recipe
Printable recipe with picture

1/3 cup olive oil
1 large onion, diced
5 cloves garlic, minced
1 stalk celery, diced
1 carrot, diced
Kosher salt and black pepper, to taste
1 (28 oz) can crushed tomatoes
2 (14.5 oz) cans fire roasted tomatoes, undrained
2 dried bay leaves
1 tablespoon dried basil
1 teaspoon dried oregano
¼ teaspoon fennel seeds
¼ teaspoon red pepper flakes

In a large pot or Dutch oven, heat the olive oil over medium high heat. Add the onion and garlic, and cook for about 2 minutes, until soft and translucent. Add the celery, carrot, and some salt and pepper. Cook for about 5 minutes, until softened. Add the tomatoes, bay leaves, basil, oregano, fennel seeds, and red pepper flakes, and cover the pot with a splatter screen. Turn down the heat to low, and simmer gently for 1 hour.

Remove the bay leaves and taste for seasoning, adding salt and pepper as needed. Using an immersion blender, blend the sauce until smooth. Allow the sauce to cool completely and, if not using immediately, pour it into freezer bags in 1-2 cup portions. It will keep frozen for about 6 months.

Crockpot Chicken Cacciatore

Posted on

It’s Secret Recipe Club time again!  I can’t tell you how thankful I am to Amanda for starting this club.  The amount of fun I have with it is a little ridiculous.  My favorite part is getting my blog assignment and stealthily stalking that blog, hunting down recipes that I want to make and post for reveal day.  I always bookmark a million and it takes me an entire week to narrow down my choice to one recipe.

{You can find my past Secret Recipe Club posts here.}

This month I was assigned to A Little Nosh and unlike previous assignments, I knew which recipe I was going to make within a minute of clicking on her blog.  I still went through Amy’s archives and bookmarked half her recipes, but did eventually return to the original that caught my eye and knew I couldn’t fight it.  I had to make the crockpot chicken cacciatore because:

1) It’s beautiful and I like pretty food.

2)  I’d never eaten or made it and thought it would be fun to try something new.

3) It fit perfectly in our diet plan while we were in the 2nd cycle of the 17 Day Diet.

4) I noticed the recipe originally came from one of my blogging buddies, Renee of My Kitchen Adventures, and it tickled me to think that I’d be making Amy’s and Renee’s recipe at the same time.


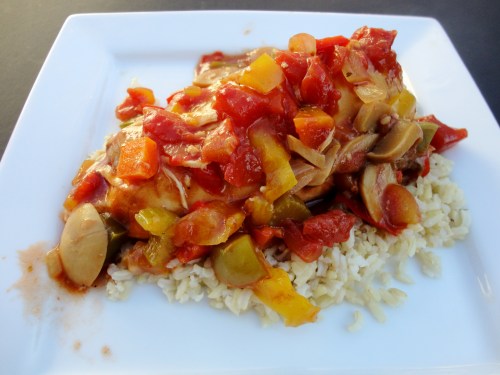
I changed the recipe to make it on a slightly larger scale with a higher ratio of veggies, and it completely filled my 6-quart crockpot to the brim.  The leftovers were enough to last us all week, and what beautiful lunches we were bringing to work!  The vegetables and sauce were such a tasty compliment to the tender chicken breast meat, which pretty much fell apart as soon as you touched it with a fork.  So delicious.

Thanks, Amy, for sharing this great recipe.  I never even saw it on Renee’s blog, so I’m glad to have gotten the opportunity through you and the SRC to try it!

Crockpot Garden Chicken Cacciatore

Printable recipe
Printable recipe with picture

6 large skinless, boneless chicken breasts
1 green bell pepper, seeded and chopped
1 red bell pepper, seeded and chopped
1 yellow or orange bell pepper, seeded and chopped
1 medium onion, chopped
2 large ribs of celery, diced
3 large carrots, diced
2 (4 oz) cans sliced mushrooms, drained
2 tablespoons minced garlic
2 (14.5 oz) cans of diced tomatoes with basil, oregano and garlic
1 (6 oz) can tomato paste
½ cup chicken broth
2 tablespoons balsamic vinegar
¼ cup cornstarch
1-2 tablespoons water or chicken broth
Additional salt and pepper, to taste

Place chicken breasts inside the bottom of a 6-quart crockpot. Add in the bell peppers, onion, celery, carrots, mushrooms, and garlic. Pour the juice from the tomatoes into a medium bowl, then put the tomatoes into the crockpot.

Into the bowl with the tomato juice, add the tomato paste, chicken stock, and balsamic vinegar. Mix well, then pour on top of the tomatoes and vegetables. Cover and cook on low for 7-8 hours, or high for 4 hours, or until the chicken is tender.

Mix the cornstarch and water together until no lumps remain, then pour over the top of the vegetables. Stir, turn the crockpot to high, and allow to cook for another 20 minutes, or until the sauce has thickened. Season with additional salt and pepper to taste.

Serve over brown rice or your choice of starch.

Recipe source: adapted from A Little Nosh, originally from My Kitchen Adventures

To check out the other submissions in Group A for The Secret Recipe Club, click on the Mr. Linky below!


Chunky Chicken Soup

Posted on

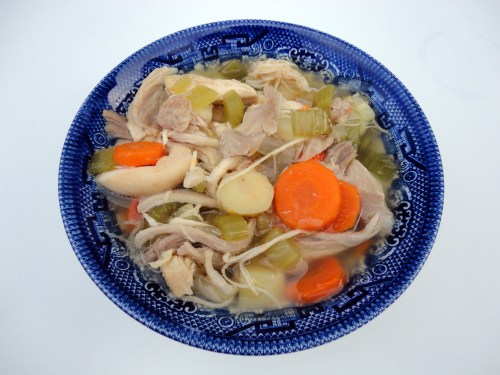
It was snowing here in Kansas yesterday, and what better way to chase away the chill than with a big bowl of soup?  This is from The Pioneer Woman‘s recipe collection, and it is fantastic.  Although I adore noodles in my chicken soup, the chicken and vegetables are the stars here and I found that I didn’t even miss the noodles.  This soup is so delicious and flavorful, the health factor was an afterthought, but realizing how healthy it is makes it a win-win in my book.  Happy mouth, happy body.

Chunky Chicken Soup

Printable recipe
Printable recipe with picture

1 whole chicken
2 (32 oz) cartons chicken broth
1 whole bay leaf
2 large onions, chopped
8 ribs of celery, trimmed & chopped
8 carrots, peeled and chopped
5 parsnips, peeled and chopped
Freshly ground black pepper, for serving

Place chicken in large stock pot and pour broth over it. Add the bay leaf and chopped vegetables. Bring to a boil, then reduce heat and simmer for 1 ½ to 2 hours, or until meat is cooked through. Remove chicken to a cutting board and allow to cool until you can touch it without burning your fingers, about ten minutes. Pull the chicken from the bone, discarding the skin, and shred or chop the meat before returning it to the pot. Taste and add salt if desired. Serve hot with freshly ground black pepper over the top.

Recipe source: adapted from The Pioneer Woman

Creamy Mashed Cauliflower

Posted on

Someone asked me about the “mashed potatoes” I served with the Steak au Poivre yesterday, and how I kept them so white. Well, the secret is that it wasn’t mashed potatoes! Since the steak itself seemed pretty rich, I decided to keep the sides healthy and low-calorie, and served it with roasted asparagus and this creamy mashed cauliflower.

I have made mashed cauliflower before that has cream cheese, Parmesan cheese, and butter in it, but I wanted to make it a little lighter this time. There is still a bit of butter, but also an equal amount of heart-healthy olive oil, and the cauliflower gets its creaminess and mild tangy-ness from nonfat Greek yogurt, giving it a closer taste to potatoes in that it reminds me of a baked potato with sour cream…minus the potato flavor. This dish definitely won’t fool you into thinking you’re eating potatoes, but it is delicious in its own right.  I actually like the taste of it even better than the higher-fat version, not to mention it’s much healthier.  To prove it’s not just me and my own weird tastes that finds this dish tasty, my husband heartily approved of the creamy cauliflower, despite being an avid mashed potatoes aficionado, polishing off a generous pile of it just as fast as he did the steak!

*Note: I updated yesterday’s steak recipe because I forgot the first and most important step in cooking them (letting them rest at room temperature prior to cooking to help ensure a tender steak).  If you saved the recipe or plan to make it, please revisit it and save the new instructions.  Sorry for the inconvenience of my memory lapse!

Creamy Mashed Cauliflower

Printable recipe
Printable recipe with picture

1 head cauliflower
4 cloves garlic, minced
1/3 cup Greek yogurt
2 tablespoons milk
1 tablespoon extra virgin olive oil
1 tablespoon butter
½ teaspoon salt
Snipped fresh chives or parsley for garnish (optional)

Separate the cauliflower into bite-sized florets. Place in a steamer basket over boiling water, cover, and steam until tender, about 15 minutes. Place in the bowl of a food processor fitted with blade attachment, add remaining ingredients, and process until smooth and creamy. Serve hot with a sprinkling of fresh chives or parsley, if desired.

*Veronica’s Note: using nonfat yogurt and milk is perfectly fine!

Recipe source: adapted from Eating Well

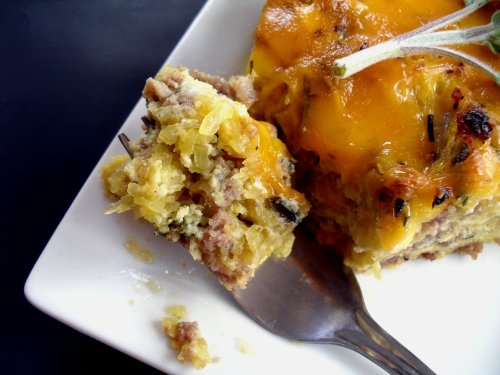
Sausage & Spaghetti Squash Breakfast Pie

Posted on

I created this recipe earlier in the year, when I was Somersizing, and not combining carbohydrates (other than from vegetables) with protein.  Although I was thinner during that time than I have been for years, it wasn’t sustainable for me.  I mostly chose to eat protein meals because those were the meals where fat was allowed, and therefore more fun.  If I wanted carbs, I had to eat carbs only and without any fat.  That was just way too boring, so I chose mainly protein/fats meals and ended up basically doing Atkins and calling it Somersizing. :)

Although I’m no longer keeping my carbs separate from fat and protein, I plan to make this casserole throughout the winter because it’s incredibly delicious and satisfying.  One thing I’m going to try next time is cooking 1/2 cup of onions with the sausage instead of using chives.  I love the chives, but I think a stronger onion flavor would be nice here.  I know fresh herbs are harder to come by in winter if you don’t have pots of them indoors or want to pay an arm and a leg for a little tiny bunch of them at the supermarket, so you can totally substitute dried–just use half the amount called for.

And for those wondering what movie the quote from yesterday came from, it was Herbie the Love Bug, in the scene where, during the race, Peter Thorndyke stops for gas at Chinese camp.  Fast forward to 8:00 to see the reference.

Sausage & Spaghetti Squash Breakfast Pie

Printable recipe
Printable recipe with picture

1 (3 lb.) spaghetti squash
8 ounces bulk sausage
2 tablespoons fresh sage, chopped
2 tablespoons fresh chives, chopped
5 eggs
1 teaspoon salt
Fresh cracked pepper
1 cup cheddar cheese

To cook spaghetti squash, cut in half lengthwise, and use a spoon to rake out the seeds. Place cut side down on a baking sheet lined with foil and sprayed with oil. Bake for 45 minutes at 375 degrees or until tender. Set aside to cool a bit. Rake the flesh from the shell and refrigerate in an airtight container until you’re ready to make the pie.

Cook sausage in a skillet over medium-high heat, breaking apart with spatula so you have crumbles. Stir in the sage and chives, then stir in the spaghetti squash. If the squash is very watery, you can cook the mixture a little to help it evaporate. Butter or spray a 9” deep dish pie plate with oil and spread squash mixture in dish. In a bowl, whisk together the eggs, salt, and pepper, then pour over the squash and sausage mixture. Bake at 350 degrees for 45 minutes. Sprinkle cheese over the top and cook another 5 minutes, until melted.  Serve hot.

Chicken in Basil Cream

Posted on

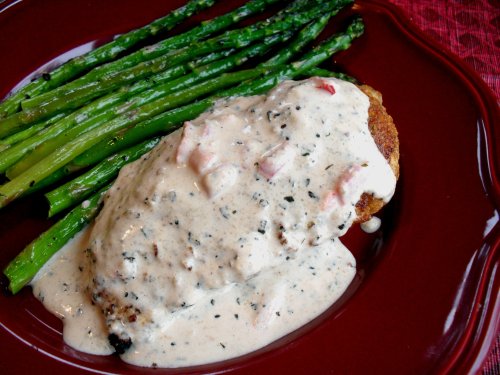
My friend, Suzie, shared this recipe on Facebook a while back, and while all the recipes I’ve tried from her rock, this was one I never intended to make.  I make it a rule to shun or lighten all recipes that call for more than a tablespoon or two of heavy cream (except in desserts, of course!), but I recently went through a low-carb phase and ended up making a lot of yummy rich dishes during the two weeks I masqueraded as a carnivorous beast.  I’m usually not a big fan of meat in general, but my husband (the true carnivore between us) and I both loved this dish.

I have to say, the coating (a Suzanne Somers recipe) I used in place of flour on the chicken was tremendous.  I made extra so I could use it again because I’m imagining it encrusting pieces of white fish and think it would be great on any cut of meat.  It has tons of flavor.  Of course the basil cream was incredible, and a very good compliment to the flavor of the “breaded” meat.  One portion of this dish is satisfying enough that you shouldn’t need anything else besides some roasted asparagus or a salad…but if you don’t have to worry about your caloric intake, I hate you I think this would be great over linguine!

Although the low-carb phase was temporary, it reminded me that fat is not the enemy and can be included in my dietary plan, even in large amounts if I reduce calories in other ways, such as serving vegetables alongside this chicken instead of pasta and bread.  It is definitely worth scrimping on the carbs in order to enjoy a meal like this every so often!

Chicken in Basil Cream

Printable recipe
Printable recipe with picture

Bake & Fry Mix
1 cup minced onion
1 teaspoons salt
1/4 teaspoon black pepper
1/4 teaspoon ground sage
1/2 teaspoon dried rosemary
1/2 teaspoon dried coriander
1/2 teaspoon dried thyme
1/4 teaspoon dried oregano
1/4 teaspoon paprika
1/4 teaspoon red pepper flakes
1 bay leaves, crushed
1/2 cup grated Parmesan cheese

Chicken and sauce
8 (4 oz) boneless, skinless chicken breasts
1 stick (1/2 cup) unsalted butter
1 cup chicken broth
2 cups heavy whipping cream
1 (4 oz) jar sliced pimentos, drained
1 cup grated Parmesan cheese
2 tablespoon dried basil
1/4 teaspoon pepper

Place minced onion in food processor fitted with blade attachment. Process one minute. Add remaining mix ingredients, except the cheese, and process another minute. Add cheese and pulse until combined. Place in a gallon-sized Ziploc bag. Add chicken to the bag and shake until every piece is coated. On medium-high heat, cook chicken in butter on both sides until juices run clear, about 10 minutes. Remove and keep warm. Add broth to the skillet. Bring to a boil over medium heat; stir to loosen browned bits. Stir in the cream, pimientos and basil; boil and stir for 1 minute. Reduce heat. Add the Parmesan cheese and pepper; cook and stir until heated through. Pour over the chicken and serve.

Makes 8 servings. Per serving: 544 calories; 41 g fat; 2.5 g carbohydrates; 0 g fiber; 36 g protein

Recipe source: adapted from Fast & Easy by Suzanne Somers and Suzie S.