I’m so happy to return today with my recipe for the Secret Recipe Club! I was assigned to a beautiful blog called NY City Eats and wow, Lacy is so gourmet. She’s a professionally trained chef who graduated from The Institute of Culinary Education in 2010. Impressive! As are her recipes, and I was pretty much in awe of all the fancy ingredients she incorporates into them. (Check out this pizza video-it is so professional! And even her “simple” pizzas sound and look so fancy.) Being less of a cook, especially not a gourmet one, and more of a baker, I felt more at home when I looked through her dessert recipes, which happily were plentiful.
I happened to inherit 16 pints of blueberries and a crate full of lemons from my Grandpa (long story, will tell it later), so I searched for something I could use them in from Lacy’s blog. I first ruined her recipe for Low Calorie Banana Blueberry Muffins by making it sugar-free (was testing out Swerve’s sweetener) and under-baking them. They were awful and I won’t share my adapted recipe, just visit the link for hers, which looks much better.
Again on the hunt for blueberry-filled recipes, I found her Mixed Berry Bundt Cake and made my own blueberry-lemon version almost as soon as the muffins were trashed. After clicking back through all the “adapted from” links to find where the recipe originated (a difficult feat in this age of food blogs, and I gave up after five clicks), I discovered this was a lower fat version of the Elvis Presley Pound Cake I’d been wanting to try for years. It has less sugar than the original recipe I’d saved to my computer back in 2009, but I made it with the smaller amount and found it to be perfectly sweet. I did, however, use the whipping cream called for in the original recipe, rather than yogurt as I was out of yogurt and didn’t want to go to the store.
The cake was buttery and dense, as a proper pound cake should be, and I loved the taste of the lemon and blueberries in it. I believe the cake would be best eaten the same day it’s baked, as it was a little dry on day two. Eating it fresh also helps the appearance, as the blueberries will be more whole (the juices get absorbed as time goes on, making them shrivel up inside the cake as in the pictures.
Please check Lacy’s healthier recipe, which looks very moist and delicious. Thank you for sharing it, Lacy, I so appreciate you helping me use up some of these blueberries! And we so enjoyed eating it!
1/2 cup unsalted butter, plus extra for pan, room temperature
1 cup (7 oz) granulated sugar
1/2 teaspoon salt
3 large eggs
1 teaspoon vanilla extract
1 1/2 cups (6 oz) cake flour
½ cup quality heavy whipping cream
1 lemon, zested and juiced
1 cup fresh blueberries
1 cup powdered sugar
Preheat oven to 350 degrees F. Grease a 9×5 loaf pan with butter and dust with flour, set aside.
Cream the butter and sugar on medium-high speed for five minutes, until light, creamy and fluffy. Add eggs one at a time, mixing well after each. Mix in the vanilla. Sift in half of the flour, beat on low until blended, then add the cream and blend again until mix. Sift in the remaining flour and mix just until blended. Add the lemon zest and mix on low until incorporated and batter is smooth. Fold in the blueberries and spread batter into prepared pan.
Bake in preheated oven for 55-60 minutes, or until a tester inserted in the center comes out clean. Remove from pan and cool completely on a wire rack.
Once cool, whisk together 1 tablespoon of the fresh lemon juice and the powdered sugar until smooth. Drizzle over the cake and let it set for half an hour before serving. Best served same day.
Turkish Delight is perhaps the recipe I’ve been wanting to make longer than any other, for over twenty years! I’ve wanted to try it ever since I was in elementary school and read about the Turkish Delight which the witch seduced Edward with in The Lion, The Witch, and The Wardrobe. It just sounded so delicious! Dennis also told me years ago that he also has wanted to try Turkish Delight ever since reading the book. So this year I decided to make it for him for Valentine’s Day, and to send it to my matches for The Sweetest Swap as well.
I decided to go with the traditional recipe, which doesn’t include gelatin and takes quite a long time to make. But the texture is worth the effort! I took my recipe and method from Titli’s video, and I tell you this woman is mad, but I love her. You have to watch a few of her videos to start jiving with her craziness. Anyway, we discovered that we quite liked Turkish Delight, especially the nice soft, chewy texture. It’s similar to a jelly candy but really so much softer that it’s not really jelly-like at all, it’s just the closest thing I can compare it to. And so smooth! The flavor is very nice, bright from the lemon juice, and mysterious & romantic from the rose water. While the rose water is nice, I think I would like this a lot better using lemon extract and would suggest it if you don’t have the rose water, but cutting the amount down to maybe a teaspoon (or to taste) since it’s much stronger than rose water.
The downside is that they tend to weep. You should store them packed in the extra powdered sugar, but even so, after only a day mine were pretty much a mess. I wish I’d taken photos right away because right after cutting and dredging in powdered sugar, they were so pretty with such smooth surfaces. Instead I took my photos two days later when the bowl had turned into the nastiness above. :( I had to cut off the worst of the edges and then roll them in fresh powdered sugar for my photos, but believe me they are so much prettier the first day! I asked Titli if this was normal and she said it was likely our damp weather to blame, but even so, hers start weeping after four days. Her cure for the weeping? “Eat them quickly!” lol
This is what my poor swappees received (along with a dozen oatmeal candies–thank goodness I sent enough of those to make up for the Turkish Delight mess!)–photo courtesy of Shesten M.
If I haven’t scared you off with my cautionary photos, here’s the recipe! Just be sure to make this when you’re enjoying a spell of dry weather and perhaps when you have enough company to polish them off within a few days.
Note: I followed the gram measurements for this recipe, using my kitchen scale.
3 ½ cups water, divided
1 tablespoon freshly squeezed lemon juice
4 cups (800 g) sugar
1 teaspoon cream of tartar
1 cup (120 g) cornstarch
1 tablespoon rosewater
Few drops of red food coloring (I used icing gel coloring)
For dusting
1 cup (160 g) powdered sugar
¼ cup (30 g) cornstarch
Oil an 8” square pan, then line the bottom and sides with parchment paper. Oil the parchment paper; set aside.
In a medium saucepan, combine 1 ½ cups of the water, the lemon juice, and sugar. Bring to a boil while stirring and continue to cook over medium heat, stirring frequently, until the mixture reaches 115C (soft ball stage). Remove from heat and set aside.
In a large saucepan, combine the remaining 2 cups water, the cream of tartar, and the cornstarch. Bring to a boil, using an electric mixer to beat it on low speed the entire time. It will get thick quite quickly. It will be very milky and opaque in the beginning, but will get more clearish. Once it is a thick gluey paste and turns more and more clear, add in a little of the sugar syrup and beat with the mixer until blended. Scrape down the sides of the pan, and add a bit more at a time, beating well after each addition until smooth. When all the syrup is added, it will be thick but fluid. Turn on the heat again and bring to a gentle boil. Turn heat to low and simmer very, very gently for about an hour, stirring frequently (I stirred every 1-3 minutes). It will turn a light golden brown color. Add in the rosewater and food coloring if desired, and mix well.
Pour into prepared pan and shake the pan to make sure the mixture reaches all the corners. Allow to sit at room temperature until set, about 3-5 hours, or overnight.
Combine the powdered sugar and cornstarch for dusting and sift them together into a large bowl. Sift some on top of the pan of Turkish Delight. Sift some over a surface, then turn the Turkish Delight upside down onto prepared surface. Carefully remove the paper and sift some sugar over the top. Using a sharp knife or pizza cutter, cut the Turkish Delight into small squares. Put the squares into the bowl of sugar and toss them around every so often. Once all are added, toss them around really well to make sure they are well coated with the sugar/cornstarch mixture.
To store, place Turkish Delight in a container with an airtight lid, and pour the sugar/cornstarch mixture over the top to keep them from weeping or sticking together.
The swap went very smoothly and I was lucky enough to get 6 packages in the mail! They disappeared all too quickly…
Oreo & Biscoff Truffles from Shania, Lemon Muddy Buddies and Pretzel Caramel Bark from Lynn. Dennis ate all the Oreo Truffles by the time I got home, so I’m glad I got one before I left for work! I enjoyed the Biscoff Truffles all to myself, which was fine by me because I liked them even better. Lynn wasn’t a match of mine, but she was kind enough to send me two packages! One stuffed with the Lemon Muddy Buddies (YUM!) and another with the Pretzel Caramel Bark (love salty and sweet!). Thank you ladies!
Snickers Bars from Laurie. Wow! Talk about impressive. These were every bit as good as they look and I had trouble saving any for Haus. I had to beg him to hurry up and eat some before I ate the whole package. LOL!
Vanilla Sea Salt Caramels from Shesten (that’s Hawaiian Black Lava Sea Salt on them). Oh so incredible. These I ate one after another until they were all gone, in just a matter of minutes. Poor Haus. Poor me! I need a refill, Shesten. ;)
In total, 1,275 candies were exchanged through our swap, and because swapper Marcia L. registered us with Cookies for Kids Cancer, Barmioli Rocco matched $1 for each and we raised another $1,275 for pediatric cancer research just by doing what we love to do. And I’m also very glad to report that we had zero flakes for this swap! Every single person sent out their candies. These swaps just keep getting better. Thank you to all who participated, I had a ball.
If you haven’t seen recipes for lasagna soup all over the web for the last couple years, then you don’t follow as many blogs as I do-lol! It is everywhere. It’s taking over the blogging world. If it wasn’t so delicious, it might scare me a little, but now that I’ve made it I totally get it.
Everyone has their own variation and I just took the one from Suzie’s blog and made it a little healthier. I have to tell you that Biz is actually the reason I finally made this soup because I think she’s made it (and raved about it) 55.7 times since Suzie posted it and I just couldn’t resist any longer.
So glad I gave in–this soup is completely frabrilis! I mean hello, lasagna in soup form? Frabrilosity!
P.S. A lot of things went wrong with my pictures and I do not care to explain the unattractive, cold plops of cheese and how thick this is because you would scoff at me and I’m not in the mood for your scoffing beyond the scoffing you’re doing at my cheese plops. :D Just follow my directions and you will have frabrilis soup that looks as delicious as it tastes.
2 teaspoons olive oil
1 (19.5 oz) package lean sweet Italian turkey sausage
1 cup chopped onions
4 garlic cloves, minced
2 tablespoons dried basil
2 teaspoons dried oregano
1/2 teaspoon crushed red pepper flakes
2 tablespoons tomato paste
1 (28 oz.) can fire-roasted diced tomatoes
2 bay leaves
6 cups chicken stock
8 oz. broken up whole wheat lasagna noodles or other pasta of choice
salt and freshly ground black pepper, to taste
For the cheesy goodness:
1 cup low-fat cottage cheese or ricotta
1/2 cup grated Parmesan cheese
1 cup shredded part-skim mozzarella cheese
Heat olive oil in a large pot over medium heat. Remove sausage from casings and add to skillet along with the onions and cook, breaking up into bite-size pieces, for 5-10 minutes, until meat is cooked through. Add garlic, basil, oregano and red pepper flakes. Cook for 1 minute.
Add tomato paste and stir well to incorporate. Cook for 3-4 minutes or until the tomato paste turns a rusty brown color.
Add diced tomatoes, bay leaves and chicken stock. Stir to combine all ingredients. Bring to a boil and then reduce heat and simmer for 30 minutes. Add uncooked pasta and cook until al dente. Don’t over cook or let soup simmer too long, as the pasta will get mushy and absorb all the broth.*
While pasta is cooking, prepare the cheesy goodness by combining the cottage cheese or ricotta and Parmesan together in a small bowl. To serve, place a dollop of the cheesy goodness in each soup bowl, sprinkle some of the mozzarella on top and ladle the hot soup over the cheese.
*Note: If you are anticipating leftovers, it’s best to cook the noodles separately and add them to the bowl along with the soup, then store them separately, drizzled with olive oil so they don’t stick together. They will become mushy if stored in the broth.
This is one of the “meals” (it’s really a side dish but I like to eat it as a meal) I’ve been making for years and usually resurrect come fall/winter. My family absolutely loves it too, even my little nephew (or at least he did at 4 years old, the last time he ate it)! I appreciate delicious vegetarian meals that satisfy me and this one fits the bill fo sho. The combination of the creamy squash, chewy barley, crisp red pepper & apple, and the contrasting savories and sweetness–it’s all just magic to me. And I guess if a four year old boy will relish something that only contains unrecognizable healthy ingredients, it is pretty magical.
3/4 teaspoon salt, divided
1/2 cup uncooked barley
1 tablespoon olive oil
2 cups butternut squash, peeled & diced
1 cup onion, chopped
1/2 cup sweet red pepper, diced
1 medium apple, peeled, cored, diced
1 1/2 teaspoons garlic, minced
3/4 teaspoon dried thyme
1/4 teaspoon black pepper
1/3 cup fat-free chicken or vegetable broth
Bring 3 cups of water and 1/2 teaspoon of the salt to a boil in a medium saucepan; add barley. Cover saucepan and simmer barley until tender, about 30 to 35 minutes; drain.
Meanwhile, heat oil in a large nonstick skillet over medium-high heat; add squash and cook, stirring often, until it’s starting to soften–about five minutes. Add the onion and red pepper and cook for an additional 3 minutes.
Stir in apple, garlic, thyme, black pepper and remaining 1/4 teaspoon of salt. Cook, stirring, until apple is almost tender, about 2 minutes; stir in broth, scraping bottom of skillet with a wooden spoon to loosen any browned bits. Stir in cooked barley; toss over low heat to mix and coat. Remove from heat and serve.
Serves 4, about 1 cup per serving.
Per serving: 192 calories; 4.2 g fat; 0 g cholesterol; 37 g carbohydrate; 8 g fiber; 5 g protein; 5 Points Plus
As you know, I’m a member of the Secret Recipe Club. On September 14, one of our members, Daniel of The Haggis and The Herring, passed away suddenly and expectantly. He had just made dinner for his family and bam. He was gone. I don’t know the details, but what a shock. His wife was expecting their third child, and just thirty minute before he died he was telling his wife how much he loved her and how everything was going to be OK. There are so many stories like this that make us realize how fleeting and precious life is, that you never know what to expect, and yet we are never fully prepared when caught by surprise. Not even half-prepared. It can turn your world upside down. My heart breaks for his family.
Despite being in this club with Daniel, I was never in the same group and him and I don’t believe I ever visited his blog until he was gone. I debated whether I should join the special tribute reveal with other members of the club, to remember him by posting a recipe from his blog. I felt strange about it since we never once communicated while he was alive that I know of, but being in the same club, both being food bloggers, and now having read some of his blog, including the beautiful eulogy his wife shared when she announced his passing, I felt his life deserved to be commemorated this way, and I couldn’t not join the tribute.
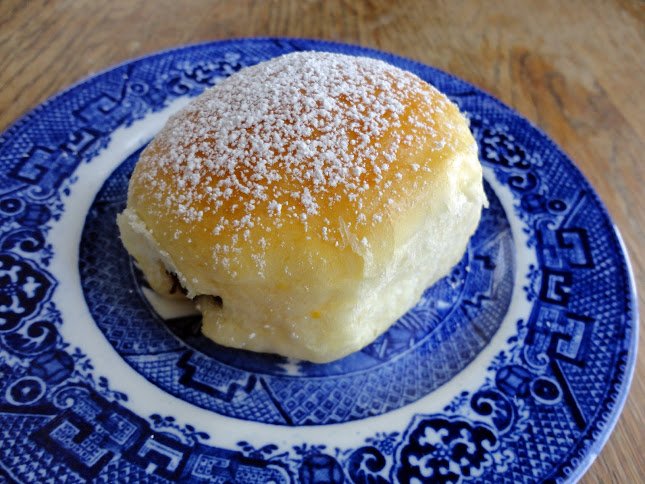
I chose this recipe because these buns were very special to Daniel. His grandmother made them while he was growing up and were his favorite sweet, but for a long time, he couldn’t’ find her recipe to duplicate them after she had passed away. His aunt finally found a copy his grandmother had written in Spanish and she translated it for Daniel to make and share on his blog. He was so happy to be able to finally enjoy them again.
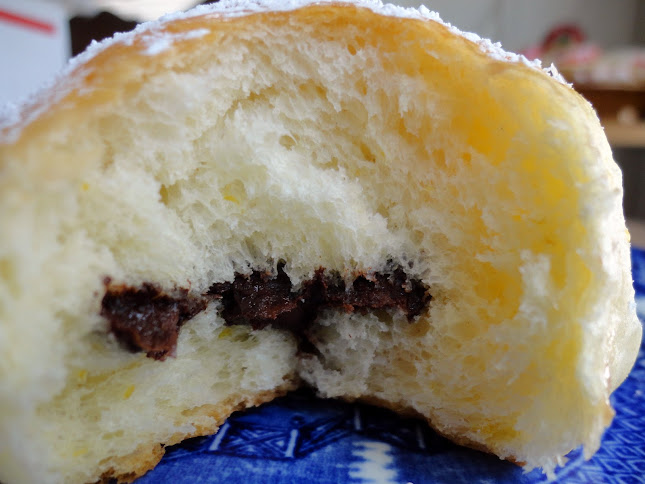
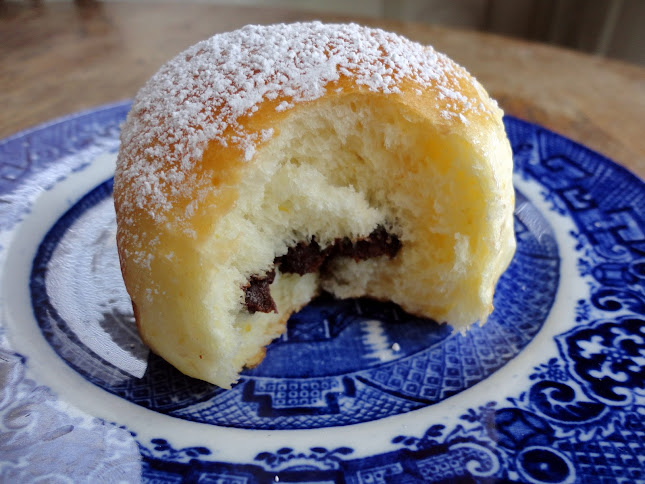
I didn’t have orange blossom water, so I upped the amount of orange zest in the recipe to make sure the orange flavor still came through and I thought the orange and chocolate flavors were very nice. I didn’t make these small like they should have been, so the amount of chocolate to bread was off, but they were still tasty. I loved how light the bread was, even when at room temperature. I took these pictures with room temperature buns so you can imagine how melty the chocolate and how light the bread is when warm. These aren’t very sweet, so I thought they were very nice as a breakfast treat with coffee. I brought them to work and they were gone in an hour-I couldn’t believe it. Either that means they are good, or people at work are starved for homemade goodies! I need to feed them more often, I think. :)
I hope that Daniel would be honored by this tribute to his life, and that his favorite buns have found their way into the hearts of others through his willingness to share his family heirloom recipe.
4 eggs
½ cup oil
¾ cup sugar
½ cup milk
½ cup orange juice
2 tablespoons orange zest (from about two oranges)
1 packet (2 ¼ teaspoons) instant yeast (aka bread machine yeast)
6-7 cups all-purpose flour
1 (12 oz) bag semisweet chocolate
1 egg for egg wash
Confectioners sugar for dusting (optional)
In a large mixing bowl, combine eggs, oil, sugar, milk, orange juice, orange blossom water and rind. Whisk together. Mix the yeast with 4 cups of the flour and stir into the liquid mixture with a large spoon. Continue stirring in flour until it is too stiff to stir, then turn it out onto a floured surface and begin kneading more flour in until the dough becomes smooth and elastic. Roll into a ball and place in a greased bowl, turning once to coat in oil. Cover bowl with a cloth and allow to rest in a warm draft-free place until doubled in size, about one hour.
To make the rolls, press a small handful of dough into a 3 x 3 square. place some chocolate at one end and roll it up. Place rolls on a non-stick baking sheet. (I put mine into two greased 9×13 baking dishes.) Cover rolls with plastic and let rise for 30 minutes or until doubled in size.
Preheat oven to 350F. Beat egg for wash and brush onto buns with pastry brush. Bake for 20 minutes or until buns are slightly golden-brown on top. Sprinkle buns with confectioners sugar when done. Buns can be frozen for later use.
I’m not a huge fan of typical zucchini bread that is scented with fall spices. Don’t get me wrong, I’ll gobble it up if it’s nearby, I mean it does have sugar in it, but I’m the kind of gal that doesn’t (usually) enjoy soup or cinnamon/nutmeg/cloves/allspice-laced treats in hot weather. Maybe I had soup for lunch yesterday, and made a big pot of Suzie’s soup last week, and some mouth-watering gingersnaps that same day. But still, I (usually) prefer summery foods in the summer and fall-ish foods in the fall.
This zucchini bread? 100% summer! Nice and tart and sweet and you can’t even taste the zucchini, it just adds moisture and some pretty green flecks. If you peeled them first, I bet you picky eaters wouldn’t even guess there were any veggies in it. Not that the zucchini makes this health food by any means, but it is a very summery, tasty way to use up this proliferous summer squash. It’s so soft and tender, it’s pretty much like eating lemon loaf cake! Thank you, NancyCreative, for this wonderful recipe!
2 cups all-purpose flour
2 teaspoons baking powder
1/2 teaspoon salt
2 eggs
1/2 cup vegetable oil
2/3 cup granulated sugar
1/2 cup buttermilk
Zest of 1 lemon
Juice of 1 lemon (or 2 Tablespoons lemon juice)
1 ½ cups shredded zucchini
Preheat oven to 35o degrees. Grease and flour a 9×5″ loaf pan; set aside. In large bowl, blend flour, baking powder, and salt; set aside. In medium bowl, beat 2 eggs well, then add oil and sugar, blending well. Add the buttermilk, lemon zest & juice, and blend everything well. Fold in zucchini and stir until evenly distributed in mixture. Add this mixture to the dry ingredients in the large bowl and blend everything together, but don’t over-mix. Pour batter into prepared loaf pan and bake for 45 minutes, or until toothpick inserted in center comes out clean (if your oven tends to run hot, check the loaf after 40 minutes). Cool in pan 10 minutes, then remove to a wire rack and cool completely. Once the loaf is cool, make the glaze…
Lemon Glaze
1 cup powdered sugar
Juice of 1 lemon (or 2 tablespoons lemon juice)
In small bowl, mix powdered sugar and lemon juice until well blended. Spoon glaze over cooled loaf. Let glaze set, then serve.
Recipe source: very slightly tweaked from NancyCreative
I put random photos throughout the introduction that have nothing to do with anything except the happenings in my life. Hover over for a brief description
I haven’t been blogging much and at first that was really nice, deciding not to blog when all I wanted to do was sleep, clean, spend time with the hubs, play Wii with my nephew, go to the lake with my family, etc. It was very freeing, recognizing that it was my choice. But last week, though I didn’t post at all, I really missed it!
I finally got a “permanent” schedule at work (“permanent” because it is still subject to change, based on the demands of the PO), 2:30-11 PM M-F with weekends off (praise God for that!) and I’m trying to go to bed right after getting home each night so that it won’t be as hard to get up early on Sunday mornings for worship. So that was the main reason I held off blogging, because my intentions were good, to go to bed early, but then I’d get caught up in email/Facebook/Pinterest and I still ended up staying up till 3-4 AM each day, making it also impossible to blog in the morning since I slept through it. And yes, Sunday was a very tired day for me, as always. Week 1 of trying to go to bed early: FAIL.
So I still don’t know how regular I”m going to be while I’m trying to get on a schedule that will allow me to get up at 8 AM each day with 8 hours sleep, but ultimately my posting time will likely start to be in the late morning/early afternoon as I switch from scheduling my posts for 8 AM the night before, to publishing after typing them each day before work.
Anyway, I’m happy to share something with you today and sorry for the rambling personal introduction that has nothing to do with coleslaw! Oh wait! If you can wait one more second, I have something else to share. When I came home from work after a really bad day almost two weeks ago, I found a package waiting for me on the kitchen table. It was the kitchen tile I won from Kudos Kitchen by Renee! It was the happy ending I really needed that day.
She painted it from this image I sent her that I found on Pinterest:
I was pretty demanding for someone who won something (i.e. got it for free!), asking if she could make the colors a deeper red, green and blue to match the colors in my kitchen, and I even went so far as to ask her to change the font to a fancier one. She didn’t complain at all and I’m totally thrilled with the tile and with Renee. If you want to check out her work, visit her Etsy shop here.
Thanks for putting up with me today–it’s hard trying to write a short blog when you’ve been silent for so long! Onto the coleslaw. Finally!
I’m not a huge coleslaw fan, but I have always liked KFC’s coleslaw. Have you met my sweet teeth? (I usually claim they’re all sweet, but a few of my molars are actually partial to savory foods. ;)) Yeah, I think they enjoy the sweetness to it. So when I volunteered to bring the coleslaw to our family’s July 4th celebration, I searched for a KFC copycat recipe and found one on Amanda’s Cookin’. I was pretty stoked to find it there, because I already follow Amanda’s blog and have much love for her since she started the Secret Recipe Club, which I enjoy participating in every month.
This coleslaw is just like KFC coleslaw! So good! And if you have a food processor, man, this comes together in 10 minutes or less. Even easier, you could just buy that bagged coleslaw mix and use the dressing on it. Either way, this is a winner and my family raved over it. Dennis and I ate an entire batch of it last week, so you know we love it too.
Slaw
1 head of cabbage
2 medium carrots, peeled (about 1/2 cup shredded)
2 tablespoons dried minced onion
Dressing
1/2 cup mayonnaise
1/3 cup granulated sugar
1/4 cup milk
1/4 cup buttermilk
2 1/2 tablespoons lemon juice
1 1/2 tablespoons white vinegar
1/2 teaspoon salt
1/8 teaspoon pepper
Chop cabbage into chunks, discarding the core, and run through your food processor using the shredding blade, or chop fine. Empty into a large bowl. Chop the stems off the carrots and shred them too, then add to the cabbage along with the minced onion. Combine all of the dressing ingredients in a large bowl, whisk well, and pour over the slaw. Stir well, then cover and refrigerate at least 4 hours, preferably overnight, before serving to allow the flavors to marry. Serve cold.
If you don’t know about and who CW is, check out Monday’s post: Meet CW.
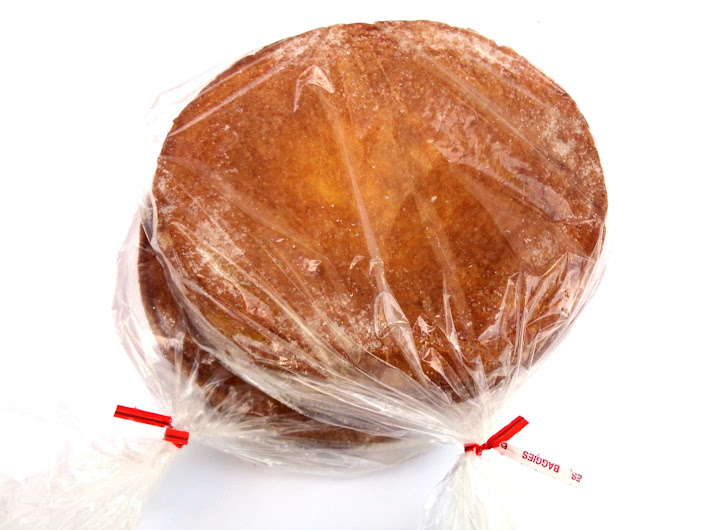
Growing up, Mom would make a very particular kind of strawberry shortcake at least once every summer. She would buy a “Family Style Shortcake” from Dillons, like this:
Then she mixed the tar out of sliced strawberries with honey (to help the strawberry juice come out to play with the honey) and poured that on top, put Dream Whip over that, and served it up once a year in summer after picnics in the park. Don’t know why, but that’s always when we had strawberry shortcake–after picnics in the park. Anyway, since we very rarely had anything sweet, this was such a lovely treat and I particularly loved the flavor of the ripe berries with the local, raw honey.
Mom’s simple strawberry shortcake was so delicious, and just the idea of it brings back fond and mouth-watering memories. But I wanted to be able to create it at home because, although we can still find the exact same shortcake at Dillons that Mom bought twenty years ago, who knows how long they’ll continue to make these and when they stop, I still want to be able to enjoy CW’s shortcake. And I want my grandchildren, or great nephews and nieces at the very least, to be able to enjoy this shortcake. And their grandchildren after that. CW’s shortcake must live on!
Since my youngest sister, Lacey, manages a Dillons deli, I first checked with her to see if she could possibly snag the recipe for me. In a way, I was happy to hear they weren’t baked in house but shipped in. That meant it was experimentation time! I’m not always in the mood to create a recipe from scratch, but I was definitely up for this challenge since the shortcake holds a special place in my heart.
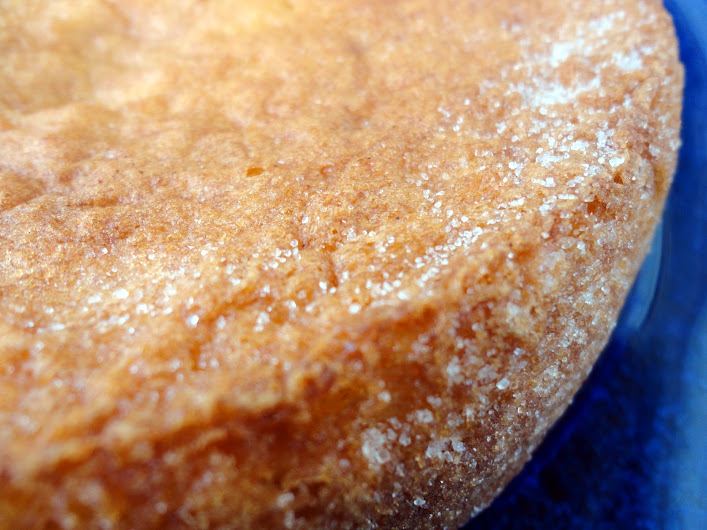
So here’s what I had to go off of to recreate the recipe (yes, I totally stood two inches from the ingredients list to take this picture and yes, I might have gotten some strange looks):
Based on the cake’s texture, flavor, and the ingredients, I decided this cake was pretty much a low-fat sponge cake so I Googled a lot of recipes to create my own that reflected these ingredients as closely as possible. I did omit the buttermilk since it seemed too fussy to have two different kinds of milk, but did add in some vinegar to replace the acidity lost. I also didn’t mess with any ingredients cooks normally wouldn’t have in their kitchens, like whey and dextrin. What is dextrin anyway?
I’m happy to report that while I don’t think I got it spot on, it was close enough that when Lacey tasted it, although she claimed to not remember eating CW’s strawberry shortcake growing up, she looked up with big eyes and said, “I totally remember this taste. I don’t remember eating it, but I remember this taste!”
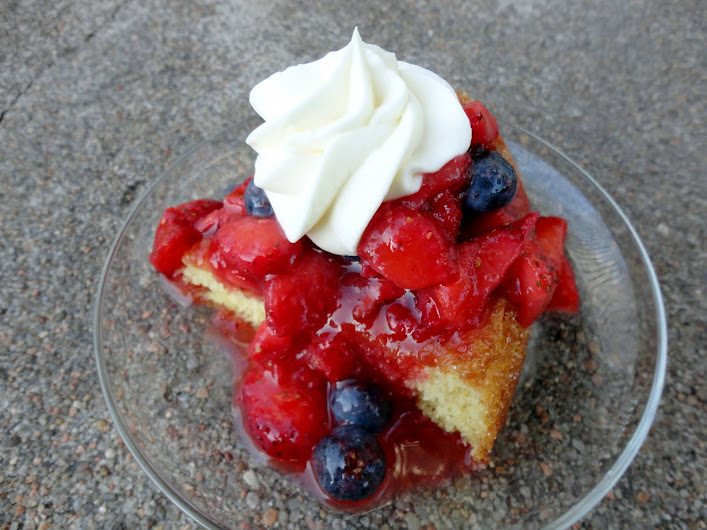
The cake from Dillons is crusted with sugar so I did that with mine, though it’s not necessary. It’s just kinda pretty. :) The cake I created is very spongy and dry, perfect for absorbing the delicious honeyed strawberry juice. Because of its texture, I really wouldn’t recommend using it in any recipe that doesn’t have a juicy topping–that juice is really needed to soften the cake. While the cake is very soft and bouncy to the touch, the texture is tough to cut because it’s so spongy, and it’s hard to cut with a fork until the juices have flowed down into the nooks and crannies of the cake. Once that happens though, you have tender, strawberry cake magic.
I was pretty impressed with the response I got from this cake. I shared it with my family twice, serving one cake at our Independence Day barbecue, then froze the second cake (the recipe makes two) and broke it out a week and a half later for our dessert after a barbecue at the lake. I usually have to ask my family what they think to get any feedback but all I had to do this time was sit back and let the accolades rain down. Adjectives such as amazing, best ever, and incredible were used liberally. Honestly, I’m pretty sure this cake now beats out THE Mocha Crunch Cake for favorite family cake. Check out my nephew gobbling it up at the lake (unless you’re averse to messy kid eaters, then you might want to steer clear):
I stuck with CW’s recipe for the strawberry topping, only using the berries and honey, and it’s just so stinkin’ good. Please try this topping, even if you buy your cake. Just make sure your honey is local and raw to get the best flavor. Also, local raw honey can help with allergies! Bonus!
For the whipped cream, you can use whatever you prefer–Cool Whip, Dream Whip, real whipped cream, or you can use the recipe for stabilized whipped cream I shared yesterday. I first made it with the stabilized whipped cream and the second time with Cool Whip and it was loved both ways. The strawberry topping is the star of this cake and I don’t think you can go wrong as long as you’ve got that. Who would have thought that honey and strawberries could create such magic?
Cake
½ cup whole milk
1 cup sifted all-purpose flour
1 tablespoon cornstarch
1 teaspoon baking powder
½ teaspoon baking soda
1/8 teaspoon salt
3 eggs
½ teaspoon cream of tartar
1 ¼ cups granulated sugar, divided
1 teaspoon vanilla extract
1 teaspoon white vinegar
Berry Topping
1 lb. fresh strawberries
¼ cup local raw honey
Optional: for a patriotic dessert, add 1 cup fresh blueberries
For the cake, in small saucepan, heat milk until bubbles form around edge of pan. Remove from heat; set aside.
Preheat oven to 350 F. Grease and flour two 8” round cake pans; set aside.
Sift flour with cornstarch, baking powder, baking soda, and salt; set aside. In small bowl of electric mixer, at high speed, beat eggs and cream of tartar together five minutes on high speed, until light and foamy. Gradually add 1 cup of the sugar, beating for an additional five minutes, or until ribbons form. Add vanilla and vinegar and mix just until combined. Blend in flour mixture on low just until smooth. Add warm milk and beat just until combined.
Immediately pour batter into prepared pans. Bake 25-30 minutes, or until cake tester inserted in center comes out clean. Turn the cakes out onto cooling racks. Place the racks over the sink and while they are still hot, using the remaining ¼ cup sugar, sprinkle sugar over the tops and rub it along the sides of the cakes. Allow to cool completely before wrapping in plastic wrap or putting in gallon-sized Ziploc bags until ready to use. You will only need one cake for this recipe so you can either freeze one for later, or double the berry topping and whipped cream and serve both cakes at once.
For the berry topping, combine the strawberries and honey in a medium bowl and stir for about 2-5 minutes, until the strawberries start to release their juices and the sauce gets thinner and takes on a red color. Cover and refrigerate until ready to use. If adding blueberries, stir them in before refrigerating or right before topping the cake.
To assemble the cake for serving, place cake on a plate, then cover with the berry mixture, including the juices so they can seep down into the cake. Allow to sit for at least 5 minutes so the juices can soak in, then top with whipped cream, slice, and serve.
Veronica’s note: I originally used nonfat milk since that’s what is used in the Dillon’s cake. The last time I made it, I only had whole milk and it made the cake so much better for it to have a little fat, so I updated the recipe. You can still use nonfat, it’s good that way, but better, more tender, with the whole milk.
OK, I’m almost ready to share CW‘s recipe for strawberry shortcake, but the draft started out so long that I’m trying to break up the longer parts into separate blogs, and this stabilized whipped cream recipe certainly deserves its own post.
Dollops of whipped cream top so many summer-time desserts and a recipe for a stabilized version comes in quite handy for me throughout the year. Since I need it so often, but very rarely have the time to whip it up right before serving dessert, and can’t make it much in advance since it waters out over time, I usually make the other recipe for stabilized whipped cream that I have on my blog. But then a reader (shout out to Miss Sandi Rose!) shared her own recipe for stabilized whipped cream with me back in March and I tried it out the first chance I got because it was so interesting! I can tell you that not only was I pleased with the results, but my family was as well. I left the leftover whipped cream at my parents’ house and when Mom gave me my piping tip back next time I was over, I asked if they ate the leftovers. She answered, “We ate the h#@& out of it!” LOL! I can totally see her squirting the whipped cream straight into her mouth and laughing like a lunatic while dodging Dad as he tries to get it away from her to hog it for himself. That’s totally Crazy Man and CW.
Anyway, while you can’t tell the other recipe apart from regular whipped cream, this one doesn’t increase in volume very much, if at all, so it’s very thick and creamy and has just a little bit of tang to it, which I happen to love. The texture reminds me of mousse and it really could be a dessert in and of itself.
I used it to top a strawberry shortcake (bet you figured that out already since you’re smart like that) that I added blueberries to for our Independence Day barbecue. Check back tomorrow for the shortcake recipe-it was a huge hit and this whipped cream put it over the top!
3 oz. cream cheese, softened
1 cup heavy cream
24 miniature marshmallows
1/4 cup granulated sugar
Mash cream cheese with a fork in a medium metal mixing bowl. Slowly add the whipping cream and stir until blended. Stir in marshmallows and sugar. Chill 4 hours or overnight. (Do not cover the bowl.) Place beaters in freezer to chill while the mixture is in the fridge. Whip mixture with the chilled beaters until the marshmallows are completely dissolved and mixed in and the mixture is thick and hold stiff peaks. Cover and keep refrigerated until ready to use.
You can thank The Secret Recipe Club for bringing me out of hiding this week! If it weren’t for being in the club, I’m sure I’d have gone to bed early last night (long day) instead of scheduling this to post. So hopefully you’re more thankful about that than I am-LOL! ;)
This month I was assigned to The Vanderbilt Wife. Yay, another blog that starts with “V” (you might not be aware, but we are an endangered blog species, though not as bad off as blogs beginning with “X” and “Z”)! Jessie is also a sister in Christ, so let’s give a little HOO-WAH for that too. Or maybe you could just wait while I do it. HOO-WAH! So lovely to meet you, Jessie!
Anyway, my assignment came right after a failed attempt at 100% whole wheat bread. It was supposed to be the best whole wheat bread ever…but it was not. So when I saw Jessie’s beautifulFluffy 100% Whole Wheat Bread, I freaked.
“Dennis, guess what she has on her blog?” I shrieked.
“Light and fluffy whole wheat bread?” he guessed without even glancing over at my computer screen.
(From that you can assume correctly that I had made it very obvious how deeply disappointed I was with the dense and yucky-tasting loaves I’d just made.)
“YES!” I screamed.
And I proceeded to make the recipe. Three times. It makes three loaves per recipe, so I made nine loaves of whole wheat bread within the span of two weeks. Unfortunately, I never got the bread to stay risen once it started baking so those nine loaves weren’t as light and fluffy as I’d have liked. Each batch started out so high and promising…
only to let me down half way through baking.
*sob*
Since I couldn’t consult Jessie to see if she had any suggestions (in the SRC, you don’t alert the blog you’re assigned to because it’s meant to be a surprise on reveal day, and I couldn’t ruin the surprise by asking her for help), I never got the recipe to turn out for me, but it did work for her so please visit her blog to see how light and fluffy her loaves are. I’m bound and determined to get the same result and will post the recipe on my own blog once I’ve got it figured out.
Since I started out with a yeast bread recipe from Jessie’s blog that I couldn’t get to turn out right, I went with another yeast bread recipe of hers that included some white flour (white flour helps because the gluten develops better and easier than with whole wheat). I’ve been wanting to try making potato bread for years, interested in how the potato would affect the texture, so I was excited to see she had a whole wheat potato bread recipe on her blog.
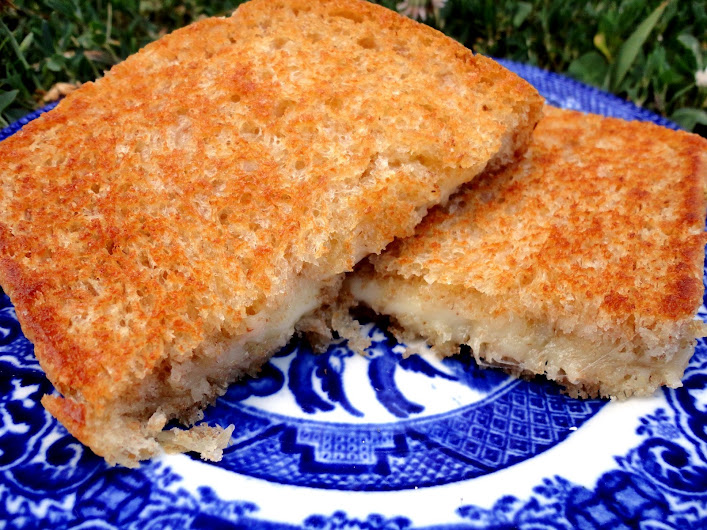
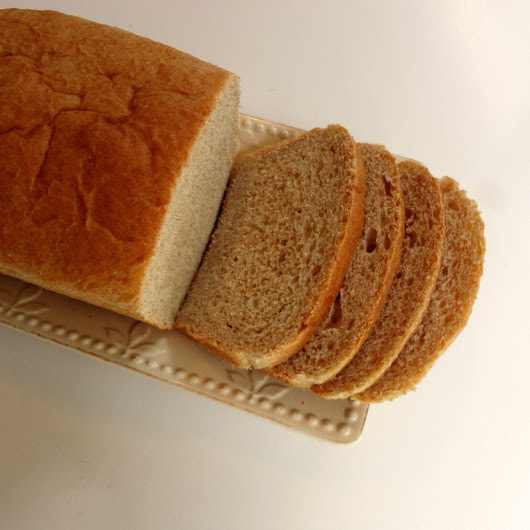
Let me tell you, making those nine failed loaves was totally worth it since they eventually led me to this recipe. (Also, those nine loaves, though deflated, were delicious and still fairly light, and all were eaten by my family who praised it highly.) This is the lightest, softest bread I have ever made that has whole wheat in it! It is so soft, in fact, that it’s hard to hold on to it while slicing without smashing it (I used an electric knife after the first slice, and highly suggest it if you have one–it makes the slices nice and even without crushing the bread.)
It is delicious and is perfect for making sandwiches, with a little more nutrition than plain white bread. Jessie said it made killer grilled cheese sandwiches, so I put it to the test with some pepper jack cheese. And I concur, KILLER! I really hope you try this!
1 medium potato
1/3 cup butter, softened
1/3 cup sugar
1 teaspoon salt
1 egg, beaten
2 ¼ teaspoons (1 envelope) active dry yeast
½ cup warm water
3 cups whole wheat flour
1 ½ to 2 cups unbleached all-purpose flour
Peel the potato, cut into cubes, and boil in a small saucepan until very soft. Drain, reserving 1 cup cooking liquid. Mash the potato in a small bowl and let cool slightly.
Cream butter, sugar, salt, and egg with an electric mixer. Add potato and mix well.
In a small bowl, put the ½ cup warm water and sprinkle the yeast over it. Let is sit for 10 minutes, then add to the potato mixture and beat until combined.
Change beaters to dough hooks and set mixer to 2. If you don’t have dough hooks, you will use your hands from this point forward. Add 2 cups whole wheat flour alternately with the 1 cup cooking liquid*, mixing/kneading well after each addition. Gradually add in the remaining flour until the dough starts to clean the side of the bowl. When that happens, let mixer go an additional 2 minutes. If kneading by hand, knead it in the bowl for about five minutes, or turn out onto a floured surface to knead. My dough was still a bit sticky when I stopped adding flour, but if I picked a ball off and rolled it in my hands, it did not stick to my hands. That is my test to know when I can stop adding flour, even though I really wanted to add more to keep it from sticking as I kneaded. I dealt with it and just scraped my hands off afterward. :)
Once your dough looks a little shiny, you’re done. If it doesn’t look shiny, just let it mix or knead it by hand until it does.
Place the dough in a greased bowl, cover with a towel and place somewhere warm. I like to preheat my oven to 350F for one minute, then turn it off and place my bowl in the oven. Let rise for an hour or until dough is doubled.
Punch dough down; divide in half. Shape into loaves by pushing each half into a rectangle, rolling it up, pinching the seam, and tucking the ends under. Place in two greased loaf pans (I slathered mine generously with softened butter). Cover with the towel again and let rise another 30-45 minutes or until doubled again.
Bake at 350 for 25 minutes or until golden brown. Remove from pans and rub the tops with a stick of cold butter. Set on a wire rack to cool
*Notes: Make sure your cooking liquid has cooled to about 115F before adding to the bread dough. If it is too hot, it will kill the yeast.


 Danielle, Lacey, Veronica")