RSS Feed

Category Archives: Sweets

Microwave Peanut Butter Cookies

Posted on

For some reason I’ve never had the urge to make one of those quick and easy chocolate mug cakes that are done in the microwave.  I’ve saved recipes for them, thinking it sounds like a fun idea, but I guess it seems like too much work to mix up the ingredients for such a small cake. Especially since I know I’d have to do it at least twice in a row to satisfy my sweet tooth-lol.

But a microwave cookie?  I had to try that.  (Don’t forget my second favorite food group is “Cookies,” with “Dip” being the first-haha.)  The original recipe was for a single cookie but I don’t keep a carton of Egg Beaters on hand and didn’t want to measure out a single tablespoon of egg white from a real egg, so I just multiplied the recipe by four to use a whole real egg (I’ve got mad baking mathematical skillz and knew that a whole egg = 1/4 cup or 4 tablespoons, just like I know how many ounces is in a cup of flour & sugar so that I don’t have to use measuring cups!).  This yielded four cookies, which is totally preferable to one cookie in my world.  :D

Dennis and I split the cookies and both loved them!  They are soft and chewy and totally hit the sweet spot. So simple and you don’t even have to turn on the oven.  Now that’s a summer dessert I can get behind. Extra bonus for those with food allergies: these are naturally gluten and dairy free!

Microwave Peanut Butter Cookies

Printable recipe
Printable recipe with picture

½ cup (4 ¾ oz) creamy peanut butter
¼ cup (2 oz) brown sugar, packed
½ teaspoon baking powder
1 large egg

Use a fork to mix the peanut butter and brown sugar together in a small bowl. Stir in the baking powder until completely incorporated. Mix in the egg until batter is uniform, thick & smooth. Remove ¼ – 1/3 of the batter and place on a small microwave-safe plate. Press into a thick cookie shape about 2″ in diameter and microwave 1 minute. Allow to cool while repeating with remaining batter. I preferred these when just a little warm.

Makes 3-4 large cookies.

Recipe source: adapted from Carrot’s ‘n Cake

Advertisement

Nutter Butter Banana Cream Pie

Posted on

This month for the Secret Recipe Club I was assigned to Our Eating Habits – pretty nifty considering I had Jamie’s blog last month!  Jamie called my blog “pay dirt” and I’d have to say the same of hers – there were just so many comfort food recipes (my favorite kind!) that I had a blast browsing through them.  I decided to make something for our annual Mother’s Day picnic from her blog and ended up making two things, this delicious pie and Smoky Baked Beans – both fabulous!

There was only one piece of pie left when we arrived late to the picnic (the pie preceded us in my IL’s van), but I had a good excuse to make it again in order to get pictures of the inside – my Father-in-law’s birthday was coming up, and he just so happens to adore banana cream pie.  Turns out so do I. It was so hard not to hog the pie all to myself but I took my single slice and let him have the three pieces that were left after we’d all had one.  He raved, everyone raved, and the pie is an official success.  Thank you, Jamie, for sharing such a fun and delicious recipe! I never would have thought to use Nutter Butters for a pie crust but it is the perfect compliment to the banana cream filling.

Nutter Butter Banana Cream Pie

Printable recipe
Printable recipe with picture

Crust
12 nutter butter cookies
1- 1/2 tablespoons cream cheese, softened

Banana Cream Filling
3/4 cup white sugar
1/3 cup all-purpose flour
1/4 teaspoon salt
2 cups milk
3 egg yolks
2 tablespoons cold butter
1 1/4 teaspoons vanilla extract
3-4 bananas, sliced

Topping
1 (8 oz) tub frozen whipped topping, defrosted
4 Nutter Butters, crushed
Place 12 Nutter Butters in food processor and pulse until fine crumbs. Add cream cheese and process until completely incorporated. Press into 9″ pie plate (not deep dish) and bake at 350F for 12 minutes. Set aside to cool while you continue with the recipe.

In medium-sized saucepan whisk together white sugar, flour, and salt.  Whisk in the milk and cook over medium heat, whisking constantly, until bubbles form. Cook for additional 2 minutes, whisking constantly to avoid scorching. Remove from heat.

Place egg yolks in a small bowl and whisk. Whisk in a small amount of milk mixture to egg yolks, then repeat a second time.  Pour egg yolk mixture into remaining milk mixture in pot and whisk to combine. Return to burner and heat again over medium heat for about 2 more minutes. Remove from heat and stir in butter and vanilla. Slice bananas into the pudding and stir gently to combine well, then pour and smooth into prepared crust.  Place plastic wrap directly on top of the pie to seal out air and refrigerate until ready to serve, at least four hours.  Before serving, spread whipped topping over the top and sprinkle on the crushed Nutter Butters.

Recipe source: Our Eating Habits

Baked Banana Doughnuts with Brown Butter Glaze

Posted on

My sister-in-law gave me a doughnut pan for Christmas two years ago…maybe three.  It’s what I asked for, had wanted for years, and yet I only used it to bake the doughnut mix she gave me with it until now!  What is UP with that?

I was Pinteresting (yes, I’m allowed to turn nouns into verbs haha) and came across Shelby’s baked banana doughnuts with a browned butter rum glaze and I HAD TO HAVE IT RIGHT THEN…or at least my own version of it.  :) I had my nearly forgotten doughnut pan, a single overripe banana, and the baby was taking a nap – it was like the stars aligned and God smiled down on me in that instant. I got to work and boy oh boy. These were quick to make and so delicious!  Brown butter and banana are a match made in heaven.  Actually, browned butter makes everything better, don’t you think?

Baked Banana Doughnuts with Brown Butter Glaze

Printable recipe
Printable recipe with picture

1 cup (4 ¼ oz / 120 g) all-purpose flour
2 teaspoons baking powder
1 teaspoon ground cinnamon
¼ teaspoon salt
1 large (about 5 ½ oz / 156 g without peel) overripe banana
1 large egg
¼ cup (2 ¼ oz / 64 g) buttermilk
2 tablespoons vegetable oil
¼ cup (2 oz / 58 g) light brown sugar, packed
2 tablespoons butter
1 cup (4 oz / 113 g) powdered sugar
1-3 teaspoons milk, as needed to thin the icing

Preheat oven to 350F. Spray a 6-well doughnut pan with oil and set aside (I wipe off the top with a paper towel to reduce the amount of baked-on oil build-up on there but that is your call). Whisk together the flour, baking powder, cinnamon, and salt in a medium sized bowl. In a separate smaller bowl, mash the banana, then whisk in the egg, buttermilk, oil, and sugar. Add to the dry ingredients and stir together until just combined (a few small flour lumps are OK). You can either use a spoon to fill the doughnut pan or put the batter in a ziploc bag and snip a corner to squeeze the batter into the pan. Fill each well 3/4 full. If you have extra, you can make it into mini muffins or wait until the first batch is done baking to make a couple more doughnuts. Bake doughnuts for 12-15 minutes, or until golden and doughnuts bounce back when lightly pressed. Turn out onto cooling rack to cool completely.

While doughnuts are cooling, brown the butter. Place in a small saucepan and cook over medium heat, stirring constantly, until the solids separate and turn a chocolate brown color. Remove from heat and add the powdered sugar and enough milk to get a glaze consistency (it doesn’t take much. Dip the tops of each doughnut in the warm glaze with the cooling rack over the sink so the glaze can drip off as you finish dipping each one. If you have extra, you can put it in a ziploc bag or disposable piping bag and snip a corner to drizzle over the doughnuts because extra glaze makes them extra good! :)

Recipe source: adapted from The Life and Loves of Grumpy’s Honey Bunch

Lemon Cream Whoopie Pies

Posted on

It’s been a year since I left the Secret Recipe Club but I’m finally back, baby! So excited! If you haven’t been around here long enough to know what the heck the Secret Recipe Club is, lemme break it down for ya. Once you’re in the club (click the link to sign up), each month that you participate, you’re assigned to another participating blog. Nobody knows who has whose blog, and everyone in the group picks a recipe from their assigned blog and makes it, then everyone posts on the same day and it’s all fun and exciting looking through the posts to figure out who had your blog and to see which recipe they picked. It’s a really fun way to visit new blogs and make recipes you might not usually try.

This month I was assigned to Chris and Amy’s blog, A Couple In The Kitchen. Aww! So sweet – a couple that cooks and blogs together! Their motto is, “The couple that sautes together, stays together.” I just love it.  The coolest thing is that they had my blog back in October of 2011 and made my Apple Cider Doughnuts, so it’s neat to finally get assigned to them in return.

I went crazy perusing their blog and pinning the recipes I wanted to try to one of my secret boards.  I’ve never made a risotto and really want to try it, so I was very close to picking their Springtime Risotto.  Their Corn and Black Bean Salsa Nachos were also calling my name, along with their Seared Scallops with Blood Orange Gastrique and Chicken Piccata.  However, my sweet tooth and curiosity drew me to their Flour Frosting and I thought I could use it as a filling in some springtime-y whoopie pies.

I’ve heard of flour frosting before and have wanted to try it for a long time, much longer than I’ve wanted to make a risotto, and I was glad to have the extra motivation to finally make it.  But let me tell you, I nearly had as much trouble with this frosting as I did with another SRC post on the whole wheat bread that would never turn out for me, even after 9 loaves. I don’t know what my problem is, but I just could not get the flour mixture right – it was always lumpy and made my frosting lumpy no matter how much I beat it (we’re talking 20 minutes people!).  Through trial and error, I devised a fool-proof way to create the smooth and fluffy frosting it’s meant to be, and while it’s a little more tedious because it involves an extra step, it’s worth the effort if you have lumpy thickened milk issues like me.  This lightly sweet frosting is incredibly light and fluffy, perfect for sandwiching between sweet, lemony cake-cookies.  Get your whoopie on!

Lemon Cream Whoopie Pies

Printable recipe
Printable recipe with picture

Cookies:
1 (15.25 oz) lemon cake mix
1/2 cup unsalted butter, melted
1/2 cup water
3 eggs

Filling:
¼ cup (1 1/8 oz) all-purpose flour
1 cup whole milk
1 teaspoon vanilla extract
1 cup (7 oz) granulated sugar
pinch of salt
1/2 cup (3 ¼ oz) vegetable shortening
1/2 cup (4 oz) unsalted butter, softened

Preheat oven to 350F. Line cookie sheet(s) with parchment paper and set aside.

Before starting the cookies, do the first step for the filling: whisk the flour and milk together in a small saucepan and continue to whisk constantly while cooking it over medium heat until it forms a thick paste, about five minutes. Set aside to cool completely.

Combine cookie ingredients in large bowl and beat on low until combined, about 30 seconds, scraping sides of bowl to incorporate. Increase speed to medium and beat for an additional minute. Drop 1 1/2 – 2 tablespoons of dough (preferably from a cookie scoop to make them nicely round) onto prepared baking sheet, 2 inches apart, and bake for about ten minutes or until lightly golden brown on edges and set in the center. Remove onto a wire rack to cool and repeat with remaining batter.

To make the filling, add the cooled milk and flour mixture to the bowl of a food processor fitted with the blade attachment. Add the vanilla and process until completely smooth and no lumps remain, a minute or two. (You can also beat it with a mixer but if there are any lumps, it will ruin your frosting. I couldn’t get the lumps out of mine without using the food processor.) In a large mixing bowl, add remaining filling ingredients and beat on medium-high for four minutes, then add in the flour mixture and beat together until nice and fluffy and no grit from the sugar remains, 3-4 minutes.

To make the pies, turn half the cookies over and spread about 2 tablespoons of filling over the flat side. Top with another cookie, flat side down and press lightly together.

Recipe source: a Veronica’s Cornucopia original, with the filling recipe adapted from A Couple in the Kitchen

A Brony Birthday Party

Posted on

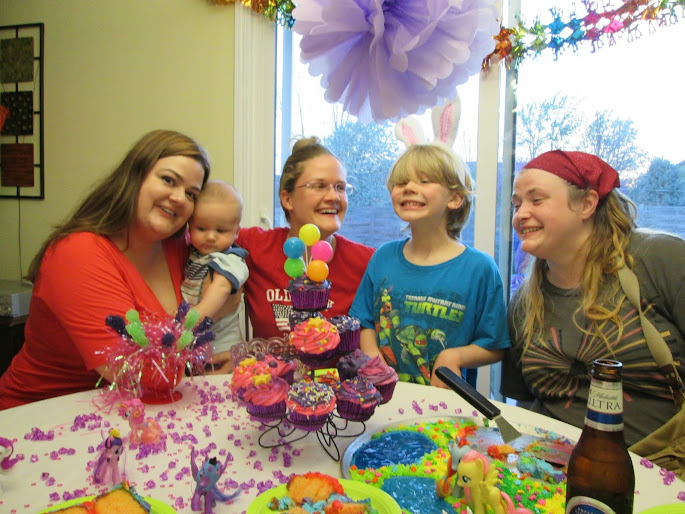
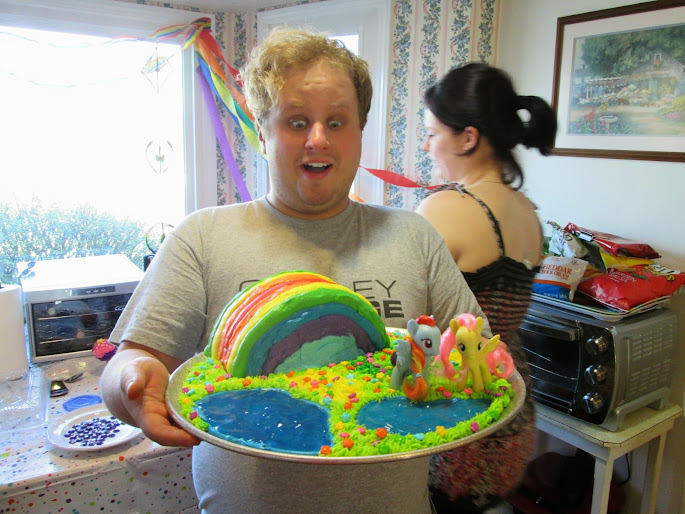
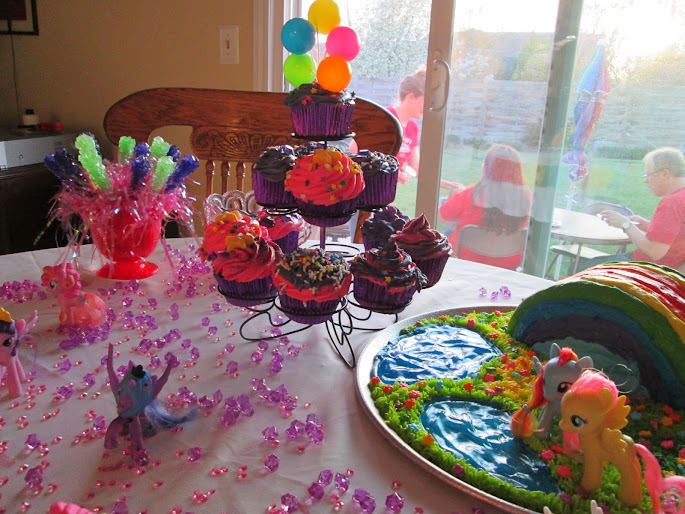
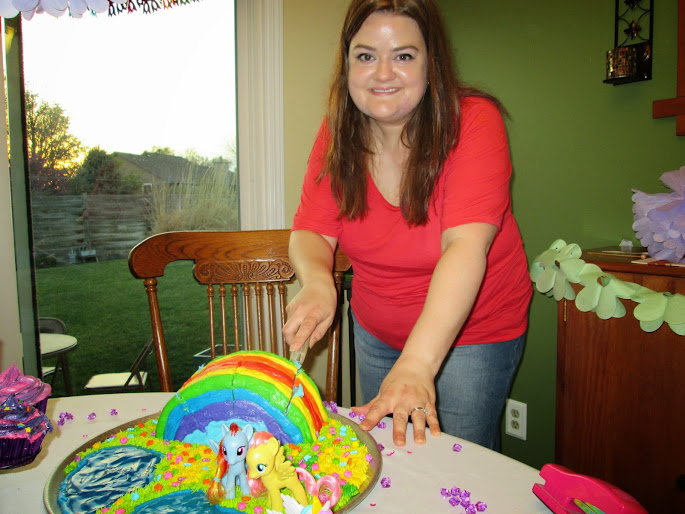
My little sister (that’s her with the black ponytail) threw a My Little Pony birthday party for her boyfriend last week.  That’s right, he’s a Brony.  A brother who likes My Little Pony.  I love that he’s secure enough in his masculinity not to have any shame about it!  He was so excited about the party and while she was taking millions of pictures of him posing with ponies, he declared it to be the best birthday party of his life.

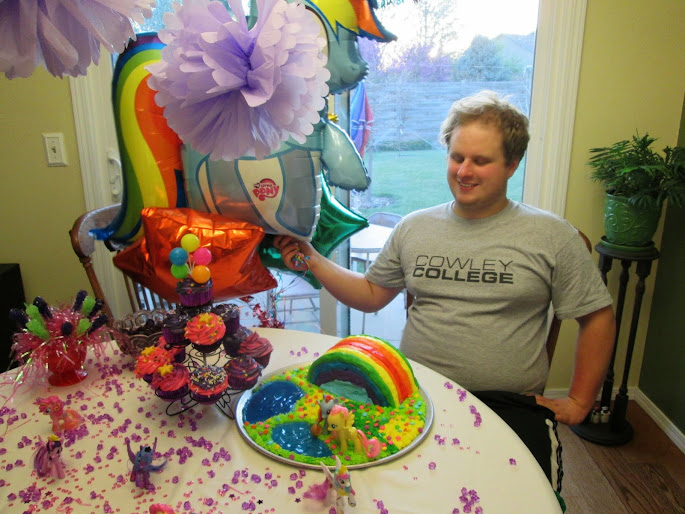
Although I’ve sworn off decorated cakes (multiple times), she talked me into making the cake for his party.  (What convinced me was her offering a really strange amount of money – not like $20 or $30, but $32.73.  It was so weird and funny I had to say yes! lol)  It was a super-simple cake and I thought I’d share how to make one if you ever have need of a rainbow or MLP cake.

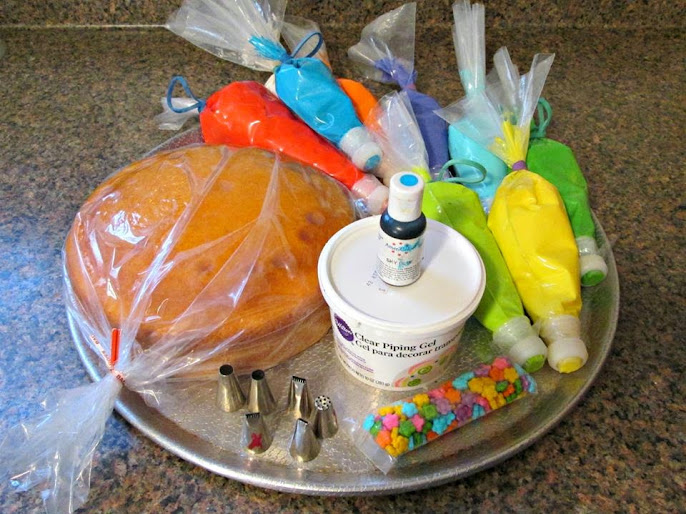
You only need a round single layer of cake.  If you make it in a 10″ pan, a cake mix will fit in it and the finished cake will serve up to 16 people, although it will be pretty difficult to serve.  I made mine in an 8″ pan and baked the rest of the batter into cupcakes, so this cake only served 8 but with the cupcakes it would have served 20.  You will also need red, orange, yellow, green, blue, purple, and sky blue frosting for the rainbow.  Pack the frosting into disposable pastry bags, preferably fitted with couplers, though you can just slice the tip off the bag to pipe the frosting directly onto the cake out of the bag if you don’t own a lot of couplers or don’t want to buy them. If you are going to make this into a My Little Pony cake, you will also need extra green for the grass (I used a lighter green than in the rainbow). You’ll need some flower sprinkles (I used these) and a grass tip (Wilton #233, and ignore all the other tips – I didn’t end up using them).  If you want to make a pond, you’ll need some clear piping gel and sky blue gel coloring (available at Walmart by the cake decorating supplies in the arts & crafts section).

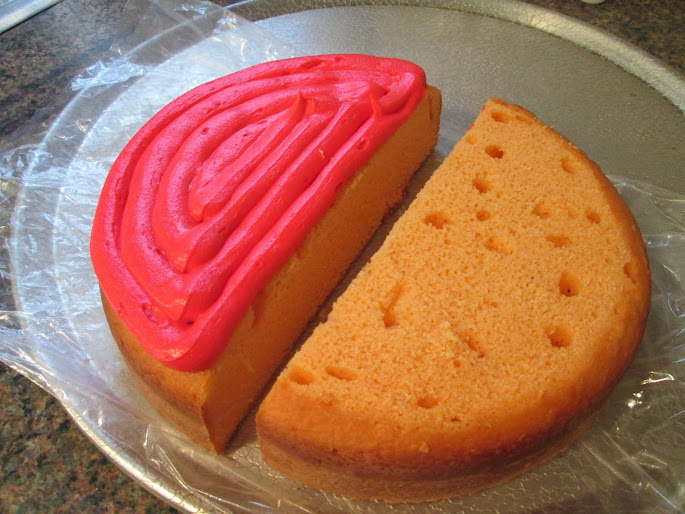
Slice your cake in half and squeeze/spread frosting onto one side. I made too much red so that’s the color I chose to use.

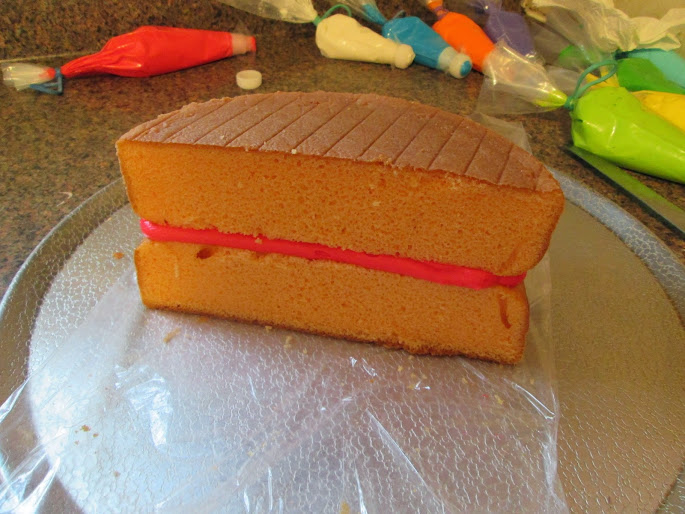
Sandwich the halves together.

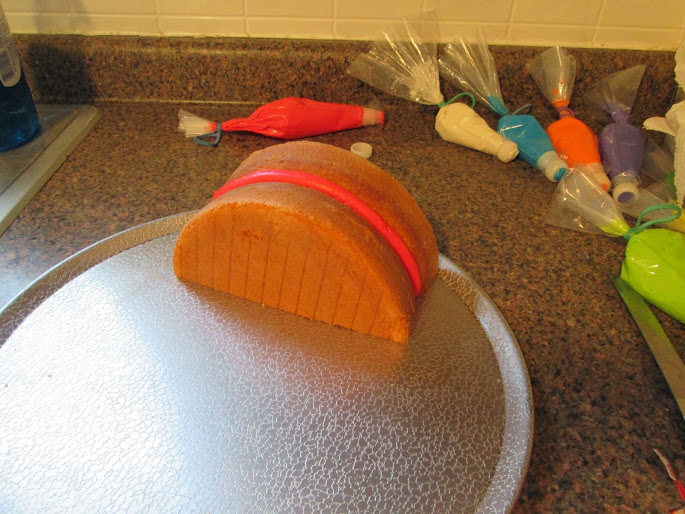
Place the cake cut-side down to your platter or cake board.

Squeeze frosting onto the cake, starting at the middle with the red (I had to build it up a little to make it higher since it dipped down), making stripes in this order: red, orange, yellow, green, blue, and purple.  I just squeezed it out from my coupler without a tip and I thought this made the perfect width of frosting for each stripe.

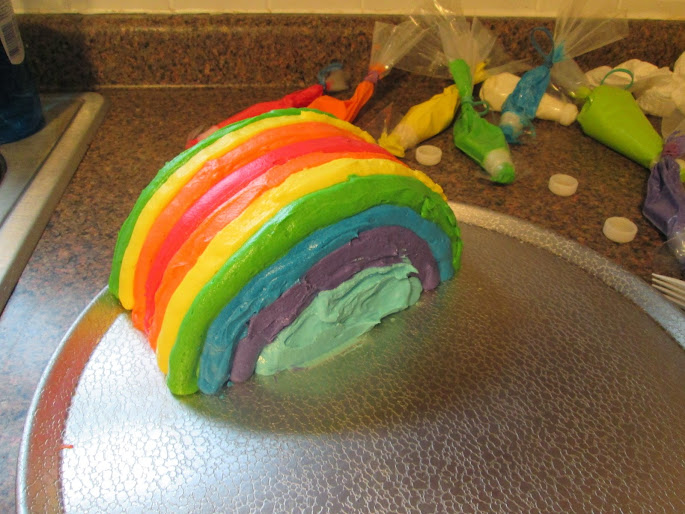
Repeat down the other side and fill in the bottom of both sides with sky blue frosting to make it look like you’re looking through to the sky underneath the rainbow.

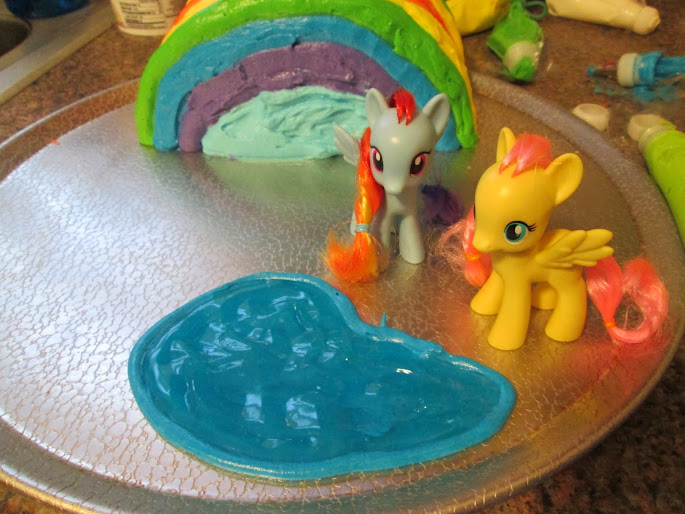
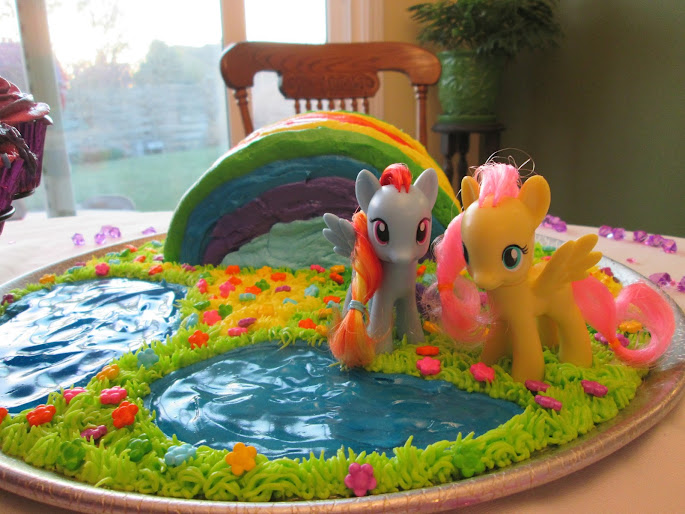
If you’re going to make a MLP cake, figure out where you’re going to put the ponies, then pipe a blue border to outline where your pond(s) will be.  Using your (clean) finger, spread a thin layer of blue frosting over the platter or cake board so that the silver (or other color of the board) doesn’t show through the piping gel.  Tint enough piping gel to fill the pond(s) with sky blue gel color and spread into the pond, creating some ripple effects with your spoon.

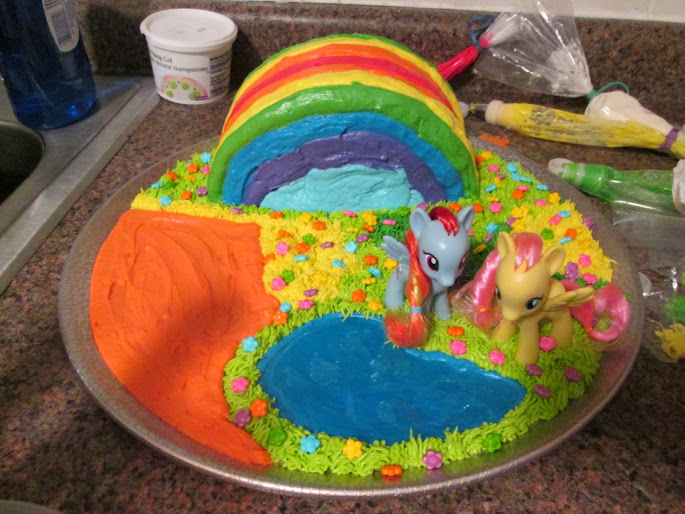
Pipe grass onto the rest of the platter and when you run out of light green, use up the rest of your darker green, then panic and use up your yellow.  Then realize there is no other color left that is suitable for grass so be really strange and spread some orange over the rest of the platter, hoping it won’t look too weird if you write a birthday message across it.  Sprinkle your flower sprinkles all over the grass.

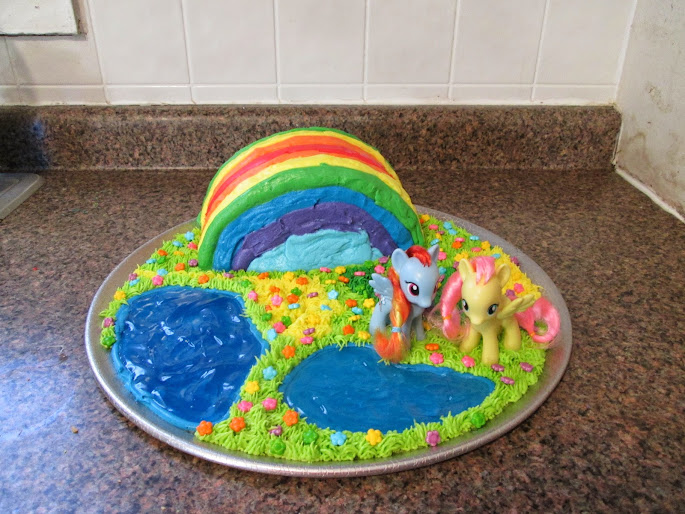
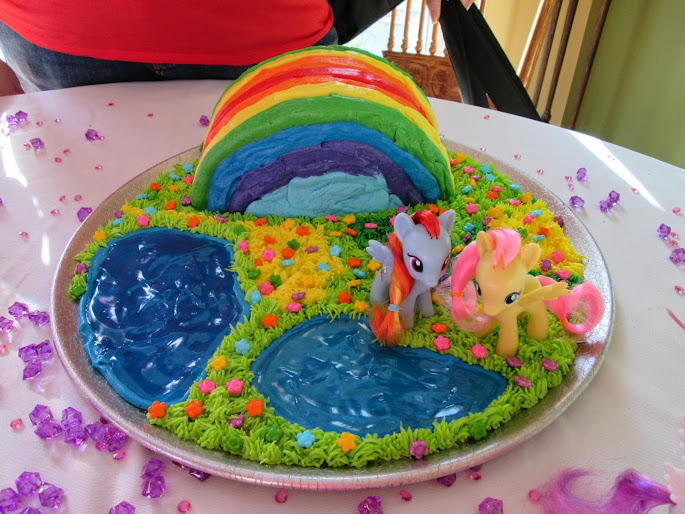
Realize the orange is just wrong, and scrape it all off, rejoicing that you found some extra blue you had set aside in a bowl.  Use it to pipe a border for another lake and repeat the steps to create a second lake.  Rejoice that you saved a little bit of white frosting and tint it green to go around the lake, then steal some of the flower sprinkles to put on the new grass.  Much better.

To serve, cut it in half down the middle, then cut each half in half, angling toward the center.  Essentially, you are cutting it the way you would if it was right-side up, but from the side instead of the top.  Cut each thick slice in half and use a spatula or cake server to draw out one of the bottom pieces (most likely two pieces will come out and you’ll have to pull the top piece off onto another plate.  Once the first piece is out, serving the others is pretty easy as they just start falling onto your spatula.
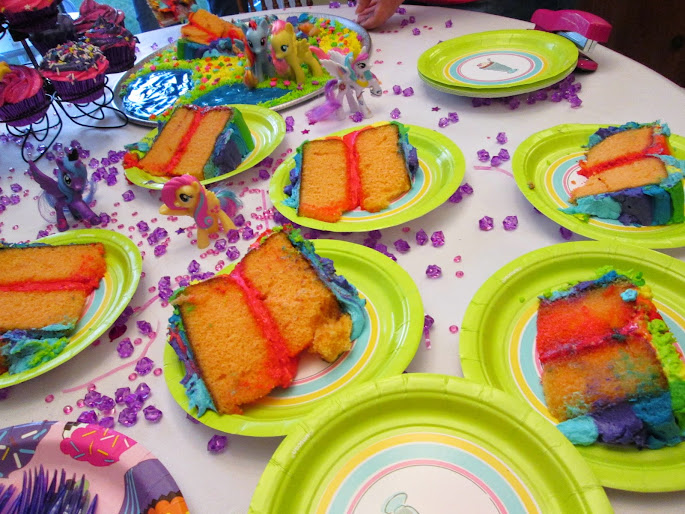
TASTE THE RAINBOW!

Whoa. It’s like a rainbow…IN MAH MOUTH.


Tennessee Banana-Black Walnut Cake with Caramel Frosting

Posted on

We celebrated Father’s Day early this year!  OK, truth be told, I made this cake for Father’s Day five years ago.  This is probably the longest it’s ever taken me to blog a recipe, but with the Black Walnut Banana Bread recipe I shared earlier this week, I figured it was about time.

You know a cake is good when you can still remember the flavor five years after you ate it.  This cake is what turned me onto using black walnuts in banana bread – the pairing is ever so perfect.  And the caramel frosting just puts it over the top!  Enjoy it for Father’s Day, or Mother’s Day, or just because you really need this cake in your life. Because you do.

Tennessee Banana-Black Walnut Cake with Caramel Frosting

Printable recipe
Printable recipe with picture

Cake:
1/2 cup (3 1/4 oz) solid vegetable shortening
1 1/2 cups (10 1/2 oz) granulated sugar
2 eggs
2 large overripe bananas
1/4 cup (2 oz) buttermilk
1 teaspoon pure vanilla extract
2 cups (8 1/2 oz) all-purpose flour
1/2 teaspoon baking soda
1 cup (4 oz) chopped black walnuts

Frosting:
1/2 cup (1 stick) butter, softened
1 cup (7 1/2 oz) packed dark brown sugar
1/3 cup heavy cream, plus more as necessary
1 tablespoon pure vanilla extract
1 (16 oz) box confectioner’s sugar
2 cups (8 oz) finely chopped black walnuts, for garnish (optional)

Preheat oven to 350 degrees. Grease and flour two 9-inch cake pans.

For the cake: In a medium bowl, stir together flour and baking soda; set aside. Using an electric mixer, cream together shortening and sugar in a bowl until light and fluffy, about 2 to 3 minutes. Add eggs 1 at a time, mixing well after each addition. Mix in mashed bananas, buttermilk, and vanilla. Add flour mixture, mix until just combined. Stir in black walnuts.

Pour into prepared pans. Bake for 35 minutes. Cool in pans on a cooling rack for 10 minutes. Remove from pans and cool completely.

Meanwhile, prepare frosting. Melt butter in saucepan. Add brown sugar and cream. Cook over medium-low heat for about 2 minutes, until the sugar is dissolved. Remove from heat and add vanilla. Transfer to a large bowl.

Using a handheld electric mixer, beat in confectioners’ sugar until smooth. If frosting is too thick, add 1 tablespoon heavy cream at a time until consistency is right. Sandwich 2 layers of cake with icing. Ice the outside of the cake. Surround sides of cake with crushed black walnuts.

*Cook’s note: DO NOT substitute English walnuts for black walnuts.

Black Walnut Banana Bread

Posted on

Well look at that, I wrapped a slice just for you! ;)

If you’ve never tasted the magic that happens when you combine banana and black walnuts, you need to try it, starting with this bread! Black walnuts used to be the only nut I used in my banana bread and I have no idea what happened but for some reason, I just stopped and totally forgot about them.  Maybe because they are harder to find, I moved on to using pecans, my overall favorite nut for baking, and didn’t remember the superior black walnut until my Mom gave me a bag from the Nifty Nuthouse recently.  I seriously wasted about three years on black walnut-less banana bread before she reminded me of the wondermosity that is the black walnut.

There is something really special about black walnuts in combination with banana. I also like to use them in banana cake- both in it and on top of the icing.  Just so good.  I can’t describe the flavor but there’s a little something extra to them that the regular walnuts don’t have.  I want to say they have a sulfuric  quality but I’m not sure that’s exactly right.  You’ll have to tell me how you would describe them because I’m at a loss.

I made this particular recipe very simple in order to showcase the banana and black walnut flavors without muddying the waters with butter or vanilla or cinnamon or  bourbon, et al.  I’m really partial to using oil in quick breads and cake because, in my opinion, it makes a superior crumb that butter just can not compete with, except in flavor, of course.  When the butter flavor isn’t necessary, I happily use oil.  I’ve made this bread both ways, and we both prefer the oil version – much more moist, tender, and almost silky.  The butter version is good, but not as good.  It’s also heavier and more dense.  I really recommend trying it this way before you scoff at the lack of butter.  You won’t believe how good it is!

Black Walnut Banana Bread

Printable recipe
Printable recipe with picture

2 cups (9 oz) all-purpose flour
1 cup (7 oz) granulated sugar
½ teaspoon salt
½ teaspoon baking soda
2 eggs
1 ½ cups (14 oz) mashed overripe banana
½ cup (3 1/2 oz) vegetable oil
½ cup (2 ¼ oz) black walnuts

Preheat oven to 350F. Spray a large 9×5 loaf pan with oil and set aside.

In a large bowl, whisk together the flour, sugar, salt, and baking soda. In a separate smaller bowl, whisk the eggs, then add the banana and oil and whisk until completely incorporated. Using a rubber spatula, scrape the wet mixture into the dry, then use the spatula to stir until somewhat blended. Add the black walnuts and stir until everything is just combined.

Pour into prepared pan and bake for 70 minutes, or until toothpick inserted in the center comes out clean. Invert onto your hot pad-covered hand and then invert again onto a cooling rack to cool as long as you can stand it. Wrap up to seal in moisture if it doesn’t get eaten in one sitting. :)

Just had to share this cautionary photo of my thumbs after I’d tried to harvest my own black walnuts since they grow abundantly in the neighborhoods around here. It took me two hours to fill maybe a single teaspoon with tiny little nut shards (it’s so hard to get through the shell!) and my thumb nails broke through the latex gloves I was wearing while I was working on them and my thumbs were stained like this for weeks. I highly recommend paying for them – the free nuts are just not worth the effort!

White Chocolate Macadamia Nut Cookies

Posted on

Looky what I did! I kind of feel like a rock star, having made my first batch of cookies post-baby, and not even the bar kind. The kind you actually form the dough into individual balls before baking.  I still haven’t recovered the sleep I lost over them since devoting this kind of time to baking requires staying up at night while the baby is sleeping, but they were oh so worth it.  And who am I kidding, I do that every night anyway! :)

Mel worked hard to perfect her recipe, and the cookies are truly wonderful.  Soft and chewy, which is my favorite cookie texture, with the crunch of macadamia nuts and the complimentary sweetness of white chocolate.  Cookie perfection.

White Chocolate Macadamia Nut Cookies

Printable recipe
Printable recipe with picture

1 cup (2 sticks) salted butter, softened
3/4 cup granulated sugar
1 cup packed light brown sugar
2 teaspoons vanilla extract
2 large eggs
3 cups all-purpose flour
3/4 teaspoon salt
1 teaspoon baking soda
12 ounces white chocolate chips
1 cup macadamia nuts, coarsely chopped
1 cup toasted coconut (optional)

Preheat the oven to 350F.

In a large bowl, beat together the butter, granulated sugar and brown sugar with a handheld mixer (or in the bowl of a stand mixer) until the mixture is well-combined. Add the vanilla and eggs and beat until the mixture is creamy and light in color, 2-3 minutes. Beat in the salt and baking soda until incorporated, then stir in the flour until just combined; a few streaks of flour are OK. Add the white chocolate chips and macadamia nuts and mix until combined and no streaks of flour remain.

Roll tablespoon (or slightly larger) size balls of dough and place on silpat or parchment lined baking sheets, 1 to 2 inches apart. Bake for 9-11 minutes and remove from pan to cool on wire racks. Repeat with remaining dough.

*Veronica’s Notes: if using unsalted butter, increase salt in the recipe to 1 1/4 teaspoons.  If your macadamia nuts are roasted and salted like mine, you might want to reduce the amount of salt. I omitted it completely since both my butter and nuts were salted. I added toasted coconut to half the batch (unphotographed because they were gone by the time I broke the camera out), and although they weren’t the classic white chocolate macadamia nut cookie, they were even better in their own class. I like both versions so I recommend you try half and half!

Recipe source: slightly tweaked from Mel’s Kitchen Cafe

Lemon Muffins

Posted on

I adore baking up lemony treats any time of year, but lemon has such a bright and cheerful color and flavor that I find it particularly appealing on a cold winter day.  I picked this recipe from my foodie mama’s cookbook to brighten up one such day a couple weeks ago.  Her cookbook is self-published, the same kind that churches print for fundraising, so it’s pretty straightforward without a lot of extra words, but at the end of this recipe, she said, “Wonderful!” so I knew it had to be good.  If she didn’t say anything at the end of her blue ribbon recipes, which I’ve tried and loved (like this banana bread and this peanut butter pie), I knew this one had to be a real winner.  And I was right.

Seriously y’alls.  The texture.  The flava flav.  It’s all kinds of wondermous.  It’s like someone crossed a pound cake with angel food cake and turned it into a muffin.  The lemon flavor is really incredible, with lemon zest and juice in the muffins, and a lemon syrup soaking down into them.  The only thing I almost changed was the walnuts, because nuts seemed such a strange addition to a lemon muffin to me.  Then I almost decided to use another nut,  like almonds or macadamia nuts because they seemed more suited.  I’m so glad I went with my foodie mama’s instinct because she never steers me wrong.  The walnuts are perfect and they even take on a pretty golden color from being toasted and baked, and look so appealing studding the yellow muffins.

Marina still has copies of her cookbook available and is selling them for $10 plus $3.50 S&H.  Email me at vraklis@yahoo.com if you’d like to purchase one!  You can see some of the recipes in her cookbook here.

Lemon Muffins

Printable recipe
Printable recipe with picture

Lemon syrup
1/2 cup granulated sugar
1/4 cup fresh lemon juice

Muffins
4 eggs, separated
1 cup (2 sticks) unsalted butter, softened
1 cup (7 oz) granulated sugar
3-4 teaspoons lemon zest
2 teaspoons baking powder
1 teaspoon salt
2 cups (8 1/2 oz) all-purpose flour
3/4 cup walnuts, toasted & finely chopped
1/2 cup fresh lemon juice

Preheat oven to 350F. Combine the sugar and lemon juice for the syrup and set aside. Butter or place paper liners in 12 muffin tin wells.

Making sure your mixer and beater(s) are completely grease-free, beat the egg whites on high speed until stiff. Scrape into a separate bowl and set aside. Cream the butter and sugar until light, about five minutes. Add egg yolks, lemon zest, baking powder, and salt, and beat well. Add the flour in three additions, alternating with the lemon juice, beating until combined. Gently fold the beaten egg whites into the batter, then stir in the walnuts. Fill prepared muffin tins almost full to the top and bake for about 25 minutes, or until a toothpick inserted in center comes out clean.

Leaving the muffins in the tins, pierce them several times with a fork while still hot. Drizzle the lemon syrup over the tops, then remove the muffins from the tins to cool completely on a wire rack.  Store in an airtight container.

Recipe source: Marina Castle

Chocolate Italian Love Cake


I made this for our Valentine’s Day dessert because 1) it’s “Italian” (I put that in quotations because honestly, I think the only reason it’s called “Italian” is because there is ricotta cheese in it), so I thought it would go well with our Spaghetti & Meatballs, and 2) it’s a Love Cake, therefore perfect for Valentine’s Day. :)  However, I’m sharing this with you today, a regular non-Hallmark holiday day, because it’s simply a fantastic cake that should be enjoyed and made for those you love on any old day, not just days designated for celebrating your loved ones.

This cake is every bit as good as it looks.  I don’t like ricotta because of the texture, but it really works with this cake.  It’s not a heavy cake, which is dangerous, because it’s also addictive and the “lightness” makes it easier to trick yourself into thinking that eating half the pan by yourself isn’t all that obscene.  Not that I’ve done that or anything.

Chocolate Italian Love Cake

Printable recipe
Printable recipe with picture

1 package chocolate cake mix (I recommend using Betty Crocker brand), and the ingredients needed to make the cake according to the package directions

  • OR your favorite chocolate cake recipe that makes as much batter as a cake mix

2 lbs. ricotta cheese
4 large eggs
3/4 cup granulated sugar
1 teaspoon pure vanilla extract
1 (5.9 oz.) package instant chocolate pudding mix
1 1/2 cups cold milk
1 (8 oz) container frozen whipped topping, defrosted

Preheat your oven to 350*F and spray a 9×13 inch pan with nonstick spray; set aside.

In a large bowl, mix together your cake mix according to the directions on the box or prepare your favorite chocolate cake.  Spread into prepared pan and set aside. In another bowl, beat together the ricotta cheese, eggs, sugar, and vanilla until smooth. Carefully pour the ricotta mixture over the cake batter, trying to get it evenly distributed, then spread it as best you can over the cake batter with a spatula. The layers will switch during baking!

Bake the cake for 1 hour. Remove from the oven and allow to cool completely.

Once the cake is cool, whisk the pudding mix and milk together until smooth and slightly thickened. Gently fold the whipped topping into the pudding until incorporated. Spread the pudding mixture over the top of the cooled cake. Do not spread it over the cake if it’s even slightly warm or it will melt and ruin the topping. Cover the cake and refrigerate at least 6 hours before serving. It tastes even better the next day.

Veronica’s notes: 1) I do not recommend my favorite chocolate cake for this recipe as it makes a lot more batter than a box mix and your pan would probably overflow if you tried it. 2) I have a stack of 9×13 baking dishes because I use that size more than any other. My largest one is a Pyrex dish and I highly recommend you use your largest one too – preferrably a Pyrex dish because they seem to be the largest.  I know every 9×13 dish should measure 9×13 but apparently they do not…or maybe some companies measure from the inside and some from the outside.  This recipe fills it up to the top so you really need to use a large dish.  3) If you live in an area that sells 5.1 ounce pudding mixes, that’s fine – it’s the size called for in the original recipe. You only need a cup of milk if you have a 5.1 ounce box, according to the original recipe. 4) I know ricotta can be expensive so if you have an Aldi in your area – go see if they sell ricotta there. Mine sells it for $1.68 for a pound. It’s also good quality! And get some pumpkin puree while you’re there – it’s usually $1 (or less) for a can and is very good quality. :)

Recipe source: adapted from Chew Nibble Nosh

%d bloggers like this: