RSS Feed

Tag Archives: recipe

Antipasti Sandwich

Posted on


This sandwich would make great party food because it needs to be made ahead and it’s fun & unique with great flavors.  And of course it’s perfect for summer because there is absolutely no cooking involved!  But don’t wait until your next party to serve it–make it for your own family for dinner like I do! I’ve already made this sandwich twice in the last month.  We love it! 


Antipasti Sandwich
Printable recipe
Printable recipe with picture
 

Coarse salt and ground pepper
1 medium zucchini, thinly sliced lengthwise
1 red bell pepper
1 loaf crusty bread (about 1 lb), sliced in half lengthwise
1 can (15.5 oz) cannellini beans, rinsed and drained
1 garlic clove, roughly chopped
1 tablespoon fresh lemon juice
1 tablespoon extra-virgin olive oil
1/2 lb. mortadella, prosciutto, or thinly sliced deli ham (I used Genoa Salami)
1/2 cup fresh parsley leaves
1 cup marinated artichoke hearts, drained and quartered or sliced
1/2 cup (1 oz) shaved Parmesan
1/2 cup pepperoncini, drained and halved if large 

Sprinkle a double layer of paper towels with salt and place zucchini on top in a single layer. Sprinkle with salt and roll up like a newspaper. let sit 10 minutes to draw out excess liquid. 


Over a low gas flame or under the broiler, roast bell pepper until skin is charred, 10 minutes, turning frequently. Place in a bowl and cover tightly with plastic wrap. (I always just pop the blackened pepper into a quart-size Ziploc bag.) Let sit 10 minutes. Rub bell pepper with a paper towel to remove skin, then core, discard seeds, and slice flesh into strips. 

The black skin is very easy to remove once it sweats for 10-15 minutes.


<picture source> 

Pull out about 2 cups bread from inside loaf halves. In a food processor, combine beans, garlic, lemon juice, and oil and puree until smooth. Season with salt and pepper. Completely cover inside of both bread halves with an even layer of bean puree. 

I used half a loaf of French bread both times because I'm only feeding 2 people. This makes 3 sandwiches.


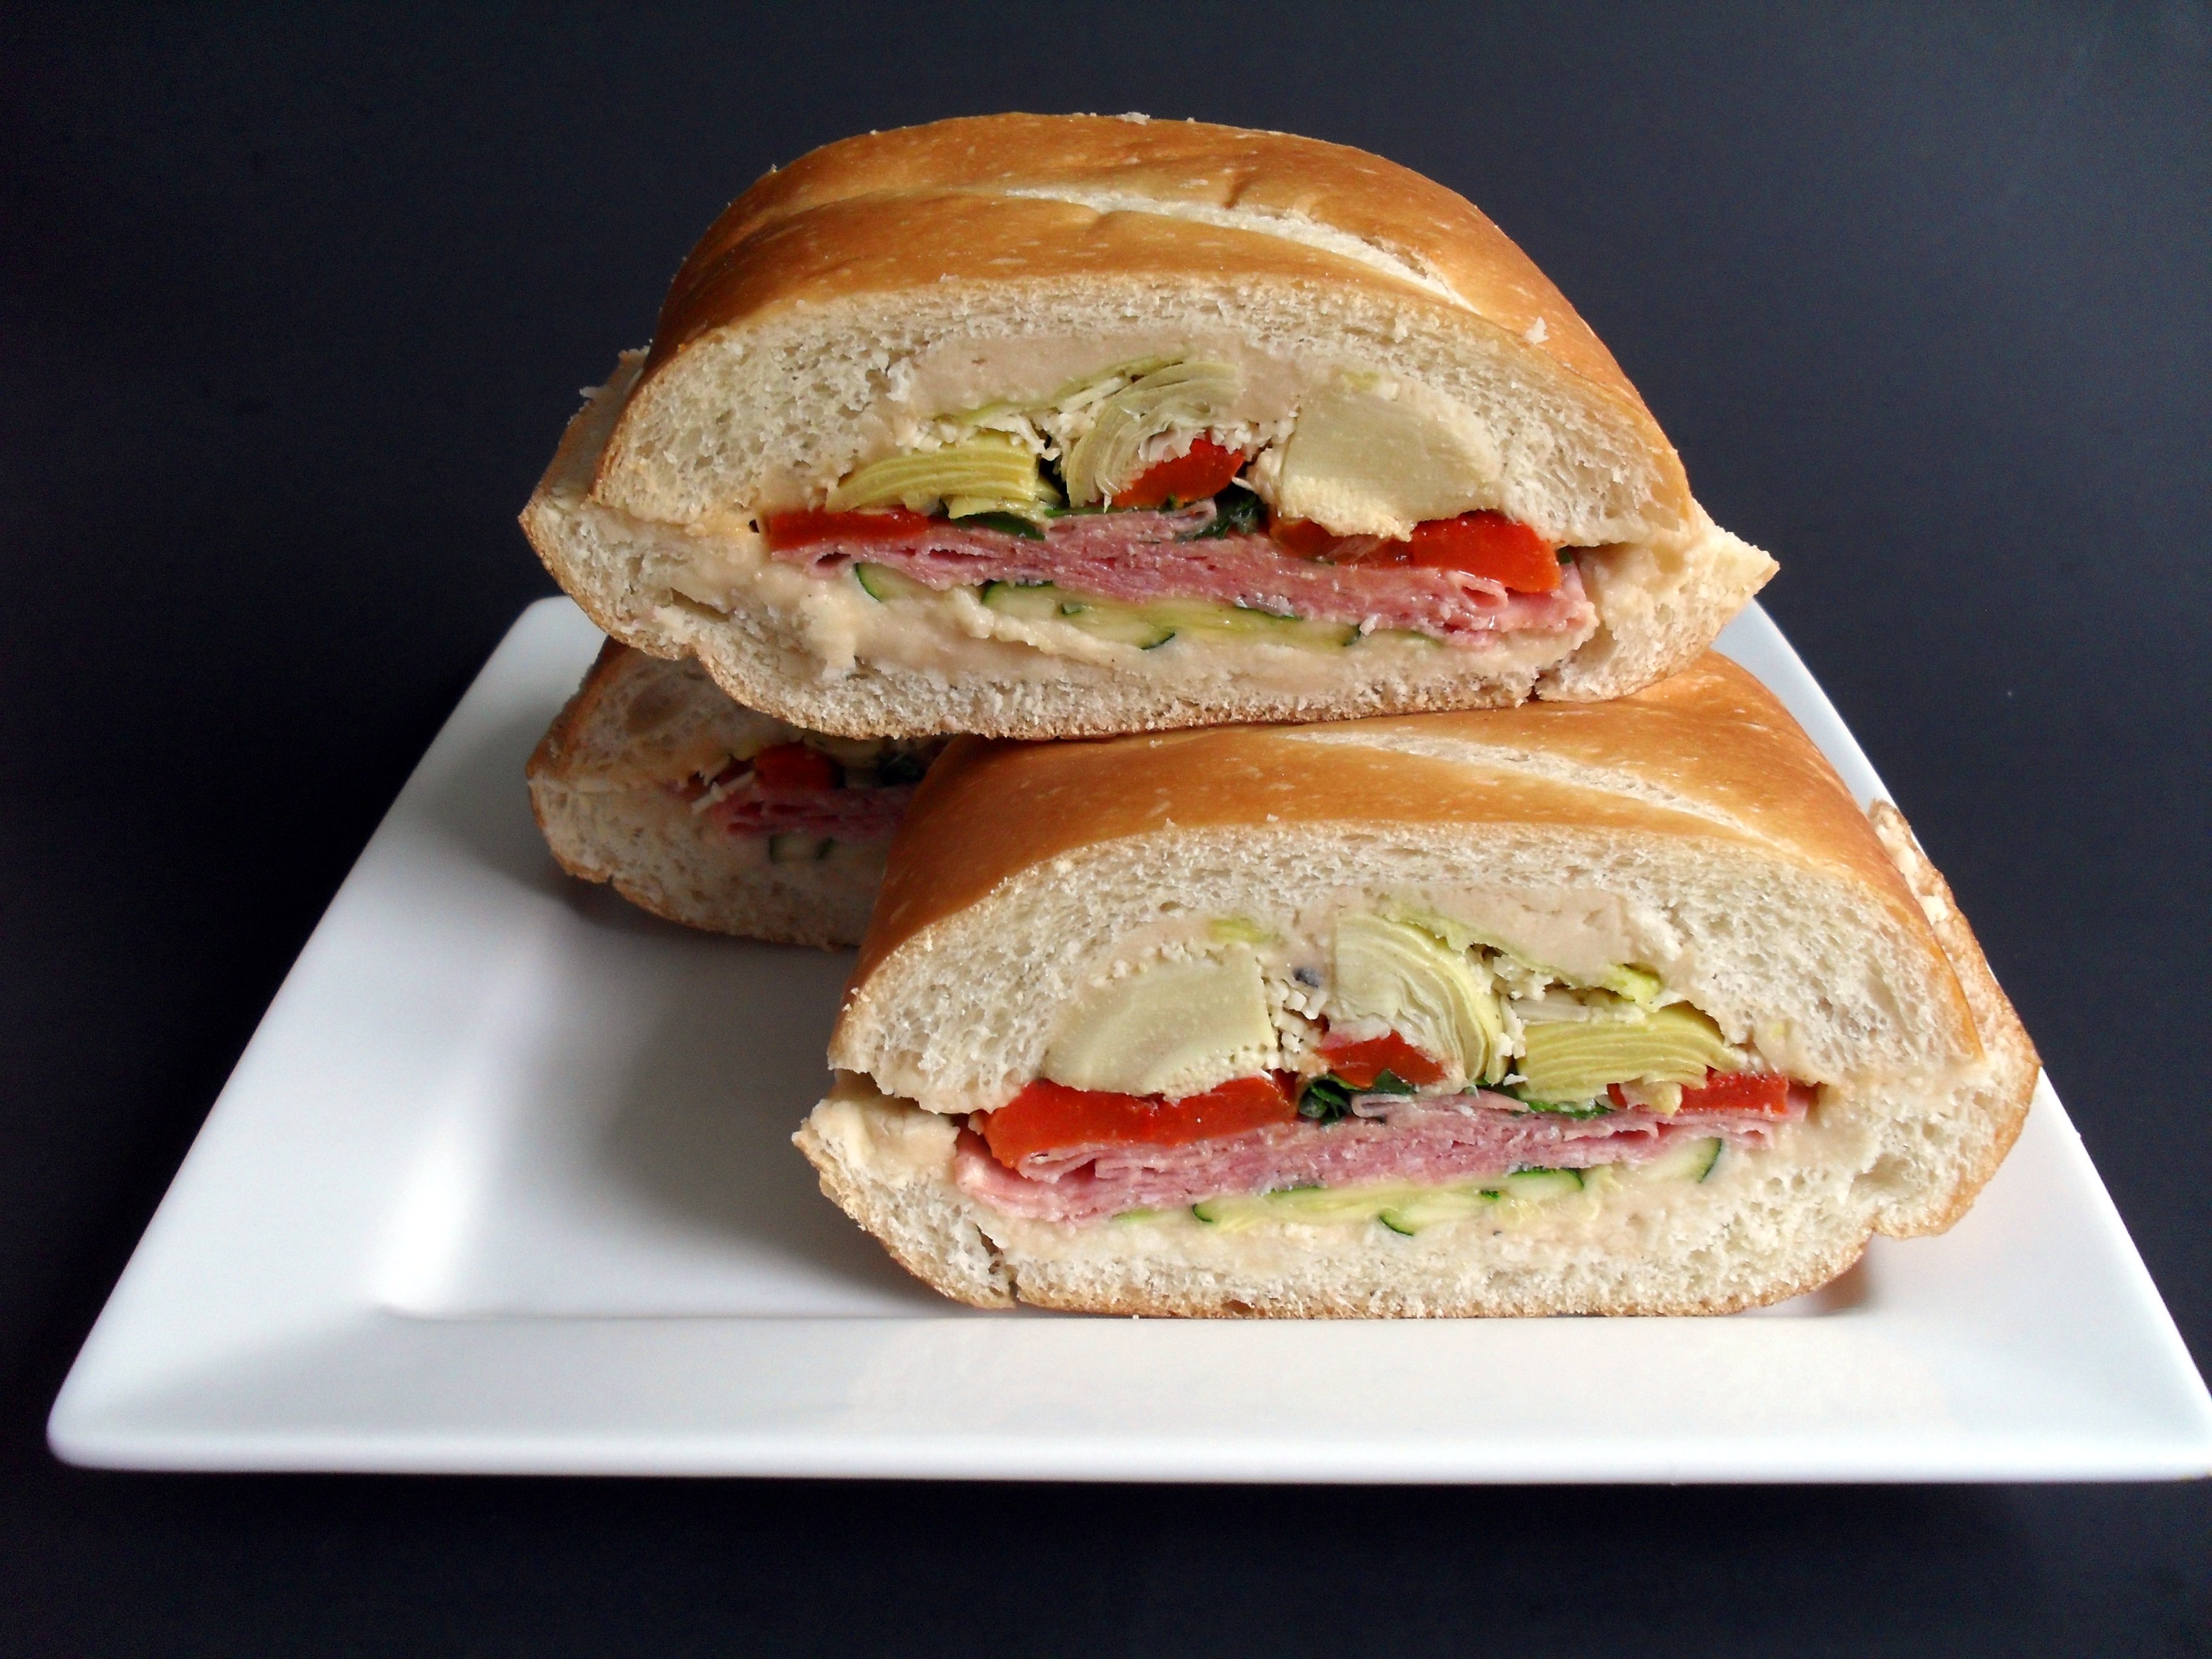
Arrange zucchini on bottom half of bread. Top with meat, parsley, roasted pepper, artichokes, Parmesan and pepperoncini. Sandwich with top half of bread and wrap tightly in plastic. Place on a baking sheet in refrigerator. Place another baking sheet on top and weight with several heavy cans. Let sit at least 3 hours (or up to overnight). To serve, unwrap and cut into wedges with a serrated knife. 


Serves 6 to 8 

Nutrition information (per serving–based on 6 servings): 496 cal; 16.2 g fat; 21.8 g protein; 63.5 g carb; 10.1 g fiber
Recipe source: Everyday Food, July/August 2010 

Watermelon & Tomato Salad

Posted on

I got this recipe from my friend, Pia, who has a wonderful blog with tons of ethnic recipes, particularly Filipino since she is from the Philippines. Now, I know what you were thinking when you read the title of this post.  You’re wrong! Watermelons and tomatoes CAN be put together in a salad–and it is delicious!  This salad is sweet, salty, acidic, tangy, and is so refreshing.  You will love it.

Watermelon & Tomato Salad
Printable recipe
Printable recipe with picture

5 cups seedless watermelon, cut into cubes
1/2 lb. tomatoes, seeded and diced
2 teaspoons sugar
1 teaspoon salt
1/2 cup red wine vinegar
1/4 cup olive oil
1 medium red onion, thinly julienned
freshly ground black pepper
chopped cilantro for garnish

In a large bowl mix chopped watermelon and tomatoes. Stir in sugar and salt and place in fridge to marinate for 15 minutes.

After 15 minutes, mix in red wine vinegar, olive oil and onions. Keep chilled.

When ready to serve add freshly ground black pepper and garnish with chopped cilantro.

Serves 8.

Nutritional Info (per serving): 106 calories; 7 g fat; 11 g carb; 1 g fiber; 1 g protein

Recipe source: Inato lang Filipino Cuisine and More

Quick Fish Tacos with Baja Cream

Posted on

I have several magazine subscriptions and the ones that aren’t entirely devoted to food and recipes do include recipes and by the time I’ve gone through them, they are inevitably bristling with pieces of paper I’ve used to mark those I want to try and never do.  Every once in a while, however, a recipe jumps out at me and I can’t stop thinking about it until it has been made.

Enter the May edition of Everyday Food.  As soon as I saw these fish tacos on the cover, my heart began to sing.  They were so colorful and seemed a perfect spring/summer meal.  I had to make them.

I mostly followed the recipe except I did something a little different with the sour cream, using a recipe from my friend, Kitty, whom I owe a sincere thanks to.  It is the closest thing she’s found to the cream they serve on fish tacos in Baja California and while I wouldn’t have a clue as to whether it tasted the same or not since I’ve never been to California, I can attest that it is delicious on these tacos!

From start to finish, this meal was on the table in fifteen minutes.  So easy!  So simple!  So gorgeous!  So light!  So delicious!  I often forgo simple recipes like this, believing that the more time and effort and ingredients that is involved makes the end product that much better.  As this recipe proves, that’s not always the case.

Quick Fish Tacos
Printable recipe
Printable recipe with picture

1 pound boneless, skinless tilapia fillets, cut into 2-inch pieces
2 Tablespoons extra-virgin olive oil
coarse salt and fresh cracked pepper
12 corn tortillas
1/2 small head red cabbage, thinly sliced
1 cup fresh cilantro
1 small white onion, finely chopped
lime wedges, for serving

Baja Cream
1/2 cup mayonnaise
1/2 cup sour cream
2 tablespoons fresh lime juice
1 teaspoon (packed) finely grated lime peel
Pinch of salt

Heat broiler, with rack in highest position. Pat fish dry with paper towels and gently coat with oil on a rimmed baking sheet. Season with salt and pepper. Broil until fish is browned on top and flesh is opaque throughout, 5 minutes.

Meanwhile, mix the Baja Cream ingredients together and set aside. Toast corn tortillas over a kitchen burner using tongs or wrap a stack of 6 at a time in damp paper towels and heat in the microwave for 40 seconds to 1 minute. Divide fish evenly among tortillas and top with cabbage, cilantro, and onion. Serve with Baja cream and lime wedges. SERVES 4.

Per serving (3 tacos): 440 cal; 14.9 g fat (4.2 g sat fat); 35.9 g protein; 42.8 g carb; 6.9 g fiber (NOTE: NUTRITIONAL STATS ARE BASED ON THE ORIGINAL RECIPE, WHICH ONLY USES 1/4 CUP OF SOUR CREAM. I know, who could possibly only use ONE teaspoon of sour cream on their taco?! I need at LEAST a tablespoon-hahahahaha!)

Recipe source: adapted from “Fish Tacos with Cabbage & Lime” from Everyday Food, May 2010

General Tso’s Chicken

Posted on

How was your Easter?  Dennis and I went to Abilene to spend it with his family and had a lovely time.  Phyllis, my mother-in-law, made a killer ham and my favorite scalloped potatoes, and we also had the creamed corn (the REAL kind with whole corn mixed with butter and cream cheese–Dennis HAS to have that stuff at every family function) and Mexican coleslaw that my sister-in-law, Joan brought.  The coleslaw was really yummy and I plan to use it on some fish tacos so I’ll be blogging it eventually.  I brought the dessert (was there any doubt?) and supplied lemon bars and white cupcakes with my favorite lemon frosting.  I’ve had lemon on the brain since it finally started warming up and I’m still thinking about making more lemon desserts!  Something to look forward to.

Anyway, now that we’re all getting a little tired of leftover ham, I have something completely different for you to add to your meal plan.  I mentioned in a recent post that I’d been wanting to spread my wings a little and try more ethnic cuisine so it’s a little ironic that I chose General Tso’s chicken as one of my first attempts since it’s actually an American creation.  But it tastes and looks Asian and is served in Chinese restaurants so that’s close enough for me!

I based my recipe & method off of a You Tube Video that my friend Dewey sent me when he read that I was wanting to try it out.  After watching itkman cook it up with little effort, I was comfortable enough to change it up a little, and it turned out beautiful and delicious!  I hope you try it.  Just looking at the photos has me drooling and wanting some more!

General Tso’s Chicken
Printable recipe

Sauce
½ cup chicken broth
¼ c sugar
¼ c rice vinegar
2 T hoisin sauce
1 T sesame oil
1 T soy sauce
1 T cornstarch
2 t minced fresh ginger
6 cloves minced garlic
4 scallions, chopped

Chicken
2 lb. chicken breast, cut into chunks
1 egg
1 T soy sauce
Flour
Vegetable oil for frying

Vegetables
1/3 of a red pepper, sliced
1/3 of an orange pepper, sliced
1/3 of a yellow pepper, sliced
2 cups broccoli florets

Mix all but the last three ingredients for the sauce and once the sugar & cornstarch are dissolved, stir in the ginger, garlic & scallions.  Set aside.

Mix the chicken with the egg and soy sauce, then roll each chunk in flour.  Fry the chicken in vegetable oil that is 375 degrees F until golden brown.*  Remove to a plate lined with paper towels and set aside.

Put the vegetables in a microwave-safe dish with a cover and nuke for 3 minutes.  Meanwhile, heat a large wok on high, give the sauce a stir, and pour it into the wok.  Wait for it to start simmering, then start stirring until it gets thickened.  Add in the chicken and toss until it is evenly coated.  Remove from heat and add the vegetables, stirring until mixed.**  Serve hot along with rice if desired.

Serves 6.

*Veronica’s notes: I do not own a fryer, so I filled an uncoated (as in, no Teflon coating or nonstick surface) skillet half full of oil and used my candy thermometer to gauge the temperature, frying the chicken in three batches.  If you do your frying on the stove top, be sure to keep an eye on the temp b/c you don’t want it over 400 or below 350.

**If you are wondering why I didn’t just stir-fry the veggies before adding the sauce & the chicken, it is because the veggies would absorb too much of the sauce if done this way and the chicken wouldn’t get enough.  Coating the chicken first ensures it’s thoroughly coated so that just the little bit extra coats the vegetables, making them slightly flavored but still bright and fresh tasting, which nicely contrasts the saucy chicken.

I’m linking this with Food For Thought for BSI: Broth.

World’s Greatest Salmon (improved)

Posted on

Yes, I know the title is a bold statement, but that is how much I love this salmon.  I’m willing to admit there may be better recipes, but I honestly have never had better salmon, no many how many variations I try.   This is my favorite and it may be presumptuous to call it “world’s greatest” simply because I love it, but this is my blog and I think it’s the best, so there! :)

This is actually the first recipe I ever posted, back when I was just a MySpace blogger.  I actually started Veronica’s Cornucopia in the fall of ’09 but if you do much searching, you’ll see I have recipes dating back to June of 2008 because I copied all those I had on MySpace over to here when I started it.  And this one was the very first.  But I like it so, so much, and have improved it since the original post, so it merits an encore.

Enjoy!

World’s Greatest Salmon
adapted from my friend Rossie K’s recipe
Serves 6

6 (4-oz) salmon fillets
4 large garlic cloves, minced
1/2 cup REAL maple syrup
1/2 cup soy sauce
1/4 teaspoon sesame oil
1 tablespoon vegetable oil
1 green pepper, cut into strips
1 red pepper, cut into strips
1 yellow pepper, cut into strips
1 onion, sliced into rings
1/4 teaspoon cornstarch

Put the minced garlic, maple syrup and soy sauce in a gallon-size Ziploc bag, seal it, and shake it to combine.  Add the filets and reseal, then place the bag in the fridge for at least two hours, turning halfway through.

Preheat the oven to 425 degrees and spray a 9×13 baking dish with cooking spray.  Arrange the salmon filets in a single layer in the dish and pour about a tablespoon of marinade over each filet.  Bake for 10-15 minutes, or until the fish flakes easily when pierced with a fork.

Meanwhile, heat the sesame and vegetable oil in a large skillet.  Add the peppers and onion, stir, and pour the remaining marinade over everything.  Saute on medium-high until the vegetables are tender and the sauce has reduced.  If the sauce is too thin, add the cornstarch and cook another minute or two until it has thickened, adding additional cornstarch if necessary.

To serve, plate a salmon filet and spoon some of the vegetables and sauce over the top.   Serve hot!

Veronica’s Notes: This recipe is best with skinless salmon filets.  You can replace the maple syrup with honey if you don’t have any–I haven’t tried it this way because I like the maple version too well to change it, but Rossie made it that way and loved it. You can use any soy sauce you like, but I always use light soy sauce (in this case, the “light” is referring to reduced sodium) because even that has plenty of salt and makes a wonderfully flavored fish.

Cake Pops

Posted on

**Update 5/12/11: If you are here looking for answers to cake pop questions, please check my Cake Pops FAQ and Troubleshooting Guide before leaving a comment.  I also have a recipe for making cake pops or balls with leftover or broken cake here, a recipe for Vegan Dark Chocolate Cake Pops, and a recipe for Cupcake Bites (cake balls that look like little cupcakes–the easier version of cake balls).  For my full pops index, click here.**

These pops are essentially cake truffles on a stick and are very simple to prepare: Bake a cake, mush it up with frosting, roll it into balls, insert a stick, and dip it in chocolate! These things really are a hit with kids because they are so fun, but adults seem to enjoy the delicious truffle-like confections equally well.

Want to make some? Here are step-by-step instructions, complete with videos.

Cake Pops
Makes 40-50 pops
Printable Recipe

What you will need:
1 (14.25 oz) box cake mix, any flavor
1 (16 oz) tub frosting, any flavor (you will not need all of it)
or 1/3-3/4 cup homemade frosting (I use my Cream Cheese Wedding Frosting)
1 (24 oz) package of almond bark/candy coating (white or chocolate)
Sprinkles
Lollipop sticks
3″x4″ cello bags
Curling ribbon

Bake the cake mix according to package directions. Once it’s cool, crumble the cake into a large bowl. I prefer to process mine in the food processor to fine crumbs. Place in a large bowl and stir in half of the frosting container or 1/3 cup of your homemade frosting. Mix with your hands until thoroughly combined and thick like a truffle center. Mix in additional frosting if necessary.  You just want enough to get the crumbs to stick together when you roll them into balls.  Do not add so much that the mixture becomes soft and mushy!

Roll mixture into 1″ balls and place on a cookie sheet. Cover with plastic wrap and refrigerate for an hour or overnight. I usually do this step the day before and then dip them the following day.  Do not freeze them before dipping or it may cause the chocolate to crack after they are dipped.

Melt chocolate in the microwave per directions on package. Dip the tip of your lollipop stick in a little of the melted candy coating and insert into the flat end of the cake balls. (Bakerella says to insert a little less than halfway, but I go more than halfway b/c I imagine they stay put a little better when dipping.)

The cake balls will have a flat bottom from resting on the cookie sheet. Insert the stick into this end so the top will be round.

Carefully insert the cake ball into the candy coating by holding the lollipop stick and rotating until covered. Once covered, remove and softly tap and rotate until the excess chocolate falls off. Don’t tap too hard or the cake ball will fall off, too. Immediately cover with sprinkles before the chocolate has a chance to set, then insert in a styrofoam block to harden.

You want the chocolate to come over the platform you created when inserting the chocolate-dipped stick, but you don’t have to cover it all the way to the stick.

Tap off the excess chocolate.

Add sprinkles before the chocolate has a chance to set.

I wrap my styrofoam board in plastic wrap to keep it clean so I can reuse it.

See the two hiding in the corner?

I ran out of sticks so I just made these two into cake truffles. To do this, drop one ball at a time into the chocolate and lift out with a fork, tapping off the excess chocolate. Place on wax paper to set.

This video illustrates the dipping process. Forgive my PJ’s–I made these first thing in the morning. OK, it was afternoon. I’m lazy on Saturdays. And every other day. Once the chocolate has set, put a cello bag over the top and tie the neck with some curling string and tie into a bow or curl.

I found these at Wal-Mart in the cake decorating section near the wedding supplies

Recipe Source: based on Bakerella’s recipe & instructions

*Update 1/19/12: I have disabled comments on this post, since there are over 400 and many of them are the same questions asked and answered over and over again. If you have a question, please refer to the FAQ. Thank you!*

Italian Green Beans

Posted on

https://i0.wp.com/a4.ec-images.myspacecdn.com/images02/117/cc0723446dc848b197e5811472625865/l.jpg

I’m often prone to exaggeration, but I’m telling you the honest-to-goodness truth when I say I eat these green beans a minimum of five times a week. The green beans and olive oil are so healthy and adding in the seasonings just makes them wonderful. I love them so much and they’re so easy to make, I bring them with me every day for lunch! In fact, my green bean infatuation has become a long-standing joke with my co-workers. They used to make bets on whether or not I’d brought the green beans but now they don’t bother. They know that no matter what else I’ve brought, the green beans will accompany it. They watch me heating my food with knowing smiles and slowly shake their heads as I take my seat.

I smile back and eat them in blissful reverence.  They wouldn’t mock if they knew what they were missing.

https://i0.wp.com/a3.ec-images.myspacecdn.com/images02/132/e60f339263b145b28476b7f5c2d4e812/l.jpg

Italian Green Beans

Printable recipe
Printable recipe with picture

1 lb. green beans (fresh, frozen or canned all work)
2 Tablespoons extra virgin olive oil
1 packet Italian dressing mix

Cook/heat the green beans, drizzle with olive oil and sprinkle the dressing mix over the top. Toss together and serve hot. To make an individual serving, I heat a can of green beans (yes, a serving to me is an entire can!), drizzle with a little EVOO and then sprinkle as much dressing mix as I want.

Recipe by Veronica Miller

Honey Oatmeal Bread


**Note: This post is an eyesore but I don’t want to change the content because I’m keepin’ it real.  This is how the original post looked and read, and I want to be able to read it again ten years from now and cringe as much as I’m cringing now. :)  (Although I am adding a new photo of this in rolls-form, and plan to add more next time I make this into bread again.)

I will let you in on the people I’m identifying here.  This was back in my MySpace days, where I originally posted this, when I was friends with a couple gals who went by Red (Kim) and Kitchen Bitch (Krista).  Red’s white bread was the first yeast bread that required kneading that I’d ever made.  This was the second one and it is still my favorite after three years of baking with yeast.  It has the best, softest, texture and an incredible taste.  I hope you overlook the bad photos and delirious writing and make it!**

Well I’ve made Red’s bread which got me over my fear of making it, so I decided to tackle the Bitch’s bread…Kitchen Bitch, that is!  :)  Kim can have “Red’s Bread” and Krista can have “Bitchin’ Bread”–am I a great marketing schemer or what?  If you guys ever do open bread shops, I want 10% of your profits. Ha!

(It’s after 1 AM and I’m sleep-deprived.  In case you didn’t notice.)

OK, so Krista sent me this recipe quite a while back, but since the directions called for a stand mixer with dough hooks (which I don’t have) and I was scared to make bread in the first place, let alone try to modify a recipe to suit my lack of kitchen apparatus, I saved it for a later date.

The date came today.  Emboldened by my most recent success with the white bread, I decided I was going to go for the Honey Oatmeal Bread, despite my lack of dough hooks and despite the fact that it was nearly 11 PM.  It was a huge success and totally worth staying up for–even better than my first bread attempt!  The taste is unbelievable and the texture is crazy soft.  I’m in love.  I wish I had a good camera to show off the beauty of these loaves, but you can get a general idea from the back-up camera that I’m using.

Honey Oatmeal Bread
from KitchenAid

1 1/2 c water
1/2 c honey
1/3 c butter or margarine
5 1/2 to 6 1/2 c all-purpose flour
1 c quick cooking oats (Krista says rolled oats work fine too)
2 t salt
2 pkgs active dry yeast or 4 1/2 tsp jarred yeast
2 eggs
1 egg white
1 T water
Additional oatmeal for decoration (optional)

Place water, honey, and butter in small saucepan. Heat over low heat until mixture is very warm. (120-130 F)

First place oats, then 5 c flour, salt, and yeast in mixer bowl. Attach bowl and dough hook to mixer. Turn to Speed 2 and mix about 15 seconds.

Continuing on Speed 2, gradually add warm mixture to flour mixture and mix about 1 minute. Add whole eggs and mix about 1 minute longer.

Continuing on Speed 2, add remaining flour, 1/2 c at a time, and mix about 2 minutes or until dough starts to clean the sides of bowl. Knead on Speed 2 about 2 minutes longer.

Place dough in greased bowl, turning to grease top. Cover (I use plastic wrap) and let rise in a warm, non-drafty place (I use my oven with the light on) about 1 hour or until doubled in bulk. Sometimes this takes longer than 1 hour. Let it go until it has doubled.

Punch dough down and divide in half. Shape each half into a loaf and place in greased bread baking pans. Cover (I use a clean dish cloth for this) and let rise again in a warm, draft free place (oven again) until doubled in bulk…usually an hour, sometimes a bit more.

Beat the egg white and water and brush the tops of loaves GENTLY. Sprinkle with oatmeal if desired. Bake at 375 F (preheat the oven so it is up to temp) for 30-40 minutes. Remove from pans immediately and cool on wire racks.

Krista recommends brushing the crust with butter or margarine after removing from pans and so do I.

Yields 32 servings (16 slices per loaf). Nutritional info per slice: 134 cal, 4 g pro, 24 g carb, 3 g fat, 13 mg chol, 162 mg sod

Veronica’s Notes:  To make this by hand, mix the dry ingredients together in a large bowl.  Beat the eggs in a small bowl.  Pour in warm liquid and mix with a spoon until blended, then dump in the beaten eggs and fold the dough over and over until all the egg is incorporated and you’ve got a ridiculously sticky mass attached to your hand.  Add the remaining flour 1/2 cup at a time, kneading it in.  I just knead my bread dough in the bowl to keep from dirtying another surface.  Once you have kneaded in all the flour and continued to knead for a few minutes, follow the instructions on the recipe.   I used instant yeast so I was able to skip the first rising and go straight to shaping the halves into loaves and sticking them in the pans.  Krista wouldn’t recommend this and she’s probably right that using regular yeast and allowing the bread to rise longer develops a fuller flavor, but I seriously can’t imagine bread getting any better than this.  If it’s better her way, the taste would probably give me a heart attack so it’s partly in the interest of my own health that I’m sticking to my own method.

Black Rice Pudding

Posted on

This stuff is just amazing.  I adore it!  The coconut milk and sugar makes it a little heavy on the calories, but I justify the splurge by reminding myself that the black rice is chock full of antioxidants, even more than blueberries!

Commonly served for breakfast in parts of Southeast Asia, this dish also makes a great dessert. Chinese black rice, sometimes called forbidden rice, works well, but if you live near a Southeast Asian market you can use this same method with the more traditional Thai black sticky rice.

If you can’t find any kind of black rice, substitute brown rice (not quick-cooking) — it will result in a thicker, light-colored pudding but will still be delicious.

Black Rice Pudding

Printable recipe

1 cup black rice
1/2 teaspoon salt, divided
1/2 cup sugar
1 (13 1/2- to 15-oz) can unsweetened coconut milk, stirred well

Bring rice, 3 cups water, and 1/4 teaspoon salt to a boil in a 3 to 4-quart heavy saucepan, then reduce heat to low and simmer, covered with a tight-fitting lid, 45 minutes (rice will be cooked but still wet). Stir in sugar, a scant 1/4 teaspoon salt, and 1 1/2 cups coconut milk and bring to a boil over high heat, then reduce heat to low and simmer, uncovered, stirring occasionally, until mixture is thick and rice is tender but still slightly chewy, about 30 minutes.

Remove from heat and cool to warm or room temperature, stirring occasionally, at least 30 minutes. Just before serving, stir pudding and divide among 8 bowls. Stir remaining coconut milk and drizzle over pudding.

Recipe source: Gourmet, December 2005

Lemony Orange Cake

Posted on

We recently celebrated my Dad’s 61st birthday and I meant to only provide a Banoffee Pie, but I’ve been in an experimental baking mode lately and we ended up having a dessert-athon with three cakes in addition to the pie…all for only 8 guests!

The surprise favorite turned out to be this Lemony Orange Cake.  It is heavier than a regular cake, but lighter than a pound cake and extremely moist with a wonderful orange glaze that locks in the moisture.  The citrus flavors make it the perfect summer treat.


Lemony Orange Cake

Printable recipe

Cake
1 (18.25 ounce) package yellow cake mix
1 (3 ounce) package instant lemon pudding mix
3/4 cup orange juice
1/2 cup vegetable oil
4 eggs
1 tablespoon orange zest
1 teaspoon lemon extract

Glaze
1/3 cup orange juice
2/3 cup white sugar
1/4 cup (1/2 stick) butter

Grease & flour a 10 inch Bundt pan. Preheat oven to 325 degrees F (165 degrees C).

In a large bowl, stir together cake mix and pudding mix. Pour in the 3/4 cup orange juice, oil, eggs, orange zest, and lemon extract. Beat on low speed until blended. Scrape bowl, and beat 4 minutes on medium speed. Pour batter into prepared pan.

Bake in preheated oven for 50 to 60 minutes. Let cool in pan for 10 minutes, then turn out onto a wire rack and cool completely.

Once it’s cool, fit the Bundt pan back over the cake and flip it over so the cake is back in the pan.  In a saucepan over medium heat, cook 1/3 cup orange juice, sugar and butter until it comes to a boil and continue to boil for two minutes. Pour the glaze over the bottom of the cake and use a spatula to spread to the sides so that it drips  down evenly on all sides and on the inside circle.  You don’t want all the glaze sitting on top, you want it to drip down so it can soak into the cake evenly.  Allow to soak for 10 minutes, then place a serving plate on top of the pan & flip it over so that the cake comes out on the plate.  Glaze will dry so that the cake can be covered with plastic wrap until serving.  If made more than two days in advance, store in the fridge.  Don’t worry–it will stay moist even if made several days ahead!