RSS Feed

Tag Archives: easy

Easy Salisbury Steaks with Onion Gravy

Posted on

This is how you know that food might be way too important to you.  You make a bucket list.  Which entirely consists of recipes you want to make before you die.  Or in my case, before I turn 40.  Lots of young food bloggers have a 30 Before 30 list, but since I’m older I made a 40 Before 40.  I don’t turn 40 for another 8 years (OK, 7 years and 2 months if you want to get all technical and make me feel even older) so I should totally be able to do it, right?

Check out my 40 Before 40 list here.

Salisbury steak just so happens to be one of the recipes on my bucket list.  Number 13 to be exact.  I don’t know what it is about the number thirteen this year but it, and three (I just realized while talking about my age that I’ll be 33 when Joshua is born-more three’s!), just keep showing up!  Anyway, I made the list several months ago and am happy to finally be able to cross off one of the recipes on it.

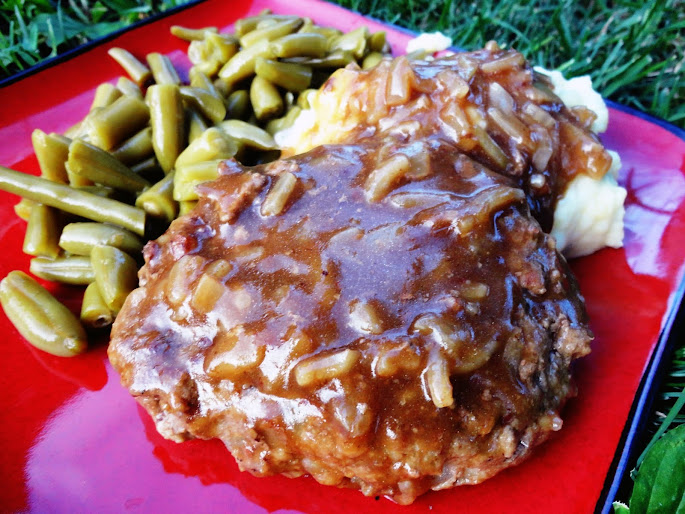
And what a delicious one it was!  This is another goodie from The Better Baker, who makes a lot of “my kind” of foods (comfort food) but usually they are healthier options.  My ultimate comfort food is meatloaf with mashed potatoes and gravy and Salisbury steak is sort of like little individual meatloaves with gravy so this was just a big plate of comfort for me.  These were so good!  So good.  Like so good, guys.  And unlike some more complicated recipes (which I’m sure are even more delish, however), they come together really quick and easy.  I had my Salisbury steaks and mashed potatoes from scratch ready in half an hour.  Dinner time!

Easy Salisbury Steaks with Onion Gravy

Printable recipe
Printable recipe with picture

1 egg
1 medium onion, finely chopped
1/2 cup crushed saltine crackers (about 15 crackers)
1/2 teaspoon pepper
1 lb. lean ground beef
1 tablespoon canola oil
1 (1 oz) envelope beefy onion soup mix*
2 tablespoons all-purpose flour
2 cups cold water

In large bowl, combine egg, onion, saltines and pepper. Crumble beef over mixture and mix well. Shape into 5 oblong patties.

Heat the oil in a large skillet over medium-high heat. Add the patties and sear each side until browned, about 3 minutes per side. Remove patties to a platter and cover with foil to keep warm.

In small bowl whisk together soup mix, flour and water; stir into skillet. Bring to a boil, stirring often. Return patties to skillet. Reduce heat; cover and simmer 5 – 7 minutes or until meat is no longer pink.

Serve with mashed potatoes and a veggie. I served mine with sour cream and chive mashed potatoes.

*The original recipe calls for regular onion soup mix, but I found a beefy version available for a limited time at Aldi.  If you can’t find the beefy kind, I’m sure it’s just as good with regular!  The color of your gravy will just be lighter.

Recipe source: adapted from The Better Baker

Bread Machine Rye Bread

Posted on

Last week I mentioned my favorite food in the whole world is a cheddar cheese sandwich with tomatoes, lettuce & onion.  Unlike other sandwiches, which I like on any bread, this one has to have a particular kind: either Ezekiel 4:9 Sprouted Grain Bread or rye bread.  We made this sandwich a lot growing up, and we only had Ezekiel bread at home, despite my yearning for white bread.  But now Ezekiel is my all-time favorite bread (go figure) and I love this sandwich on it!  But I have to say, the flavor of rye goes so nicely with cheddar cheese that I choose it over Ezekiel bread most times.

I got this recipe from my friend, Erin, in 2009 and it’s the only rye bread recipe I’ve ever made because I just love it so much I have no reason to try another.  I’ve been making it for several years now so I thought it was about time I shared the recipe!

This loaf was baked in the bread machine and lighter in color, probably because I made my coffee a little too strong in the latest loaf.

A note regarding the molasses: if you use unsulfured/unsulphured blackstrap molasses, it adds a good dose of iron, calcium, and potassium to your bread!  (1 tablespoon contains 20% of your daily calcium and iron, and 17% of your potassium.)  It has a little bit of a different flavor from regular molasses, but I used it in my most recent loaf and it tastes just as good as ever so you may as well boost your nutrition with the good stuff! I got mine at a health food store but they might even have it at the regular supermarket.

Bread Machine Rye Bread

Printable recipe
Printable recipe with picture

1 1/3 cups strong coffee
1/4 cup vegetable oil
1/4 cup molasses
1 1/3 teaspoons salt
1 1/2 tablespoons caraway seeds
1 cup rye flour
1 cup whole wheat flour
2 cups bread flour (I usually use all-purpose)
2 tablespoons unsweetened cocoa
1 1/2 tablespoons brown sugar
2 1/2 teaspoons rapid-acting bread machine yeast

Fill 2-lb bread machine pan with ingredients in the order listed, and bake according to bread machine manufacturer’s directions. If you wish to bake your bread in the oven, run the dough cycle. Once complete, dump onto a floured surface and shape into a loaf with floured hands, kneading in a bit more flour if the dough is too soft. Place in a 9×5 loaf pan (or two 8×4 1-lb bread pans for small loaves), covering with a towel and allowing to rise again until doubled in size. Bake at 350F for 30-40 minutes, or until the loaf sounds hollow when removed from the pan and tapped on the bottom. Remove to cooling rack and rub all over with a cold stick of butter. Allow to cool completely before slicing.

Veronica’s note: I’ve always made this bread with the three different flours, but it is probably OK to use another cup of rye in place of the whole wheat.

Recipe source: Erin N.

The Masters Pimento Cheese

Posted on

Me and pimiento cheese go way back.  Although Mom fed us a very healthy diet growing up, cheese (and butter, thank God) was always present in our house and to this day, my favorite food in the whole world is a cheddar cheese sandwich with lettuce, tomato, and onion.  Mom would occasionally indulge in one of her favorite treats and buy a tub of pimiento cheese, and I was always more than OK with that.

But there’s quite a difference between store bought and homemade!  I didn’t try making it at home until a few years ago, and haven’t looked back.  I used to follow a Paula Deen recipe that’s quite good, but I have now found an even better recipe.  In fact, I’d go so far as to say it’s the BEST, or at least the best I’ve tried.

This one includes Parmesan cheese, which I never would have thought to put in pimiento cheese, but it makes it so good!  You just gotta try it.

The Masters Pimento Cheese

Printable recipe
Printable recipe with picture

1/4 cup (2 oz) cream cheese, room temperature
1/2 cup (4 oz) mayonnaise
1/2 cup (4 oz) sour cream
1/8 tsp garlic powder
¼ tsp minced dried onion
2 cups (8 oz) shredded sharp cheddar cheese
1/2 cup (1 ½ oz) shredded Parmesan cheese
1 (4 oz) jar diced pimientos, drained
Salt to taste (I don’t use any)

Using a mixer, whip the cream cheese until creamy, then beat in the remaining ingredients.  Beating them will help break down the cheese and pimientos.

Veronica’s note: I used reduced fat cream cheese, mayonnaise, and sour cream and you couldn’t tell – it was so good.

Recipe source: adapted from Plain Chicken

Special Egg Salad

Posted on

I have a couple easy and delicious sandwich fillings for you this week!  This one I got from one of my favorite people, Marsha of The Better Baker.  And her last name just so happens to be Baker – how cute it that?  Anyway, I bought her cookbook several months ago (she has a new one coming out soon, too!) and she made a list of her family’s favorite recipes in it for me.  This was one of the first one I picked – her description of it being the “best egg salad” sold me.

Usually I make my egg salad crunchy, with celery, red, green, and yellow or orange peppers mixed in.  I just like to have some crunch that boosts the nutrition.  But if I made enough for leftovers, it tended to get watery from the veggies and it’s a pretty loose salad to begin with because I only used Miracle Whip as the binder.  Although this one has absolutely no vegetables in it, it really is the best egg salad I’ve ever had.  It’s got a wonderful, creamy texture (the cream cheese is just brilliant here), and incredible flavor.  And if you serve it the way Marsha suggests, on toasted wheat bread with lettuce, you do get a very satisfying crunch.  I served mine on multigrain bread and thought it was just over-the-top wonderful.

Photo courtesy of Jaclyn H.

Another tip for this salad – to make easy work of the eggs, you can use a pastry blender as Marsha mentions in her cookbook, or you can try using a cooling rack! My friend, Jaci, introduced me to this idea and at first I thought I’d never try it, because chopping eggs isn’t that hard. But when it came to dicing up six eggs, pushing them through my cooling rack only took a few seconds and was a real time saver. Thanks, Jax!

Special Egg Salad

Printable recipe
Printable recipe with picture

1 (3 oz) package reduced-fat cream cheese, softened
1/4 cup reduced fat mayonnaise or Miracle Whip*
1/2 teaspoon sugar*
1/4 teaspoon onion powder
1/4 teaspoon garlic powder
1/8 teaspoon salt
1/8 teaspoon pepper
6 hard boiled eggs, chopped

In a small mixing bowl, beat the cream cheese until smooth. Add the mayonnaise, sugar, onion powder, garlic powder, salt and pepper; fold in the eggs. Cover and refrigerate at least one hour before serving. Will keep for several days in refrigerator.

*You probably won’t need the sugar if you use Miracle Whip since it already has sugar added.

Veronica’s note: Although my method of hard-boiling eggs probably isn’t the best one, it works for me: put eggs in a pan and cover with an inch of water.  Add several dashes of salt (I heard this helps with something, maybe peeling them, but can’t remember. I just do it out of habit.)  Bring to a boil, then reduce heat to medium-high and continue to boil for 15 minutes.  Carefully drain off water and fill pan with cold tap water.  Pour off water and fill again with cold tap water.  At this point you can add ice to quickly cool the eggs, or keep the cold tap water running so that the pan is continually being cooled. Once  the eggs have cooled to room temperature or lower, which shouldn’t take too long, you can peel them and continue with the recipe.

Recipe source: The Better Baker

Creamy Mushroom-Parmesan Chicken

Posted on

Would you like to know the recipe I use from my blog more than any other?  You might be surprised.  It’s Breadless Breading, a gluten-free alternative to breading for meats.  It has such incredible flavor (click the link to check out the recipe and you’ll see why it’s so flavorful) that I use it all the time, usually coating tilapia with it before cooking it in olive oil on the stove top for a 5-minute dinner alongside some microwaved veggies.  This coating is also fabulous on chicken!

This is a super simple recipe but oh so delicious!  The breading does all the flavoring for you–when you have a batch of it in the fridge, you can use it in so many ways and you will always have a delicious meal.  I’m also going to give the “recipe” for the corn in the photo that is my husband’s creation, which is only two ingredients and so incredible!  The heat and flavor of the sriracha is a nice contrast to the sweetness in the corn.

Creamy Mushroom-Parmesan Chicken

Printable recipe
Printable recipe with picture

Boneless, skinless chicken breasts, cubed
Breadless Breading
Olive oil
1 can reduced-fat cream of mushroom soup

Heat a tablespoon or two of olive oil in a skillet, enough to coat the bottom. Lightly coat the chicken chunks with Breadless Breading and add to the heated pan, cooking on all sides until cooked through. Add the cream of mushroom soup, stir, then stir in enough Breadless Breading to thicken and flavor the sauce. Serve hot.

For the Sriracha Corn: add a touch of sriracha (start with a little and add more to taste) to a can of corn and stir together in a microwave-safe bowl. Microwave until hot and serve immediately.

Easy Cream of Tomato & Red Pepper Soup

Posted on

I know you expected a pregnancy update today but the weekend was so busy I forgot to have Den take a picture of me, and what is an update without a picture? Boring.  So I hopefully will have that tomorrow. In the meantime, here’s a soup recipe for you.  (P.S. Cookies in July swappers, I will be sending your matches later today!)

While I enjoy baking year-round, I try not to turn the oven on in the summer for dinner (I save it for more important stuff, like pie!) and lean toward simple stovetop meals like last week’s Easy-Peasy Cheesy Tuna Noodle Bowls, or grilled cheese with tomato soup.  I usually wouldn’t be eating hot soup in the summer, but baby is digging it lately and who am I to decline to deliver “womb service?”  I have a feeling I’m going to be turning on the oven for dinner if baby decides s/he needs some sort of casserole, too.

from www.umberttheunborn.com

I’m not above heating up canned soup (I love the roasted red pepper and tomato soup in the cartons you can get at Aldi now!), but I came up with this recipe when I had a tomato soup emergency (i.e. I really wanted needed it!) and no canned tomato soup, using ingredients I found in the cupboard and fridge.  Emergencies make the most delicious dinners sometimes!

Easy Cream of Tomato & Red Pepper Soup

Printable recipe
Printable recipe with picture

1 (14.5 oz) can Italian style diced tomatoes (with basil, garlic & oregano)
½ cup jarred roasted red peppers, drained
1/3 cup V-8 Hot & Spicy juice (optional, will be thicker without)
1/3 cup heavy cream
2 tablespoons granulated sugar, or to taste
½ teaspoon salt

Combine all ingredients in a medium saucepan and heat to simmering. While heating, use an immersion blender to puree the mixture. Serve hot.

Serves 2-3

Easy-Peasy Cheesy Tuna Noodle Bowls

Posted on

I haven’t been wanting to cook lately.  And when I do, it’s super simple stuff like this most of the time–a stove top recipe that starts with a box.  While I’ve been making this for over a decade, this is the first time I considered sharing it.  I finally realized there are probably a lot of busy people out there who don’t mind using a convenience food item now and then if it means dinner in 15 minutes. You can easily double or triple this recipe to feed a family, and it still only takes 15 minutes!

My best friend’s Mom used to make this all the time and I thought she was a genius because the addition of tuna and peas really ups the health-factor of boxed macaroni and cheese, while still tasting wonderful.  I gobbled this up alongside her children, so I think it’s safe to say this is kid-approved.  The only change I’ve made is to add in extra cheese to help flavor the added ingredients a little more, and a little mayonnaise to make it extra creamy (the latter is a new addition and the photos show it without – it’s so much more creamy with it!).

So yummy, so easy!  So cheesy! :)

Easy-Peasy Cheesy Tuna Noodle Bowls

Printable recipe
Printable recipe with picture

1 box macaroni and cheese
milk and butter as called for on box (usually 1/4 cup each)
2 ounces (or more) finely shredded cheddar cheese
2 tablespoons mayonnaise
1 can of tuna packed in water, drained very well
1 cup frozen peas, microwaved until hot

Cook pasta according to box directions. Meanwhile, heat peas in the microwave until hot. Drain the macaroni when it has the bite you desire, then stir in the butter until melted and combined. Add the milk , cheese, mayonnaise, and the cheese powder from the box and stir until blended and the cheese is melted. Add the tuna and peas, and stir until combined. Spoon into bowls and serve hot.

Serves 2-3

Raspberry Zinger Poke Cake

Posted on

So I’ve turned into a food blogger rebel.  I don’t cook or bake, and when I do its favorites I’ve already posted recipes for.  Also, I’ve been eating a lot of Taco Bell.  Bad food blogger!

Speaking of Taco Bell, I can’t believe I’ve managed to keep it under wraps for so long, but I think I might have ITBES.  I may or may not drink the sauce packets to get me through to my next Taco Bell fix.  I even put the sauce on my hard boiled eggs and I can almost pretend I’m eating real Taco Bell when I’m snacking at work.  I feel a Taco Bell intervention coming my way, so I’m packing my bags, ready to flee to the nearest Taco Bell to set up permanent residence.  Pretty sure the employees will protect me from you crazy non-ITBES people.   YOU CAN’T MAKE ME QUIT TACO BELL!

So while I’m totally out of control when it comes to doing all the things a good food blogger should do, I at least have a few photos saved from the days when I was a good girl and taking photos of things I’d baked and cooked.  Such as this Raspberry Zinger Poke Cake.

I made this for Den’s birthday last December, right about the time the last Raspberry Zingers were disappearing off store shelves.  Sad times for Raspberry Zinger lovers.  Well cry no more, for you can still get your fix with an easy poke cake!  It’s not exactly the same, but it’s good stuff, nonetheless.

I created this with help from Suzie’s recipe and Renee’s recipe, and it couldn’t be easier.  Poke cakes are especially good for warmer weather (if you are fortunate enough to be enjoying some right now) because they are served cold, and are really refreshing on a warm day!  Or, let’s be honest, it’s also quite nice on a cold December day as well.  At least we thought so. :)

Raspberry Zinger Poke Cake

Printable recipe
Printable recipe with picture

1 white or yellow cake mix* (also water, vegetable oil and eggs/eggs whites as instructed on box)
1 box (3 oz.) raspberry-flavored gelatin
1 c. boiling water
1/2 c. cold water
1 container (8 oz.) Cool Whip, thawed
¾ cup shredded sweetened coconut

Bake cake according to package directions and cool completely. Pierce cooled cake all over with a fork. In a small bowl, stir gelatin and boiling water until sugar is dissolved. Stir in cold water. Pour over cake, cover, and refrigerate 2 or more hours (overnight is fine).  Frost with whipped cream and sprinkle coconut over the top. Keep refrigerated until ready to serve. Serve cold and refrigerate any leftovers.

*Pillsbury brand not recommended.

Recipe source: adapted from Two Dogs In The Kitchen,  with inspiration from My Kitchen Adventures.

Key Lime Pie


So happy to return today for the Secret Recipe Club‘s Group C reveal day!  Life has been keeping me pretty busy, but I’ll talk about life another day.

Today I need to tell you about this Key Lime Pie.  This amazing key Lime Pie.  I was assigned to Mother Thyme‘s blog this month, which is a new-to-me blog, and I was really excited to peruse it.  Jennifer’s blog is attractive, organized (yay for a recipe index!), and her photos are beautiful, so it was a real treat!  Not to mention that most of the recipes are her own creations!  I truly admire bloggers like Jennifer who mostly post their original creations, since I find that difficult, personally.  My creations are very rarely blog-worthy. LOL!

So when I ran across this key lime pie recipe, I was excited because Dennis loves Key Lime Pie and I’ve been wanting to make him one for a long time, but I was also very skeptical.  The main ingredients are sweetened condensed milk and lime juice.  And it only calls for for 9 minutes of baking.  I thought it was mis-typed, and eggs and extra baking time were missing.  I mean, how can two very liquid hardly-baked ingredients make a thick, creamy filling?

So I searched online recipes and found some similar ones that didn’t even require any baking.  What?  Really?  Wouldn’t this make soup pie?

I decided to give it a go, and I’m so glad I had faith in Mother Thyme!  This is kitchen science, folks, and utterly fascinating.  Apparently when the acidic lime juice is combined with the condensed milk, it thickens it, because as soon as I whisked it in, the two liquids turned into a thick, pudding-like filling.  Amazing!  After just two hours, it was ready to slice, and I didn’t even bake it at all!

The taste?  Just as amazing as the magical thickness.  Perfect balance of sweet and tart!  I’m just so excited by this pie, you guys, you don’t even know.  It’s so easy to make, so magical, and so delicious.  You could even say…it’s magically delicious.  :)

I made it a little festive by adding some food coloring to intensify the green (it’s really more ivory without the food coloring), and added shamrock sprinkles for a St. Patrick’s Day look.  This would make a nice change for a St. Patty’s day dessert since most of them feature booze and/or mint.  But even if you don’t try it for a holiday (would also be cool for Christmas with red sprinkes!), it’s great any time of year–especially spring and summer.  Dig in!

Key Lime Pie

Printable recipe
Printable recipe with picture

Crust
1 1/2 cups crushed graham crackers
5 tablespoons melted butter
4 tablespoons granulated sugar

Filling
3 (14.5 oz) cans sweetened condensed milk
2 drops green food coloring + 1 drop yellow (optional)
1/2 cup sour cream
1 cup key lime juice (or regular lime juice)
2 tablespoons freshly grated lime zest (from about 2 large limes)

Garnish
Whipped cream or Cool Whip
Extra lime zest or sprinkles

Preheat oven to 350 degrees. Mix crumbled graham crackers, butter and sugar in a 9” spring form pan or a deep dish pie plate and firmly press evenly over bottom and sides of pan. Bake for 8 minutes. Let cool before adding filling.

Meanwhile, combine sweetened condensed milk and food coloring if desired, mixing until totally blended. Add the sour cream, lime juice and lime zest and whisk until thickened and completely incorporated. Pour mixture in to cooled crust and refrigerate 2 hours or until ready to serve.

If desired, just before serving, pipe whipped cream around the edge of the pie (I used Wilton tip 1M) and garnish with some extra lime zest or festive sprinkles of your choice.  Or you can just serve with a dollop of whipped cream on top.  Refrigerate leftovers.

Veronica’s note: never mind my shallow pie dish, do not use a regular pie dish or you will have too much crust and filling, as I did (I made a second small dish of pie with my leftovers). Do as I say, not as I do. ;)

Recipe source: Mother Thyme

You can see all the other Group C SRC recipes by clicking the linky man below:


Easy Pumpkin-Chocolate Chip Cookies/Muffin Tops {3 Ingredients}


This is one of those super easy recipes that many people seem to know about, but no one knows where it originated.  While there are many online sources for the recipe, I got mine from my friend Teri, who just spouted off the short list of ingredients during a conversation about holiday baking, and I decided I had to try them myself.

Teri calls these cookies but I call them muffin tops because they truly are the texture of a muffin, not a cookie.  In fact, I’ve seen people (hi, Jorie!) use this same recipe (with and without the chocolate chips) to make full-blown muffins, so there you go.  Bake them whichever way you like and no matter what you call them, they’re delicious, and a great last minute treat to add to your holiday spread.

Easy Pumpkin-Chocolate Chip Cookies

Printable recipe
Printable recipe with picture

1 (18.25 oz) box spice cake mix
1 (15 oz) can pumpkin puree
1 (12 oz) bag semisweet chocolate chips (I used mini because I made small cookies)

Preheat oven to 350F and line cookie sheets with parchment or silpat mats.

Empty cake mix into a mixing bowl and whisk well until there are no lumps. Mix in the puree, then stir in the chocolate chips. Use a cookie scoop to portion the dough out onto the prepared baking sheets. Bake for 10-12 minutes until just firm. Remove to cool on a wire rack and repeat with remaining dough.

Recipe source: Teri B.

*******

I hope you guys have a happy Thanksgiving and if you are traveling for the holiday, travel safe!  I don’t think I’ve mentioned it before, but this is the first year since meeting my husband that we are not going to his parent’s house for Thanksgiving.  His cousin Mike (who was his best man at our wedding) got married in Jamaica and their wedding reception is this Saturday…and I’m making the cake!  It’s been crazy trying to get it baked without taking time off but I will have all Thursday and Friday to finish it so it’s all good…still…please pray for me!! lol!  If you know my track record, you know I need every bit of help I can get. :)  (If you don’t know my track record, you can see both my wedding cake failures here.)

One last note, I’m ending the fundraiser for Suzie on Saturday because she now has her hospital & doctor bills from her first hospital stay ($9,600 total) and not all of them are accepting payments–some are threatening to send her account to collections if she doesn’t pay in full.  So I’m ending it a little earlier than I planned so she can get at least enough to cover those that are threatening her.   If you wanted to help but forgot or weren’t able to before, if you are able to give even a few dollars before the fundraiser ends, I would so greatly appreciate it.  I would love it if we could reach $2,000 by Friday night!  And my offer for the carrot cake recipe still stands–I will email everyone who makes a minimum $5 donations my top-secret blue ribbon carrot cake recipe!  You can click here to make a donation.

Again, happy Thanksgiving! Have an extra bite of stuffing for me…and pecan pie too. :)