RSS Feed

Raw Double Chocolate Brownie Bites

Posted on

I joined The Secret Recipe Club at the end of May, which was too late to participate in June, so I was super eager to finally get my assignment for July.  In this club, each month the participating bloggers make a recipe from another participant’s blog.  The blog is assigned secretly and at random, so no one else knows who’s making something from their blog that month.  I found the whole idea really fun and exciting!  (Don’t judge me.)

I was assigned to make a recipe from Ginger Lemon Girl’s blog, and my first reaction was a mixture of both trepidation and anticipation.  Carrie follows a gluten-free diet, and since I don’t have any dietary restrictions, I wasn’t sure if the recipes would appeal to me, but I knew I could adapt them if necessary and was ready for the challenge.  Once I started browsing her archives, I quickly realized that her recipes were good, wholesome foods that anyone could enjoy, and some of them were naturally gluten-free because no flour was involved.  Like this one!

When I came across Carrie’s recipe for Raw Chocolate Brownie Bites, I immediately thought of my love for Fudge Babies, and knew it was the one I’d have to make.

I made the recipe as it was written the first time (pictured above) and really liked it (maybe that’s an understatement, seeing as how I ate half the batch the first day!), though adding as much agave nectar to sweeten them as I liked (2 T) made them too soft for me. I wanted them chewier and a little sweeter (i.e. more dates!). I also wanted more of the chocolate dough so that it would completely cover the bottom of a loaf pan. The first batch, spreading it to the thickness I wanted, filled only 2/3 of the bottom of the pan. So I took Carrie’s rockin’ recipe and tweaked it a bit, and couldn’t help adding some mini chocolate chips to make them doubly chocolatey!  The chocolate chips only add 16 calories per Brownie Bite and don’t change the points, so I really recommend you put them over the top to make these bites, well, over the top. :)

For those unfamiliar with raw desserts, they are a lot like Larabars, but better (at least I think these are).  If you’ve never had those either, now’s your chance to see what all the fuss is about.  This isn’t like eating a candy bar or any sort of processed sweet, because it’s all-natural, raw, and much healthier (not to mention allergy-friendly), but they are very good!  I bet even your kids will love them.  Give them a try and see if you don’t agree.

Raw Double Chocolate Brownie Bites

Printable recipe
Printable recipe with picture

1 cup pitted dates
1 1/3 cups raw nuts (I used 2/3 cups each almonds & pecans)
¼ cup cocoa powder
½ teaspoon Fleur de Sel or kosher salt
~or ¼ teaspoon table salt
1 teaspoon vanilla
1/3 cup mini semisweet chocolate chips

Soak the dates in a bowl of hot tap water for five minutes; drain well. (Skip the soaking step if you are using Medjool dates.) In a food processor fitted with the blade attachment, grind the nuts until very fine. Add the drained dates, cocoa powder, and salt. Process for a minute or two, until nuts are very fine and the mixture sticks together quite easily, if it’s not already coming together in the bowl. With the food processor running, add the vanilla through the feed tube and continue processing until the mixture starts to form a ball. Just run it for another 10-30 seconds and if it doesn’t form a ball, check the consistency and see if it will stick together when pinched. If not, add a teaspoon of water and continue processing, adding more water if necessary (it shouldn’t be) until the mixture is sticky. Pat the chocolate dough into a loaf pan. It is OK if oil separates a little and forms a layer on top; it will soak back down into the brownie dough while it sits in the refrigerator.   Sprinkle the chocolate chips over the top and pat them down into the surface so that they will stick. Cover the pan with plastic wrap and refrigerate for 2-3 hours. Cut into 18 squares (6 rows x 3 rows) and enjoy cold.

Makes 18 Brownie Bites

Per Brownie Bite: 107 calories; 7 g fat; 1.1 g saturated fat; 1.6 g polyunsaturated fat; 3.8 g monounsaturated fat; 0 g cholesterol;  33.2 mg sodium; 151 mg potassium; 12 g carbohydrates; 2.4 g fiber; 2.1 g protein; Vitamin B-6 2%; Vitamin E 8%; Calcium 2.2%; Copper 10%; Iron 4%; Magnesium 8.4%; Manganese 21.3%; Phosphorous 5.6%; Riboflavin 3.6%; Thiamin 3.3%; Zinc 3.6%      3 Points Plus

Recipe source: adapted from Ginger Lemon Girl


Margarita Cake {Alcohol-Free}

Posted on

I got one of my favorite cake recipes, for Zesty Lemon Pound Cakes, from the back of the cardboard label that came on a Wilton pan.  So when I bought a Wilton bundt pan and found a recipe for Margarita Cake on the back, I saved it in hopes that it would be equally delightful.  Three years later, I finally got around to trying it!

This cake uses a mix, so I apologize to those who are averse to cake mixes.  If you have been following my blog for very long, you know I prefer cakes that start with a mix for not only the ease, but the flavor & texture.  (I make no apologies for my unrefined ways.)  As is the case with many doctored cake mix cakes, you can not tell it started with a mix.  The margarita mix, along with the lime zest in the cake and glaze, gives it a nice lime flavor, and the texture is incredible.  The only thing I’ve ever had that is similar to it is a sour cream angel food cake, managing to be both airy and a little dense all at the same time.  Honestly, the texture delighted me so much that I ate a second piece that I really didn’t need, just to feel it in my mouth a little bit longer.

Margarita Cake

Printable recipe
Printable recipe with picture

1 package (18.25 oz) white cake mix
1 can (10 oz) frozen margarita mix, thawed and undiluted
3 egg whites
2 tablespoons vegetable oil
3 tablespoons finely chopped lime zest, divided
1 cup confectioners sugar
Lime juice, as desired
Coarse sugar for garnish (optional)

Preheat oven to 350 degrees F. Grease and flour a bundt pan; set aside. In large bowl, combine cake mix, thawed margarita mix, eggs and oil. Beat at medium speed two minutes. Stir in 2 tablespoons of the lime zest. Pour into prepared pan. Bake 40-45 minutes or until toothpick inserted in middle comes out clean. Cool in pan 5 minutes; invert onto cooling rack, remove from pan, and cool completely. In a small bowl, combine confectioners sugar, 1 tablespoon lime zest and enough lime juice to make a glaze; drizzle over cake. If desired, sprinkle the top of the cake with coarse sugar to resemble salt.

Makes 10-12 servings

Recipe source: Wilton

Thankful Thursdays #33: a good score

Posted on

I made a thanksgiving resolution to find something to be thankful for every day until next Thanksgiving.  Here’s what I am thankful for this week!

Thursday: That the water pump on my car wore out in the summer rather than the winter.  In the summer I can fill the radiator with water for free until we can afford to fix it, rather than buying two jugs of antifreeze a day!

Friday: Packages in the mail!  I won a cupcake pop mold from Five Great Kiddos and got it in the mail, along with two bags of candy melts, chocolate jimmies, and lollipop sticks.  I also got some extras I wasn’t expecting, like cloth flower pins from The Pleated Poppy,and a matching set of paper goodies including a journal, greeting cards, recipe cards, magnetic listpad and grommet tags.  Thank you, Susan, you are too generous!  I can’t wait to try the mold out and make some cupcake pops with it.  You all know I’m crazy about cake pops!

Saturday: That the move from our old church location to the new went smooth and fast. We were all done by 2 PM!

Sunday: The tremendous blessing of our new church building, which we worshiped in for the first time.  We have more room than we need, definitely plenty of room to grow into, it is in great shape, and we got it for almost 1/4 of the cost of its value.

“And my God will meet all your needs according to his glorious riches in Christ Jesus.” Philippians 4:19

Monday: That my sister got an order for 5,000 lip balms shipped by the deadline.  (Danielle owns a gift boutique where she sells her own bath/beauty products which you can also order online.)  She enlisted my help among many others and when I saw how much had to be done in such a short amount of time, I was a little worried about it, but we got ‘r done!

Tuesday: That I was able to use up the rest of an open package of ground venison before it went bad.  That would have killed me-I hate wasting food, especially good food!

Wednesday:  Remember that test I took a while back?  Well, I got a good score that was high enough for them to consider me for a career (permanent) position and I had my interview this morning.  I won’t know for sure for two weeks, but the interview went well and I expect to be permanent by August 1. :)

Dairy-Free White Cupcakes

Posted on

My husband and I don’t have an allergy to dairy, but we typically don’t keep milk in the house because we prefer coconut or almond milk beverages.  So when I decided to send some cupcakes to work with my husband to welcome his boss, who lives in Colorado and was coming to Wichita for the first time to stay for a week, I decided just to make them completely dairy free and see how they turned out.  I was really impressed with the results!  I’ve never made white cake without using a box mix, and I was quite pleased with how crazy moist these were, and they did not have a hint of coconut flavor, despite all the “dairy” coming from coconut.  They tasted just like regular white cake, and they were a hit with the boss and co-workers.

I wasn’t sure if these would turn out, so I made this recipe for a dozen cupcakes instead of the usual two dozen.  If you would like to make two dozen, or a two layer cake, just double the recipe.

Dairy-Free White Cupcakes

Printable recipe
Printable recipe with picture

½ cup coconut milk beverage*, room temperature (I used Silk Pure Coconut Original)
3 large egg whites, room temperature
2 teaspoons vanilla extract
1 teaspoon almond extract
1 ¼ cups all-purpose flour
1 cup granulated sugar
2 teaspoons aluminum-free baking powder*
½ teaspoon salt
½ cup refined coconut oil, room temperature*

Preheat oven to 350 degrees.  Line cupcake tin with paper liners; set aside.

In a 1-cup measure, mix together the milk, egg whites, and extracts; set aside.  In large bowl, mix remaining ingredients, except for the oil. Add the oil and mix until incorporated and there are moist crumbs, with no powdery streaks remaining.. Add all but ¼ cup of the milk mixture and beat at medium speed for 1 ½ minutes. Add remaining milk mixture and beat 30 seconds more.  Stop mixer to scrape the sides of the bowl, then beat again on medium for 20 more seconds.

Using an ice cream scoop, divide batter between prepared muffin cups.  Bake for 15-17 minutes, or until toothpick inserted in center comes out clean or with a few moist crumbs.  Cool in tin on a wire rack.  I prefer to turn mine out onto the rack after a few minutes to finish cooling so the pan doesn’t bake them too much by retaining the heat.

Once cupcakes are completely cool, frost with White Celebration Frosting, or your favorite dairy-free frosting.

Makes 12 cupcakes.

*Notes: you can use canned coconut milk and unrefined coconut oil, but this will give your cupcakes a distinct coconut flavor. If you want them to taste like white cake, please follow the recipe as written. Also, I recommend using Rumford, or another aluminum-free baking powder in recipes calling for more than a teaspoon, as the aluminum can give a very strong, unpleasant aftertaste.  This is especially true in cakes with milder flavors, like white or yellow.

Recipe source: adapted from Cook’s Illustrated

Corn, Avocado, and Black Bean Tostadas

Posted on

For some reason, before I made these tostadas, I had an aversion to chipotle peppers that came canned in adobo sauce.  I think I made one bad dish with them that turned me off, and I was hesitant to use them in anything again.  This recipe has completely turned me around!  These are the absolute best tostadas I’ve ever made.  I love how the sweet corn balances the smoky and spicy flavor of the chiles.

I really love it when I can find vegan meals that don’t require a lot of fake ingredients, and love it even more when those meals are just as delicious as a meat-centric meal.  I have to say that these tostadas beat the pants off of any tostada I’ve made with meat to date.  Although I did put cheddar cheese on these, you can leave it off for a vegan meal because you get plenty of (healthy) fat from the avocado.

This is a great summer meal because it comes together really quickly and only requires a few minutes of heat on the stovetop.  Enjoy!

Corn, Avocado, and Black-Bean Tostadas

Printable recipe
Printable recipe with picture

1 large zucchini, diced
2 cups frozen corn kernels
2-3 medium tomatoes, diced
1/3 cup red onion, chopped
¼ cup cilantro, chopped
2-3 chipotle chiles in adobo sauce, minced
2 tablespoons fresh lime juice
½ teaspoon kosher salt
8 tostada shells
1 cup refried black beans*
Shredded lettuce
1 avocado, peeled & sliced
1 cup shredded cheddar cheese

Spray a large nonstick skilled with oil and heat over medium-high head. Add zucchini and sauté 3 minutes. Add corn and cook until heated through. Remove from heat and stir in tomatoes, onion, cilantro, chipotle chiles, lime juice, and salt. Spread each tostada shell with 2 tablespoons of heated beans and top with shredded lettuce. Spoon corn mixture over lettuce, then top with shredded cheddar and slices of avocado.

*To make your own quick refried black beans, drain a can of black beans and reserve the liquid. Place beans in a food processor fitted with the blade attachment, along with 1 teaspoon cumin, 1/2 teaspoon onion powder, and 1/4 teaspoon garlic powder. Process, adding in liquid through the feeding tube as necessary to obtain your desired texture. Taste and add salt, pepper, and additional seasonings if desired.

Makes 8 tostadas.

Per tostada: 235 calories; 11.6 g fat; 27.5 g carbohydrates; 5.4 g fiber; 8.6 g protein; 6 Points Plus

Recipe source: adapted from Redbook, October 2010

Secret Recipe ClubThis recipe has actually been recreated twice by the SRC. Here is the first blogger who made it (click the box above for the second): Thru the Bugs on My Windshield

Homemade Magic Shell

Posted on

Have you ever had Magic Shell?  If you haven’t heard of it, it’s a Smucker’s ice cream topping that comes out liquid, like chocolate syrup, but hardens when it comes in contact with your ice cream, so that you have to tap and break it to take a spoonful of icecream.  It’s so cool!

My husband is obsessed with it, but you can rarely find the peppermint kind, his favorite, so I started making it for him last year.

It is super simple to make, and you can add any extracts you like to change the flavor profile.   You can also use dairy-free chocolate, such as Ghirardelli semisweet chips, and you have a vegan topping for your vegan one-ingredient ice cream. Since that ice cream is so healthy, I didn’t feel too guilty about adding some of this to the top of it and calling it my breakfast.  :)


Homemade Magic Shell

Printable recipe
Printable recipe with picture

1 1/2 cups (300 grams) semisweet chocolate chips
1 cup (200 grams) refined coconut oil
pinch of salt

Place the chocolate and oil in a microwave-safe dish and microwave for thirty seconds, stir, and microwave another 15 seconds. Repeat, if necessary, stirring well every 15 seconds, until mixture is melted and smooth.  This can also be done in a double boiler. Stir in salt and store in an airtight container at room temperature.  Mixture will remain liquid during the summer, but might solidify during the winter.  If it becomes solid, simply heat it until liquid again.

Peppermint Magic Shell: add 2 teaspoons peppermint extract.  I like to divide the batch in half, leaving half plain and adding 1 teaspoon peppermint to the other half.

Makes about 2 cups Magic Shell.

Recipe source: adapted from Brownie Points

Thankful Thursdays #32: I’m not any fatter

Posted on

I made a thanksgiving resolution to find something to be thankful for every day until next Thanksgiving.  Here’s what I am thankful for this week!

Thursday: I didn’t have to cook dinner!  Maybe my enthusiasm seems strange, since I’m a food blogger and therefore should love to cook, but honestly cooking isn’t really my thing.  I love to bake, but I’d rather eat a meal cooked by someone else any day.  Anyway, some friends had us over for dinner, and I was also thankful for the time we had with them as well.  I never remember my camera when we visit Ben and Ashley, so I have no pics of the wonderful taco dinner, which included homemade tortillas and a smorgasbord of fillings, including pork, shrimp , cilantro lime rice, and everything else you can imagine.  MUST REMEMBER CAMERA NEXT TIME.

Friday: the internets. We got a DVD from Netflix that we’ve already seen, but thankfully we were able to watch Dr. Who online with “instant play.”  The more I watch the latest season, the more the new doctor reminds me of a fairer version of my cousin, Tyson.  I know that has nothing to do with being thankful, but it’s wigging me out. Maybe you’d have to know my cousin and watch the show regularly to see it?

https://i0.wp.com/www.femalefirst.co.uk/image-library/port/376/m/matt-smith-awi-0907.jpg

Saturday: a husband who is willing to go grocery shopping with me.  Although I do it faster alone, it’s not nearly as fun without him coming up with new ways to annoy me.  His favorite thing to do is to grab random, horrible food items and ask for them like he’s three years old.  For instance, if there was something called cotton candy cereal, he would pick it up, then smile and hold it up and bounce around, saying, “Cotton Candy Cereal!”

Sunday: The current Sunday School teacher for the preschool/elementary class is out of town, so I had an opportunity to teach the twins for the first time in over 6 months.  I didn’t realize how much I missed them!

https://i0.wp.com/a1.l3-images.myspacecdn.com/images02/11/a427494a4b2c45f7b71658d12c891ed4/l.jpg

Monday:  1) For our wonderful Declaration of Independence and the freedoms it gives us as Americans.  2) For Katie, Den’s co-worker, who invited us to her 4th of July gathering, thus sparing us from a depressing holiday spent at home without fireworks since we are too cheap to purchase them ourselves. 3)  For the people at said party, who were so friendly and made me feel at ease despite not knowing a soul there.  Many were foodies, and that helped because we could all relate to the love of food!  4) That we haven’t had war on American soil in over a hundred years.  The party we joined was in Derby, where more fireworks are allowed, and boy it was crazy!  The steady stream of explosions and the heavy haze of smoke made me feel like I was in a war zone, and very thankful that I never have been.  It also made consider and all the more thankful for our soldiers who risk their lives for the sake of others.

Tuesday: Puppy antics.  We’ve been taking care of Ben and Ashley’s chickens while they’re away camping and although another friend is taking care of the dogs (there are five of them), we always end up staying to play with and pet them.  The golden lab is about a year old and has a ridiculous amount of energy.  Today he nabbed a squash Dennis picked and rolled around with it, chomping on and playing with it like it was the most delightful thing he’d ever encountered.  At one point, he was rolling on his back while holding it up in the air with his paws.  The joy of a puppy is a beautiful thing.

Wednesday: I’m not any fatter! I got my rear in gear and went to my first Weight Watchers meeting in three weeks, knowing that after all the stress-dieting I’d done (i.e. eating everything I possibly could to calm my nerves–emotional eating is my downfall), I was going to see a big gain.  But I weighed exactly the same.  Granted, the last time I weighed in I had a 3-pound gain due to the heavy clothes I was wearing and the later time of day I went, so weighing the same in the morning before eating, and while wearing shorts, definitely means I’ve got more padding now.  But still.  Technically, I weigh the same as I did at my last meeting. :)  I’ll take it as a victory and move on, counting my points and working toward my goal like a good girl.

How To Henna Your Hair

Posted on

Being raised in a whole-foods home, it only makes sense that my mother also chose all-natural hair and body products.  I started breaking into her stash of henna hair color when I was in middle school, so I have more than 15 years experience with it by now.

You may have heard of henna tattoos, popularized by the Indian culture, which are temporary and slowly fade over time.  You may not have been aware that you can use henna to color your hair as well, but it has been done since at least 400 AD.


Henna is a tall bush or small tree, and the leaves, once dried, are powdered and can be mixed with hot water or an acidic liquid to dye skin, hair, and nails.  The benefit of using henna on hair is that it  seals in oils and tightens the cuticle, resulting in a rich, healthy shine.  It contains no ammonia, peroxide, or other chemicals that are damaging to hair.  Unlike other hair dyes, it fades slowly over time (usually it lasts 4-6 weeks) so there are no tell-tale roots as your hair grows out.

Things you should know about henna:

1) It can only make your hair darker.  It bonds with the protein in your hair, adding color to it (unless you use the neutral henna, which only conditions without adding color); you can’t use it to lighten your hair.

2) If you get any color besides “neutral” or “black,” you will get red highlights in your hair.  In my case, I buy “light brown” and I get a medium brunette color with pretty red highlights.  You can get many tones of red, such as strawberry blonde, auburn, copper, etc, but all of these will only add color to what you already have so don’t expect your black hair to turn strawberry blonde if you choose that color.  It may give some warmth to your color, but will not lighten.

3)  In my experience, henna will not take your hair too far from the color you start with, so if you buy black and have light brown hair, you will become a darker brunette.

4) It is quite goopy and messy and can stain anything it touches.

5) It can react with chemicals in your hair, such as chlorine, or those used in coloring or perming.  In the picture below, taken before a homecoming dance my freshman year of high school,  you can see I turned the ends of my hair green when I tried using black henna after an entire summer of swimming daily in a public pool.  The photo was taken two months after the application, so you can see that green really hung on!  If you want to use henna after your hair has been exposed to chemicals, I highly recommend doing a strand test first.

 photo scan0031.jpg

6) You can add things to the henna mixture to enhance the conditioning and coloring properties, and adjust the amount of water used accordingly.  For deeper conditioning, add an egg or two tablespoons of yogurt.  To bring out golden highlights in already light hair, replace heated water with half warm water and half warm lemon juice or chamomile tea brewed with three tea bags.  To create rich golden or copper highlights add three tablespoons vinegar or fresh lemon juice.  To enrich browns or reds, add one teaspoon ginger, allspice, nutmeg or paprika.  To enhance brown tones, replaced heated water with day-old, black, very warm coffee (not instant).

7) Henna has a distinct herbal smell, which is quite pleasant compared to some of the harsh chemical dyes, but it can be off-putting to some.  It reminds me of a blend of powdered algae, herbal tea, and marijuana.  I sort of feel like a hippie when I’m applying it. :)

8) You can not use any metal during henna preparation or application, as it will react to it and make your hair a funky color.  Which could be fun, but if you’re hoping for a natural color, steer clear of the metal and use a glass, ceramic, or plastic bowl and stir with a wooden or plastic spoon.  I used a small silicone scraper this time.  They also recommend you use distilled water, but I just use purified water and this has never been a problem for me.

There are many henna products for hair and I have tried a few brands, but the one my Mom used is Light Mountain Natural, and after trying other brands, it continues to be my preferred henna product to this day.  Light Mountain Natural is a pure, natural product made from 100% organic powdered botanicals of three species of herbs: Red (Lawsonia inermis), Neutral (Cassia auriculata), and Black (Indigoferae tinctoria).  These powdered botanicals are blended for a rich medly of color.   Botanical color may vary from crop to crop and season to season, but their blending process helps compensate for these variations.

The instructions I’m giving are according to my experience with the Light Mountain Natural henna, and may not work with other henna products.  I use light brown, which I buy at a local health food store that has nothing to do with the Whole Foods chain.  In the box, you will get a bag of henna, instructions, plastic gloves, and a plastic cap.

The day before, please do an allergy and strand test according to the package directions.  I never do, but it is in your best interest, especially if you’ve never used henna before.

To start, empty your henna into a glass or plastic bowl. Add enough water, stirring with a non-metal utensil, that you get a consistency similar to yogurt.  I like to go a little thin, using two or more cups of water, because it thickens a bit upon standing, and it’s easier to apply if it’s not too thick.

Let mixture sit for 1-3 hours to cure.  I usually just wait an hour.  Curing cuts down on the time you will have to leave it on your hair, but you can use it as soon as ten minutes after mixing if you like.  The mixture will thicken and get darker on top. Stir to check the consistency and add more hot water if necessary.

They tell you to get your hair wet, and I went ahead and did it this time, but usually I apply the henna to my dry hair and I noticed no difference in the final outcome, except my grays didn’t seem to be covered as well.  Whether you get it wet or not, it’s now time to don your “henna shirt,” i.e. any shirt that you don’t mind ruining.  I have a shirt designated for henna application and it has been used many times.

Apply a cream or Vaseline around your hairline to protect your skin from getting stained.  I used a sunscreen stick.  Whatever works. :)

It helps to pretend you have no teeth while you apply it.

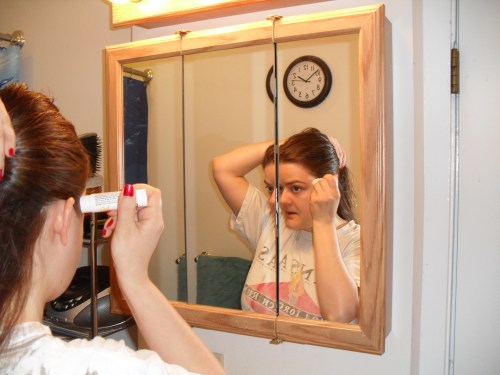
“Back in my day, we didn’t have these fanshy schmancy sunshreen shticks, but they sure are handy!”

Apply the henna from roots to tips whichever way you please.  With a comb…

Or my preferred barbarian method–slapping it on and rubbing it in with my hands.

I think I make this same face when I apply mascara.  Perhaps the synapses in my brain were misfiring and telling my face that doing any beauty regimen requires wide eyes and an open mouth.  Apparently I channel the elderly quite a lot during this process as well…

“What’s that, shonny?  I can’t hear you, shpeak up!”

As I apply the henna downward, I like to pile my hair up on top of my head to keep it out of the way.  You can see what I meant when I said it gets messy.  I always put cream or Vaseline on my ears and all the way around my hairline because it never fails to get on my skin.

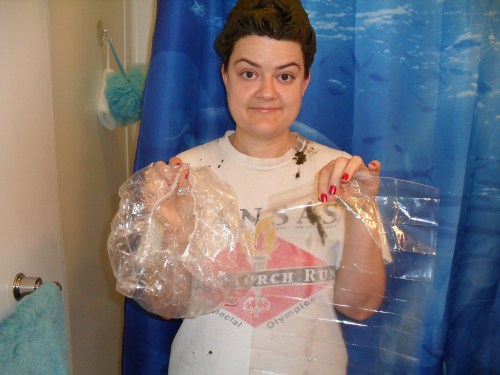
I just keep applying it until the entire bowl is on my head.  My hair is fine and I don’t really need that much, but at least I know every inch is covered.  If you have very long or thick hair, you might need two boxes of henna, but as you saw, one bag makes quite a bit.  If you’re spreading it further, be sure to massage it into your hair before covering with a cap.

When you’re finished applying the henna, the first thing you should do is clean up.  Discard your gloves and clean up all the henna that dropped on your sink and floor.  Use damp paper towels or a damp washcloth to wipe away any henna that is on your face, ears, and neck.  Next, don your plastic cap.

The one that comes with the kit (right) is square and after fitting it to your head, you have to close the gap at your nape with a hair tie, so I usually use a handy-dandy shower cap instead (left).

It is now time to apply heat, which activates the henna and bonds it to your hair.  My Mom used to have a retro hair dryer that came down over her head, which was uber fabulous for this part, but at my house, I apply heat with a handheld blow dryer.

Move the dryer around constantly so you don’t melt the cap, and maybe take this time to practice your lip curls and strengthen your forehead with eyebrow lifts.   I also like to use my other hand to press down on the cap while I’m heating my hair, so that the henna disperses even better while the color is setting.  The directions say to heat intermittently to maintain constant warmth, but I use the blow dryer for fifteen minutes straight, then, depending on  my mood, I will either go online until my hair gets cold, or go straight into the shower.  This time I went straight into the shower, which could be why my grays weren’t covered as well as they usually are–not enough time with the henna on.  Depending on your hair type (mine is super thin), the process usually takes 45-minutes of off-and-on heat application.

Get thee to the shower and rinse the henna out of your hair with warm water.  It is gritty, so it will take some time. Once you get as much of the henna out as you can, fill your hand with a huge pile of conditioner and work it through your hair from roots to tips.  Use a wide-tooth comb or your fingers to comb through it so that your hair is saturated with conditioner and tangle-free.  This will help get the remaining henna out as you rinse it again.  Do not use shampoo.  Ideally, you shouldn’t use shampoo on your henna’ed hair for 24 hours, but I usually do my first shampoo after 12 or so.

Style your hair as usual.  I usually just comb my hair and let it air dry, but after applying henna, I usually at least blow dry it because I’m eager to see what color it is.  Plus, I imagine that the heat helps set the color even more.

Here’s my hair about 6 weeks after the last henna treatment, and the day before this one:

And here it is after this henna treatment:

Another note: there is a specific Light Mountain Natural henna treatment for gray hair, but I haven’t tried it yet, as it is a two-step system and I’m not terribly patient, plus buying it would confirm my suspicion that I’m getting old.  The gray hairs are bad enough without having to buy a special gray hair treatment for them, you know what I mean?

Disclaimer: Light Mountain Natural doesn’t know I exist and did not compensate me in any way for this tutorial or for my opinion of their products.  I just included it here because it is the best henna product I know of and wanted to share the best with you. Check out their website here.

I gathered my information about henna and the henna hair color process from knowledge passed on to me from my mother, from Wikipedia, and from the Light Mountain Natural instructions.  I nabbed the first two pictures off the sites given on the actual pictures themselves.

Cold-Brewed Iced Coffee

Posted on

I recently read a short story, by an unknown author, that teaches a simple, yet incredible lesson about life.  Since I’m sharing a recipe for coffee with you today, I thought this would be the perfect time to share this parable with you as well.

Life is Like a Cup of Coffee

A group of alumni, highly established in their careers, got together to visit their old university professor. Conversation soon turned into complaints about stress in work and life.

Offering his guests coffee, the professor went to the kitchen and returned with a large pot of coffee and an assortment of cups – porcelain, plastic, glass, crystal, some plain-looking, some expensive, some exquisite – telling them to help themselves to the coffee.

When all the students had a cup of coffee in hand, the professor said: “If you noticed, all the nice looking expensive cups have been taken up, leaving behind the plain and cheap ones. While it is normal for you to want only the best for yourselves, that is the source of your problems and stress.

“Be assured that the cup itself adds no quality to the coffee. In most cases it is just more expensive and in some cases even hides what we drink. What all of you really wanted was coffee, not the cup, but you consciously went for the best cups… And then you began eyeing each other’s cups.

“Now consider this: Life is the coffee; the jobs, money and position in society are the cups. They are just tools to hold and contain Life, and the type of cup we have does not define, nor change the quality of life we live.

“Sometimes, by concentrating only on the cup, we fail to enjoy the coffee. Savor the coffee, not the cups! The happiest people don’t have the best of everything. They just make the best of everything.”

Live simply. Love generously. Care deeply. Speak kindly.

~Author unknown

*******************************

Since we’re concentrating on the coffee here, let’s talk about this recipe, which really lets coffee shine.  Allowing the coffee to steep at room temperature overnight yields a strong brew devoid of any of the usual bitterness you get when percolating it.  I have never been able to tolerate the bitterness of strong coffee, which is why I steer clear of Starbucks.  I still prefer a milder coffee, but cold-brewing makes it so much smoother that I can even enjoy a strong cup prepared this way.  You can control how strong your cup is by adding more or less water to the coffee concentrate.

Unless you are averse to sweet coffee drinks, I highly recommend you use some of that leftover sweetened condensed milk from my pound cake recipe to try a Vietnamese-style iced coffee.  It is out of this world!

Cold-Brewed Iced Coffee

Printable recipe
Printable recipe with picture

3 cups water
2/3 cup ground coffee

Optional additions:
Milk &/or Sweetener
Sweetened Condensed Milk

In a 4-cup measure, add 3 cups water and stir in coffee.

Unless you are super cool like me (are you laughing?!?!) and have Tupperware measuring cups, you will have to measure two 1/3 cups, or use one of those one-cup measures that have marks on the inside/outside to show where 2/3 is.  I’m so happy to now have 2/3 and 3/4 cup measures for the first time since I left home!! Thank you, Tupperware! (Wait, am I already losing sight of the lesson by concentrating on the measuring cup and not the coffee?)

Cover your measuring cup with plastic wrap and let rest at room temperature overnight or 12 hours.  Line a sieve or colander with a large coffee filter, cheesecloth, or a double layer paper towels, and prop inside a bowl.  Strain coffee through the sieve.

As you can see, my measuring cups are way cooler (why are you laughing?!?!) than my colander, which I’ve had longer than I’ve been married, and I’m pretty sure I bought it for 10 cents at a garage sale, where the owner was getting rid of it because it was the first colander ever made.  So, you see, I can’t get rid of it.  It is a piece of living history, in my very own kitchen.

Besides, it’s all about the coffee (or life, if you will), so whatever colander I use really doesn’t matter because it won’t alter the resulting brew, or my life. Wow, this “life is coffee” philosphy is so empowering!  :)

Pour strained coffee concentrate into a jar, or rinse out the measuring cup and pour it back in to store.  Keep refrigerated.  To serve, fill a glass with ice, and add equal parts coffee concentrate and water, or to taste.  Stir in milk and sweetener, if desired.  For a Vietnamese iced coffee, stir in a tablespoon or two of sweetened condensed milk.

Bada-bing, bada-boom!  If you like sweet stuff, you have to try it this way!  I’m hooked.

Yield: 2 1/2 cups coffee concentrate, usually good for 4-5 servings.

Recipe source: adapted from Smitten Kitchen

Black Bean and Sweet Corn Quinoa Salad

Posted on

Last week, I shared the Fudge Babies recipe, divulging how late I was in jumping on the raw dessert train.  Well, raw desserts aren’t the only thing I was incredibly slow to catch on to.  Until this week, I also had not tried quinoa (pronounced keen-wah), despite seeing it on nearly every blog I frequent!  I’ve been saving recipes for years, finally bought some over a month ago, and finally, finally, made something with it this week.

Quinoa is gluten-free and while it’s not a grain (it’s a seed), it is often used in place of rice and is cooked the same way.  Although I’ve now enjoyed it, I still can’t tell you if I like quinoa or not, because I couldn’t identify its flavor apart from everything else in this salad.  The salad itself was stupendous, so I guess if I didn’t like quinoa, I wouldn’t have liked the salad as much.

It has a pleasant Mexican flavor profile, and while carbohydrate-heavy, it is also fiber and protein-rich.  It is so delicious that I am a bit ashamed to admit I couldn’t even wait to sit down and eat it from a bowl like a civilized human being.  As soon as it was done, I took a taste and then stood over the pan, shoveling it into my mouth with the ginormous serving spoon.  In my defense, I was stressed, approaching a certain time of month, very hungry, and found this salad to be irresistible.  The perfect storm of coincidences to bring out the barbarian in me.

Black Bean and Sweet Corn Quinoa Salad

Printable recipe
Printable recipe with picture

1 tablespoon olive oil
1 medium yellow onion, chopped
2 cloves garlic, minced
3/4 cup uncooked quinoa
1 1/2 cups chicken or vegetable broth
1 teaspoon ground cumin
1/4 teaspoon cayenne pepper
1/2 teaspoon salt
1/2 teaspoon freshly ground black pepper
1 cup frozen sweet yellow corn
2 (15-ounce) cans black beans, drained and rinsed
1/2 cup cilantro, chopped

In a medium pot, heat the olive oil over medium heat. When shimmering and hot, add the onions and saute for 4-5 minutes, stirring often. Add the garlic and stir for a minute or two until the garlic is fragrant, being careful not to burn the garlic.  Add the quinoa and cover with broth. Stir in cumin, cayenne pepper, salt and pepper. Bring the mixture to a boil. Cover, reduce heat and let simmer for 20 minutes (or until all the liquid is absorbed).  Stir in the frozen corn and black beans. Cover and let the pot sit off the heat until the corn and beans are heated through, about 5-6 minutes. Stir in the cilantro. Serve warm or chilled – it is delicious both ways!

Serves 4 as a main dish, serves 6-8 as a side

Per serving (1/4 of recipe): 417 calories; 7 g fat; 72 g carbohydrates; 17 g fiber; 20 g protein; 10 Points Plus

Recipe source: Mel’s Kitchen Cafe