RSS Feed

Chocolate Italian Love Cake


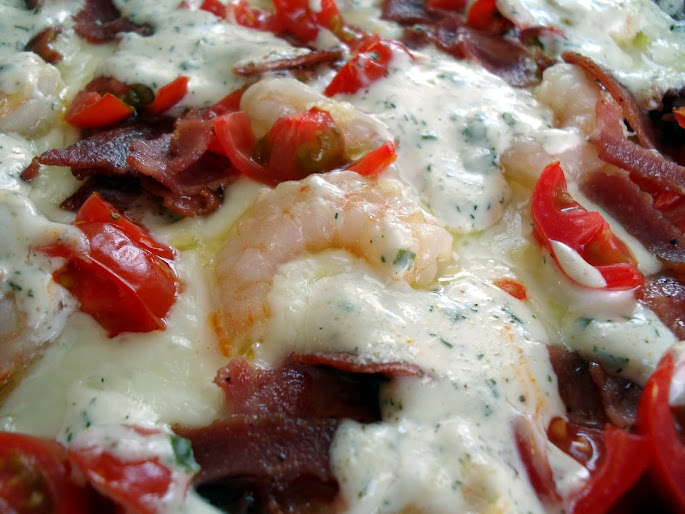
I made this for our Valentine’s Day dessert because 1) it’s “Italian” (I put that in quotations because honestly, I think the only reason it’s called “Italian” is because there is ricotta cheese in it), so I thought it would go well with our Spaghetti & Meatballs, and 2) it’s a Love Cake, therefore perfect for Valentine’s Day. :)  However, I’m sharing this with you today, a regular non-Hallmark holiday day, because it’s simply a fantastic cake that should be enjoyed and made for those you love on any old day, not just days designated for celebrating your loved ones.

This cake is every bit as good as it looks.  I don’t like ricotta because of the texture, but it really works with this cake.  It’s not a heavy cake, which is dangerous, because it’s also addictive and the “lightness” makes it easier to trick yourself into thinking that eating half the pan by yourself isn’t all that obscene.  Not that I’ve done that or anything.

Chocolate Italian Love Cake

Printable recipe
Printable recipe with picture

1 package chocolate cake mix (I recommend using Betty Crocker brand), and the ingredients needed to make the cake according to the package directions

  • OR your favorite chocolate cake recipe that makes as much batter as a cake mix

2 lbs. ricotta cheese
4 large eggs
3/4 cup granulated sugar
1 teaspoon pure vanilla extract
1 (5.9 oz.) package instant chocolate pudding mix
1 1/2 cups cold milk
1 (8 oz) container frozen whipped topping, defrosted

Preheat your oven to 350*F and spray a 9×13 inch pan with nonstick spray; set aside.

In a large bowl, mix together your cake mix according to the directions on the box or prepare your favorite chocolate cake.  Spread into prepared pan and set aside. In another bowl, beat together the ricotta cheese, eggs, sugar, and vanilla until smooth. Carefully pour the ricotta mixture over the cake batter, trying to get it evenly distributed, then spread it as best you can over the cake batter with a spatula. The layers will switch during baking!

Bake the cake for 1 hour. Remove from the oven and allow to cool completely.

Once the cake is cool, whisk the pudding mix and milk together until smooth and slightly thickened. Gently fold the whipped topping into the pudding until incorporated. Spread the pudding mixture over the top of the cooled cake. Do not spread it over the cake if it’s even slightly warm or it will melt and ruin the topping. Cover the cake and refrigerate at least 6 hours before serving. It tastes even better the next day.

Veronica’s notes: 1) I do not recommend my favorite chocolate cake for this recipe as it makes a lot more batter than a box mix and your pan would probably overflow if you tried it. 2) I have a stack of 9×13 baking dishes because I use that size more than any other. My largest one is a Pyrex dish and I highly recommend you use your largest one too – preferrably a Pyrex dish because they seem to be the largest.  I know every 9×13 dish should measure 9×13 but apparently they do not…or maybe some companies measure from the inside and some from the outside.  This recipe fills it up to the top so you really need to use a large dish.  3) If you live in an area that sells 5.1 ounce pudding mixes, that’s fine – it’s the size called for in the original recipe. You only need a cup of milk if you have a 5.1 ounce box, according to the original recipe. 4) I know ricotta can be expensive so if you have an Aldi in your area – go see if they sell ricotta there. Mine sells it for $1.68 for a pound. It’s also good quality! And get some pumpkin puree while you’re there – it’s usually $1 (or less) for a can and is very good quality. :)

Recipe source: adapted from Chew Nibble Nosh

Really Great Spaghetti & Meatballs


Growing up, I practically lived on spaghetti.  It was the one “junk” food my Mom allowed us to eat (junk because it wasn’t whole wheat spaghetti).  Therefore it’s what I ate most of (because I hated health food)!  Spaghetti with Ragù sauce – I loved it.  But the best was when I made meatballs to go with it, which was a special treat because we didn’t do a lot of meat in our house.  I remember one time I was cooking my famous spaghetti & meatballs dinner for the family when I was about twelve and they all left me at home to cook while they went to the health food store.  I didn’t really love the health food store, but I still cried into my meatballs because I didn’t want to be left out.  Meanie old Davis family! haha

Anyway, this recipe is a lot different from the one I made growing up, but my recipe was little more than ground beef mixed with tons and tons of garlic powder, salt and pepper, rolled up and cooked in a skillet before being added to a pot of pasta with Ragù sauce on it.  I will always love meatballs made that way because that’s how I ate them growing up and have a fondness for it, but honestly these are better, the best I’ve had, actually, and I love the cooking method.  You don’t have to cook them separately, you just plunk them into the sauce and let it simmer away!  So simple.  It also makes the meatballs more tender and moist to cook them this way, and the flavor of the sauce and the meatballs both benefit from cooking slowly together.

The sauce is a very simple recipe and so, so good.  The amount of black pepper gives it a bit of a spicy kick so I’d cut it by half if you don’t like heat.  This is now my go-to spaghetti sauce (I’ve made it twice in the last week) and I hope you’ll give it a try!

Really Great Spaghetti & Meatballs

Printable recipe
Printable recipe with picture

Sauce
2 tablespoons olive oil
1/2 cup finely chopped onion
3-4 cloves garlic, minced
1 (28 oz) can crushed tomatoes
1 (6 oz) can tomato paste
1 tablespoon dried oregano
3 tablespoons sugar
1 teaspoon salt
1 teaspoon pepper

Meatballs
1 egg
1 lb lean ground beef
1/3 cup Italian breadcrumbs
1 1/2 teaspoons dried parsley
2 teaspoons dried oregano
½ teaspoon salt
½ teaspoon pepper

1 (1 lb) package spaghetti

Remove ground beef from the fridge to allow it to come to room temperature while the sauce cooks.

Heat the olive oil in a large stock pot over medium heat. Swirl to coat the bottom of the pan to coat. Add the onion and garlic and saute, stirring occasionally, until browned, about 7 minutes. Lower the heat if they begin to burn. The more color that develops on the onion and garlic, the more flavor they’ll add to the finished sauce.

Once the onions and garlic are tender and caramel in color, add the crushed tomatoes and the tomato paste and stir until the mixture is smooth and well combined. Add the remaining sauce ingredients (oregano through pepper), stir, and bring the mixture to a simmer. Reduce the heat to the lowest setting, cover the pot, and let cook for 30 minutes, stirring occasionally so that the bottom does not burn.

Make the meatballs: Lightly beat the egg in a large mixing bowl. Break apart the beef as best you can into the bowl and add the remaining ingredients. Use your hands to mix together until well incorporated, trying not to overmix, which could render your meatballs more tough. Shape the meat mixture into 12 balls (I always get 13), each about 1 ½ inches in diameter. Drop them into the sauce, stir gently so that they’re all covered in sauce. It might look like there’s only enough sauce for the meatballs and there won’t be enough for pasta, especially if you’re like me and love your sauce, but trust me, there’s enough. Let them cook, covered, for about 1 1/2 hours over low heat, stirring occasionally to prevent burning.

Once the meatballs are done, cook your spaghetti to al dente according to the package directions, drain, pile some onto plates, and top with sauce and meatballs.

Veronica’s Notes: your tomatoes matter. I bought very cheap tomato puree (and tomato paste, for that matter) from Aldi that was excellent but found that Walmart’s brand, which is higher in price, was horrible by comparison. Buy good tomatoes or you won’t have good sauce. Also, the original recipe used mint in the meatballs instead of parsley and I just wanted to mention that in case you’d like to try it.

Recipe source: Can You Stay for Dinner

Maximum Cuteness Level: attained


A few of his many faces :)

My Mom always said babies reach their maximum cuteness at three months because they’re still fairly small, but have had enough time to grow into their looks.  Joshua is almost three months now and it’s hard to imagine him getting any cuter, but it seems that he does get cuter every day.  I may or may not be outrageously biased, however. :)

Good news on his bilirubin (jaundice), it went down from 5 to 2.7 in just a week.  We did have an appointment yesterday but since it’s on the decline, the doctor wanted to wait until his four-month check up to test it again because it’s not even at a level that they would treat for.  He just wants to make sure it keeps going down.  Yay for not needing a specialist! You can see how clear his skin is in the photo below, and his eye whites are finally white!  He has just a bit of yellow left at his hairline.

This month he has definitely found his voice, and I included two videos at the end (the first and third one) where you get to hear it.  I feel like he’s finally a “real baby” as I call it – one that I can interact with and does real baby stuff like coo and smile and laugh.  I love it!

He’s not into toys yet, but does like to hold things and if I give him something soft, he seems to enjoy clutching it to himself.

One toy he does enjoy is his jungle gym from cousin Andrea.  He’s not purposely reaching up to hit the danglies, but he moves a lot while staring up at them and when he does hit the lowest one, he likes to watch the movement.  It’s amazing how staring up at three dangling things can be so enthralling – I’ve put him underneath it quite a lot and it just never gets old for him.  He also loves staring up at things we hang over the changing table – first a blankey with tags on it and now a sensory giraffe toy from Grandma Miller.  I keep thinking he’s going to start getting bored with the same old things, but I guess living in a world for only three months, everything every day would seem so new.

My favorite photos this month (both from last week):

Catch you soon with more recipes – I’ve now got quite a few to share and hope I have the time to do so soon!  Here are the videos from this last month if you care to watch.  Enjoy!

Joshua loves to jump, although you wouldn’t know it from his face, which is always so serious when he does it, but he gets so intense about it that I think he must enjoy it to do it so much once I hold him in position and we start. Anyway, my camera is dying on me and it’s really hard to capture a complete video and this is the worst video because it cut out all his really intense, good jumping, but you do get to see a few little jumps on it. :)

Tiger Butter


If you need an idea for last-minute Valentine’s Day treats for your loved ones, I gotcha covered!  I’ve made four batches of this Tiger Butter fudge since Christmas and everyone has been so impressed with it, I don’t know whether to be proud or ashamed of how easy it is to make!  Three ingredients, melt, stir, and swirl, and you’re done.

And if you’re wondering about the taste, it is oh so good.  The peanut butter layer is incredibly creamy and of course the chocolate is the perfect complement.  Need I say more?

Tiger Butter

Printable recipe
Printable recipe with picture

1 (24 oz) package vanilla almond bark candy coating
1 (1 lb 2 oz) jar creamy peanut butter
1 1/4 cups milk chocolate chips

Line a rimmed baking sheet with foil; set aside.

In a microwave-safe bowl, microwave the chocolate chips for one minute and stir well. Microwave in 15-second intervals, stirring well in between, until completely melted. This takes 2 intervals for my microwave. Be careful not to overheat the chocolate and stir well after each interval, allowing the residual heat to melt the chips before microwaving again. If you overheat them, they will get too thick and you won’t be able to use the melted chocolate for swirling. Once melted, set aside.

Melt the almond bark according to package directions. Usually that would be to place them in a microwave safe bowl, microwave for 1-1 1/2 minutes, stir well, and microwave in 15 second intervals, stirring in between, until melted and smooth. Once melted, stir in the peanut butter until creamy and smooth. Spread into prepared baking sheet.

If the melted milk chocolate has become too firm with standing, microwave for ten seconds, stir, then pour it over the peanut butter mixture in long horizontal lines. Drag a spatula through the lines in a vertical pattern, going up on one line, then down on the next, repeating until the pan is swirled. Allow to set for several hours or overnight before cutting. You may refrigerate the fudge to set it up quickly.

Stores great at room temperature, and you don’t even have to cover it. Great shelf life. I’ve left some uncovered for up to two weeks with no spoiling.

Veronica’s notes: although I haven’t tried it, you should be able to substitute 1 1/2 lbs white baking chips for the candy coating if you can’t find it in your area, or even real white chocolate if you don’t mind the big price tag. I like to use milk chocolate with peanut butter, but semisweet chocolate is perfectly fine and would create a more dramatic stripe effect.

Recipe source: adapted from The Better Baker

Roasted Tomato & Portabella Meatloaf

Posted on

Meatloaf with mashed potatoes and Italian Green Beans is my ultimate comfort meal.  But for some reason I rarely make it!  In fact, I only have one other recipe for meatloaf on my blog.  What is up with that?  There’s a good reason that I don’t make other favorites like pecan pie and cheesecake – because I puffy heart loooove them would eat way too much of those fat and sugar bombs.  But meatloaf isn’t necessarily unhealthy (you can even use ground turkey if you like!) and is so delicious.  I really need to make it more often.

My first meatloaf sammie! So good.

I adapted this recipe from my Foodie Mama, Marina‘s, recipe, which she adapted from the original Quaker Oats recipe.  I love that about the online foodie world – recipes keep shifting and changing as they pass from person to person.  I didn’t mean to get all fancy pants on my meatloaf, but baby portabella mushrooms were on sale at Aldi (LOVE ALDI!) for 99 cents and I had no idea what I was going to do with them, and when I decided on meatloaf I had no tomato sauce and had to make my own with canned roasted tomatoes (also from Aldi), so this wonderful meatloaf was born.

This is probably my favorite meatloaf I’ve had so far, but I know there are a lot of different ways to make it and I don’t have a ton of versions to compare it to.  It’s got lots of great flavor, the added veggies keep it nice and moist, and we thought the the sweet and sour roasted tomato sauce really put it over the top.  I hope you enjoy it too!

Roasted Tomato and Portabella Meatloaf

Printable recipe
Printable recipe with picture

2 lbs lean ground beef
1 tablespoon extra virgin olive oil
1 (8 oz) package mini portabella mushrooms, chopped
1 small onion (or ½ of a medium), diced
1 large clove garlic, minced
1 (15 oz) can diced roasted tomatoes, undrained
¾ cup quick oats
1 large egg
1 tablespoon + 1 teaspoon Worcestershire sauce, divided
½ teaspoon salt
¼ teaspoon black pepper
½ cup ketchup
½ cup brown sugar
¼ teaspoon lemon juice

Take the ground beef out of the refrigerator 30 minutes before starting the recipe.

Heat the oil in a skillet over medium-high heat and add the mushrooms, onion, and garlic. Saute until softened and all the liquid is evaporated; set aside. Place the roasted tomatoes, with the juice, in a food processor or blender and process for about a minute, or until pureed. Spoon out ½ cup of the puree and add the mushroom mixture to the remaining puree. Process until vegetables are very finely chopped, or until pureed if you don’t want to see them in your meatloaf. If you are using a blender, you might have to stop frequently to stir the mixture.

In a large bowl, mix the ground beef with the tomato and mushroom mixture, oats, egg, 1 tablespoon Worcestershire sauce, salt, and black pepper. Pat into a loaf pan and set aside.

In a small bowl, combine the reserved toasted tomato puree with ketchup, brown sugar, lemon juice, and 1 teaspoon Worcestershire sauce. Spread ½-2/3 cup of the sauce over the meatloaf and bake for 1 ½ hours, or until a meat thermometer inserted in the center reads 160F. Remove from oven and carefully pour off the liquid; allow to sit for ten minutes before slicing and serving. Refrigerate leftovers and make meatloaf sandwiches the next day. :)

What’s your ultimate comfort food? Here are a few of my personal favorites…

Chunky Chicken Soup

Easy Salisbury Steaks with Onion Gravy

Creamy Green Chile Chicken Enchilada Casserole

Cranberry Crumb Bars

Posted on

Are cranberries in season any more?  I haven’t been looking for them since they’re more of a December thing for me, but I had a jar of Killer Cranberry Sauce leftover from a large batch I made in December and I wanted to use it, so these bars were made…in season or not.

And oh my goodness, they are amazeballs.  I include orange juice and zest in my cranberry sauce, and there is even more orange flavor from the zest in the crust and crumb topping, which pairs so well with cranberry filling.  The crust and crumb are so tender, buttery, and crumbly – the perfect texture and I plan to use the base recipe for other crumb bars in the future.  The recipe does include a little bit of an unusual ingredient – almond flour or meal, but you can make your own by grinding almonds very fine in a food processor.  Also the Killer Cranberry Sauce is great in these bars, if you don’t want to make cranberry sauce, go see Bakerita’s recipe for her filling that doesn’t require cooking beforehand.

If you prefer very tart desserts you can skip the glaze, but for the sweet tooth like me, it is necessary to balance the cranberry.  Alternately, you could melt some white chocolate to drizzle over the top – a classic cranberry pairing.  Enjoy!

Cranberry Crumb Bars

Printable recipe
Printable recipe with picture

2 1/2 cups (10 1/2 oz) all purpose flour
1/2 cup (2 oz) almond meal (almond flour)
1 cup (7 oz) granulated sugar
1 teaspoon baking powder
1/4 teaspoon salt
1 cup (2 sticks) cold, unsalted butter
1 large egg
Zest of 1 orange
1/2 teaspoon cinnamon
2 cups Killer Cranberry Sauce
1 cup (4 1/2 oz) powdered sugar
2 tablespoons orange juice (or milk or water)

Preheat oven to 375F. Butter a 9×13 baking dish.

In a medium bowl, mix together flour, almond meal, sugar, baking powder, and salt. Use a fork or pastry cutter to blend in the butter and egg. The dough will be crumbly. Alternatively, you can pulse the dry ingredients in a food processor with the butter until pebbly, then mix in the egg until it all comes together. pat half the dough into the buttered pan. Spread the cranberry sauce over the crust, the crumble remaining dough over sauce. Bake for 45-55 minutes, or until top is a light golden brown. Cool completely, then blend the powdered sugar and orange juice together in a small bowl and drizzle over the top. let set for 5-10 minutes before slicing into bars.

Recipe source: adapted from Bakerita

Who cares if cranberry is out of season when it makes such delicious eats?  Here are a few other ways to enjoy it…

Cranberry Chicken

Cranberry Bliss Cookies

Romaine Salad with Chicken, Cheddar, Apples, Spiced Pecans and Cranberry Vinaigrette

Oatmeal Raisin Bars with Brown Butter Icing

Posted on

When I look back on things I’ve pinned, sometimes I’m like, “I would never make something like that – it’s just not me.  Why did I pin it?”  But I know why.  The blogger’s enthusiasm about how good it is sells me every time and I end up pinning a lot of things I’ll never make, but still want to make because the blogger was so enthusiastic about how good it was.  Such is the case with these bars, but they are SO me so of course I had to make them almost immediately. :)

Miss Marsha sold me with her sheer enthusiasm, but hello, did I ever mention that cookies are my second favorite food group (with dip being the first)?  The recipe itself probably would have sold me without her enthusiasm.  It had been way too long since I’d enjoyed an oatmeal raisin cookie and making them in bar form sounded genius.  I don’t have time to be portioning out dough right now, but I can fo sho pat it into a pan!

These bars are just as good as my award-winning oatmeal raisin cookies and I even used the same icing on them.  Marsha’s recipe uses cream cheese frosting so please check it out to if you’d like to make them that way – it looks and sounds majorly delish but I just had to go with brown butter this time.  It’s my weakness.  Along with cookies and dip.

Oatmeal Raisin Bars with Brown Butter Icing

Printable recipe
Printable recipe with picture

½ cup (1 stick) unsalted butter, softened
1 cup (8 oz) light brown sugar, packed
1 large egg
1 teaspoon vanilla extract
1 cup (4 ¼ oz) all-purpose flour
1 cup (3 ½ oz) old fashioned or quick cooking oats
1 cup (5 ¼ oz) raisins
½ cup (2 oz) chopped walnuts
1 teaspoon cinnamon
½ teaspoon baking soda
¼ teaspoon salt

Icing
1/4 cup (1/2 stick) unsalted butter
1 1/2 cups (6 oz) powdered sugar, sifted
1 teaspoon vanilla extract
1-2 tablespoons water

Preheat oven to 375F and grease a 9″ X 13″ baking dish.

In a large bowl, beat together the butter and brown sugar until lightened and fluffy. Beat in the egg and vanilla until combined. In a medium bowl, combine flour, oats, raisins, walnuts, cinnamon, baking soda, and salt. Stir into butter mixture until well combined. Spread into prepared pan and press into an even layer with floured fingers. (It may seem there isn’t enough dough to cover the bottom, but there will be). Bake 15 – 20 minutes, or until golden brown. Place on wire rack to cool.

While cooling, prepare the icing. In a small saucepan, heat the butter over medium heat, stirring occasionally, until golden brown and the solids separate and turn a chocolate brown. Remove saucepan from heat; stir in sifted powdered sugar and vanilla. Stir in enough water to make an icing of drizzling consistency. Drizzle on warm bars and cool completely before cutting.

Recipe source: adapted from The Better Baker

You don’t have to go clubbing to hit up some good bars.  Check these babies out!

Sweet Potato Pizza

Posted on

Although my favorite pizza isn’t fancy or interesting (supreme with regular ol’ pizza sauce), I do love to try new things and this recipe, found in the latest Taste of Home magazine, called to me.  My husband doesn’t like sweet potatoes and I have this weird thing where if he doesn’t like something, I try to find a way that he will enjoy it.  I want everyone to like the things I like – I’m a control freak like that. ;)

Anyway, he hates eggplant even worse than he dislikes sweet potatoes, and I once got him to enjoy it on a pizza, so I figured it would work with sweet potato too.  I was right!  He might not have enjoyed it as much as our mutually loved supreme pizza, but he gobbled it up and said “it’s good” when I asked what he thought, so I count this as a success.  :)

Sweet Potato Pizza

Printable recipe
Printable recipe with picture

2 tablespoons extra virgin olive oil, plus extra for pan
1 clove garlic, minced
1 medium sweet potato, about 10 oz.
2 tablespoons water
1/4 teaspoon salt
1/4 teaspoon coarsely ground black pepper
1 tube (13.8 oz) refrigerated pizza dough*
8 oz. mozzarella cheese, shredded*
1/4 cup grated Parmesan cheese
1/4 teaspoon dried thyme
1/4 teaspoon dried rosemary, crushed

In a small microwave-safe bowl, stir the olive oil and garlic together; microwave for 30 seconds and set aside to infuse while preparing pizza. Preheat oven to 450F. Rub plain olive oil over a large 14″ pizza pan; set aside.

Peel the sweet potato and cut into 1/4-inch slices. Cut each slice into 1/2-inch wide strips; place in a microwave-safe dish and add the water. Cover and microwave on high 3-4 minutes, or until potato is almost tender. Drain; sprinkle with salt and pepper and toss together gently.

Unroll pizza dough and press to fit prepared pan. If desired, pinch edge to form a rim. Sprinkle with the mozzarella cheese and one tablespoon of the garlic olive oil. Top with sweet potato and sprinkle with the herbs. Drizzle with remaining tablespoon of garlic oil and sprinkle on the Parmesan cheese. Bake on lowest oven rack 12-15 minutes or until crust is golden and cheese is melted.

*Veronica’s notes: if you prefer to make your own crust, go for it! This is my favorite whole wheat crust. The original recipe called for 1 cup of mozzarella and 1 cup of fontina cheese, but I couldn’t find the latter and went with all mozzarella.  I’d definitely encourage you to try it with fontina if you can find it – I’m sure it’s even better that way!

Recipe source: adapted from Taste of Home Feb/March 2014, sent in by Libby Walp of Chicago, IL

Lookin’ for more pizza with pizzaz? Here are a few of my personal favorites:

Shrimp & Bacon Ranch Pizza

Fresh Vegetable Pizza

Cheeseburger Pie

I quit

Posted on

Yep, I did it.  I resigned last Wednesday and I’m officially a stay-at-home Mom now!  I went back to work Tuesday and Wednesday to make enough to pay back some leave I took and hadn’t earned, and am so glad I did because it gave me the chance to say a lot of goodbyes.  And it was hard.  I was postal (lol) for almost ten years and although my work environment wasn’t conducive to forging friendships, somehow I managed to forge a few over those years and not seeing those faces every day makes me sad.  But staying home with my little dude makes me happier than I am sad not to be there. Joshua wins!  I’m so happy, and so fulfilled.

Joshua is nine weeks old now and it’s hard to believe.  Time is flying!  He’s getting bigger all the time and has outgrown all the stuff he was wearing the first month.  He’s now 12 lbs and 22 3/4″ – up almost 3 lbs and 3 inches since his one month check up.  He had to get his shots which was awful, and he also had to have blood drawn (also awful) to check his bilirubin since he’s still a bit yellow. It’s still a bit elevated (5 and they want it at 1 or less) so he’ll have to see a specialist if it’s not lower by Friday.  It was nice and warm this last weekend so we took him our for a sunshiney stroll both days.  I’m really hoping we won’t have to go to a specialist about his jaundice.  I just want that over with and behind us! Jaundice be gone!

The biggest update is that Joshua now really smiles!  OK, not frequently, just randomly, but finally he’s given me a few non-gas-related smiles.  The last video has smiles in it, unfortunately they are gas related as you will see and hear (lol) at the end, but he does smile like this without being gassy and it’s awesome.  I even got my first giggle yesterday. Be still my heart!

And here are the latest videos.  Sorry for the random and spaced out postings – I guess I’m not quite up to getting on a regular blogging schedule yet.  But I’m at least cooking and baking again so I have some more recipes to share as soon as I can! :)

I thought my boob was my baby

Posted on

People have asked if I’ve had any postpartum craziness.  Well, yes, but I don’t think it’s the usual kind.  I didn’t have any depression or blues, though I was more prone to tears the first couple weeks (especially with our little guy back in the hospital – that made me cry a lot!), and I didn’t get too crazy, but I did think my boob was my baby at one point. Yup.

For some reason almost every night for the first month, I would wake up thinking Joshua was in bed with us, and then I couldn’t find him and would wake Dennis up in my search for him.  He has slept in his crib from day one so I have no idea why this kept happening.  Sometimes I’d wake up thinking I was holding him and would be cradling my boob, thinking it was his head.  For reals.  Sometimes I’d wake up and stare at the back of Dennis’ head and stroke it, thinking he was Joshua.  (I think this is partially justified since they both have old man hair that gets totally crazy when they sleep on it.)  Sometimes I’d stroke his hand and wonder how our baby’s hands could have gotten so big, so fast.

I’m pretty sure this is kinda normal.  Normal for postpartum women, I mean.  It’s not normal to think your boob is a baby, but I think getting kinda crazy after a baby is normal.  My sister seriously believed she had two babies and someone had kidnapped the other one.  And she didn’t think this in a sleepy haze, this was a fully conscious conviction, despite having birthed and left the hospital with a single baby.  Dennis told me a man at the Boot Camp for New Dads told the men about his wife’s postpartum depression, and how one day she was convinced she had dropped her baby off at daycare and when she went to pick her up, they said she never did.  She had a full out meltdown yelling at them that they were trying to take her baby and when she finally got back home, she found her baby in her crib.  So yeah, those whacko hormones can really do a number on your head!

What about you?  Any crazy or scary postpartum stories to share?