RSS Feed

Category Archives: Tips & Tricks

Celebration Frosting & A Giveaway! {CLOSED}

Posted on

***The giveaway is now closed.  Congratulations to Jenna, Suzie, Biz, Cheryl, and Kim~the lucky winners!***

Celebration Frosting | veronicascornucopia.com

Wedding and birthday cakes from good bakeries, at least here locally, have a certain evasive flavor in the icing that I’ve always mentally defined as “celebration.”  I am still unable to describe the flavor any other way, but I learned the secret of that flavor and have been using it in the frostings for my own homemade celebration cakes ever since.

It is a flavor emulsion called “Crème Bouquet.”  This is wonderful stuff.  It is an oil-based flavoring with lemon and other essential oils that aren’t listed on the label (because they are sneaky and don’t want us to figure out how to duplicate it at home!).  Believe me, I’ve tried, but I can’t make anything that tastes even remotely as wonderful as this emulsion.  It doesn’t taste like lemon to me, although that’s the only essential oil listed, and it doesn’t taste like anything else I’ve ever had.  Well, besides wedding and birthday cake.  I have relatives that call it “that sweet flavor.”  But that is not an apt description, either.  You just have to try it for yourself!

Since I’m so in love with this flavoring and know it’s not a common household ingredient, I am going to give five lucky readers a 2-ounce bottle from Cake Stuff!  To enter, just leave me a comment on this post and I will draw the winners using Random.org on Friday, November 5th .  Simple as that.  For those interested in purchasing crème bouquet, you can order by phone from Cake Stuff–just call the number on their website.   It is very reasonably priced at $2.50 for a 2-ounce bottle, and they also have two larger sizes available.

You can turn any vanilla frosting into celebration frosting by adding crème bouquet to it, and I’ll share the two that I use it in.  Enjoy!

White Celebration Frosting

I try to avoid this one since it’s kind of a non-food, one but sometimes, you just need a good, bright white frosting and the only way to achieve that is with shortening. And believe me, it does not taste like non-food. It is utterly delicious. I promise. The meringue powder is essential in this recipe to eliminate the greasy mouth-feel that shortening frostings usually have. It is also important to use good shortening because cheaper brands tend to be clearish, off-colored, and slimy. You want one that is an opaque white, like Crisco.
Printable recipe
Printable recipe with picture

2 cups Crisco vegetable shortening
2 tablespoons meringue powder
2 teaspoons crème bouquet
1 teaspoon clear vanilla extract
1 teaspoon butter flavoring
Pinch of salt
2 lbs. (8 cups) powdered sugar
1/3-1/2 cup water

Put the Crisco in the bowl of an electric mixer and beat on medium a few seconds, until creamy. Add in the meringue powder, flavorings, and salt and beat until smooth. Slowly add in the powdered sugar, alternating with water when it becomes too thick. Add more or less water to get your desired consistency. Once it is all added, beat on medium-low speed for four minutes. This frosting will keep for up to a month, tightly covered, at room temperature, or several months in the refrigerator.

Cream Cheese Celebration Frosting

This is my favored celebration frosting. This frosting on white cake, for me, makes the ultimate celebration cake. And be sure to try it on red velvet as well–divine!
Printable recipe
Printable recipe with picture

1 (8 oz) package cream cheese, room temperature
1/2 cup (1 stick) unsalted butter, room temperature
2 pounds powdered sugar
2 teaspoons crème bouquet
2 teaspoons clear vanilla extract*
Pinch of salt
Milk, if desired

Beat the cream cheese and butter until smooth. Add the remaining ingredients and beat on low, scraping the sides, until all the sugar is incorporated, then turn to medium/high and beat for another two minutes. I prefer not to add any extra liquid because I find it easier to get a perfectly smooth cake with thick frosting**, but you can add milk as needed to make it creamier. Refrigerate or freeze if you won’t be using it within a few days.

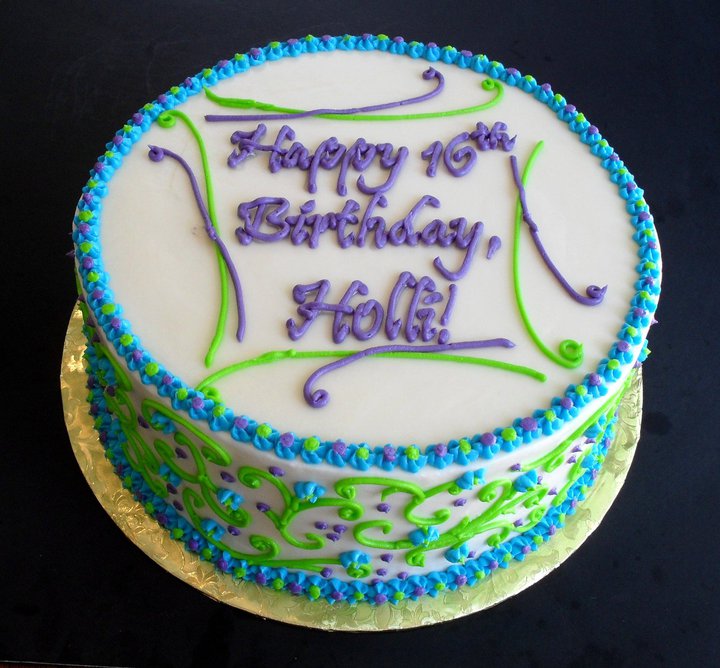
*You can use regular vanilla but the color will turn more yellowish-ivory (like Mom’s birthday cake above), which is fine unless you are aiming for a lighter color.  To illustrate, I made the following two wedding cakes with the same recipe for cream cheese celebration frosting, but used clear vanilla on the first and regular on the second:

**To get my icing perfectly smooth, I use a straight-edged offset spatula and the water bottle trick: fill a clean (ideally, brand new or designated for water only) squirt bottle with water and spray the frosted cake all over.  This allows the spatula to glide over the surface and smooth it easily.  I recommend placing the cake, uncovered, in the refrigerator for an hour or overnight to allow the water on the surface to evaporate completely before decorating.  You can see me demonstrating the “water bottle trick” in this video: How to Make a Layer Cake part 3: stacking and frosting.

~Disclaimer: I was not compensated for this blog or sponsored by Cake Stuff to promote them.  That is the store where I’ve always purchased my crème bouquet and it is consistently delicious.  So I decided to buy some to share with my readers so you can experience the awesomeness for yourselves!~

Advertisement

Don’t Waste That Cake!

Posted on

I bake a lot of cakes, which means I throw away lots of cake.  Not because I ruin them, but because I have to level off the dome on top in order to layer them without trouble.  That extra cake, if I’m being a good girl and not stuffing it in my mouth, gets tossed most of the time.

Not any more!  Cake Balls/Pops to the rescue!

I just posted the recipe and step-by-step tutorial for cake pops and you can use the same concept to save a cake that stuck to your pan, came out too dry or heavy, or to use on the extra cake that you levelled off.

If using an entire cake, go ahead and follow the recipe as instructed.  If the cake is very very dry, you will probably have to add the entire can of frosting to it.  For cake tops, I use just about a spoonful of frosting and then mush it all up with my hands, just like with cake pops.

I ran out of lollipop sticks, so I just made cake balls (also called “cake truffles”) this time.  Roll them up into quarter-size balls and put on a plate; refrigerate until very cold (I always do this 24 hours or more in advance of the dipping but a couple hours should be enough).  You’ll need about 3-4 squares of white or chocolate candy coating.  Melt it and dip the balls using a spoon, tapping off the excess chocolate before placing on wax paper to set.  If adding sprinkles, do it quickly before the chocolate hardens.  You can also drizzle any leftover candy coating over the tops or melt another color to drizzle over the tops.

This works with any flavor cake mix.  So far I have tried red velvet , chocolate and white.  Have fun with it!

By the way, I lied when I said I don’t ruin cakes.  Though I haven’t in a while, it’s been known to happen.

This was the 14" base of a wedding cake. It was the biggest cake I'd ever made and I didn't realize you had to freeze the layers before trying to lift and stack them. I'm surprised it didn't crack completely in half when I hefted that huge layer on top of the other one!

This was the middle 10" tier of the same wedding cake, which I ruined when I applied the fondant that the bride had insisted upon, despite my insistence that I couldn't do it. I guess I showed her!

There was no hope for this cake. I ended up baking and frosting two whole wedding cakes and barely got the second one done in time for the wedding. Had I known about cake balls & pops back then, I would have saved back some of the cake for that.

Though I've had other cake tragedies, this is the only other one I photographed. This is Orange Chocolate Chunk Cake.

To end this on a happy note, here’s some pics of the wedding cake after I completely redid it.  I didn’t even attempt the fondant because I didn’t want to risk ruining a second cake when I had absolutely no more time to spare.  Thankfully, the bride was very pleased with the cake (though nothing like the one she originally wanted) and had no complaints!

Brenda's Wedding Cake 8-8-08


Me with the cake.

How to Quickly Defrost Meat & Bring Eggs to Room Temperature


You’d think with the amount of time I spend in the kitchen, I’d have planned ahead for every meal and would always have my meat defrosted when it was time to cook dinner or have my eggs at room temperature when it was time to bake bread or cake.

This is rarely the case.

Since I don’t have much foresight, I’ve developed a simple method for achieving these things quickly without cooking the meat or eggs in the slightest.

I should preface the meat tip with an explanation of my aversion to microwave defrosting.  Perhaps you have had better luck with it, but I’ve found that I usually end up partially cooking the meat in order to get it thawed all the way through and for some reason, cooking the meat in the microwave in defrost mode makes it taste a little funky.  Am I alone in this opinion?  In any case, I want to cook it with the spices/sauce/vegetables/etc.  for whatever dish I’m preparing, not naked and lonely.

OK, so to quickly defrost meat, simply fill a bowl with extremely hot tap water, seal the meat in a Ziploc bag and plop it in.  Change the water when it becomes tepid and feel the meat to check temperature.  It usually takes 10 minutes-1/2 hour, depending on the amount and the thickness.  For chicken breasts, I put each one in an individual bag rather than a large Ziploc bag because they will stick together and that slows the defrosting.  I do the same with fish fillets.  I haven’t yet tried this with hamburger or sausage but I don’t see why it wouldn’t work.

As you may or may not know, eggs should be at room temperature when using them in bread & scratch cake recipes–the former to keep from inhibiting the yeast action (cold=bad in bread language), and the latter for better structure in the cake.  You can quickly bring eggs to room temperature with the exact same method as I use for defrosting meat.  Crack your eggs into a sandwich bag (putting all of them in one bag is OK), seal it, and plop it into a bowl of hot tap water.  It will only take about 5 minutes or less, depending on how many eggs are in your bag.  You can also put the uncracked eggs in a bowl of hot tap water, but it will take much longer to bring them to room temperature and there’s no way to tell for sure if they’re warm until you crack them.  In the bag,  you can feel them through the plastic.

There you go!  Hope this tip comes in handy for you.

Pumpkin Pie Spice


I have been baking a lot of pumpkin desserts this fall, and nearly every one calls for pumpkin pie spice.  I’ve never bought pumpkin pie spice in my life because I keep all the separate spices on hand.  If this is your situation as well, here’s a quick recipe for mixing a small batch of your own pumpkin pie spice blend. If you want to make a larger batch, just double/triple/quadruple the measurements accordingly.

Pumpkin Pie Spice
Makes about 2 tablespoons

1 tablespoon cinnamon
1 teaspoon nutmeg
1 teaspoon ginger
3/4 teaspoon allspice

Mix all spices and store in an air-tight container.

Overripe Bananas

Posted on

Whenever I buy a bunch of bananas, I rarely get through half the bunch before they start turning brown.  If I’m not ready to make a loaf of banana bread or another banana concoction (smoothie, muffins, cupcakes, pancakes, pie), I pop the suckers in the freezer whole with the peel still on–no bagging, wrapping or sealing–and leave them there until I’m ready to use them. 

When you do this, the skin on the bananas will turn completely black and when you thaw them out, they will get extremely limp and will leak water so set them on a plate or in a bowl (I don’t use the water but you could stir it back into the bananas if you like).  You only have to peel a little and the insides will fall out like wet goop and you barely have to stir them to mash them.  It is quite unappetizing, but the flavor is wonderful!


To make a banana cake today, I just used three bananas I’ve had frozen (with no protection save their skins) for over six months and there was no freezer taste, just a very strong banana flavor due to me freezing them after letting their skins get super spotty.

Don’t be scared of over-ripe bananas!  Their powerful flavor might not appeal when eaten fresh, but once mixed into a smoothie or into some sort of baked good, it lends loads more banana taste than a fresh banana ever could.

Cake Decorating Competition

Posted on

I work for the US Postal Service Remote Encoding Center, and this month we’ve officially been open for 15 years. They had no budget to throw a celebration, so they came up with some cute and, in this case, genius ideas to throw one on the cheap.

Today was their birthday cake decorating competition, which totally eliminated the need to buy a celebration cake (there were 5 cakes just for our shift & mine serves 150)! Isn’t that smart? All they had to do was round up some items they got for Christmas and didn’t want and put them in a basket for a prize! Genius.

I started working on my cake last Thursday, going with the idea that immediately came to mind of a three tier cake with a red, white and blue theme since those are the colors in the USPS logo. I started with the topper since it wouldn’t be perishable. I made 30 red, white and blue stars by outlining them with royal frosting on waxed paper & filling them in with color-flow icing. After they dried hard, I hot-glued them to cloth-covered floral wire and bent them into shape to make it look sort of like an explosion or fireworks.


I used 9 boxes of cake mix, 36 eggs, 3 cups oil, 8 lbs powdered sugar and 1 1/2 tubs of shortening to make this cake. It makes me shudder just to think about all that shortening.

Once all 6 cakes were baked (two per tier), I sandwiched each tier together with some of that artery-clogging white frosting and spent almost an entire day trying to get the frosting on the outside as smooth as possible. For me, the frosting is the hardest part. I choose simple decorations and they don’t take long, but it’s really hard for me to get perfectly smooth frosting. I eventually have to beat down my perfectionist tendencies into submission b/c I’ve discovered that the frosting will NEVER be perfectly smooth and even if it is, I will inevitably stick a finger (twenty times) into the frosting after it has been perfected. This time was no exception.


Bottom tier after first icing:


And after the last–as good as it gets:


Once the tiers were as smooth as they were going to get, I let them dry a little in the refrigerator and then brushed edible glitter over the surface. This proved useless b/c after adding the swirlies, you couldn’t even see the glitter. Oh well.


Next was the logo, which I was loathe to do. I am NOT an artist and I always cringe at the part of decorating when it’s time to put a picture on the cake. My usual trick (I trace the picture with clear piping gel onto waxed paper and press that onto the cake, leaving a clear impression which I can trace) didn’t work b/c the glitter created a non-stick surface, so I had to use a toothpick to draw the logo & writing onto the cake. I was NOT going to just go for it with that navy blue frosting bag–that would have been a disaster with nothing to trace! Well, even with my toothpick drawing I didn’t do much better and ended up with this:

After much lamenting and trying to convince myself you really could tell it was an eagle if you looked hard enough, I finally decided to use white to cover up the blue in the places it shouldn’t be–essentially “erasing” my mistakes with white frosting. And to my relief, it came out perfect:


I decided to insert the dowel rods before going any further. Large tier cakes need support, so you insert dowel rods that are even with the surface of the cake to support the cake above, so not all the weight is on the bottom cake. Oh, and I should mention that each tier of cake should be resting on a cardboard circle or the dowel rods won’t do any good–the cake will just sink into them and leaving you with a sort of cake-implosion. The cardboard rests on the dowel rods beneath and supports the cake above.

I measured the length needed by inserting a rod into the middle of the bottom two tiers and marking it with a pencil. Dennis cut them to size and after inserting them around the hole in the middle, I placed rounds of parchment paper over them, slightly smaller than the cake that would be placed on top. This keeps the cardboard from sticking to the cake below it–so the frosting isn’t ruined during serving.


Next I swirled & dotted red onto the bottom, white on the middle and blue on top. (Yes, we did have to empty our shelves to keep the cakes in the fridge–everything went into a cooler or thrown away. I’m so happy the cake’s gone so we can buy groceries!)


Phew! Time to stack them. I put hot glue onto the disposable base and quickly centered the bottom tier over it and let it fall into place. Then I repeated with the other two tiers, minus the hot glue part.


I sharpened a long dowel rod and forced it down through the middle of the entire cake to stabilize it during transport. I left it a little higher than I usually would b/c I intended to cover it so it really didn’t matter. I also covered the cardboard edges beneath the tiers by piping a star border in the corresponding colors.

Then I pushed a hollow plastic dowel rod over the wooden towel rod and let it go all the way down to the bottom of the first cake. This provided a place to stick the “stem” of my star topper.


Next came the tricky part. Transport! My wonderful husband agreed to wake up super early to drive so I could sit in the back seat with the cake. Since the car seat slants toward the back, I rolled up old (clean) towels to provide a flat surface for the cake.


I was barely able to carry it out, it was so heavy. But I did it b/c there’s no way I was going to let anyone else touch my cake.


As you can see, the surface wasn’t QUITE flat, so I had to shove my hand under the back and hold it in an awkward position during the drive.

All highways and roads that I usually take to work are under heavy construction and the thought of using them was enough to give me colonic spasms. Too many curves, too many potholes–and all one lane so that if Dennis went as slow as I wanted him to, our lives would actually be in jeopardy each time we came to a stop b/c surely at least one of those angry people trailing behind us would be willing to put a cap in him just to get him out of the way.

So we took a very convoluted route that was blessedly smooth and only left me screaming “SLOW DOWN!” about five times. Every little bump had my heart jumping into my throat as I watched the cake shudder and wobble and bob up and down–even with me holding it in place and my arm aching with the strain (my left was shoved under the cake and slightly lifting the whole time, while I held the topper in a vase in my right hand to keep it from jostling too much b/c the stars were fairly fragile).

What usually was a 15 minute drive was doubled by the longer route and my insistence that he go 5 mph at every turn. And even then, I was screaming, “DENNIS!” The poor man. I had him just as tense as I was. We were both ecstatic when we finally pulled into the REC parking lot.

Although we brought a flat dolly to bring it inside, once it was in my arms, I was unwilling to set it down–too afraid of what might happen after we’d got it this far–so I carried it all the way into the building and to the break room. My arms & hands were trembling with the effort and with relief once it was safely on the table. I messed up the frosting swirlies a little when I put in the birthday candles b/c I couldn’t stop shaking, but it wasn’t noticeable.

Still shaking, I admired and took pictures of the other cakes.

USPS Jeep Cake


Flip-Flop Cake


Candyland Cake (2nd place)


Computer Cake (3rd Place)–we work on computers all day so this one was really clever and appropriate.


Cake table


For all this effort and stress, I was awarded first place and got to choose from three gift baskets. Two were stuffed with candy and I went with the third labeled “Pamper Yourself” b/c it didn’t look quite as fattening as the others.

I got the book, What About The Big Stuff?, Dove Caramel Chocolates (with Christmas ornaments on the box–yeah, remember what I said about the leftover Christmas junk?), Avon foot lotion, chamomile tea, Warm Sugar Vanilla body lotion (which I believe is one of BBW’s holiday lotions) hot cocoa mixes (yeah, more Christmas leftovers–who drinks/buys cocoa in the summer?) some yummy votive candles, Burt’s Bees cuticle oil, Nifty Nuthouse (it’s a local place) mixed nuts, a luxury eye mask that I just might use b/c it’s sooooo soft, Garnier face-cleansing towelettes and (get this) a bar of soap from a hotel (the Hyatt). I’m not complaining–I love everything and am very grateful–but I just think it’s pretty hilarious how they didn’t try to hide the fact that they were regifting old Christmas rejects (and hotel soap!). I would have at least removed the chocolates from their box and put them in a nifty new container.

Anyway, the real prize–and the only reason I entered the competition–was to win…and I did! So I’m happy. I don’t think I’ll be putting myself through that again, though–I really feel like I’m done with cake decorating. I’m way too anal to bear it. But I like to contradict myself so be watching out for my State Fair cake come fall. ;)

Tips and Tricks of the (Baking) Trade

Posted on

Some of my most basic baking essentials are reusable chopsticks, paper plates and a squirt bottle. 

Chopsticks–the rounded end (the top is more square) is perfect for levelling off measuring cups & spoons.  Most of my knives don’t have a straight edge and I really like using my reusable plastic chopsticks for this. They’re also handy for stirring coffee. :)

Paper plates–when measuring flour, cornmeal, sugar and powdered sugar, etc–I place my measuring cup on a single paper plate, pour the ingredient into the cup until heaped up, then level it off with a chopstick and let the extra fall onto the plate.  After dumping the ingredient into the sifter or mixing bowl, I fold the plate and pour the extra back into the sack or into my measuring cup for the next measure of that ingredient.  This is particularly useful for flour, since pouring it into the cup does not compact it the way dipping the cup into the sack does.  Compacted flour can make your recipe too dry in some cases, especially with cakes.

Squirt bottle designated for water only–I use this on every cake I bake.  Cakes tend to get dry around the edges and it’s very easy to fix by just squirting water directly onto the edges.  I NEVER have a dry cake and get lots of compliments on it.  Professional bakers use a simple syrup (sugar cooked with water) that they dab onto the cake with a pastry brush, but the water bottle method is so much easier and does not add needless calories or change the flavor of the cake at all.  Just makes it more moist.

Holiday Eating Tips

Posted on

It took us two days, but Dennis and I finally addressed, signed and stuffed all 140 of our Christmas cards (never again!).  Now I’m thoroughly in the Christmas spirit and ready to follow these holiday eating tips (ha–I actually got a jump start on them this year!).

1. Avoid carrot sticks. Anyone who puts carrots on a holiday buffet table knows nothing of the Christmas Spirit. In fact, if you see carrots, leave immediately. Go next next door, where they’re serving rum balls.8. Same for pies. Apple. Pumpkin. Mincemeat. Have a slice of each. Or if you don’t like mincemeat, have two apples and one pumpkin. Always have three. When else do you get to have more than one dessert? 
Labor Day


2. Drink as much eggnog as you can. And quickly.  Like fine single-malt scotch, it’s rare. In fact, it’s even rarer than single-malt scotch. You can’t find it any other time of year but now. So drink up! Who cares that it has 10,000 calories in every sip? It’s not as if you’re going to turn into an eggnogaholic or something. It’s a treat. Enjoy it. Have one for me. Have two. It’s later than you think. It’s Christmas

3. If something comes with gravy, use it. That’s the whole point of gravy. 
Gravy does not stand alone. Pour it on. Make a volcano out of your mashed potatoes. Fill it with gravy. Eat the volcano. Repeat. 
 
4. As for mashed potatoes, always ask if they’re made with skim milk or whole milk. If it’s skim, pass. Why bother? It’s like buying a sports car with an automatic transmission. 
 
5. Do not have a snack before going to a party in an effort to control your eating. The whole point of going to a Christmas party is to eat other people’s food for free. 
 
6. Under no circumstances should you exercise between now and New Year’s. You can do that in January when you have nothing else to do. This is the time for long naps, which you’ll need after circling the buffet table while carrying a 10 lb  plate of food and that vat of  eggnog. 
 
7. If you come across smething really good at a buffet table, like frosted Christmas cookies in the shape and size of Santa, position yourself near them and don’t budge. Have as many as you can before becoming the center of attention. They’re like a beautiful pair of shoes.   If you leave them behind, 

you’re never going to see them again.
9. Did someone mention fruitcake? Granted, it’s loaded with the mandatory celebratory calories, but avoid it at all costs. I  mean, have some standards
10. One final tip: If you don’t feel terrible when you leave the party or get up from the table, you haven’t been paying attention. Re-read tips; start over, but hurry, January is just around the corner.

Cream Cheese Wedding Frosting & Some Cake Tips

Posted on

These are some of my trade “secrets,” including my recipe for cream cheese wedding cake frosting.  I hope you find some of them useful!

1.  A box mix cake covered in delicious homemade frosting is quicker and easier, and can be just as delicious (or more so) than from-scratch cake. Replace the water and oil with milk and melted butter to give it a richer, more homemade taste.

2.  Make your own frosting.  It is worth the effort and doesn’t take much time.  The flavor is incomparable to canned frosting and even if you use it on an un-enhanced box mix cake, it will still taste from scratch rather than generic.  If you’re looking for a good recipe, I have many favorites in my Cake & Frosting Index.

3.  For cakes that never stick to the pan, no matter how big it is: grease the bottom of your pan, cover it (bottom only) with parchment paper, then grease and flour the whole thing. I use this mostly for bigger pans, but for 12″ and under, Miracle Pan Release works perfectly without the extra steps.

4.  Cool your cake completely before frosting.  Otherwise the frosting will melt off and your efforts will have been for naught.  Another tip on cooling: after baking, allow your cake to sit in the pan for five minutes and then turn it out onto a cooling rack so that the heat releases easier and it cools faster.  Otherwise the cake continues to bake in the pan after it’s out of the oven and dries it out more.  Leaving it in the pan 5 minutes allows it to set a little and reduces the risk of the cake breaking since it’s hot from the oven.

5.  If your cake feels dry to the touch (this happens especially around the edges), use a spray bottle to douse the affected area with water.  I use a bottle designated for water only b/c you don’t want to get residue from a bottle that previously housed cleaner on something you’re going to eat.  This trick works wonderfully and doesn’t affect the taste at all.  Don’t be afraid to put too much water—just squirt until it feels moist and then keep it covered or wrapped until you’re ready to frost it.  The cake will absorb the moisture uniformly so that it’s moist and delicate throughout.  You can also add liqueur to the spray bottle to add a subtle flavor to the cake.  I used chocolate liqueur on a red velvet wedding cake and have also used Kahlua on a chocolate cake and both worked very well.

6.  Here’s another water bottle trick that is invaluable to me.  To make your frosting super-smooth on your cake, use your water bottle to douse the entire cake after you’ve smoothed it out as much as you can.  Your spatula will glide over it easily to give a flawless finish and whatever water remains on the surface will evaporate and no one will be the wiser.  Oh, and you can’t do this without an offset spatula or some sort of long, straight edged tool.

7.  Here’s another secret that you have to either go to the cake store for or buy online.  You know that flavor that’s in the white frosting of every wedding cake you’ve ever had?  Have you ever tried to duplicate it?  You can’t find it in any Betty Crocker frosting and you will probably never be able to make it at home without crème bouquet.

It is a divine flavor emulsion that gives that sweet wedding cake taste to your frosting.  You can add it to plain vanilla frosting, but I also add it to my cream cheese frosting for a subtle, wonderful effect.  So there was the wedding cake taste underlying the rich, tangy cream cheese flavor.  Yum!

My Secret Cream Cheese Wedding Frosting

1 stick unsalted butter, room temperature
1 (8-oz) package cream cheese, room temperature
1-2 pounds powdered sugar (less for a creamier frosting, more for thicker)
2 tsp. clear vanilla extract (you can use regular if you don’t mind the color turning a tad darker)
2 tsp. crème bouquet*

Beat the butter and cream cheese until smooth.  Add the remaining ingredients and beat on medium/high.  Use immediately or store at room temp until cake is frosted.  Refrigerate or freeze if you won’t be using it within a few days.  Use the water bottle trick to get it smooth on your cake.

*Crème bouquet is a flavoring, essential to achieving the “wedding cake” flavor.  To find out more about crème bouquet, click here.

8.  If you’re fed up with cakes that dome in the middle, use Bake-Even cake strips.  You wet them with cold water, pin them around the cake pan, and your cake rises evenly and fairly flat. This dramatically reduces the amount you have to cut off the top in order to make it flat for layering and frosting, so less is wasted and you get more cake per serving.  That’s always good. :)

9.  And if you do make cakes enough, you should probably invest in a cake leveler. Unless you’re uniquely gifted, it’s nearly impossible to cut the cake top off in a straight line.  Wilton sells two different sizes of cake levelers (I prefer the large and use it for all my cakes) that makes this a breeze.   You just adjust it to the height you want and saw across the cake (keeping the cutter straight up and down) and you’ll have a perfectly flat cake that will stack gorgeously.

10.  If you won’t be frosting the cake as soon as it’s cool, wrap it well with plastic wrap or seal it in Ziploc bag and press the air out (without squashing the cake).  If it dries out in the slightest, just give it a spray with water or liqueur to restore moisture. You can also freeze your cake (after wrapping it well) and when ready to assemble, take it out of the freezer and frost it while frozen! It actually makes the job easier since the hard cakes are easier to handle and cold cake firms up the frosting as it is applied, which helps when icing a cake.

I hope these tips help you a little with your own cake baking. Please share your own tips in the comments!

%d bloggers like this: