I was perusing Minda’s Cooking after a long hiatus and I pinned everything I saw and then made it within a week. OK, so it was three things, but that’s kind of epic for me. I pin tons of things (seriously, I’m almost at 8,000 pins), but rarely make them, let alone all at once. Minda’s blog was speaking my language, though. First it was the Frito Salad. Then it was this dip. Then it was the Crockpot Chicken & Stuffing. Bring on the easy-to-make comfort food.
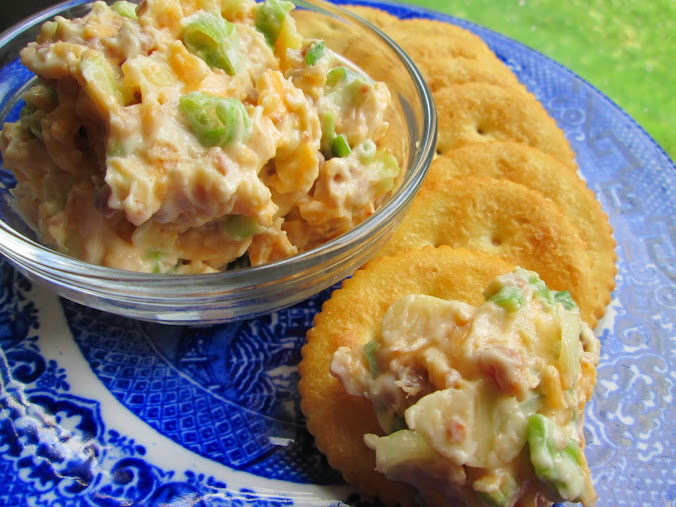
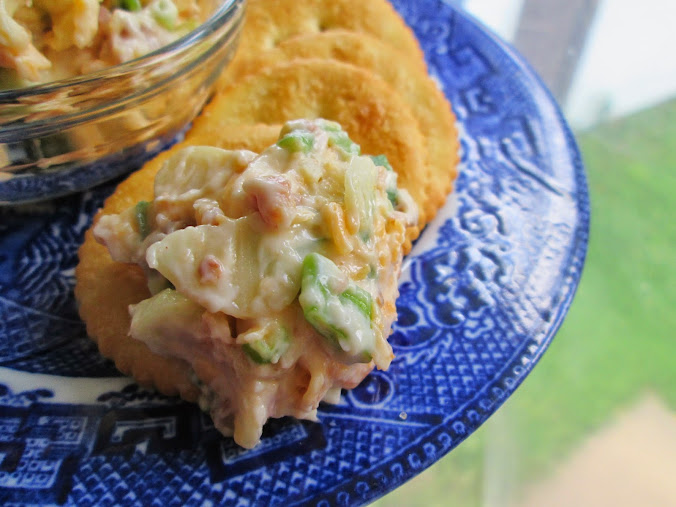
OK so we’ve already established that dip is my thing. Dip is like majorly my thing. If dip were a man, I would marry him and then eat all our dip babies. OK, maybe that’s going a little too far, but not by much. And this dip is so, so good. Totally meets my dip standards because it’s fat, plus more fat, plus some more x 2, with onions, which means it’s delicious. Can’t go wrong with quadruple fat plus onions.
All kidding aside, this dip is some serious goodness. It’s creamy, crunchety, bacony goodness. Make it, and you’ll be a superstar at your next potluck, game day, or to yourself as you spend some quality alone-time with it.
This month my Secret Recipe Club assignment was Annie’s Noms and I was in heaven. A baking blog with the majority of recipes given with grams instead of cups! Be still my beating heart. :) While I enjoyed scouring through her recipes to find the one, I actually found it in the first thirty seconds but just had to keep looking because, hello. A baking blog. I love you and all your desserts, Annie!
I knew before I even saw the recipe that her Biscoff Butter Bars were exactly what I wanted to make. Hello. Biscoff and butter? Gimme gimme. If you haven’t had Biscoff yet, it’s cookie butter – smooth and creamy like peanut butter but made with lightly spiced cookies instead of peanuts. Yes, seriously, cookie butter really is a thing, and it’s so good. I encourage you to try it. Most supermarkets, including Walmart, sell it now, and can be found by the peanut butter usually. Annie likes to eat it on croissants and that sounds like heaven!! Personally, I try not to buy it too often because it inevitably gets eaten spoonful by spoonful until I’ve devoured the entire jar in a shamefully short amount of time. But adding it to a butter-laden recipe, while perhaps even more sinful, makes it a lot easier to share with others and keep it off my own hips.
Unfortunately, I ended up eating more than my fair share anyway. Although I over-baked them a bit (something I previously considered an unforgivable culinary sin until I had a child and realized that over-baking is sometimes unavoidable), they were so good it was hard to stop eating them. Butter makes everything better, even something as perfect as Biscoff.
Please stop by Annie’s blog to see how beautiful these bars are when baked perfectly, and check out her other yummy desserts!
½ lb (2 sticks) unsalted butter, at room temp
½ cup (3 ½ oz / 100 g) granulated sugar
¾ cup (3 oz / 84 g) powdered sugar
1 tablespoon vanilla extract
2 cups (8 ½ oz / 242 g) all-purpose flour
1 (14.1 oz) jar Biscoff Spread
Preheat the oven to 325F and grease a 9×9 in pan. Place the butter and sugars into a large bowl or the bowl of your stand mixer and beat until light and fluffy, about 2 minutes on med-high speed. Add the vanilla extract and flour and mix until a soft dough forms. Press half the dough into the greased pan (wrap remaining dough in plastic wrap and refrigerate) and bake for 12-14 minutes, until puffy and ever so slightly firm to the touch. It will not look done.
Allow the base to cool for 15 minutes. Once cooled, spread the Biscoff over the base, leaving a 1/4 inch gap around the edge. Crumble the remaining dough over the top of the Biscoff and bake for 20-25 minutes, until puffy, very lightly golden and slightly firm to the touch. Allow to cool completely before removing from pan. Slice into 12-15 bars.
Recipe source: slightly adapted from Annie’s Noms.
Joshua has been developing and growing so much since I posted when he was a wee five months. Now he’s a big 6 1/2 months and this is what he’s accomplished in the last month and a half…
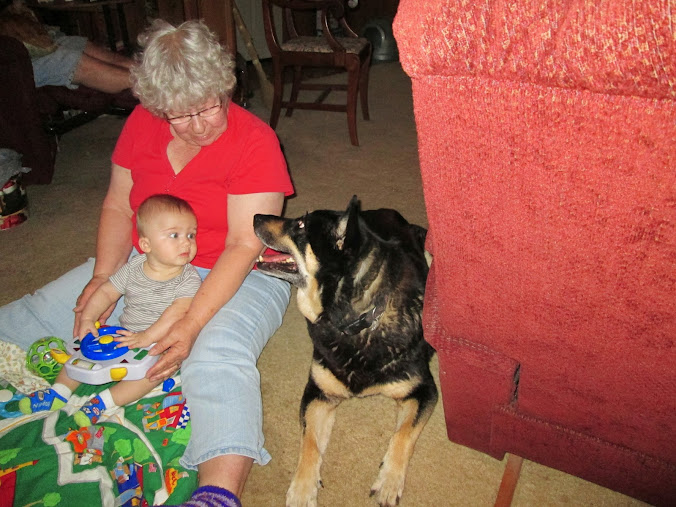
He’s fallen in love with Jessie! This photo was during a week-long stay at Grandma & Grandpa Miller’s and is the only one I have of them together, though it doesn’t reflect his love for her. Every time she goes past him now, he gets a huge smile on his face and reaches for her. She doesn’t like to be touched by him yet (he’s a bit grabby) but will allow it if I’m there to help make sure he’s gentle. She rarely licks us but she licks him every chance she can get so on some level, she must like him…or at least likes the way he tastes. :) Here’s a video of the first time he pet her (sorry it’s dark), and you can also see her taking advantage of his nearness by giving him a tongue bath lol:
He started rolling over from back to tummy while we were on vacation there, and is now sleeping not only without a swaddle, but on his side or belly because he refuses to be on his back any more and rolls immediately when put in his crib. When I took the above picture, I felt a little catch in my heart because it was the first time I really felt like I was already losing my baby. He looks like such a little boy in his shorts and T-shirt, rolled onto his side without his arms in the straight-jacket look of a swaddle.
He found his feet and loves to hold on to them while he’s drinking his bottle, or laying on the floor, or the bed, basically he holds them a lot. It’s pretty cute. :)
He’s become interested in other kids, including himself! He loves looking at his reflection and smiles like this every time. Whenever a child five or under is in his vicinity, he is mesmerized. It’s about time to start having baby play dates. Here’s a video of his first baby lunch date:
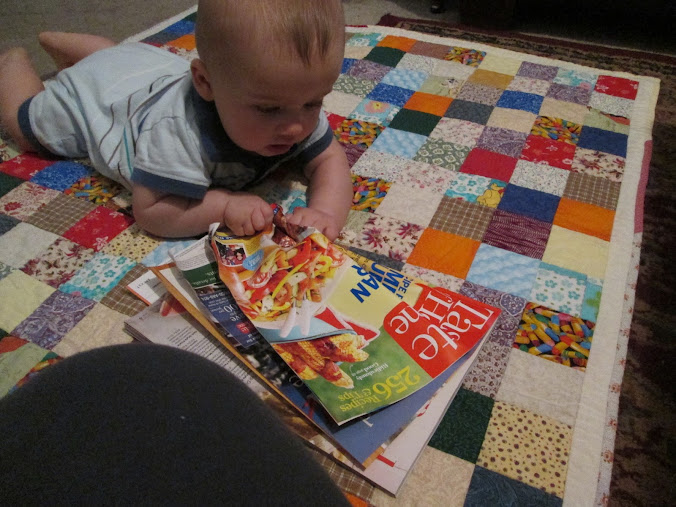
He learned to read! OK, maybe not, but I had to include this pic of him checking out my Taste of Home magazine. He’s my little foodie baby.
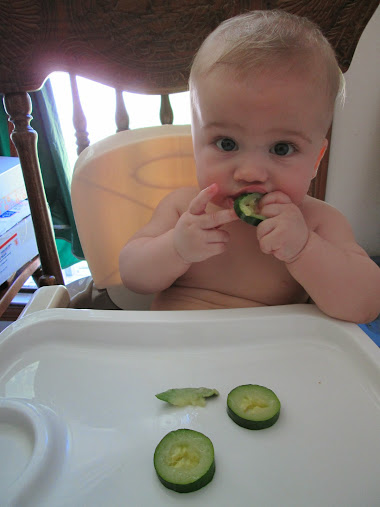
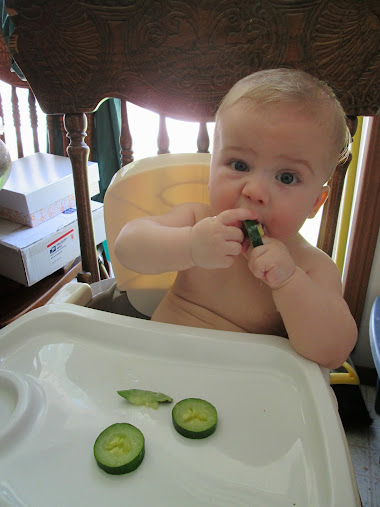
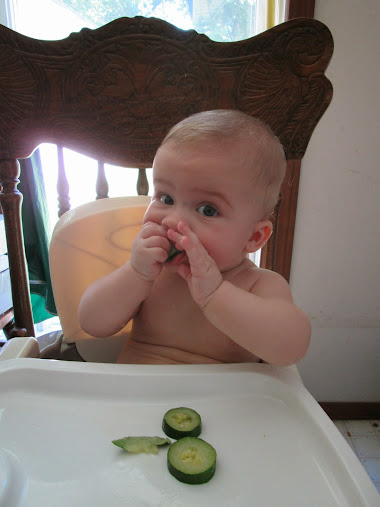
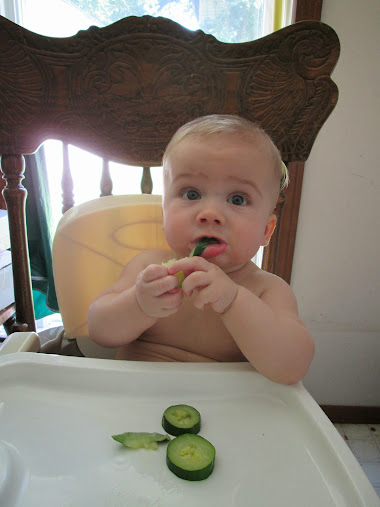
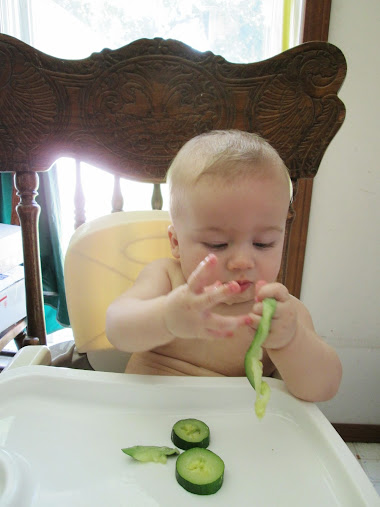
Speaking of my foodie baby, here he is taking his first spoonful of real food (rice cereal). He was ready for it! When he saw it coming he grabbed it and insisted on feeding himself. LOL! This was before we even had baby spoons and his high chair was still in the box. We are doing a combination of pureed/mushed foods and soft foods like peas, zucchini microwaved and sliced into coins, and banana chunks.
This way of feeding a baby is called Baby Led Weaning, which I discovered through other blogging mothers and they had such success with it I thought I’d give it a try. I have to say, he and I both prefer when he can hold his own food and feed himself. It’s less messy (so far, I’ve heard in the end it’s about the same) and less work, and I don’t have to fight him to get him to eat. He seems to enjoy it much more when he’s in charge. He doesn’t want to take food from a spoon much any more. Here’s a video of him chewing on a bread stick -he didn’t eat it but he sure had fun using it as a teether! lol
While I’m not ready for him to be a little boy, I have to say he’s more and more fun the older he gets. I don’t want him to grow up too fast, but I’m looking forward to all the fun we’re going to have along the way.
I have an internal maniacal laugh every time I say or even think, “Frito Salad.” Saying the words “Frito” and “Salad” in the same recipe title just makes me giddy with hilarity. Reminds me of one of my favorite eCards…
This “salad” is basically my two favorite things combined. Chips and dip (and one of my all-time favorite dips at that). And it’s called a salad. WINNING! :D To be fair, it’s a little healthier than regular chips and dip because of all the corn (and some peppers & and onion), but let’s just get honest here. This ain’t my Momma’s kinda salad. But it sure is mine. >:)
This salad is downright delicious and would be great to bring to any potluck you might be attending in the near or distant future. I know I will be!
3 (14.5 oz) cans of whole kernel corn, drained
1 green pepper, seeded and finely diced
1/2 of a small red onion, finely diced
1 cup (4 oz) grated cheddar cheese
1 1/4 cups mayonnaise
1 (9.25 oz) bag of Chili Cheese Fritos
Stir the corn, green pepper, onion, cheese and mayonnaise in a bowl. Cover and refrigerate until ready to serve. Just before serving, mix in Fritos, reserving a handful to lay on top as a garnish. Serve immediately.
Veronica’s Notes: The original recipe called for red pepper along with the green, so feel free to sub in half of the green for red to make it prettier. Also, if you know you will have leftovers, add the chips to the individual servings rather than all at once, because the chips will get soggy and gross.
I never learned to make goulash – I just knew it had noodles, ground beef, and tomatoey stuff going on in it, according to my Mom’s memories of what her mother made. But she never made it so I just came up with my own way of making it which was sort of like the same way I made spaghetti with meat sauce, but just with macaroni noodles instead. I have my favorite version of my own version posted here.
I finally had real (real as in the Americanized real, not the Hungarian real) goulash at my in-law’s house. I’d been wanting to get my MIL’s recipe for a long time, because although Dennis never says “this isn’t like Mom used to make,” I’ve always wanted to cook his favorite meals that he grew up eating and goulash topped that list. His Mom’s goulash is really, really good! After enjoying it on Easter, I asked her exactly what she put in it so I could recreate it at home. I’ve never turned out better goulash and Den’s favorite is now one of my absolute favorites as well. We could eat this almost every week!
1/2 lb macaroni
1 1/2 lbs ground beef
1 large onion, diced
garlic salt, pepper, chili powder, & hot sauce to taste
2 (14.5 oz) cans whole stewed tomatoes, undrained
2 tablespoons ketchup
Tomato juice as needed
Cook the macaroni to al dente according to package directions. While it’s cooking, brown the ground beef and onion together in an extra-large skillet or in a dutch oven. Drain and season with spices to taste. In a large bowl, mash tomatoes with potato masher and add to beef along with the ketchup. Drain macaroni and add to the beef mixture, stirring well. Taste and add additional seasoning as needed. I didn’t need to add any tomato juice to mine, but if you like yours very juicy you can add as much tomato juice as you like. Phyllis adds it to her leftovers, which I would also recommend, because the noodles tend to soak up all the juice with time.
Recipe source: Phyllis Miller
P.S. Happy anniversary to my hubby! These have been the best 14 years of my life.
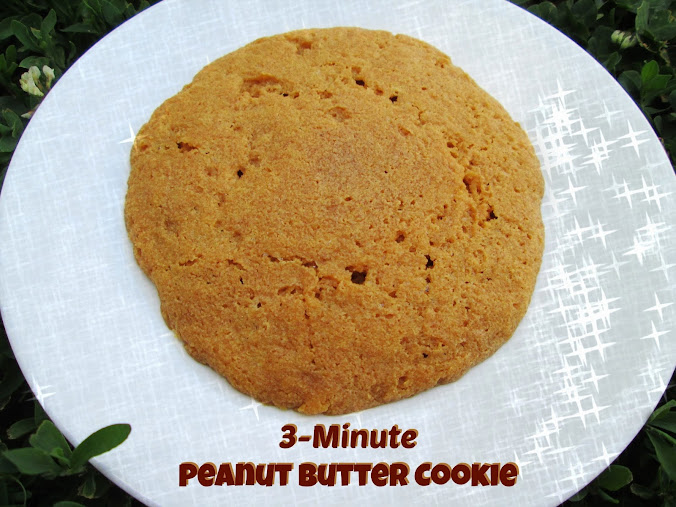
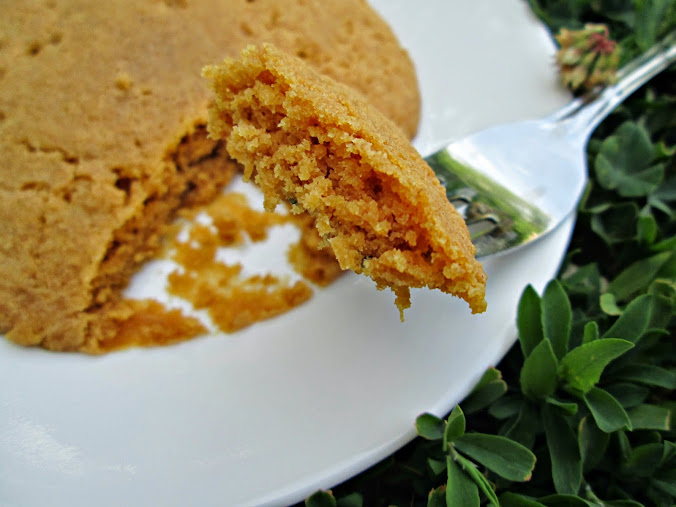
For some reason I’ve never had the urge to make one of those quick and easy chocolate mug cakes that are done in the microwave. I’ve saved recipes for them, thinking it sounds like a fun idea, but I guess it seems like too much work to mix up the ingredients for such a small cake. Especially since I know I’d have to do it at least twice in a row to satisfy my sweet tooth-lol.
But a microwave cookie? I had to try that. (Don’t forget my second favorite food group is “Cookies,” with “Dip” being the first-haha.) The original recipe was for a single cookie but I don’t keep a carton of Egg Beaters on hand and didn’t want to measure out a single tablespoon of egg white from a real egg, so I just multiplied the recipe by four to use a whole real egg (I’ve got mad baking mathematical skillz and knew that a whole egg = 1/4 cup or 4 tablespoons, just like I know how many ounces is in a cup of flour & sugar so that I don’t have to use measuring cups!). This yielded four cookies, which is totally preferable to one cookie in my world. :D
Dennis and I split the cookies and both loved them! They are soft and chewy and totally hit the sweet spot. So simple and you don’t even have to turn on the oven. Now that’s a summer dessert I can get behind. Extra bonus for those with food allergies: these are naturally gluten and dairy free!
½ cup (4 ¾ oz) creamy peanut butter
¼ cup (2 oz) brown sugar, packed
½ teaspoon baking powder
1 large egg
Use a fork to mix the peanut butter and brown sugar together in a small bowl. Stir in the baking powder until completely incorporated. Mix in the egg until batter is uniform, thick & smooth. Remove ¼ – 1/3 of the batter and place on a small microwave-safe plate. Press into a thick cookie shape about 2″ in diameter and microwave 1 minute. Allow to cool while repeating with remaining batter. I preferred these when just a little warm.
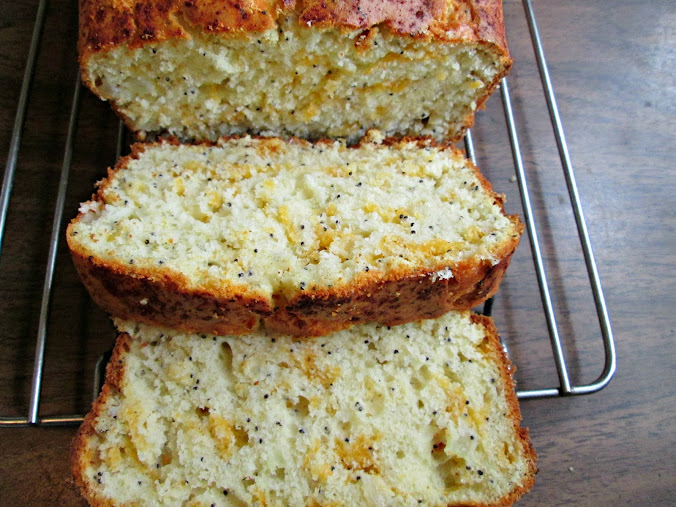
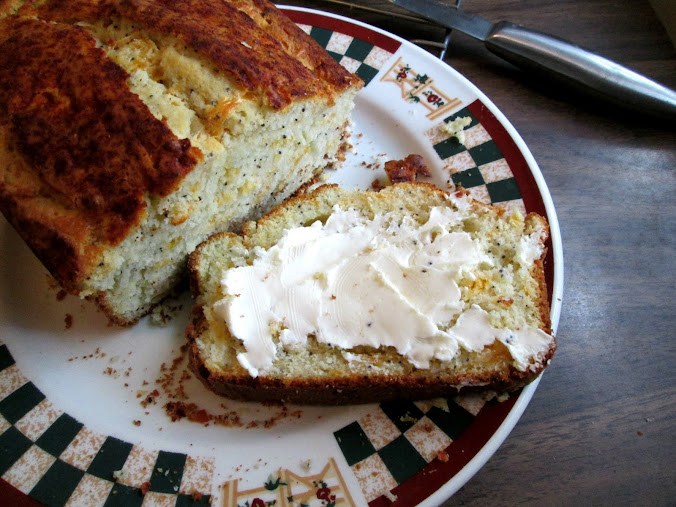
Poppy seeds go with lemon, amiright? Maybe orange if you want to get a little adventurous. But cheese and onion? I wasn’t sure. I love to try new things but I admit, I wouldn’t have made this bread if I hadn’t gotten the recipe from my Foodie Mama, and if she hadn’t told me that it was an undefeated blue ribbon winner for 25 years in California and she finally retired it to give someone else a chance. Ha! Well, knowing it had to be good, even if it was a sweet quick bread with onions and cheese in it and poppy seeds, I made it while staying with my in-laws last week. The loaf was devoured in less than a day. (I may have had more than my fair share.)
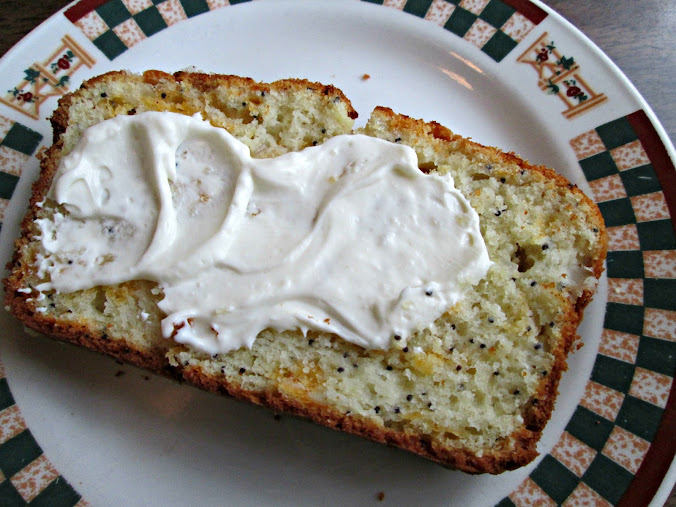
Marina recommended spreading cream cheese on the slices and I have to tell you, that was incredible! The tangy cream cheese really was the perfect compliment to the sweet & savory bread. She also said if you toast the slices first, it makes an outrageous grilled ham and cheese sandwich. Unfortunately this loaf was eaten too fast for us to try it, but I’m going to next time!
P.S. Marina still has copies of her cookbook available for purchase for $10 + $3.50 S&H. Let me know if you’d like to purchase one! I have yet to be disappointed in any recipes I’ve tried from it.
1/2 cup (3 1/2 oz) granulated sugar
1/2 cup (3 1/4 oz) vegetable shortening
3 large eggs
2 cups (8 1/2 oz) all-purpose flour
1 tablespoon aluminum-free baking powder*
1 teaspoon dry mustard
3/4 teaspoon salt
1 cup whole milk
1 tablespoon poppy seeds
1 1/4 cups shredded cheddar, Monterrey Jack or a combination
1/2 cup finely diced sweet onions
Sweet paprika
Preheat oven to 375F. Grease a 9″x5″ loaf pan or coat with Miracle Pan Release; set aside.
Cream sugar and shortening until fluffy, a few minutes. Add eggs, one at a time, beating well after each addition. Combine dry ingredients and add alternately to creamed mixture with milk, beginning and ending with dry ingredients. Stir in cheese, onions, and poppy seeds. Pour into prepared loaf pan and sprinkle the top with paprika. Bake 50 minutes or until a toothpick inserted in middle of loaf comes out dry. Cool 10 minutes in pan. Remove loaf carefully and cool completely on wire rack. Loaf is best the next day, or at least several hours after baking so that the flavors can deepen and meld.
*I always recommend using an aluminum-free baking powder, such as Rumford, in any recipe calling for more than a teaspoon. The regular kind with aluminum tends to leave a chemical aftertaste in baked goods, especially if a larger amount is used. Recipe source: Marina C.
This month for the Secret Recipe Club I was assigned to Our Eating Habits – pretty nifty considering I had Jamie’s blog last month! Jamie called my blog “pay dirt” and I’d have to say the same of hers – there were just so many comfort food recipes (my favorite kind!) that I had a blast browsing through them. I decided to make something for our annual Mother’s Day picnic from her blog and ended up making two things, this delicious pie and Smoky Baked Beans – both fabulous!
There was only one piece of pie left when we arrived late to the picnic (the pie preceded us in my IL’s van), but I had a good excuse to make it again in order to get pictures of the inside – my Father-in-law’s birthday was coming up, and he just so happens to adore banana cream pie. Turns out so do I. It was so hard not to hog the pie all to myself but I took my single slice and let him have the three pieces that were left after we’d all had one. He raved, everyone raved, and the pie is an official success. Thank you, Jamie, for sharing such a fun and delicious recipe! I never would have thought to use Nutter Butters for a pie crust but it is the perfect compliment to the banana cream filling.
Banana Cream Filling
3/4 cup white sugar
1/3 cup all-purpose flour
1/4 teaspoon salt
2 cups milk
3 egg yolks
2 tablespoons cold butter
1 1/4 teaspoons vanilla extract
3-4 bananas, sliced
Topping
1 (8 oz) tub frozen whipped topping, defrosted
4 Nutter Butters, crushed
Place 12 Nutter Butters in food processor and pulse until fine crumbs. Add cream cheese and process until completely incorporated. Press into 9″ pie plate (not deep dish) and bake at 350F for 12 minutes. Set aside to cool while you continue with the recipe.
In medium-sized saucepan whisk together white sugar, flour, and salt. Whisk in the milk and cook over medium heat, whisking constantly, until bubbles form. Cook for additional 2 minutes, whisking constantly to avoid scorching. Remove from heat.
Place egg yolks in a small bowl and whisk. Whisk in a small amount of milk mixture to egg yolks, then repeat a second time. Pour egg yolk mixture into remaining milk mixture in pot and whisk to combine. Return to burner and heat again over medium heat for about 2 more minutes. Remove from heat and stir in butter and vanilla. Slice bananas into the pudding and stir gently to combine well, then pour and smooth into prepared crust. Place plastic wrap directly on top of the pie to seal out air and refrigerate until ready to serve, at least four hours. Before serving, spread whipped topping over the top and sprinkle on the crushed Nutter Butters.
My sister-in-law gave me a doughnut pan for Christmas two years ago…maybe three. It’s what I asked for, had wanted for years, and yet I only used it to bake the doughnut mix she gave me with it until now! What is UP with that?
I was Pinteresting (yes, I’m allowed to turn nouns into verbs haha) and came across Shelby’s baked banana doughnuts with a browned butter rum glaze and I HAD TO HAVE IT RIGHT THEN…or at least my own version of it. :) I had my nearly forgotten doughnut pan, a single overripe banana, and the baby was taking a nap – it was like the stars aligned and God smiled down on me in that instant. I got to work and boy oh boy. These were quick to make and so delicious! Brown butter and banana are a match made in heaven. Actually, browned butter makes everything better, don’t you think?
1 cup (4 ¼ oz / 120 g) all-purpose flour
2 teaspoons baking powder
1 teaspoon ground cinnamon
¼ teaspoon salt
1 large (about 5 ½ oz / 156 g without peel) overripe banana
1 large egg
¼ cup (2 ¼ oz / 64 g) buttermilk
2 tablespoons vegetable oil
¼ cup (2 oz / 58 g) light brown sugar, packed
2 tablespoons butter
1 cup (4 oz / 113 g) powdered sugar
1-3 teaspoons milk, as needed to thin the icing
Preheat oven to 350F. Spray a 6-well doughnut pan with oil and set aside (I wipe off the top with a paper towel to reduce the amount of baked-on oil build-up on there but that is your call). Whisk together the flour, baking powder, cinnamon, and salt in a medium sized bowl. In a separate smaller bowl, mash the banana, then whisk in the egg, buttermilk, oil, and sugar. Add to the dry ingredients and stir together until just combined (a few small flour lumps are OK). You can either use a spoon to fill the doughnut pan or put the batter in a ziploc bag and snip a corner to squeeze the batter into the pan. Fill each well 3/4 full. If you have extra, you can make it into mini muffins or wait until the first batch is done baking to make a couple more doughnuts. Bake doughnuts for 12-15 minutes, or until golden and doughnuts bounce back when lightly pressed. Turn out onto cooling rack to cool completely.
While doughnuts are cooling, brown the butter. Place in a small saucepan and cook over medium heat, stirring constantly, until the solids separate and turn a chocolate brown color. Remove from heat and add the powdered sugar and enough milk to get a glaze consistency (it doesn’t take much. Dip the tops of each doughnut in the warm glaze with the cooling rack over the sink so the glaze can drip off as you finish dipping each one. If you have extra, you can put it in a ziploc bag or disposable piping bag and snip a corner to drizzle over the doughnuts because extra glaze makes them extra good! :)
How do I have a 5-month-old? I remember looking at 6-month sized clothing and thinking he would never fit it. And now he’s starting to wear it!
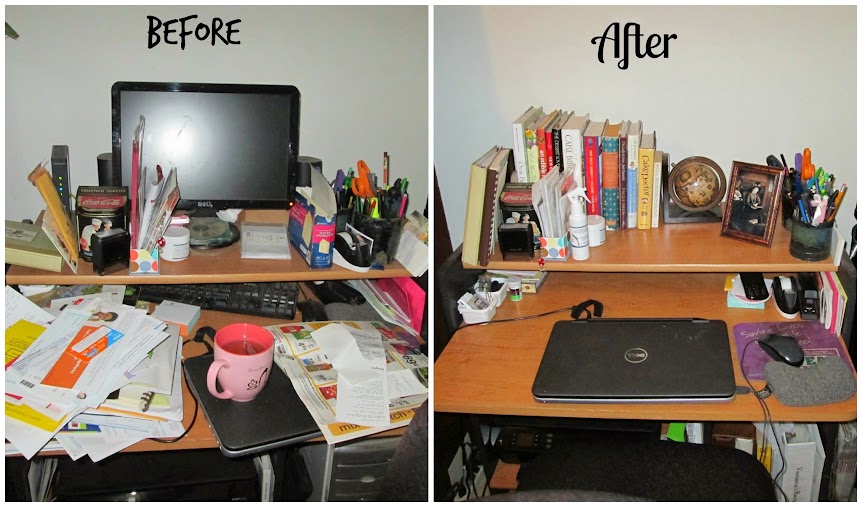
I took an internet “fast” last week and used it to clean up my house. Unfortunately that isn’t reflected in these videos and you can see plenty of clutter, but hopefully the adorable baby will distract you from it! I included one before and after photo from my cleaning after the videos for your viewing pleasures. I love having a clean house! Almost as much as this baby.