RSS Feed

Category Archives: Bread

Whole Wheat Potato Bread

Posted on

You can thank The Secret Recipe Club for bringing me out of hiding this week! If it weren’t for being in the club, I’m sure I’d have gone to bed early last night (long day) instead of scheduling this to post.  So hopefully you’re more thankful about that than I am-LOL! ;)

This month I was assigned to The Vanderbilt Wife.  Yay, another blog that starts with “V” (you might not be aware, but we are an endangered blog species, though not as bad off as blogs beginning with  “X” and “Z”)!  Jessie is also a sister in Christ, so let’s give a little HOO-WAH for that too.  Or maybe you could just wait while I do it.  HOO-WAH!  So lovely to meet you, Jessie!

Anyway, my assignment came right after a failed attempt at 100% whole wheat bread.  It was supposed to be the best whole wheat bread ever…but it was not.  So when I saw Jessie’s beautiful Fluffy 100% Whole Wheat Bread, I freaked.

“Dennis, guess what she has on her blog?” I shrieked.

“Light and fluffy whole wheat bread?” he guessed without even glancing over at my computer screen.

(From that you can assume correctly that I had made it very obvious how deeply disappointed I was with the dense and yucky-tasting loaves I’d just made.)

“YES!” I screamed.

And I proceeded to make the recipe.  Three times.  It makes three loaves per recipe, so I made nine loaves of whole wheat bread within the span of two weeks.  Unfortunately, I never got the bread to stay risen once it started baking so those nine loaves weren’t as light and fluffy as I’d have liked.  Each batch started out so high and promising…

only to let me down half way through baking.

*sob*

Since I couldn’t consult Jessie to see if she had any suggestions (in the SRC, you don’t alert the blog you’re assigned to because it’s meant to be a surprise on reveal day, and I couldn’t ruin the surprise by asking her for help), I never got the recipe to turn out for me,  but it did work for her so please visit her blog to see how light and fluffy her loaves are.  I’m bound and determined to get the same result and will post the recipe on my own blog once I’ve got it figured out.

Since I started out with a yeast bread recipe from Jessie’s blog that I couldn’t get to turn out right, I went with another yeast bread recipe of hers that included some white flour (white flour helps because the gluten develops better and easier than with whole wheat).  I’ve been wanting to try making potato bread for years, interested in how the potato would affect the texture, so I was excited to see she had a whole wheat potato bread recipe on her blog.

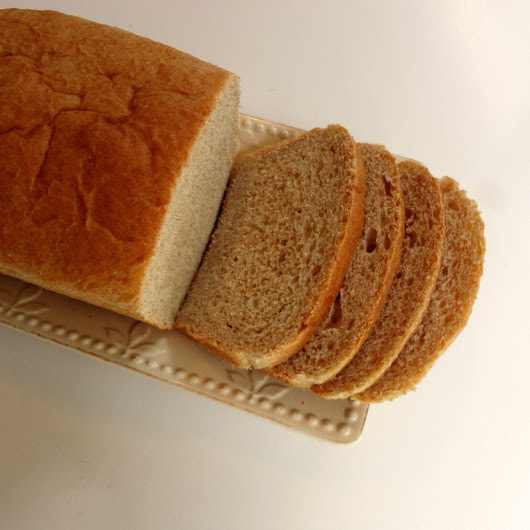
Let me tell you, making those nine failed loaves was totally worth it since they eventually led me to this recipe.  (Also, those nine loaves, though deflated, were delicious and still fairly light, and all were eaten by my family who praised it highly.)  This is the lightest, softest bread I have ever made that has whole wheat in it!  It is so soft, in fact, that it’s hard to hold on to it while slicing without smashing it (I used an electric knife after the first slice, and highly suggest it if you have one–it makes the slices nice and even without crushing the bread.)

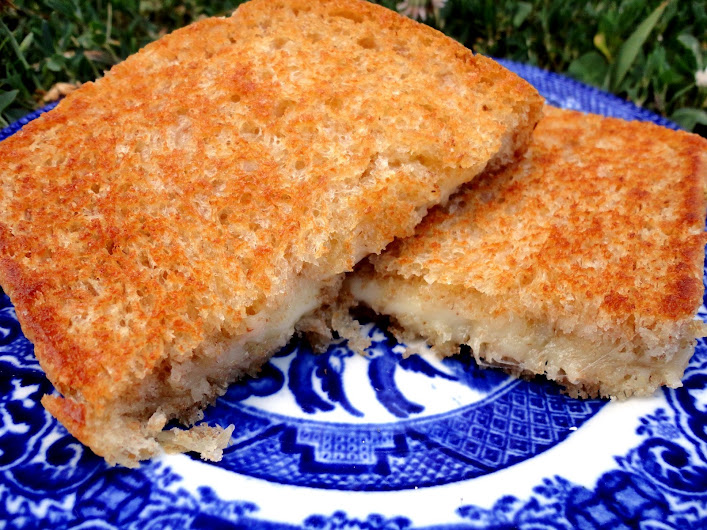
It is delicious and is perfect for making sandwiches, with a little more nutrition than plain white bread.  Jessie said it made killer grilled cheese sandwiches, so I put it to the test with some pepper jack cheese.  And I concur, KILLER!  I really hope you try this!

Whole Wheat Potato Bread

Printable recipe
Printable recipe with picture

1 medium potato
1/3 cup butter, softened
1/3 cup sugar
1 teaspoon salt
1 egg, beaten
2 ¼ teaspoons (1 envelope) active dry yeast
½ cup warm water
3 cups whole wheat flour
1 ½ to 2 cups unbleached all-purpose flour

Peel the potato, cut into cubes, and boil in a small saucepan until very soft. Drain, reserving 1 cup cooking liquid. Mash the potato in a small bowl and let cool slightly.

Cream butter, sugar, salt, and egg with an electric mixer. Add potato and mix well.

In a small bowl, put the ½ cup warm water and sprinkle the yeast over it. Let is sit for 10 minutes, then add to the potato mixture and beat until combined.

Change beaters to dough hooks and set mixer to 2. If you don’t have dough hooks, you will use your hands from this point forward. Add 2 cups whole wheat flour alternately with the 1 cup cooking liquid*, mixing/kneading well after each addition. Gradually add in the remaining flour until the dough starts to clean the side of the bowl. When that happens, let mixer go an additional 2 minutes. If kneading by hand, knead it in the bowl for about five minutes, or turn out onto a floured surface to knead. My dough was still a bit sticky when I stopped adding flour, but if I picked a ball off and rolled it in my hands, it did not stick to my hands. That is my test to know when I can stop adding flour, even though I really wanted to add more to keep it from sticking as I kneaded. I dealt with it and just scraped my hands off afterward. :)

Once your dough looks a little shiny, you’re done. If it doesn’t look shiny, just let it mix or knead it by hand until it does.
Place the dough in a greased bowl, cover with a towel and place somewhere warm. I like to preheat my oven to 350F for one minute, then turn it off and place my bowl in the oven. Let rise for an hour or until dough is doubled.

Punch dough down; divide in half. Shape into loaves by pushing each half into a rectangle, rolling it up, pinching the seam, and tucking the ends under. Place in two greased loaf pans (I slathered mine generously with softened butter). Cover with the towel again and let rise another 30-45 minutes or until doubled again.

Bake at 350 for 25 minutes or until golden brown. Remove from pans and rub the tops with a stick of cold butter. Set on a wire rack to cool

*Notes: Make sure your cooking liquid has cooled to about 115F before adding to the bread dough. If it is too hot, it will kill the yeast.

Recipe source: The Vanderbilt Wife

If you’d like to check out the other Secret Recipe Club submissions, click the link below!


Honey Whole Wheat Beer Bread

Posted on

Sheesh, I know what you guys are thinking. That with all the alcohol-laden recipes I’ve been posting lately, I must be a secret raging alcoholic! Well, I promise I’m not.  While I will take a sip once in a while, I generally dislike it on several levels. Besides the taste, and abstaining for scriptural reasons like not wanting to cause a brother to sin against their conscience (1 Corinthians 8:9-13), I’ve seen firsthand the effect it can have on a person’s health and on a family if abused, and I steer clear of alcohol so that I don’t continue that legacy.

However, while I have a personal distaste for it in its pure state, I do have quite a fondness for adding it to my baked goods. A little bit can really intensify the flavor in a recipe, and the baking (and cooking) process eliminates the alcohol content so that it will not have an intoxicating effect on your body.  Win-win!

Because of my fondness for baking with it, you really might think I had an alcohol problem if you took a look in my cupboard! I’ve got rum, bourbon, and brandy upstairs (great for so many things, including a fantastic fruit cake recipe I’ll be sharing come October–it takes two months to make), and I keep a few beers in the basement. Beer is my least favorite alcohol, but I make sure I always have a few on hand because one of my favorite breads happens to be beer bread. Go figure.

Beer creates magic when you put it in a quick bread, supplanting a yeasty flavor that quick breads lack, and it’s just so delicious! I’m very excited about my newest variation on beer bread (I can not believe this is my fourth beer bread post! Stop the madness!) because it is not only delicious, but healthy!

My favorite beer bread has white flour, butter, and white sugar in it, but I wanted something more wholesome this time so I used white whole wheat flour, canola oil, and honey. I was so delighted when I sliced into this loaf and took my first bite! I couldn’t believe how soft, tender and moist it was, and the flavor was incredible. Very yeasty, with a mild sweetness.  I think that honey and beer were meant to come together in bread!

You may remember the leftover Guiness I was going to throw out because I’d already made cupcakes and brownies and couldn’t take it any more. I’m so glad I decided to use the last of it to make this bread because it added a much more intense yeasty flavor to the bread than what I usually get from the lighter colored beers I use and it was quite lovely! But if you have a lighter beer, don’t make a special trip to the store, it will work just fine here and your bread will be much lighter in color (if you use white whole wheat flour like I did), and you might fool healthy-phobic people into thinking it’s white bread.

And lest you think that the beer-haters in your family won’t dig this, just remember I hate beer, and it literally makes my husband gag to even smell it.  (Remember when he threw up after I served him vodka sauce on his spaghetti?  Yeah, alcohol and him do not mix!)  But we both love this bread.  I think you will too.

Honey Whole Wheat Beer Bread

Printable recipe
Printable recipe with picture

3 cups white whole wheat flour
1 tablespoon aluminum-free baking powder, such as Rumford
1 teaspoon salt
1 egg
¼ cup canola oil
1/3 cup honey
12 oz. (1 1/2 cups) beer

Preheat oven to 375 degrees F. Butter or oil a loaf pan and set aside.

In a large bowl, whisk together the flour, baking powder, and salt; set aside. In a smaller bowl, beat the egg until uniform in color, then whisk in the oil, honey, and beer. Pour into the larger bowl and whisk well to combine. Pour into prepared pan, smooth the top, and bake for 50-55 minutes, or until golden brown and a tester inserted in the center comes out clean. Remove from pan and cool for at least 15 minutes prior to cutting. Wrap leftovers in plastic wrap or keep in a Ziploc bag with the air pressed out. This bread freezes well too, just slice it before you freeze it and you can take it out slice by slice, as you need it.

A Veronica’s Cornucopia Original

White Wheat Bread


I’ve been posting a lot of soup recipes lately, so I figured a good bread recipe was in order.  After all, that’s why we make soup in the first place, right?  To go with our bread?

Dennis and I actually haven’t had any bread for the last 22 days, and won’t have any again for the next twelve.  We started the 17 Day Diet at the end of January, and this bread was the last thing I made as a temporary farewell to high-carbohydrate foods, knowing our mouths would not enjoy it for another month or so.  This diet cycles in 17-day increments and during the first two, there is no bread.  We are eating so good that I don’t miss it, but perhaps this spectacular recipe helped with the separation anxiety.  It was so delicious that recalling it makes me smile even a month later!  It also helps that I got the original recipe, which I adapted to the one I’m sharing here, from a friend (thank you, Tracy!), so it gives me the warm fuzzies all around.  You just can’t beat the combination of friendship and warm bread.

While this bread still does not beat out my number one favorite to date, Honey Oatmeal Bread, it is a very close second.  I was very impressed with how soft and tender the bread is, and the flavor, as with all homemade bread, is of course incredible.  It goes very well with soup, or just slathered with butter as a meal.  Not that I speak from experience or anything.

White Wheat Bread

To ensure success, make sure all your ingredients are at room temperature before you start. Cold will inhibit the yeast’s growth.  If you’re in a hurry, you can quickly bring the egg to room temperature by placing in a bowl of hot tap water for five minutes before cracking, and can warm the milk by zapping it in the microwave, stirring every 30 seconds until lukewarm.

Printable recipe
Printable recipe with picture

1 package (2 1/4 teaspoons) dry yeast
2 tablespoons sugar
1/2 cup warm water (105-115 degrees)
1 cup milk, room temperature
1/4 cup vegetable or canola oil
2 tablespoons honey
1 egg, beaten, room temperature
1 3/4 cup white whole wheat flour
1 teaspoon salt
2 1/4 – 2 3/4 cups all-purpose flour

Combine yeast, sugar, and water in a large bowl; let stand five minutes. Add milk, oil, honey & egg; stir well. Stir white whole wheat flour and salt into yeast mixture. Gradually stir in enough all-purpose flour to make a soft dough.

Turn dough out onto a floured surface & knead until smooth & elastic (about 8-10 minutes.) (Tracy says it will only take a few minutes to do this if you use a bread hook on your Kitchenaid.) Place in a well-greased bowl, turning to grease top. Cover and let rise in a warm place (85 degrees), free from drafts, for 1 hour or until doubled in bulk.

Punch dough down, and divide in half; shape each half into a loaf. Place in 2 greased 8 1/2 by 4 1/2 by 3 inch loaf pans (I used 9×5 which seemed to work well, but they’ll probably be higher with the smaller pans). Cover and let rise in a warm place (85 degrees), free from drafts, 45 minutes or until doubled in bulk. Bake at 350 degrees for 25 minutes or until loaves sound hollow when tapped. Remove from pans and cool on wire racks.

Makes 2 loaves.

Recipe source: adapted from a 1986 Southern Living Magazine, shared with my by Tracy R.

Double Chocolate-Rum Amish Friendship Bread

Posted on

It’s been a while since I posted any Amish Friendship Bread recipes, and that’s because this is the last one I made and I wanted to save it for December, since the flavor combination reminded me of Christmas.

Are you one that identifies certain foods with certain seasons and holidays, like I do?  For me, pumpkin and pies are fall and Thanksgiving.  December and Christmas is cookies, chocolate, and anything spiked with alcohol.  Like this bread!

This was actually my favorite variation that I came up with, though I haven’t made very many yet.  The bread is so incredibly moist, is nice and chocolatey with a punch of rum and just a hint of cinnamon from the sugar coating.  Very festive, and so yummy!  This would make great gifts, and I plan to break out one or two of the starters I froze in order to give some away this year.  (If you don’t have any starters in your own freezer, you can click here to learn how to make your own.)

Double Chocolate-Rum Amish Friendship Bread

Printable recipe
Printable recipe with picture

¼ cup sugar
1 tablespoon cinnamon

1 cup Amish Friendship Bread starter (or whatever is left after you’ve divvied it up)
3 eggs
1 cup oil
½ cup dark rum
¼ cup Dutch process cocoa
1 small box instant chocolate pudding
1 cup sugar
2 cups flour
1 ½ teaspoons baking powder
½ teaspoon baking soda
½ teaspoon salt
1 cup semi-sweet chocolate chips

¼ cup mini semisweet chocolate chips

Preheat oven to 325 degrees. Combine sugar and cinnamon in a small bowl. Generously butter two loaf pans, then dust with the cinnamon sugar. Tap out excess and save for topping.

Whisk the eggs into the starter, then whisk in the oil and rum. Add everything but the chocolate chips and whisk until blended. Stir in 1 cup chocolate chips. Divide batter between pans, then sprinkle remaining cinnamon sugar over the tops. Sprinkle mini chocolate chips over the top and bake for an hour. Cool in pans for 10 minutes, then turn out to cool completely on wire rack.

Recipe source: adapted from Friendship Bread Kitchen

Buttery-Soft Beer Bread


One of my all-time favorite recipes on this blog is for Buttery Beer Bread, which is slightly sweet with a delicious yeasty flavor, and a thick, crunchy, and buttery crust.  The only downside to it is that it is best fresh from the oven and does not store well, so it’s a little hard to fit into a diet plan because we usually end up splitting the whole loaf between us and polishing it off in one sitting.  (Avoiding dry leftover bread is perfection justification for the overindulgence, no?)  If you’ve made this bread, you know that eating half a loaf of it is a lot easier to manage than one would imagine.  In the interest of trying to shrink our midsections, however, we try not to pull that stunt too often.

Deciding I needed a soft beer bread that stored well so that we could enjoy it for several days versus five minutes, I instinctively knew (well, hoped may be the better word) all I had to do was add an egg and blend the butter in with everything else instead of pouring it over the top.  And voilà!  I was right.  I love being right.  Especially when it results in something so delicious!

This bread has the same flavor I fell in love with in the original beer bread, the beer giving it a nice yeasty flavor despite this being a quick bread containing no yeast (another bonus-fresh bread in under an hour!).  But it is a million times prettier (smooth top versus major bumpiness), the texture is velvety soft when fresh from the oven, and the crust still has just a bit of that buttery crunch to it.  And it fulfills the reason for the modification: it stores well and stays soft and moist!

While I might still make the original if we have company over since there would be less risk of leftovers, and I adore that thick, crunchy & buttery crust, this is the one I’ll be making most often because the texture is so wonderful and its ability to stay that way upon storage robs me of the justification for polishing off an entire loaf in one sitting.  Which I may not be so thankful for, but my hips surely are.

*Despite this loaf storing well, we still ate half of it as soon as it was out of the oven, so I only had half a loaf (OK, maybe a little less than half, truth be told) to photograph the next day.  Sorry.  Our stomachs got in the way of the interests of my blog!  At least we didn’t eat the whole thing this time. At least not all at once.  :)

Buttery-Soft Beer Bread

Printable recipe
Printable recipe with picture

3 cups self-rising flour*
1/4 cup sugar
1 (12-oz) can beer
1 stick (1/2 cup) salted butter, melted
1 egg, beaten

Preheat oven to 375 degrees. Spray a loaf pan with cooking spray and set aside.

Whisk the flour and sugar together in a large bowl. Add beer, butter, and the egg, and whisk well to combine. Pour into the prepared pan and bake for 45-50 minutes or until golden brown. Remove from pan and cool on a wire rack for at least 15 minutes before slicing.

*I know it’s weird, but I really feel I get the best results using self-rising flour for this bread. However, if you do not have it, you can replace it with 3 cups all-purpose flour, 1 Tablespoon baking powder and 1 teaspoon salt instead. I recommend using a baking powder without aluminum, such as Rumford, particularly in this recipe since you need so much of it. The aluminum has an aftertaste and can foul up baked goods which call for quantities in excess of 1 teaspoon.

Update 2/18/15: I’ve discovered you can substitute honey for the sugar with delicious results as well, lending a light honey-sweet taste to the bread.  Just look at how tender it is!


Cranberry Pumpkin Spice Bread

Posted on

Let’s pretend that this bread isn’t spiked with cranberries and toasted walnuts and isn’t made with orange juice or vanilla bean paste.  That bread, the one pictured down there, without all the extras, is the one I won third place for last year.  I thought I’d kick it up a notch by adding all the things we’re pretending it doesn’t have, sure that would get me at least a 2nd place ribbon…and I got nothing.  I got good feedback on my judging paper, but I guess the others this year were still better.  Kansas has some pretty excellent bakers!

Now, as for what we thought of this bread (we being me, my husband, and his co-workers), we loved it.  No ribbons aside, this bread is fantastic and has a great texture (if I do say so myself).  Perfectly sweet, with a nice variation in texture from the chewy cranberries and crunchy nuts.  The bread itself is so soft and moist it practically melts in your mouth.  A great bread to include in your holiday baking this year!

Cranberry Pumpkin Spice Bread

Printable recipe
Printable recipe with picture

1 cup dried cranberries, roughly chopped
¾ cup orange juice
1 cup chopped walnuts
4 eggs
2 (15 oz) cans pumpkin puree
3 cups granulated sugar
1 cup vegetable oil
1 tablespoon vanilla bean paste*
3 ½ cups all-purpose flour
2 teaspoons cinnamon
2 teaspoons baking soda
1 teaspoon baking powder
1 teaspoon salt
1 teaspoon nutmeg
½ teaspoon ground cloves
½ teaspoon allspice

In a small bowl, combine cranberries and orange juice. Cover and let soak at least one hour before making bread. Meanwhile, place walnuts on a microwave-safe plate and microwave for one minute. Stir with fingers, then continue to microwave for another 1-2 minutes in 30 second intervals, stirring in between, until fragrant and toasted. Set aside until ready to use.

Heat oven to 350. Generously butter two 9×5 loaf pans; set aside.

Drain the orange juice into a large mixing bowl and set the soaked cranberries aside. Add the eggs to the orange juice and whisk them until well beaten. Add pumpkin, sugar, vegetable oil, and vanilla bean paste. Beat until well mixed. Measure the flour and remaining ingredients into a separate bowl and stir until combined. Slowly add the dry ingredients to the pumpkin mixture, beating until smooth. Stir in the reserved cranberries and toasted walnuts.

Divide batter between prepared pans. Bake for 65-75 minutes or until a toothpick inserted in center comes out clean. Cool for 10-15 minutes, then remove from pans by inverting onto a rack and tapping the bottom.

*Vanilla extract can be substituted for vanilla bean paste.

Carrot Cake Protein Muffins {Vegan}

Posted on

You may remember these from the roundup of all my fair entries.  The challenge was to make a heart-healthy muffin using at least one soy product (the contest was sponsored by the Kansas Soy Commission) and I created these beauties using four: soy flour, soy milk, tofu, and soy “cream cheese.”

These were so delicious, I had high hopes of coming home with the $75 prize for first place.  There was just one problem.  Two, actually.  I didn’t notice, until it was too late, that these were supposed to be “fruit muffins” and one of the judging criteria was “ease of preparation.  I gave a sigh of relief over the “fruit muffin” thing because although these are mostly a vegetable muffin, there are raisins in them and so they might pass the “fruit muffin” test.  My heart sank at the second oversight, however, because these really aren’t simple to prepare.  They’re not horribly difficult, but you don’t look at a list of ingredients this long and with this many steps and call it “easy.”

Well, that’s exactly what the judges wrote on my judging paper.  “Very healthy ingredients.  Wide variety of ingredients.  They taste wonderful & attractive.  We are looking for ease of preparation & thought this muffin, though wonderful, has too many ingredients.”

Shoot.  The real kick in the butt was my soy yeast bread, though (pictured above).  It didn’t rise as well as I would have liked, and thought the judges must have found it too dense because it didn’t place.  Well, this is what they wrote on that paper: “Beautiful bread-the cinnamon with the raisins is fantastic. I loved it!  HOWEVER: due to the facts listed in the State Fair Rule Book, this entry was to be entered on a “sturdy white plain paper plate” & had to be disqualified.  I am sorry.  Please pay close attention to the listed rules.” (Wasn’t she sweet about? Aw!)

I entered my bread on a foil-wrapped piece of cardboard because that is what I used for all my other breads for the regular contests.  But the special contests apparently have special rules too. DRAT!  Oh well, maybe next year I’ll get it right.

One thing I did get right is the moisture (so moist!) and taste (like dessert!) on these muffins.  They are just SO good you would never guess they don’t have any eggs or dairy–even the soy “cream cheese” filling tastes nothing like soy.  Honestly, they hardly even taste “healthy” because they are so good.  I froze the leftovers and have been enjoying them slowly.  I have only a precious few left and even after almost two months in the freezer, they are still as wonderful as the day I made them!

Carrot Cake Protein Muffins

Printable recipe
Printable recipe with picture

Filling
8 oz. Toffutti Better Than Cream Cheese
2 tablespoons granulated sugar

Muffins
1 cup white whole wheat flour
¾ cup all-purpose flour
¼ cup soy flour*
½ cup rolled oats
1 cup sugar
2 teaspoons baking powder
½ teaspoon baking soda
1 ½ tablespoons cinnamon
½ teaspoon nutmeg
¼ teaspoon ginger
1 ½ teaspoons salt
16 oz. silken tofu
½ cup orange juice
½ cup soy milk
¼ cup agave nectar
2 tablespoons canola oil
1 tablespoon orange zest
1 ½ cups finely shredded carrots
½ cup chopped walnuts
½ cup raisins

Topping
¼ cup chopped walnuts
2 tablespoons brown sugar

Mix the filling ingredients together until smooth; set aside. Line 24 muffin cups with paper liners and set aside. Preheat oven to 400 degrees.

In a large bowl, whisk together the flours, rolled oats, sugar, baking powder, baking soda, cinnamon, nutmeg, and salt. Set aside. In a blender, combine tofu, orange juice, soy milk, agave nectar, and canola oil. Blend until smooth, then add the orange zest and pulse once to combine. Pour into the bowl with the flour mixture and stir until moistened. Fold in the carrots, walnuts, and raisins. Divide half the batter between prepared muffin cups, then spoon about 1 ½ teaspoons of the filling mixture over the centers before covering with the remaining batter. Bake for 20-22 minutes or until the center no longer looks wet and feels done when touched in the middle (a toothpick will not come out clean because of the filling so go by the look and feel). Remove to cool completely on a wire rack.

*There’s no need to go out and buy soy flour if you don’t have it, just use a full cup of all-purpose flour and omit the soy flour.

Recipe source: adapted beyond belief from Healthy Happy Life

Sugar-Free Banana Bread two ways

Posted on

My Secret Recipe Club assignment this month was The Ginger Snap Girl, and after scouring her blog to pick a recipe to make, I’m a little smitten.  Gloria and I have so much in common!  We’re both in our thirties, married about the same amount of time, no children except the animal variety, we both have day jobs, and we both LOVE to bake!  It was so hard not to leave comments on the many gorgeous recipes she has shared, but I was afraid I would spoil the surprise of who had her blog this month, so I kept mum.

There were so many recipes of hers that I wanted to make.  Pretty much every single one, in fact.  I mean, hello, the large majority are baked goods so of course I wanted to make them all!  I was reminded of my mother’s love for Boston Cream Pie when I saw Gloria’s recipe, though hers is a million times prettier than anything my mother ever purchased.  Then there was the glorious eggplant parmesan, a recipe that I’ve always wanted to try.  I thought about making her ginger snaps since she’s the “gingersnap girl,” but I decided against it because I don’t like ginger snaps (the only thing I’ve found that we don’t have in common-forgive me, Gloria!).  I still might make them for my Dad, though, who almost always had a bag of them stowed away when we were growing up.

The recipe I chose actually ended up choosing me.  I had a bunch of screaming bananas (you know, the kind that are so black they start screaming at you to use them) on the same day that I wanted to bake something sugar-free for the visiting diabetic preacher during our church’s gospel meeting.  I had bookmarked Gloria’s banana bread because, as many of you know, I’m on the hunt for a recipe that will beat my baking nemesis’ banana bread at the state fair next year.  I decided I’d try turning it sugar-free for Connie.  (Yes, the preacher’s a man and his name is Connie.  And his wife?  Bobby.  No joke!)

So of course I had to try it, because I’m not going to hand over a loaf of bread that tastes vile or might make our guest preacher violently ill.  I figured he’d forgive me for whacking off a hunk of his loaf for the sake of his health.  (My Grandpa always said, “I’m saving your life,” when he found our stash of candy and ate the whole thing.  So I guess I got this habit from him! haha)  I have had really good results using Truvia, an all-natural sugarless sweetener, in baking and again, I’m quite pleased with the results.  The loaf rose well, had a good texture, was perfectly sweet, but turned out just a tad dry, most likely because of the sweetener substitution.  I imagine the brown sugar lends moisture to the loaf that the Truvia didn’t.

While Connie loved the slightly dry bread, I decided to try making another loaf, this time upping the sour cream to 1/2 cup and using the NuNaturals MoreFiber Stevia Baking Blend that I recently got in a giveaway from My Kitchen Adventures.  This banana bread was the definite winner.  So unbelievably moist and soft and absolutely NO weird taste/aftertaste.  It was just like sugar-sweetened banana bread, but with a the softest texture in a bread I’ve ever experienced.  I think the baking blend was responsible for the texture since it says that it will help the texture of your baked goods, and I have to say I’m very, very pleased with this product.  Truvia works very well, but the NuNaturals baking blend works even better (so far).

Thanks, Ginger Snap Girl, for giving me a wonderful recipe to share with brother Connie.  Next, I will be trying the recipe as written.  If it’s this good without real sugar, just think how amazing it will be with brown sugar.  I feel a blue ribbon coming on. :)

Sugar Free Banana Bread

Printable recipe
Printable recipe with picture

2 cups flour
½ cup Truvia or NuNaturals More Fiber Stevia Baking Blend
1 teaspoon baking powder
½ teaspoon baking soda
½ teaspoon salt
2 large bananas, mashed (a heaping cup)
2 eggs, lightly beaten
½ cup (1 stick) unsalted butter, melted
½ cup sour cream
1 teaspoon vanilla
7 drops NuNaturals Vanilla Stevia (optional)

Optional add-ins
½ cup chopped nuts
2 tablespoons cinnamon

Preheat oven to 350 degrees. Butter the bottom only of a large loaf pan; set aside.

In a small bowl, whisk flour, sweetener, baking powder, baking soda, and salt together. In a separate bowl, whisk the remaining ingredients, save the add-ins, until fully combined. Stir in the dry ingredients with a spoon or spatula until just combined. Batter will be thick. Spread into prepared pan and bake for 50 – 60 minutes, or until a toothpick comes out clean.

For banana-nut bread, stir in nuts when the batter is barely stirred together, then continue stirring until just combined. Bake as directed.

For cinnamon-swirl bread, spread half the mixed batter into prepared pan, then sprinkle liberally with cinnamon, avoiding the edges. Spread remaining batter on top, then use a folding motion to swirl the batter. I did this by facing the pan horizontally in front of me, taking my fork and plunking it down on the far left side from me, then pulling it toward me and upward in a circular motion, then repeating it 2-3 more times, moving down the pan to the right. Smooth the batter on top and bake as directed.

Recipe source: adapted from The Ginger Snap Girl

Be sure to check out the other member’s recipes! Click on Mr. Linky below to view all of them.


Amish Friendship Creamed Cornbread

Posted on

I don’t enjoy eating hot, hearty meals in the summer.  It makes me feel icky.  And yet I’ve been eating them like crazy.  Enchiladas, chicken noodles, meatloaf and creamed corn, chicken and rice, pot roast.  Today?  Pinto beans and cornbread. All foods I associate with cold winter months, and that have no business being in my belly this time of year.

OK, so I have some excuses.  The enchiladas?  I had all the ingredients without even planning for it.  The chicken noodles, meatloaf, chicken and rice, and pot roast I made all in a single day with Teri because she was teaching me to cook more homestyle-type foods.  So that’s a pretty good excuse.  And today, with the winter beans and cornbread? Four words.

AMISH FRIENDSHIP BREAD STARTER.

(Click here if you want to make your own starter.  But you might want to read the rest of this blog first.  As a warning.)

It’s taking over my life.  Sparking creative neurons in my brain and making me want to bake things with it that I’d rather not eat this time of year.  But I just couldn’t resist the idea of turning this round of starter into cornbread, despite having no desire to actually eat it.  (Until I baked it of course, and then I couldn’t stop eating it!) I was inspired by the Miller-family’s creamed corn to incorporate the same ingredients into this recipe, which made the most moist cornbread I’ve ever had.  It almost melts in your mouth!

Debbie left a comment yesterday on the creamed corn recipe that made me LOL: “Oh sure, stick a brick of cream cheese and a whole stick of butter on it and you could make your shoes taste awesome!!”  Can’t argue with that, or with what the magic of excessive cream cheese and butter do to this cornbread.  There is not a dry crumb to be found on this bread.  It is so moist, it’s almost a cross between cornbread and corn pudding.  The starter has enough sugar to give it a very nice, sweet, Northern-cornbread feel, and I love the sharp and salty edge the cheddar on top imparts.

If you decide to make this during the winter months, particularly for a holiday gathering, I’m going to tell you right now to go ahead and shred the whole block of cheese and add the other half to the batter.  But if you’re making it right now…well, I hope you’ve at least packed away your swimsuit for good until next summer.  Just sayin’.

Amish Friendship Creamed Cornbread

Printable recipe
Printable recipe with picture

Remaining starter after you’ve divied up three bags for friends
1 (8 oz) package cream cheese, room temperature
1 stick butter, room temperature
2 eggs
1 ½ cups cornmeal (I used stone ground)
1 ½ teaspoons baking powder
½ teaspoon baking soda
½ teaspoons salt
1 can corn, drained
4 oz sharp cheddar cheese, shredded

Preheat oven to 350 degrees F. Spray a 9×13 dish with cooking oil and set aside.

Add the cream cheese and butter to the starter in a large bowl and beat until fairly smooth. Beat in eggs until combined. Stir in cornmeal, baking powder, baking soda, and salt just until combined. Stir in corn and mix until well combined. Spread into prepared dish and bake for 30 minutes or until tester inserted in center comes out clean. Sprinkle cheese on top and allow to cool for ten to fifteen minutes before serving. Cheese will melt while the cornbread cools.

Caramel Banana Amish Friendship Bread

Posted on

Have you ever heard of Amish Friendship Bread?  This is how it works.  A friend gives you a bag of starter and instructions with a recipe, and over the next ten days you knead the bag and add more flour, sugar and milk to it.  On the tenth day, you take out three cups of the starter and put one cup each into three bags to give to friends along with instructions and recipes.  Then you add stuff to your leftover starter to bake two loaves of Amish Friendship Bread.  It’s the bread that never dies!

Back in 2000, I got burnt out on Amish Friendship Bread because it spread like the plague among my friends.  We couldn’t seem to get rid of it.  I finally had to stop accepting bags of the starter because I couldn’t bear to eat one more piece of the bread.  Eleven years later, I was finally ready to make another go of it, although the thought of it made me feel a little ill.  When I eat something until it makes me sick, I can hardly ever enjoy it again.

Thankfully, Amish Friendship Bread is proving to be an exception.  Perhaps because I flaunted the usual recipe instructions that comes with the starter, which always includes a pudding mix, or perhaps because I gave myself enough time to recover from the AFB overload, but my love for the bread has been fully restored.

This variation was inspired by the circumstances that inspire me most frequently in the kitchen: what I had on hand.  In this case, homemade caramel sauce and overripe bananas.  The bread is very moist, almost like a pound cake, with plenty of banana and caramel flavor.  OK, so mine was heavier on the banana flavor because I happened to add some banana extract to it, believing that 1 1/2 cups of caramel sauce in the recipe would surely overpower the flavor of banana, but the extract was completely unnecessary, so I omitted it from the recipe below.

I chose to dust my pans and the tops of the loaves with cinnamon sugar, which I thought was nice, but you could simply grease and flour your pan and maybe swirl some dulce de leche on top before baking.  Mmmmm.  Or serve with extra caramel sauce.  Double mmmm.  No wonder I kept a starter for myself from the batch I made!  I can’t wait to make this again.

Caramel-Banana Amish Friendship Bread

Printable recipe
Printable recipe with picture

¼ cup granulated sugar
1 tablespoon cinnamon
Remaining Friendship Bread starter
1 ½ cups caramel sauce, room temperature
1 1/3 cups mashed banana (3 medium)
3 eggs
1 teaspoon vanilla
2 cups flour
1 ½ teaspoons baking powder
½ teaspoon baking soda
½ teaspoon salt

Preheat oven to 325 degrees. Combine sugar and cinnamon in small bowl. Butter two loaf pans and dust with cinnamon sugar. Shake excess out onto a sheet of wax paper, or a large dish, and reserve extra for topping.

Put the friendship bread starter in a large bowl and beat in the caramel sauce, banana, eggs, and vanilla. Add the flour, baking powder, baking soda, and salt; stir until blended. Pour into prepared loaf pans and sprinkle remaining cinnamon sugar over the top. Bake for 1 hour or until toothpick inserted in center comes out clean.