RSS Feed

Tostada Pizzas

Posted on

These are an insanely quick & easy lunch, coming together in less than 5 minutes start to finish.  And so delicious, you will be amazed!

I was craving pizza but didn’t want to deal with rising dough or a hot oven on a sweaty summer day, so I came up with these when I spied the tostada shells on my counter.  You only need your broiler on in the oven for a couple minutes and you’ve got hot, melty, crispy pepperoni pizzas.  I bet these would be a huge hit with the kiddos, too.  Bonus for those with gluten sensitivity: they’re gluten-free! Score.

Tostada Pizzas

Printable recipe
Printable recipe with picture

You will need:
Tostada shells
Pizza sauce (here‘s a quick and easy recipe that requires no cooking)
Mozzarella cheese, shredded
Pepperoni
Other toppings of choice*

Line a baking sheet with foil and set aside. Spread a tablespoon of pizza sauce over each tostada shell, then sprinkle with cheese and toppings. Broil on high for 1-2 minutes, keeping the oven light on so you can remove them before they burn. They cook quickly so do keep an eye on them-mine took just a little over a minute to get melty and hot. Serve immediately.

*Be careful with adding too many veggies as they could water out and make the crispy tostada shells soggy.

A Veronica’s Cornucopia original

Blueberry-Lemon Upside Down Cake

Posted on

Secret Recipe Club

Whoop whoop!  I took a month off from the Secret Recipe Club and am so excited to be back with this recipe! My assignment this month was Evelyne’s blog, Cheap Ethnic Eatz.  As the title implies,her recipes are from around the world and affordable to make.  I nearly made her beautiful Peach Salsa since I’ve been on a salsa kick lately, but in the end, this beautiful cake won out.  When I read the titles of the recipes I was considering to my husband, including Strawberry Puff Pastry Pizza, Lazy Chocolate Raspberry Cake, Self-Saucing Chocolate Pudding, Afghan Cardamom Pudding, and Peanut Butter Daifukumochi Balls (apparently I was really craving sweets when searching Evelyne’s archives-big surprise!), he absolutely insisted that I make this one.  I aim to please.

Well, thank you very much dear Evelyne, because this cake surely did please us both.  I’m almost embarrassed to admit how much.  Between the two of us, it only took us two days to polish off the entire cake.  While we do enjoy our sweets, this was ridiculous even for us, and a testament to how wonderful (and addictive) the cake is.

I did change it up by adding lemon flavor to the cake, because I really enjoy the combination of lemon and blueberry flavors .  It was amazeballs, as my friend, Jennifer, would say.  I think I also changed the texture of the cake as well by switching the baking powder for baking soda (the only science I’m any good at is baking science, and I knew the acid in the lemon juice was a perfect catalyst for baking soda, so I pulled the old switcharoo on my leaveners) and the cake was crazy moist to the nth degree.

I would probably try making this cake with the baking powder next time because although I did love the moist texture, with the juicy, dripping blueberry topping it wasn’t really necessary.  Another benefit of using the baking powder (which is baking soda with an acid mixed in (cream of tartar) to activate it) is that it wouldn’t take away the tartness from the lemon juice like the baking soda does (baking soda reacts with acids, which causes the bubbles and rising, and it neutralizes the acid in the process), so it might balance the sweet topping a little better.  But unless you hate sweet sweets, you will love this cake as is.  You know we did!

Blueberry-Lemon Upside Down Cake

Printable recipe
Printable recipe with picture

1 lemon
1/4 cup melted butter
1/2 cup brown sugar
1 (12 oz) bag frozen blueberries OR 2 cups fresh blueberries
2/3 cup milk
1 1/3 cups all-purpose flour
1 teaspoon baking soda
1/4 teaspoon salt
1/2 cup butter, softened
3/4 cup granulated sugar
1 egg
1 teaspoon vanilla

Preheat oven to 350 degrees. Zest the lemon and set the zest aside. Squeeze the lemon and set the juice aside. In an 8 or 9 inch square cake pan, combine melted butter and brown sugar; spread evenly on bottom. Spread blueberries evenly over top. Sprinkle with 1 tablespoon of the lemon juice. If you are using frozen blueberries, put the dish in the oven for 10 minutes or until the blueberries are mostly defrosted. Remove from oven and allow to cool while preparing the cake batter. *It is OK if the dish is still warm when you add the batter.

Pour the milk into a 1-cup glass measure. Add enough of the leftover lemon juice to equal ¾ cups liquid. If you don’t have enough lemon juice, just add a bit more milk. Set this aside to curdle while you prepare the batter.

Whisk together flour, baking soda, and salt in a small mixing bowl. In a separate larger mixing bowl, cream the butter and sugar together with an electric mixer, beating for about five minutes, until light and fluffy. Beat in egg and vanilla. Add dry ingredients alternately with milk to creamed mixture, beating well after each addition, beginning and ending with the flour mixture (flour, milk, flour, milk, flour). Spread batter evenly over blueberry layer.

Bake for 45 to 50 minutes or until toothpick inserted in center comes out clean. Let cool 10 minutes in pan, then turn out on to a large flat plate. Serve warm or at room temperature.

Recipe source: adapted from Cheap Ethnic Eatz


P.S. Happy 12th anniversary, sweetheart! I’m testing him to see if he’ll read this without me telling him he should.  :)  And happy birthday to my itty bitty sweetie who turns eight today!

Greek Chicken with Tzatziki

Posted on

I took the above photo on a cold day in February, when there was only about five minutes of daylight left.  I’m sorry if it looks  a little unappealing, it seems somehow off to me but since I started with this:

I can’t be sure. It was just so bad to begin with that I’m really happy I got it to come this far! lol

If the photo doesn’t entice you to try this, maybe it will help to know how delicious it is.  I love the tangy yogurt sauce with the tender, flavorful chicken–it’s just perfect.  And it goes great with the Greek Salad I posted yesterday!  If you don’t want to heat up your kitchen, just slide the pieces of meat onto skewers and grill them. (If using wooden skewers, please soak them in water for half an hour so they don’t catch on fire during grilling.)  Bet they’d taste even better off the grill!

Greek Chicken with Tzatziki

Printable recipe
Printable recipe with picture

Chicken:
1 ½ lbs. boneless, skinless chicken breasts, cut into large chunks
1/3 cup extra virgin olive oil
¼ cup lemon juice
2 tablespoons red wine vinegar
2 teaspoons dried oregano
2 teaspoons dried thyme
1 teaspoon onion powder
1 teaspoon garlic powder
1 teaspoon dried parsley
¼ teaspoon coriander
Salt and pepper

Tzatziki:
1 medium cucumber
1 cup plain non-fat Greek yogurt
1 tablespoon lemon juice
2 teaspoons dried dill weed
2 teaspoons minced garlic
¼ teaspoon salt
1/8 teaspoon pepper

Mix the oil, juice, vinegar, and seasonings together and marinate the chicken for 30 minutes but no longer or the texture of the chicken will change and won’t be as good.

While the chicken marinates, prepare the Tzatziki. Slice the cucumber in half lengthwise and scoop out the seeds and pulp and discard. Shred the cucumber (you should get about 1 cup of cucumber), then wrap in several layers of paper towel and squeeze it dry. Mix with the remaining ingredients and refrigerate until ready to serve.

Preheat oven to 375 degrees.

Line a rimmed baking sheet with foil, then place a cooling rack on top of it. Spray the rack with oil, then remove the chicken from marinade and place on the rack. Dab the remaining marinade over the top of the chicken pieces. Bake for 15 minutes. Serve with tzatziki and Greek Salad.

Recipe source: Eat Little, Eat Big

Greek Salad

Posted on

Since this is my first blog of the week, I hope you’ll forgive me for skipping Thankful Thursday in favor of a recipe for Greek salad.  I made it months ago and kept forgetting to share it, but now that the weather is heating up and cool, crunchy salads are especially appealing, I knew it was now or never.

I’ve eaten a lot of Greek salads at restaurants and they are always lettuce salads with kalamata olives, red onions, tomatoes, and feta cheese.  This salad has the same elements but the lettuce is replaced with chopped peppers and cucumber.  The result is a crunchy, more fulfilling salad–it really feels like you’re eating something other than air with some toppings.  And it’s so delicious!  My husband’s favorite salad is a Greek salad and he really went wild for this, somehow managing to eat all but the little bit I managed to grab for myself before he basically confiscated the whole bowl and started murmuring, “My preeeecious.”

It makes a wonderful side dish for a Mediterranean meal and I’ll be sharing the recipe for the chicken I served it with tomorrow.

Greek Salad

Printable recipe
Printable recipe with picture

Dressing:
½ cup extra virgin olive oil
¼ cup lemon juice
1 teaspoon minced garlic (from a jar is fine)
2 teaspoon dried oregano
1/8 teaspoon salt
Dash of pepper

Salad:
1 large cucumber, quartered lengthwise, seeds removed then chopped
1 ½ cups chopped tomatoes
12 large kalamata olives, quartered
1 cup diced green pepper
¾ cup thinly sliced red onion
3.5 oz good quality feta cheese, diced

Mix the dressing together and store at room temperature until ready to serve, preferably overnight to allow the flavors to develop. Combine salad ingredients, shake the dressing and add half of it, then gently stir everything together. Add more dressing to taste.

Recipe source: Eat Little, Eat Big

***

P.S. As you can see from the video ad below, I’ve been approved for participation in WordPress’s WordAds program.  I’ve been blogging with WordPress for more than two years without having any affiliates or any other monetary support.  I never thought I would want ads on my blog, but I applied for this program on a whim since applying doesn’t mean you’ll get accepted or that you even have to do it if you get accepted.  I was approved and I decided to try it out on a trial basis.  The two commercials I have watched were tasteful and well done, one was actually really informative, comparing our country’s standard of living to other countries with statistics, and I do like that it is optional to my readers to watch them, so I hope you enjoy the ads you do choose to watch.

My reason for not having ads until now has been a fear of turning my blog into work instead of something I do for fun, turning my concentration from creativity to money.  So far there’s no difference in my thinking, so maybe I can make a few cents while I’m having fun without it spoiling my fun. :)

Watermelon Black Bean Salsa

Posted on

For the Holiday Recipe Club‘s Memorial Day blog hop, the secret ingredients to choose from were watermelon, beer, and pork.  I think I’m on a salsa kick because my last recipe for the HRC on Cinco de Mayo was for Fresh Mild Salsa, and the first thing I thought of when I saw that watermelon was one of the ingredients for Memorial Day was the salsa recipe my hair dresser gave me back in February.  I have been craving it ever since I read the recipe, imagining how wonderful it must taste, and I was trying to wait until watermelon were truly in season here in Wichita to try it (that happens in August for us), but with the added incentive of the Holiday Recipe Club blog hop, I knew the time had come.

This stuff is the bomb, yo!  The only change I made was to add in some lime juice, which I feel was essential to achieve the salsa flavor and balance the sweetness of the watermelon.  The beans, which may seem strange, are somehow a perfect fit with the flavors & textures.  I could eat this as a meal, it is so good!  It is juicy, and seriously addictive.  It is, however, best if eaten within four hours of making it as the watermelon leaks more and more water and becomes mushy after a while.  To serve this at your Memorial day barbecue or another gathering,  just have the watermelon prepped in a separate container than the other ingredients, then stir them all together and refrigerate an hour before serving and you’ll have a bowl of salsa perfection ready to wow your guests.

Watermelon Black Bean Salsa

Printable recipe
Printable recipe with picture

2 cups diced seedless watermelon
3/4 cup finely diced sweet onion
3/4 cup canned black beans, rinsed and drained
2 jalapeno peppers, seeded and finely diced
1/4 cup minced fresh cilantro
Juice from 1/2 a lime
2 teaspoons brown sugar, packed
1 garlic clove, minced
1/2 teaspoon salt
Tortilla chips

In a small bowl, combine all ingredients but the chips. Cover and refrigerate for at least 1 hour. Drain if necessary before serving. Serve with chips within 2-3 hours of making.

Yield: 3-1/2 cups.

Veronica’s Note: I advise wearing latex gloves when handling and dicing the jalapenos, as the oils can burn your skin.

Recipe source: Jennifer L.

A big thank you to Erin for creating this club!  I’m having a lot of fun with it.  If you’d like to join or find out more, check out the Holiday Recipe Club website.  And don’t forget to check out the other Memorial Day recipes by clicking the linky frog below.


Thankful Thursdays #75: where the buffalo roam

Posted on

Oh give me a home
Where the buffalo roam
Where the deer and the antelope play
Where seldom is heard
A discouraging word
And the skies are not cloudy all day
Home, home on the range
Where the deer and the antelope play
Where seldom is heard
A discouraging word
And the skies are not cloudy all day

If you’ve never heard this song, you can hear the tune to it here.  It’s the state song of Kansas, one I’ve been singing all my life.  And while the skies get plenty cloudy here, and I’ve heard my fair share of discouraging words, I am happy and proud, and thankful that Kansas is my home.

As Dennis and I were driving through Abilene, shopping and sight-seeing, we saw signs like this everywhere:

PFCG?? What does that mean??  Then we started seeing signs that explained a little more…

We finally got the full explanation from a checker at West’s Country Mart.  PFCG means “Pray for Carly Gassman.”  When news spread in Abilene that this high school senior had a brain tumor, people in Abilene came together to support her and stores throughout the city, both individually owned businesses and chains, posted signs to “pray for Carly.”  Abilene business owners and those in surrounding cities pulled together to do a fundraiser for her.  The checker also reported that she’d had surgery to remove 90% of the tumor and she was recovering well.  This story gives me the feel-good sunshiney shivers!  God bless Kansas!  What a wonderful community!

Besides this inspiring example of the small communities and how they draw together to help each other out, I’m also thankful for Kansas in a purely superficial way.  While I’m often envious of more beautiful areas overseas and even within the United States, it doesn’t really take much searching to discover the unique beauty of the plains God created here.  Sometimes you just have to drive a little to get past all the manmade buildings…

Dennis says the mulberry tree should be our state tree because we have so many of them.  This one was in Abilene but we have them right in our own backyard, literally.  We always have to stop and have a taste.

I had Dennis pull over so I could take a photo of this man driving his tractor.  I gave the man a friendly wave as he got closer, and though he was working, he pulled his tractor as far over to the side as he could to see if I needed help or was lost.  See what I mean about our folks here?  So thoughtful!  Though I did feel bad about interrupting his work!

Can you tell what crop this is?

Green (unripe) wheat!  You see a lot of wheat fields in Kansas, as it is our main crop.  We are known as the “wheat state.”

We’re also known as the sunflower state.

Cutest water tower ever?

Sunsets in the country are so beautiful.

Atop the castle at Coronado Heights near Lindsborg.

When you slow down and take it all in, you notice the little things.  It’s times like these, watching a lady bug and ants going about their business, being out in nature, that I really feel close to God.  This makes me want to sing, “He’s Got The Whole World In His Hands.”

The heavens declare the glory of God; the skies proclaim the work of his hands. Day after day they pour forth speech; night after night they reveal knowledge. They have no speech, they use no words; no sound is heard from them. Yet their voice goes out into all the earth, their words to the ends of the world. ~Psalm 19: 1-4

Strawberry Lemonade Layer Cake

Posted on

Wheee!  We’re back and boy did we have a blast in good old Abilene.  I think my blues have been cured by some good old Kansas sunshine and fun times.  We did so many things I don’t know if I can even blog about it because it would either be one long blog, or a million short ones, but I’ll see what I can do later on.

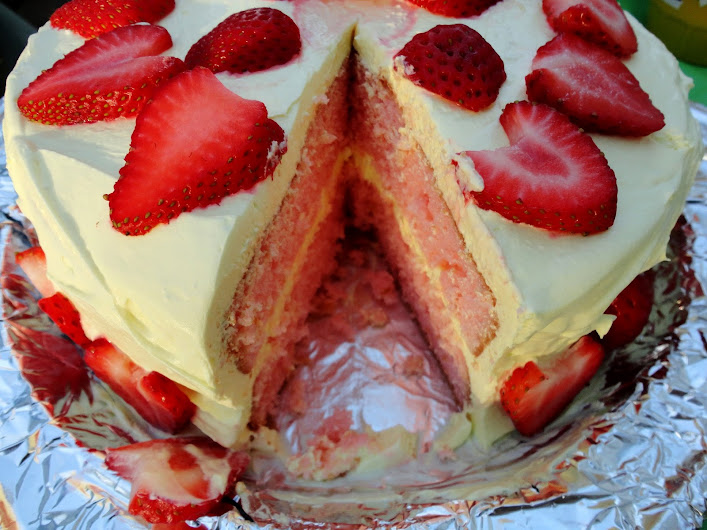
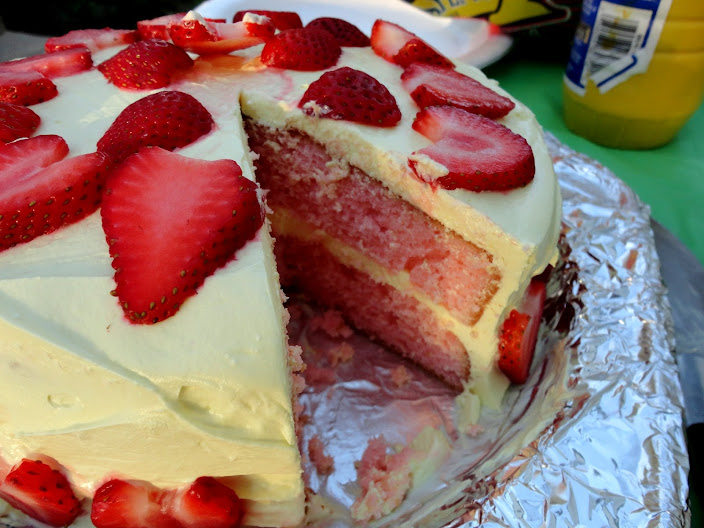
While we were there, we had a cookout with the whole family and I surprised my father-in-law, Al, with an early birthday cake since we were leaving the day before his actual birthday.  Since I was making it in a kitchen that wasn’t my own, and it was hot, I wanted it to be super easy, and cool and refreshing.  This one fit the bill since it’s made with convenience products and is refrigerated and served cold.  Plus, there’s no butter in the frosting so maybe it’s even a little lighter than my usual decadent cakes.  Perfect for summer.  Except for that whole turning on the oven thing, but I baked it at night so that made the hot kitchen not quite as unbearable.

Jessie’s trying to do a sneak attack on the grill!

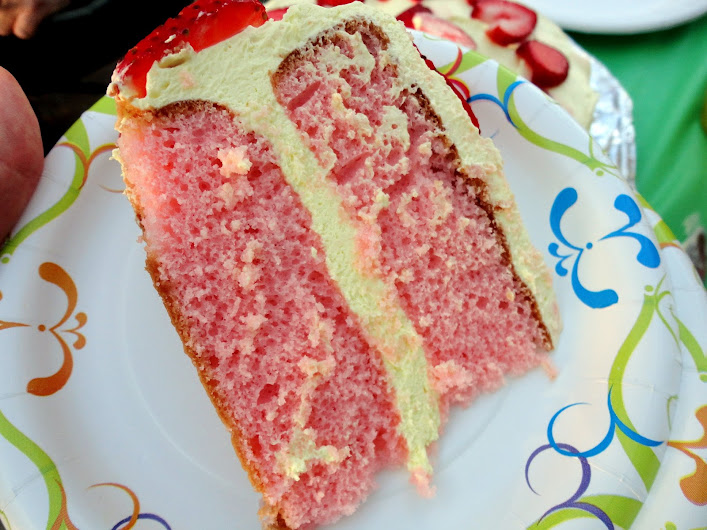
Everyone loved the cake, but I have to be honest and tell you it’s not even close to my favorite cake.  The frosting is very tart, like lemonade, and I tend to like my cake super duper sweet.  If I made it again, I’d use less of the lemonade mix.  But I did like it, and judging by the reviews I got, it’s totally worth sharing.  It does have a nice strawberry lemonade flavor going on.  Like I said, it’s a great cake for summer because it’s served cold.  The frosting doesn’t get hard when cold like all the butter-laden ones I usually make, so that is nice.  And don’t forget my water bottle trick to make sure your cake is super moist! I taught it to my Mother-in-law while I was there, using her tap water, and she was so excited about it that she didn’t notice I was using her undrinkable tap water until I was done.  So yeah, I tried to poison everyone with not quite crystal-clean well water, but we all survived. lol

(Oh no, I hope Janice isn’t reading this!  She’s a reader in Abilene that I got to meet and I brought her a piece of this cake when I stopped by her office.  It was so cool to meet her, except for the trying to poison her part.  If you’re reading, Janice, I was just joking about the poisonous well water.  *ahem*  But you might want to get checked for fingernail cancer during your next doctor visit.)

OK, enough madness.  Here’s the recipe.

Strawberry Lemonade Layer Cake

Printable recipe
Printable recipe with picture

1 (18.25 oz) box strawberry cake mix (plus oil, water and eggs as directed on box)
1 (8oz) package cream cheese, room temperature
1 (0.23 oz) packet of Kool-Aid lemonade
Yellow food coloring gel (as desired for color)
1 (7 oz) container marshmallow creme or fluff
1 (8 oz) container frozen whipped topping, thawed
Fresh strawberries to garnish

Make cake according to box instructions and bake in 2- 8 inch round cake pans as directed. Turn finished cakes out onto cake racks and allow to cool completely.

Once cake is cool, cream together cream cheese, lemonade and yellow food coloring until smooth. Mix in marshmallow creme and then mix in whipped topping until completely smooth. Level the cakes, and place one layer on a platter, cut side up. Spread about a third of the frosting over the top, then place the second cake layer cut side down on top. Spread the remaining frosting over the top and sides. Slice strawberries and place on the top and sides of the cake for decoration. Refrigerate until ready to serve and serve cold, straight from the fridge.

Recipe source: Easy Baked

Disclaimer: No humans or animals were harmed during the eating of this cake.  I believe the reason they don’t drink their water is because it’s hard water, which isn’t really poisonous.

More photos from our evening…

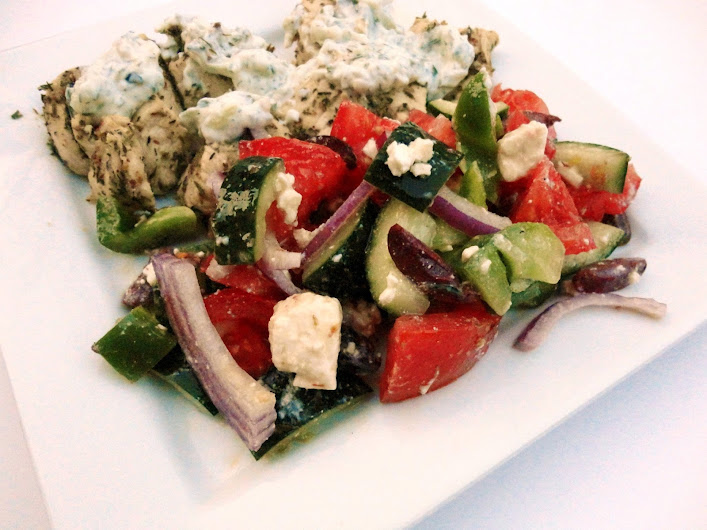
My plate: burger, dilly cucumber salad, 7 layer dip, and jalapeno chips.

A closer look at the 7 layer dip. I did it a little different this time, putting the tomato layer on top and mixing some goodies into it (I made the tomato layer from this recipe).  I also mixed in a packet of Fiesta Ranch dip mix into the sour cream instead of taco seasoning and it was even better than the original!  I’ve been looking for that dip mix ever since my girl Jaci made a dip with us while we were visiting last year because it is just wonderful and miracle of miracles, I finally found it in Abilene:

I loaded up, so if you’ve never tried this and would like to, just let me know in a comment below, and I’ll draw among the interested parties for a winner of a packet.  It’s so good mixed with sour cream!

Maybe you can tell he likes Coke?

Dennis and his nephew, Carson, played catch after dinner.


Look how studly my man is.  He’s not much for sports but I think the sporty look is good on him. :)

When I met this boy, he was a toddler.  And now he towers 6 inches over me.  Kids are great at making adults feel old! lol

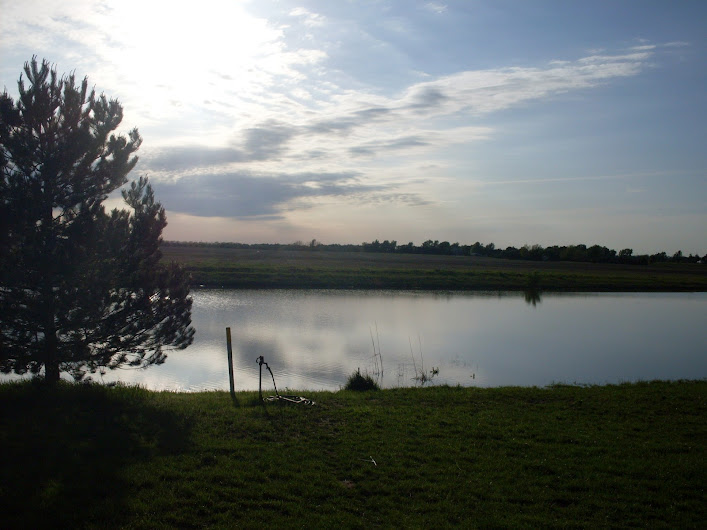
Love country sunsets!  Such a pretty ending to the day.

Asian Lettuce Wraps

Posted on

I’m still on vacation but, SURPRISE!  I had another blog scheduled.  :)

This is one of the fabulous recipes I made on the first cycle of the 17 Day Diet, one that I would eat whether I was on a diet or not, and one I intend to eat again soon.  I doubt it is any sort of copycat PF Changs recipe, but it is good, nonetheless, and doesn’t use any pre-made, packaged sauces for flavoring, which is the main reason I chose this recipe over others.  I didn’t want the sugar you find in those sauces!  I did think it needed a hint of sweet to compliment the other flavors, so I added some stevia, but that’s totally optional.

This recipe makes a large family-sized batch, and I took it for lunch a couple days.  Eating lettuce wraps with a dipping sauce is a bit messier than I’d like for a work lunch, so I just put a bunch of lettuce in a bowl then heated the filling at work and dumped it on top, then drizzled the sauce over.  And voila!  Asian Lettuce Wrap salad.  The easier way to eat lettuce wraps!

Asian Lettuce Wraps

Printable recipe
Printable recipe with picture

2 teaspoons olive oil
5 cloves garlic, minced
1 tablespoon fresh shredded ginger
20 oz 97% lean ground turkey (or ground chicken breasts)
5 oz mushrooms, finely chopped
½ teaspoon kosher salt
4 cups bagged coleslaw mix or finely shredded cabbage
1 (8 oz) can water chestnuts, drained, and finely minced
1 cup thinly sliced green onions
¼ cup soy sauce
2 teaspoons sesame oil
1 packet NuNaturals stevia powder, or other sweetener to taste
1 lemon, zested and juiced
½ to 1 teaspoon sriracha (optional)
1/3 cup chopped cilantro
1-2 heads iceberg lettuce

Dipping/Drizzling Sauce
¼ cup soy sauce
¼ cup rice vinegar
3 tablespoons water
1 packet NuNaturals stevia powder, or 2 teaspoons honey
1 teaspoons fresh shredded ginger

Heat an extra-large skillet to medium-high heat on the stovetop. When hot, add oil and then garlic and ginger. Saute for about 30 seconds, or until fragrant, then add the turkey, mushrooms, and salt. Cook for about five minutes, breaking the turkey up and stirring often until it is cooked through. Drain off the broth, and add the cabbage, water chestnuts, and green onions. Cook until the cabbage is wilted, about 2 minutes, then add the soy sauce, sesame oil, stevia, lemon zest and juice, and sriracha if desired. Remove from heat and stir in the cilantro.

To prepare the dipping sauce, combine all the ingredients and whisk to combine.

To serve, carefully remove each individual leaf from the head(s) of lettuce, place chicken mixture on the leaves and serve with sauce.

Recipe source: adapted from Our Best Bites

Secret Recipe Club

Creamy Chocolate-Mint Pie

Posted on

I know, I know.  I’m supposed to be on vacation.  What am I doing blogging, right?  Thanks to the miracle of scheduled posting, I wrote this blog last week and scheduled it to publish today.  I’m so tech-savvy!  (And I’m a big liar because I can barely even text, but I’m glad I at least have this one thing figured out.  It helps me a lot!)

So last month our friend, Joe, came over with a tractor to help us level out our back yard so the water wouldn’t collect in the middle and run up against our house and under the back door, flooding the basement.  Yay for no more basement flooding!!!

Like my husband, Joe loves mint desserts, and as part of my thanks for his help, I made him a creamy chocolate-mint pie.  Actually, I made two, because my husband deserved a “thank you” too. :)  Also, you deserved the recipe, and how could I share it without cutting up a pie to show you the inside?  And how could I do that to Joe’s pie?  I could not.  So I made Dennis a pie and butchered his pie up for you.  And for me, because I ate this piece.

This pie is creamy, fudgy, smooth, and minty.  I don’t know why, but mint desserts just aren’t my number one choice, and I’d probably never make them if it weren’t for Dennis and Joe (Joe is also responsible for these peppermint patties I posted a while back), but I thoroughly enjoyed my half of this pie.  Yes, my husband let me have half the pie!  I will not overshare how fast I ate that half, however.  That would be my version of TMI. Hey, a girl has to have some secrets.

Creamy Chocolate-Mint Pie

Printable recipe
Printable recipe with picture

1 1/4 cups milk
1 package (4-serving size) chocolate pudding and pie filling mix (not instant)
1 cup semisweet chocolate chips
4 oz cream cheese, softened
1/2 cup powdered sugar
1/4 teaspoon peppermint extract
1-2 drops green food color
2 cups frozen (thawed) whipped topping, divided
1 Oreo cookie crust
2-4 thin rectangular chocolate and green mints, unwrapped

In 2-quart saucepan, stir together milk and pudding mix; cook as directed on package. Continue cooking over low heat while adding chocolate chips, stirring until melted. Set aside.

In medium bowl, beat cream cheese, powdered sugar, peppermint extract and green food color until smooth. Gently fold in 1 cup of the whipped topping.  Spread cream cheese mixture in the Oreo crust, then top with chocolate mixture, spreading it smooth. Spread remaining 1 cup whipped topping over the top, then either chop mints or use a vegetable peeler to shave off curls, and sprinkle over whipped topping. Cover and refrigerate at least two hours before serving.

Recipe source: tweaked from Pillsbury.com

The Truth

Posted on

The truth is…

  • I’ve been in a funk and not my usual happy self.  I’m not going to start using you guys as my therapist and boo-hoo about anything, but it is what it is and I’m working through it.  I actually have a whole program I’ve worked out for myself to get out of the funk and am doing it, so I hope to let you know soon if it worked and how I did it!
  • I have gained a lot of weight.  Hello, my name is Veronica…and I’m an emotional eater.  I feel a cleansing coming on because I pretty much can’t stand myself any more!
  • Oh yeah, my hubby didn’t get that 911 call taker job!  I forgot I never updated you on that.  We thought he had it in the bag, but the old adage, “don’t put all your eggs in one basket,” comes to mind.  We are not worried, he got severance pay from his last job and if he can’t get another job right away, he can get up to 6 months unemployment if he needs it.  Though we’d really prefer an amazing job right away if you feel like praying for him! :)
  • My hubby and I are going out of town on a sort of staycation an hour and a half from home, to stay with his ‘rents and check out the sights in good old Abilene, KS.  (Don’t scoff, it may only take 5 minutes to drive through Abilene (we timed it), but they pack quite a tourist punch!)  So this is likely the last blog from me for a week or so but try not to have too much fun in my absence. ;)  I will definitely return with lots of pictures to share.
  • I’m so glad to have this creative outlet and I’m so glad that you’re here to share in it!  I so appreciate your comments and appreciate those who read silently as well–I’m not omniscient but my statistics let me know you’re there.  :)  I usually convince myself that I only keep this blog for my own benefit, but if there wasn’t anyone reading, I know I wouldn’t have enough motivation to continue, despite my amazing threshhold for selfish endeavors.  You guys make it fun, and you are why I do it if I’m completely honest with myself.  Thank you for all your recipe reviews, comments, and encouragement.  Thanks for reading and putting up with me, and hopefully enjoying some of my craziness.

See you again very soon!

Hugs,

V

P.S. So that you don’t feel recipe-deprived in my absence, how about checking out these oldies but goodies in the mean time:

This vegetable appetizer pizza is SO good, I bring it to at least one party a year.  I’m bringing it to one tomorrow, in fact!

I’m also bringing some 7 layer dip because I have some leftover refried beans from the last batch I made.  Love this stuff!

I’m bringing two plum pies to a Mother’s Day picnic.  This pie is so easy and so good! By the way, the plate in this picture belongs to my Mother-in-Law, whose own Mother-in-Law passed it on to her.  So I’m kinda hopin’ she’ll stick to the theme and I’ll inherit it some day. Isn’t is gorgeous?

And of course, I’m making a double batch of dilly cucumber salad because I need enough for both parties.  It’s the perfect summer side dish, so light and refreshing!

And while I’m not making this Italian cornmeal-crusted white fish over the weekend, it is a favorite, and elegant enough to serve Mom on Mother’s Day!

God bless you all, especially the mothers out there. What would we do without you?  Happy Mother’s Day!