I don’t have any kiddos of my own, unless you count Jessie (OK, I totally count her, she’s my baby!) but I am thankful for children. Sure, they can be irritating and disgusting and annoying, particularly when they aren’t your own (I think if they’re your own, you probably see past all that and only see their beauty, inside and out, right?), but they are also innocent and joyful creatures and they can bring so much joy to those around them. There is only one kiddo that’s in my life on a regular basis, my 6-year-old nephew, Owen, and he is a breath of fresh air in my sometimes stale adult world.
I love the blunt questions Owen asks without any sense that it might be considered rude to ask. He’s too innocent to realize asking everything that he is wondering might not be OK. Which makes it OK. There are only two ages when it’s OK to say anything and everything you think of–either when you’re very young, or very old.
“Why is Jessie SO FAT?!” “Why is your house so small?” “Why don’t you have any kids?”
I’m the worst person to answer children’s questions because I answer them as an adult. I really have no concept of how to kid-ify and answer so they can understand on their level. We’ve ended up discussing things like how Elvis overdosed and died on the toilet. Don’t ask me how–the kid has so many questions and my answers lead to more questions and before you know it, there I am telling him about Elvis, someone he’s never even heard of, dying on a toilet because he overdosed on drugs, which he also has no concept of. (What is wrong with me?!) I really hope he never asks me how babies are made because I’ll surely traumatize him with diagrams, etc. lol
I also love the theoretical questions he asks…constantly. “What if the world was made of rubber?” “What if bugs were the size of a house?” “What if Jessie kept eating and never stopped?”
That last one might have been influenced by my answer to “Why is Jessie SO FAT?!” (Because she’s always hungry.)
FYI, Jessie was on Temaril-P, an allergy medication that increased her thirst and hunger so much and made her gain so much weight that I finally took her off of it and although she’s itching like crazy, she has already lost a lot of weight.
And then there’s just the hilarious questions. After he learned about Noah’s ark and that it was a long time ago, he asked, “Was my mom on the ark?” LOL! I’m sure she’d be flattered he thought her that old. :)
I also love the refreshing interludes I have with friends’ kiddos, like my friend, Jaci’s, brood of four, and the kiddos at church that I have taught in Bible class on and off. I love pasting the artwork of all the kiddos I know on my fridge, which therefore looks like a pack of crayola products attacked it. I love it.
What children do you have in your life that you are thankful for…and why?
If you don’t know about and who CW is, check out Monday’s post: Meet CW.
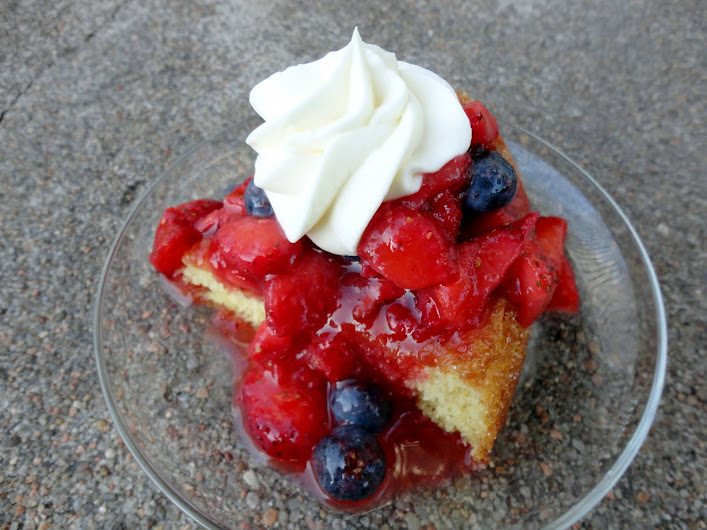
Growing up, Mom would make a very particular kind of strawberry shortcake at least once every summer. She would buy a “Family Style Shortcake” from Dillons, like this:
Then she mixed the tar out of sliced strawberries with honey (to help the strawberry juice come out to play with the honey) and poured that on top, put Dream Whip over that, and served it up once a year in summer after picnics in the park. Don’t know why, but that’s always when we had strawberry shortcake–after picnics in the park. Anyway, since we very rarely had anything sweet, this was such a lovely treat and I particularly loved the flavor of the ripe berries with the local, raw honey.
Mom’s simple strawberry shortcake was so delicious, and just the idea of it brings back fond and mouth-watering memories. But I wanted to be able to create it at home because, although we can still find the exact same shortcake at Dillons that Mom bought twenty years ago, who knows how long they’ll continue to make these and when they stop, I still want to be able to enjoy CW’s shortcake. And I want my grandchildren, or great nephews and nieces at the very least, to be able to enjoy this shortcake. And their grandchildren after that. CW’s shortcake must live on!
Since my youngest sister, Lacey, manages a Dillons deli, I first checked with her to see if she could possibly snag the recipe for me. In a way, I was happy to hear they weren’t baked in house but shipped in. That meant it was experimentation time! I’m not always in the mood to create a recipe from scratch, but I was definitely up for this challenge since the shortcake holds a special place in my heart.
So here’s what I had to go off of to recreate the recipe (yes, I totally stood two inches from the ingredients list to take this picture and yes, I might have gotten some strange looks):
Based on the cake’s texture, flavor, and the ingredients, I decided this cake was pretty much a low-fat sponge cake so I Googled a lot of recipes to create my own that reflected these ingredients as closely as possible. I did omit the buttermilk since it seemed too fussy to have two different kinds of milk, but did add in some vinegar to replace the acidity lost. I also didn’t mess with any ingredients cooks normally wouldn’t have in their kitchens, like whey and dextrin. What is dextrin anyway?
I’m happy to report that while I don’t think I got it spot on, it was close enough that when Lacey tasted it, although she claimed to not remember eating CW’s strawberry shortcake growing up, she looked up with big eyes and said, “I totally remember this taste. I don’t remember eating it, but I remember this taste!”
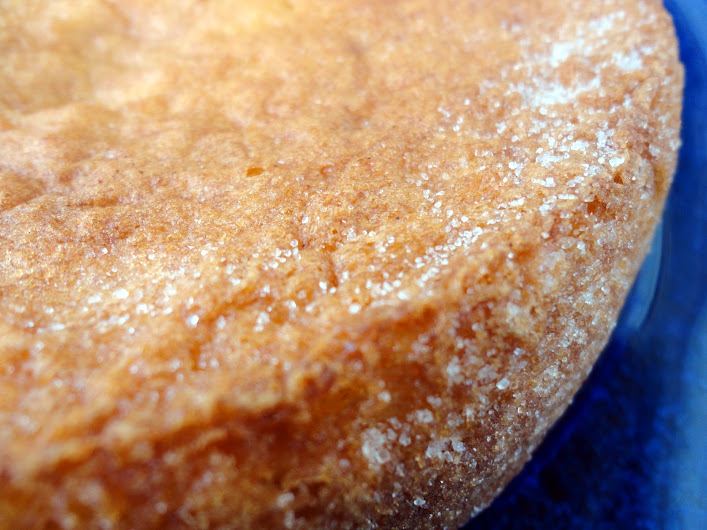
The cake from Dillons is crusted with sugar so I did that with mine, though it’s not necessary. It’s just kinda pretty. :) The cake I created is very spongy and dry, perfect for absorbing the delicious honeyed strawberry juice. Because of its texture, I really wouldn’t recommend using it in any recipe that doesn’t have a juicy topping–that juice is really needed to soften the cake. While the cake is very soft and bouncy to the touch, the texture is tough to cut because it’s so spongy, and it’s hard to cut with a fork until the juices have flowed down into the nooks and crannies of the cake. Once that happens though, you have tender, strawberry cake magic.
I was pretty impressed with the response I got from this cake. I shared it with my family twice, serving one cake at our Independence Day barbecue, then froze the second cake (the recipe makes two) and broke it out a week and a half later for our dessert after a barbecue at the lake. I usually have to ask my family what they think to get any feedback but all I had to do this time was sit back and let the accolades rain down. Adjectives such as amazing, best ever, and incredible were used liberally. Honestly, I’m pretty sure this cake now beats out THE Mocha Crunch Cake for favorite family cake. Check out my nephew gobbling it up at the lake (unless you’re averse to messy kid eaters, then you might want to steer clear):
I stuck with CW’s recipe for the strawberry topping, only using the berries and honey, and it’s just so stinkin’ good. Please try this topping, even if you buy your cake. Just make sure your honey is local and raw to get the best flavor. Also, local raw honey can help with allergies! Bonus!
For the whipped cream, you can use whatever you prefer–Cool Whip, Dream Whip, real whipped cream, or you can use the recipe for stabilized whipped cream I shared yesterday. I first made it with the stabilized whipped cream and the second time with Cool Whip and it was loved both ways. The strawberry topping is the star of this cake and I don’t think you can go wrong as long as you’ve got that. Who would have thought that honey and strawberries could create such magic?
Cake
½ cup whole milk
1 cup sifted all-purpose flour
1 tablespoon cornstarch
1 teaspoon baking powder
½ teaspoon baking soda
1/8 teaspoon salt
3 eggs
½ teaspoon cream of tartar
1 ¼ cups granulated sugar, divided
1 teaspoon vanilla extract
1 teaspoon white vinegar
Berry Topping
1 lb. fresh strawberries
¼ cup local raw honey
Optional: for a patriotic dessert, add 1 cup fresh blueberries
For the cake, in small saucepan, heat milk until bubbles form around edge of pan. Remove from heat; set aside.
Preheat oven to 350 F. Grease and flour two 8” round cake pans; set aside.
Sift flour with cornstarch, baking powder, baking soda, and salt; set aside. In small bowl of electric mixer, at high speed, beat eggs and cream of tartar together five minutes on high speed, until light and foamy. Gradually add 1 cup of the sugar, beating for an additional five minutes, or until ribbons form. Add vanilla and vinegar and mix just until combined. Blend in flour mixture on low just until smooth. Add warm milk and beat just until combined.
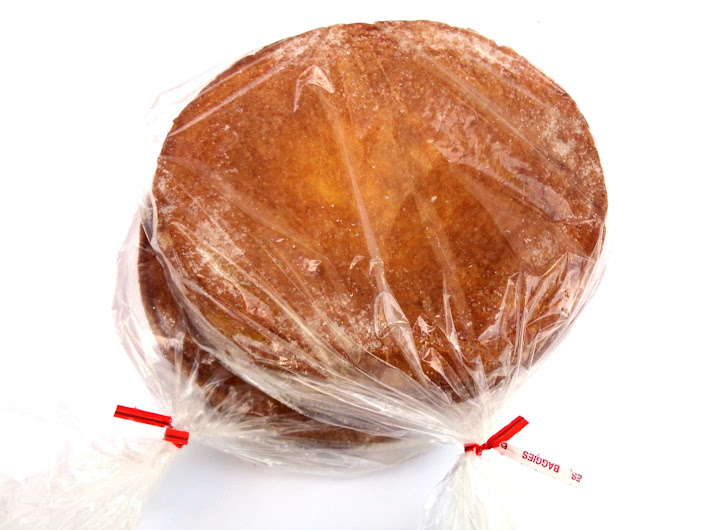
Immediately pour batter into prepared pans. Bake 25-30 minutes, or until cake tester inserted in center comes out clean. Turn the cakes out onto cooling racks. Place the racks over the sink and while they are still hot, using the remaining ¼ cup sugar, sprinkle sugar over the tops and rub it along the sides of the cakes. Allow to cool completely before wrapping in plastic wrap or putting in gallon-sized Ziploc bags until ready to use. You will only need one cake for this recipe so you can either freeze one for later, or double the berry topping and whipped cream and serve both cakes at once.
For the berry topping, combine the strawberries and honey in a medium bowl and stir for about 2-5 minutes, until the strawberries start to release their juices and the sauce gets thinner and takes on a red color. Cover and refrigerate until ready to use. If adding blueberries, stir them in before refrigerating or right before topping the cake.
To assemble the cake for serving, place cake on a plate, then cover with the berry mixture, including the juices so they can seep down into the cake. Allow to sit for at least 5 minutes so the juices can soak in, then top with whipped cream, slice, and serve.
Veronica’s note: I originally used nonfat milk since that’s what is used in the Dillon’s cake. The last time I made it, I only had whole milk and it made the cake so much better for it to have a little fat, so I updated the recipe. You can still use nonfat, it’s good that way, but better, more tender, with the whole milk.
OK, I’m almost ready to share CW‘s recipe for strawberry shortcake, but the draft started out so long that I’m trying to break up the longer parts into separate blogs, and this stabilized whipped cream recipe certainly deserves its own post.
Dollops of whipped cream top so many summer-time desserts and a recipe for a stabilized version comes in quite handy for me throughout the year. Since I need it so often, but very rarely have the time to whip it up right before serving dessert, and can’t make it much in advance since it waters out over time, I usually make the other recipe for stabilized whipped cream that I have on my blog. But then a reader (shout out to Miss Sandi Rose!) shared her own recipe for stabilized whipped cream with me back in March and I tried it out the first chance I got because it was so interesting! I can tell you that not only was I pleased with the results, but my family was as well. I left the leftover whipped cream at my parents’ house and when Mom gave me my piping tip back next time I was over, I asked if they ate the leftovers. She answered, “We ate the h#@& out of it!” LOL! I can totally see her squirting the whipped cream straight into her mouth and laughing like a lunatic while dodging Dad as he tries to get it away from her to hog it for himself. That’s totally Crazy Man and CW.
Anyway, while you can’t tell the other recipe apart from regular whipped cream, this one doesn’t increase in volume very much, if at all, so it’s very thick and creamy and has just a little bit of tang to it, which I happen to love. The texture reminds me of mousse and it really could be a dessert in and of itself.
I used it to top a strawberry shortcake (bet you figured that out already since you’re smart like that) that I added blueberries to for our Independence Day barbecue. Check back tomorrow for the shortcake recipe-it was a huge hit and this whipped cream put it over the top!
3 oz. cream cheese, softened
1 cup heavy cream
24 miniature marshmallows
1/4 cup granulated sugar
Mash cream cheese with a fork in a medium metal mixing bowl. Slowly add the whipping cream and stir until blended. Stir in marshmallows and sugar. Chill 4 hours or overnight. (Do not cover the bowl.) Place beaters in freezer to chill while the mixture is in the fridge. Whip mixture with the chilled beaters until the marshmallows are completely dissolved and mixed in and the mixture is thick and hold stiff peaks. Cover and keep refrigerated until ready to use.
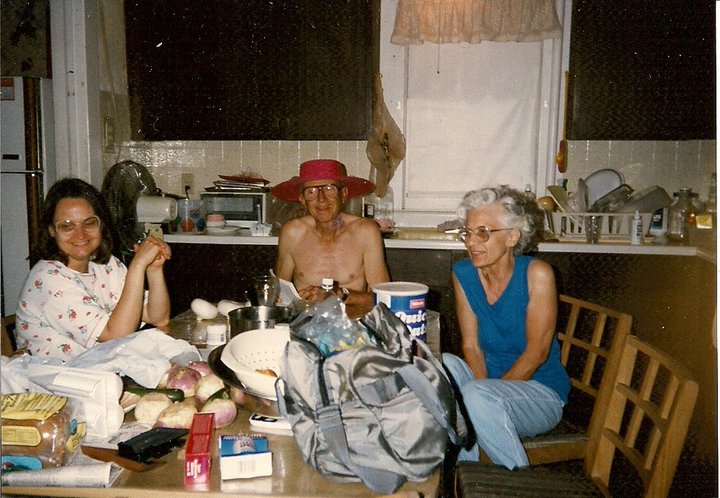
CW is my Mom (yes, that totally hot babe above), whose real name is Shelley Ann, though everyone calls her Ann because she hates her first name. How she came to be called CW is a long story that starts in a land far, far away.
OK, not really. It’s a short story. I guess if you’re still reading, you’d maybe like to hear it.
So my Dad used to call his Mom “Crazed.” He seems to like dubbing the women he loves with these questionable terms of endearment because when Crazed passed away, his own wife inherited the title. Over time, she became Crazed Woman and eventually, CW for short.
Mom calls him Crazy Man in return. Despite these signs of marital dysfunction, they really do love each other, even if you do find threats on Crazy Man’s life from CW in the refrigerator from time to time…
Love how she signed it. Since there are so many people that would write a note like this, especially considering they live alone.
Anyway, I don’t have much to tell you about CW except that she’s my crazy Mom and I love her warts and all, but I needed to introduce you to her because I’m going to be sharing a recipe with “CW” in the title soon, and it was better to make a whole separate post with her introduction and explanation of her nickname rather than bog down the recipe with it.
I guess I don’t talk about Mom a lot on my blog because, honestly, she causes me a lot of grief, and I don’t want to use my blog as an outlet to complain or bash any one I love. She was and is a great Mom despite her issues and I thank God for her. Because of her, I studied hard and got good grades in school because she cared. She taught me right from wrong and introduced me to God, starting me on my path to becoming a Christian, and that is the most biggest, best, and important gift any one can give someone. I’m so thankful for my mother.
Mom has battled mental illness since she was a teen. I never realized she was different, I just thought she was mean and that she had what Dad called “nervous breakdowns” in the summer. She could not handle it when I left home and as my sisters left home in the years after me, she had the worst period of her life when she was living in a complete nightmare fantasy that she had created in her head that involved a past she never lived. To give you a small idea of what she was like during that time, she used to try to peel off my mask (i.e. my face) when I would visit, to see if I was her daughter or an imposter.
It took a long, long time, but Mom finally came back to reality. Now she is different from when she was raising us, her hard edges have softened, at least where we’re concerned, and she is positive and supportive and in general, a lot more light-hearted. She still lives up to her nickname, but in a way that makes it OK to make light of it because it’s not very serious.
Mom has only been treated for mental illness once in her life and likely will never be treated again unless she becomes dangerous to herself or others. She was institutionalized for three months as a teen and was raped while under heavy drug therapy and she refuses to return to a mental health practitioner. When Dad was in the hospital after his stroke, I could barely get her to come to see him, she was so scared to enter the hospital, and I had to hold her hand the whole way. But just like she pulled through for me when I was hospitalized, she pulled through for her Crazy Man too.
I don’t push the matter of her seeking help since Dad is also against it, and especially now that she seems to finally found a moderate amount of equilibrium. Sometimes it gets pretty rocky, but for the most part, Mom does fairly well and we have learned to live with her the way she is. She’s actually quite normal on the surface, and you’d never guess she had a problem if you met her. It takes a while before you start to suspect there might be a little more crazy to her than the evil ring in her laughter. LOL!
So this is my Mom, CW. I shared a lot more than I planned to but the words kind of tumbled out of my fingertips. Now you finally know my Mom and soon, I’ll be sharing a recipe from her. Don’t worry, it’s not poisonous! lol In the mean time, here are some more pictures I dug up while searching for them for this blog. I really didn’t think I would find very many and was glad I’d collected more than I thought.
FYI, all the photos on this post will have titles pop up if you hover your mouse over them.
And I just couldn’t resist ending with this photo of my Mom with her parents…
When they came to visit that summer, Grandpa (the one who gave me the bike) totally confiscated my hot pink sun hat that I had just bought for the beach, claiming to love how the wide brim kept the sun off of him. I hadn’t even had the chance to wear it yet, but he managed to talk me into letting him keep it and he took it back to Joplin with him. I’m telling you, he wore that hat all over Wichita while he was here, flitting in and out of health food stores, and the man runs everywhere so he was quite the spectacle. Maybe craziness runs in the family? You be the judge. ;)
You can thank The Secret Recipe Club for bringing me out of hiding this week! If it weren’t for being in the club, I’m sure I’d have gone to bed early last night (long day) instead of scheduling this to post. So hopefully you’re more thankful about that than I am-LOL! ;)
This month I was assigned to The Vanderbilt Wife. Yay, another blog that starts with “V” (you might not be aware, but we are an endangered blog species, though not as bad off as blogs beginning with “X” and “Z”)! Jessie is also a sister in Christ, so let’s give a little HOO-WAH for that too. Or maybe you could just wait while I do it. HOO-WAH! So lovely to meet you, Jessie!
Anyway, my assignment came right after a failed attempt at 100% whole wheat bread. It was supposed to be the best whole wheat bread ever…but it was not. So when I saw Jessie’s beautifulFluffy 100% Whole Wheat Bread, I freaked.
“Dennis, guess what she has on her blog?” I shrieked.
“Light and fluffy whole wheat bread?” he guessed without even glancing over at my computer screen.
(From that you can assume correctly that I had made it very obvious how deeply disappointed I was with the dense and yucky-tasting loaves I’d just made.)
“YES!” I screamed.
And I proceeded to make the recipe. Three times. It makes three loaves per recipe, so I made nine loaves of whole wheat bread within the span of two weeks. Unfortunately, I never got the bread to stay risen once it started baking so those nine loaves weren’t as light and fluffy as I’d have liked. Each batch started out so high and promising…
only to let me down half way through baking.
*sob*
Since I couldn’t consult Jessie to see if she had any suggestions (in the SRC, you don’t alert the blog you’re assigned to because it’s meant to be a surprise on reveal day, and I couldn’t ruin the surprise by asking her for help), I never got the recipe to turn out for me, but it did work for her so please visit her blog to see how light and fluffy her loaves are. I’m bound and determined to get the same result and will post the recipe on my own blog once I’ve got it figured out.
Since I started out with a yeast bread recipe from Jessie’s blog that I couldn’t get to turn out right, I went with another yeast bread recipe of hers that included some white flour (white flour helps because the gluten develops better and easier than with whole wheat). I’ve been wanting to try making potato bread for years, interested in how the potato would affect the texture, so I was excited to see she had a whole wheat potato bread recipe on her blog.
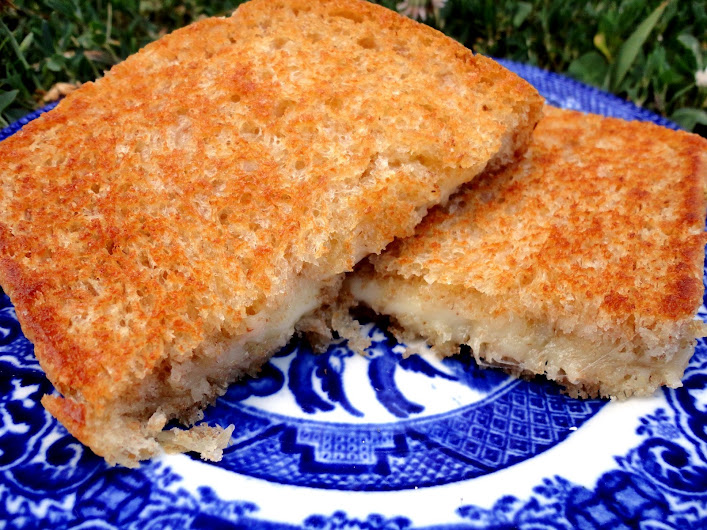
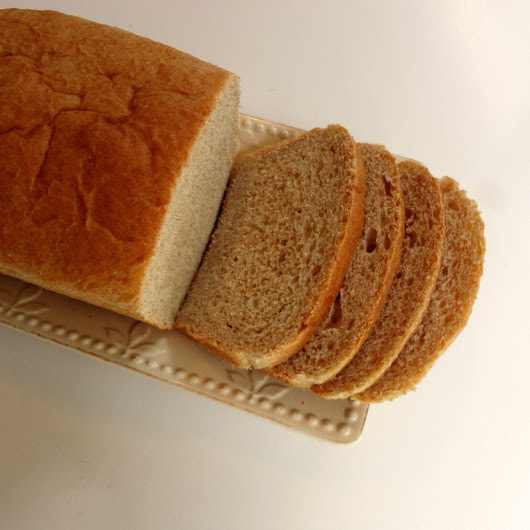
Let me tell you, making those nine failed loaves was totally worth it since they eventually led me to this recipe. (Also, those nine loaves, though deflated, were delicious and still fairly light, and all were eaten by my family who praised it highly.) This is the lightest, softest bread I have ever made that has whole wheat in it! It is so soft, in fact, that it’s hard to hold on to it while slicing without smashing it (I used an electric knife after the first slice, and highly suggest it if you have one–it makes the slices nice and even without crushing the bread.)
It is delicious and is perfect for making sandwiches, with a little more nutrition than plain white bread. Jessie said it made killer grilled cheese sandwiches, so I put it to the test with some pepper jack cheese. And I concur, KILLER! I really hope you try this!
1 medium potato
1/3 cup butter, softened
1/3 cup sugar
1 teaspoon salt
1 egg, beaten
2 ¼ teaspoons (1 envelope) active dry yeast
½ cup warm water
3 cups whole wheat flour
1 ½ to 2 cups unbleached all-purpose flour
Peel the potato, cut into cubes, and boil in a small saucepan until very soft. Drain, reserving 1 cup cooking liquid. Mash the potato in a small bowl and let cool slightly.
Cream butter, sugar, salt, and egg with an electric mixer. Add potato and mix well.
In a small bowl, put the ½ cup warm water and sprinkle the yeast over it. Let is sit for 10 minutes, then add to the potato mixture and beat until combined.
Change beaters to dough hooks and set mixer to 2. If you don’t have dough hooks, you will use your hands from this point forward. Add 2 cups whole wheat flour alternately with the 1 cup cooking liquid*, mixing/kneading well after each addition. Gradually add in the remaining flour until the dough starts to clean the side of the bowl. When that happens, let mixer go an additional 2 minutes. If kneading by hand, knead it in the bowl for about five minutes, or turn out onto a floured surface to knead. My dough was still a bit sticky when I stopped adding flour, but if I picked a ball off and rolled it in my hands, it did not stick to my hands. That is my test to know when I can stop adding flour, even though I really wanted to add more to keep it from sticking as I kneaded. I dealt with it and just scraped my hands off afterward. :)
Once your dough looks a little shiny, you’re done. If it doesn’t look shiny, just let it mix or knead it by hand until it does.
Place the dough in a greased bowl, cover with a towel and place somewhere warm. I like to preheat my oven to 350F for one minute, then turn it off and place my bowl in the oven. Let rise for an hour or until dough is doubled.
Punch dough down; divide in half. Shape into loaves by pushing each half into a rectangle, rolling it up, pinching the seam, and tucking the ends under. Place in two greased loaf pans (I slathered mine generously with softened butter). Cover with the towel again and let rise another 30-45 minutes or until doubled again.
Bake at 350 for 25 minutes or until golden brown. Remove from pans and rub the tops with a stick of cold butter. Set on a wire rack to cool
*Notes: Make sure your cooking liquid has cooled to about 115F before adding to the bread dough. If it is too hot, it will kill the yeast.
Every summer, I become a broken record: “It’s soooo hot,” I moan. Me and the heat-we don’t really get along. Especially since I love baking, and summer heat makes it very uncomfortable to turn on the oven. I really hate sweating. Which may explain why I don’t exercise very much. ;)
But lately I’ve been thinking about all the great things about summer and it’s actually really changed my attitude a lot. I’m still miserably hot, but at least I’m having a great time while sweating my butt off!
Why I’m thankful for summer:
*You can hover over the photos to get a description for each.
Summer is when our crops are grown and harvested and without summer, we’d all starve to death! Thank you God, for giving us summer, which is the perfect climate for producing delicious corn, berries, wheat for our bread, gorgeous tomatoes, potatoes, carrots, and the enormous cornucopia of colorful delicious vegetables and fruits.
Which brings me to…
The farmer’s market! I rejoice every summer when it opens up for the season.
I enjoy the vibrant, happy colors of bountiful green on the earth and blue of the sky. Every season owns a unique beauty and summer is no exception. God is the ultimate artist.
Babies! Baby bunnies, ducklings, and goslings are everywhere in early summer and they are just so cute you have to stop in your tracks when you spot one to “oooh and awwww” for a while. Unfortunately, I missed any photos of them when they were really small and only caught them once they were already half-grown, but they’re still pretty cute. :)
Ever since I was a baby, I’ve spent my summers swimming in lakes and pools and I continue to enjoy it as an adult. One of the most delicious feelings is soaking up the shimmering hot heat of the sun and then running into water that is hot at the edge and gets cooler and cooler the deeper you go. Swimming is my favorite exercise, next to biking, and there’s no other time of year I can do it since I don’t have access to an indoor pool. It is also one of the best exercises since it is low-impact and a whole-body exercise, so I’m thankful for summer for helping me get more active by enjoying one of my favorite things.
Summer time means extra time with the nephew, which is always a reason to be thankful.
Danielle’s eyes were closed and she asked if I could Photoshop her eyes open. Aren’t you jealous of my Photoshopping skillz? And aren’t you glad you’re not my sister? lol
The Wichita River Festival, where there are myriad outdoor activities to enjoy like paddle boating, kayaking, outdoor concerts, miniature golf, an ice cream social…
Last year Dennis went overboard in his kayak and he had to be rescued out of the river. Not that I was thankful for that, but it was a pretty good laugh. ;)
Picnics and barbecues! It may be hotter than Hades, but that’s OK when there’s good company and good food to enjoy.
It’s been a while! And I’ve noticed I’m not the only one blogging less–it seems summer time is a busy time for everyone and I’m no exception. Except I haven’t been busy with obligations–I’ve been busy having fun! That’s the best kind of busy, right? :)
I’ve been enjoying my nephew’s baseball games, we celebrated my PIL’s 50th anniversary, we’ve been biking and walking, I’ve been baking for bake sales, birthdays, and banana bread experiments, and we’re going to Lake Afton every chance we get. When it’s this hot, the only thing I want to do is soak in the sun’s heat on the beach (with SPF 1,000 sunscreen, of course) and then cool off in the water. Love it so so much!
I haven’t been cooking very much, but this corn salad is one of the dishes we’ve enjoyed lately. I love eating cool foods on hot days and fresh corn in the summer is so yummy in any form! This salad has a a Mexican vibe to it and the flavors are great. You can make it as is for a side dish, or turn it into a meal by adding some leftover grilled or rotisserie chicken. Fabulous!
I added so much chicken and tomato to my salad that the corn was hardly the main feature any more!
4 cups fresh or frozen corn kernels
8 ounces queso fresco or cotija cheese
1 large red bell pepper, seeded and chopped
1 small red onion, finely chopped
1 jalapeno pepper, chopped (and seeded if desired-the seeds will add more heat)
1/2 recipe (about 6 ounces) Cilantro-Lime Vinaigrette (recipe follows)
1 large avocado, pitted, peeled, and cubed
Kosher salt and freshly ground pepper to taste
Optional: chopped tomato and leftover rotisserie chicken
Bring about 1 inch of water to a boil in a large stock pot. When the water boils, add the corn and cook for 2-3 minutes. Drain and rinse and then add to a large bowl. Toss together the corn, red bell pepper, red onion, jalapeno pepper, and crumbled cheese. Toss with Cilantro-Lime Vinaigrette. Chill until ready to serve. Right before serving, gently toss in the avocado and season with salt and pepper. Serves 10-12.
1/4 cup fresh lime juice (about 2-3 juicy limes)
1/4 cup white wine vinegar or rice vinegar*
4-5 cloves garlic
1/2 teaspoon Kosher or sea salt
1 tablespoon sugar
1 cup canola oil
1/2 cup roughly chopped cilantro, stems removed
In the jar of your blender, combine lime juice, vinegar, garlic, salt, and sugar. Blend until ingredients are completely combined. With the blender running, add the oil in a steady stream. Add cilantro and blend until the cilantro has broken down but still maintains some of its texture. Serve with greens, on any type of Mexican salad, or use as a marinade.
*Reduce sugar to 2 teaspoons if using seasoned rice vinegar, which contains sugar.
I’m terrible about using recipes from cookbooks. I own quite a few but hardly ever go to them when I need a recipe, instead I go to blogs and Pinterest and Google searches. But I vowed I would make at least one recipe from the Pioneer Woman’s Food From My Frontier cookbook. It’s the only cookbook I own that I paid more than $15 for (I get them used or as gifts) and even though it’s cool to have as a memento since she signed it, it still felt like wasting money if I never used it.
Being a coffee and cake lover, the first thing that called to me was her Coffee Cream Cake. Two layers of coffee-flavored cake with a cream filling and a coffee frosting. Yum. I decided to turn it into cupcakes, putting the cream filling in the center of each. Her recipe has a drippy frosting that is more like a glaze that thickens as it cools, but I wanted a fluffy buttercream frosting on the cupcakes so I made up my own coffee buttercream recipe for these.
The cupcakes are great, mostly because of the cream filling and frosting. I could tell from how thin the cake batter was that it would make sturdy cupcakes, not the light and fluffy ones that a thicker batter will make. While the cake part isn’t my favorite (I’m pretty picky when it comes to cake), it does work well overall. I always state my honest opinion on recipes so that you’re fully informed, but I want to assure you that you will like these cupcakes as is. I doubt any one besides a cake connoisseur would notice the crumb. There isn’t anything really wrong with it because it is nice and moist, but it’s just not as light and tender as I like my cake to be. The taste is fabulous, so fabulous that my coffee-hating husband couldn’t get enough of them.
So make these, you will love them if you love coffee, and perhaps even if you don’t. Or, if you’re like me and prefer a lighter cake, you might try a different recipe for the cupcakes. Personally, I’m either going to use chocolate cake next time, making them into mocha cream cupcakes, or sub really strong coffee for the water in a white or yellow cake mix recipe to get the texture I like.
To get this white streak effect, I used the same piping bag for the frosting that I used for the filling. The residual white filling lined the bag and made a streaky look when I piped the buttercream onto the cupcakes.
Cupcakes
1 cup (2 sticks) unsalted butter
3 tablespoons instant coffee crystals
1 cup boiling water
2 cups all-purpose flour
2 cups granulated sugar
½ teaspoon salt
½ cup buttermilk
2 eggs
1 teaspoon baking soda
2 teaspoons vanilla extract
Cream filling
4 oz. cream cheese, room temperature
½ cup powdered sugar
½ cup heavy cream
Coffee Buttercream
¼ cup Kahlua (here is a recipe to make your own)
1 tablespoon instant coffee crystals
1 cup (2 sticks) unsalted butter, softened
1 lb. powdered sugar
Dash of salt
For the cupcakes, preheat the oven to 350F. Line 24 cupcake tins with paper liners; set aside.
Melt the butter in a saucepan, then stir in the instant coffee and boiling water. Let the mixture bubble up for a few seconds, then turn off the heat. In a large bowl, combine the flour, sugar, and salt. Pour the hot butter/coffee mixture over the top and stir to combine. Mix together the buttermilk, eggs, baking soda, and vanilla and add it to the bowl. Whisk until smooth (batter will be very thin). Using a levered ice cream scoop, fill the cupcake tins half full. You will have extra batter, which you can bake more cupcakes with or a small cake if you have a 6” cake pan. Bake for about 15 minutes, or until a toothpick inserted in the center of a cupcake comes out clean. Allow cupcakes to cool for a few minutes in the tins, then remove to a cooling rack to cool completely.
While the cupcakes cool, prepare the filling. Beat the cream cheese until smooth, then add the powdered sugar and heavy cream and beat on low until sugar is moistened, then on high until light and fluffy. Fill a pastry bag fitted with a round tip (or a squeeze bottle) with the filling. Push the tip or nozzle into each cupcake and squeeze filling into the center, pulling back once the top starts to rise, and stopping when the filling bursts through the top of the cupcake. Repeat with remaining cupcakes.
For the buttercream, bring the Kahlua to a boil and stir in the coffee crystals. Set aside to cool completely. Once cooled, beat the butter in a large bowl until creamy, then add the sugar, Kahlua mixture, and salt. Beat on low until sugar is moistened, then beat on high until smooth and creamy
To complete cupcakes, pipe swirls of coffee buttercream on top of the filled cupcakes. Serve at room temperature.
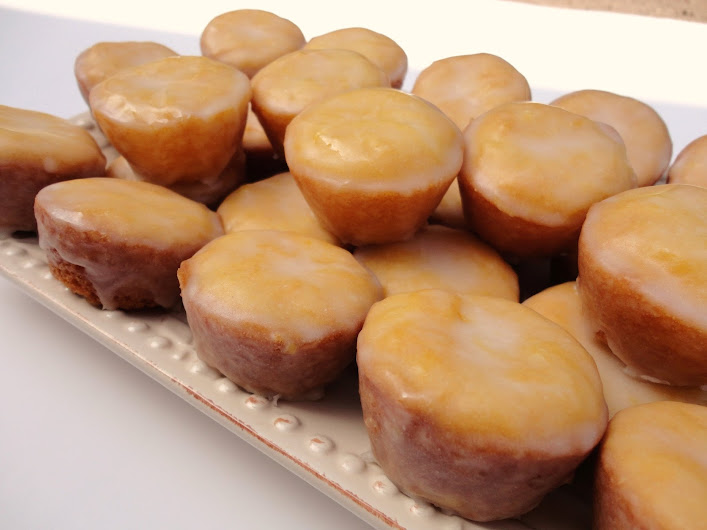
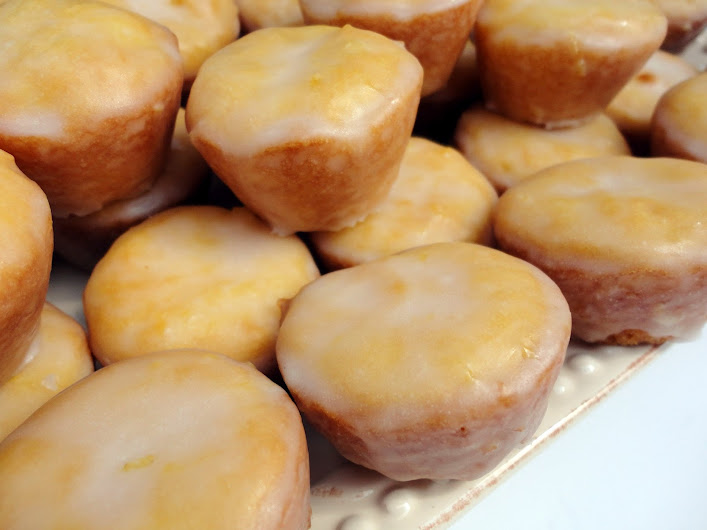
I made these for Mother’s Day, intending to give pretty little baggies of them as gifts to all the mothers at the annual Mother’s Day picnic on Dennis’ side of the family. It didn’t quite work out that way. The first pan, which was half the batch, I didn’t grease well enough and they all stuck horribly so guess where those ended up? Yup, in our bellies. Can’t say we were too sad that only half the batch was pretty enough to share. But then we couldn’t keep our hands off those either, and in the end, there were only enough to give to two mothers: his and mine.
Our mothers loved these little beauties, and we loved them. Way too much. They are really delicious, but most of the lemon flavor comes from the glaze, and I would suggest trying this with a lemon cake mix instead of a yellow if you can find one. That would really intensify the lemon flavor. They are wonderful as is, but can you get enough lemon flavor in the summer? I think not.
1 (18.5 oz) box yellow or lemon cake mix
1 (3.5 oz) box instant lemon pudding mix
4 large eggs
3/4 cup vegetable oil
Glaze:
4 cups confectioners sugar, sifted
1/3 cup fresh lemon juice
Lemon zest from 1 lemon
3 tablespoons vegetable oil
3 tablespoons water
Preheat oven to 350 degrees. Spray miniature muffin tins thoroughly with cooking spray.
Combine cake mix, pudding mix, eggs and oil and blend well with an electric mixer until smooth, about 2 minutes. Batter will be quite thick. Using a cookie scoop, divide the batter between the muffin wells, filling each halfway. Bake for 12 minutes.
While the blossoms are baking, make the glaze. In a mixing bowl, whisk together the sugar, lemon juice, zest, oil, and 3 tablespoons water. Whisk until smooth.
Remove the blossoms from the oven when they are done and turn out onto a tea towel. You might have to run a butter knife around the edges of the cupcake wells to loosen them before turning out. While they are still warm, dip the blossoms into the glaze, covering as much of the cake as possible, or spoon the glaze over the warm cupcakes, turning them to completely coat. Place on wire racks with waxed paper underneath to catch any drips. (I did this over the sink.) Let the glaze set, about 1 hour, before storing in airtight containers or covering with plastic wrap on a platter.
Thank you so much for the beautiful bike! I’m calling her PJ since she’s got a Panama Jack design. :) It was such a lovely and thoughtful gift.
Honestly, I never would have asked for a bike, as it never occurred to me that I might like one. But from the moment you presented it to me, I was in love. And the moment I sat on the seat and took off pedaling (thank goodness that it’s true, “you never forget how to ride a bike,” as I haven’t ridden one since I was ten!) was one of the happiest moments of my life. It felt like freedom, and I told Dennis, “Everyone needs a bike so when they are feeling crummy and oppressed, they can just take off riding to remind themselves what it feels like to be completely free and happy.”
I’m now addicted to the feeling of freedom I get each time I jump on PJ and take off, and to the sore and healthy feeling I have every time I come home from a long ride. At first I was embarrassed to go out in public in daylight, afraid that I would make a fool of myself by falling off, especially since it has been so long since I regularly rode a bicycle. But since Dennis has a bike now too, thanks to you (your generosity is so appreciated!), he has helped me overcome my phobia, and yesterday we took an hour long bike ride along the river to the library, which included time in front of people and traffic.
I’m happy to report I didn’t fall off or embarrass myself, except for when we were going up a steep hill to the bridge to cross the river and I couldn’t make it and had to walk the bike up the last bit. Unfortunately for me, there was a large crowd on the bridge, as the Riverfest is going on this week, but only a few people were staring at my ineptitude, as most were watching the jet ski racers on the river.
We ride our bikes most every day, and I think we’ve only missed riding them for a couple days out of the last two weeks since you gifted them to us. I wanted you to know how much we appreciate the gifts, and that we did buy helmets right away, so you don’t have to worry about us getting injured. We will treasure them until they bite the dust, which hopefully won’t be for many more years, as they have sentimental value coming from you and I hope I never have to replace them.


")


")


")