RSS Feed

Vanilla Buttercream


I’ve come to realize that there is a simple, basic frosting recipe that is missing from my blog.  Sure, I’ve got recipes for white, cream cheese, chocolate, chocolate cream cheese, egg white chocolate, cherry chocolate, chocolate fudge, caramel, whipped caramel ganache, peanut butter, Oreo, raspberry, and lemon frostings (phew!), but no vanilla.

With as much cake as I obviously make, you may well be wondering why in the world I haven’t shared a basic vanilla buttercream recipe with you yet.  And the truth is, I haven’t posted one because before last week, I’d never made it.  Not once.  Seriously!

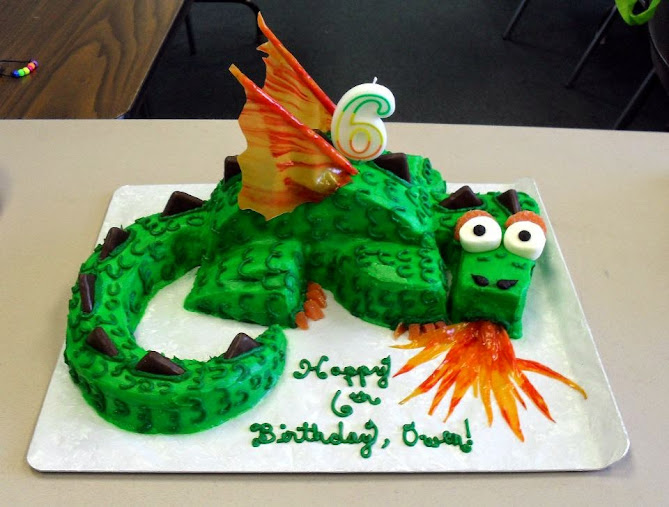
I prefer cream cheese frosting for most cakes, so I never needed to make something so simple as a basic vanilla frosting.  Until I started making my nephew’s 6th birthday cake and realized (*gasp*) I was out of cream cheese.  But as soon as I realized it, I was excited to make a new frosting, even if it was such a basic no-frills attached kind of buttercream.

If you don’t like cream cheese frosting, and your cake doesn’t have to be perfectly white, this is the one for you.  I based the recipe off of my celebration (white) frosting recipe and prefer it MUCH more because, come on, it’s made with real butter.  The only downside, which won’t matter in most cases, is that it is ivory colored, even if you use clear vanilla, because butter has a soft yellow hue.  This does affect the resulting color of your buttercream when you add icing colors to it, lending them warmth rather than the pure color advertised on the bottle.  My Mom once made a baby shower cake with real buttercream rather than white frosting and the pink turned out peach.  It was OK, but if the color scheme is very important to your cake, you should stick with the white celebration frosting recipe.

If you want to fancy this up a bit, use vanilla bean paste or scrape out a real vanilla bean in place of the vanilla in the recipe.  I imagine the little black flecks would make your cake so pretty!

Vanilla Buttercream

Printable recipe
Printable recipe with picture

2 cups (4 sticks) unsalted butter
1 (2 lb.) bag powdered sugar
4 teaspoons real vanilla extract
¼ teaspoon salt
Milk or cream to thin, if desired

Cream the butter with an electric mixer. Add remaining ingredients and beat on low until powdered sugar is moistened, then increase speed to medium and continue to beat for a few minutes longer, until smooth and creamy, scraping down sides of bowl occasionally. I don’t thin mine, but if you want yours more creamy, add milk or cream a teaspoon at a time until desired consistency is reached.

*For celebration buttercream, use two teaspoons crème bouquet flavor emulsion and two teaspoons vanilla extract. If you want to keep the color as light as possible, use clear vanilla extract.

Just for fun, here are the cakes I’ve made for Owen through the years.  His first birthday was teddy-bear themed, and his cake was one of the first I ever decorated.  The trouble I had with it inspired me to learn how to decorate cakes so that it wouldn’t be as stressful in future.

https://i0.wp.com/a2.l3-images.myspacecdn.com/images02/140/7aec2a1bde3e416ab2dbb16c2aa393a9/l.jpg

His Mom (my youngest sister, Lacey), made his second birthday cake, which is the only one I didn’t make for him.  I guess I was slacking that year!  I thought this was a really cute and simple idea–using cereal to make a picture on top.

Lacey had a Sponge Bob luau for his third birthday, by which time I’d finally taken the basic Wilton cake decorating class.  I used a trick I learned in the class to transfer a picture from the internet onto the cake in clear gel so I could trace over it with colored icing.

https://i0.wp.com/a3.l3-images.myspacecdn.com/images01/63/aaa82308731bf2e8a52d60acf4d79d46/l.jpg

We went to the zoo for Owen’s 4th birthday so I gave his cake a zoo theme, cheating with some plastic toys and animal crackers.

https://i0.wp.com/a2.l3-images.myspacecdn.com/images02/11/93412935a29444f2a37aab65b701364c/l.jpg

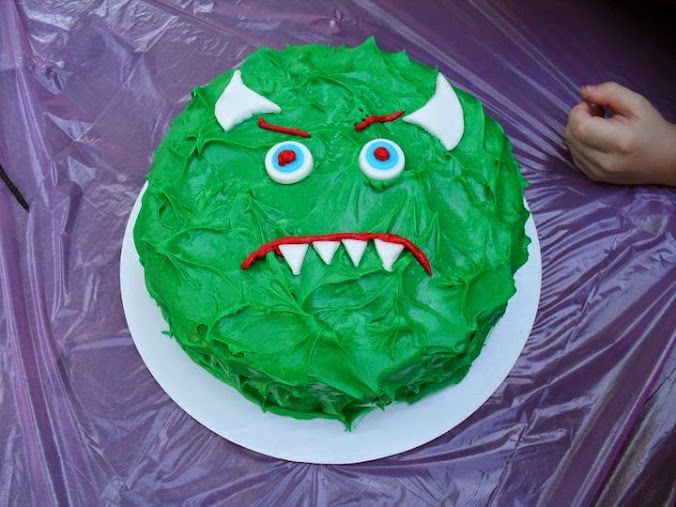
He requested a “monster” party for his 5th birthday, and I had no idea how to make a monster cake so I asked him how he imagined his cake.  I made it exactly how he described it, which was a lot simpler than I would have done if left to my own devices, and he loved it!

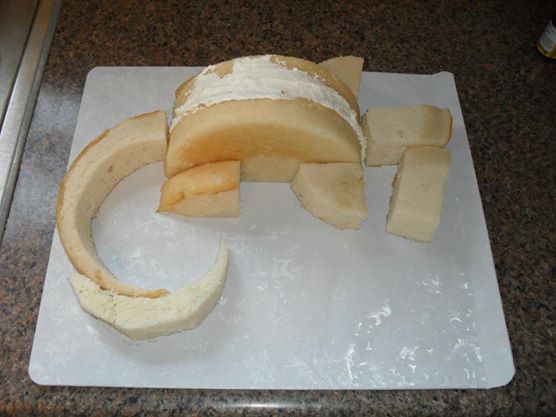
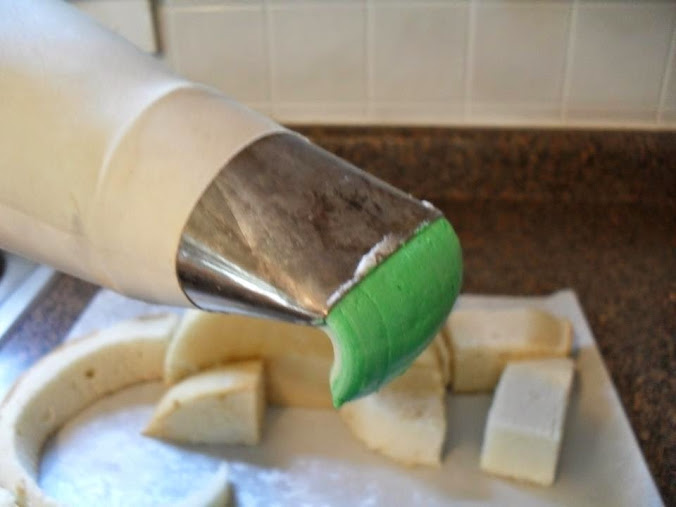
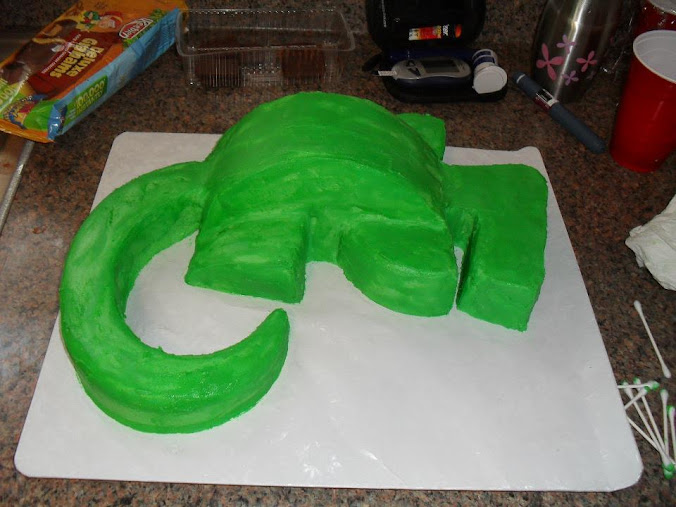
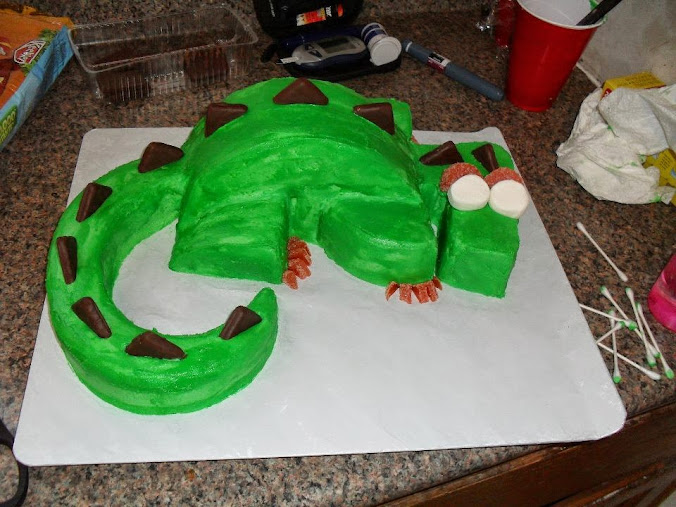
This year’s dragon cake was the first shaped cake I’ve ever done.  Using that flat frosting tip pictured above really eased the frosting process–all I had to do was squirt and smooth.  (I actually use that tip for all my cakes, but it was especially handy frosting an uneven surface.)  Although I don’t enjoy decorating and do it only because I enjoy baking cakes and people, for some strange reason, expect birthday cakes to be decorated, I’m kind of excited to make future shaped cakes now that I know I can do it.  It was a lot easier than I thought!  I used the tutorial for the cake on Instructbables.  Creating an account is free, and if you make one, you can view each full-size step-by-step photo, which helped me a lot.

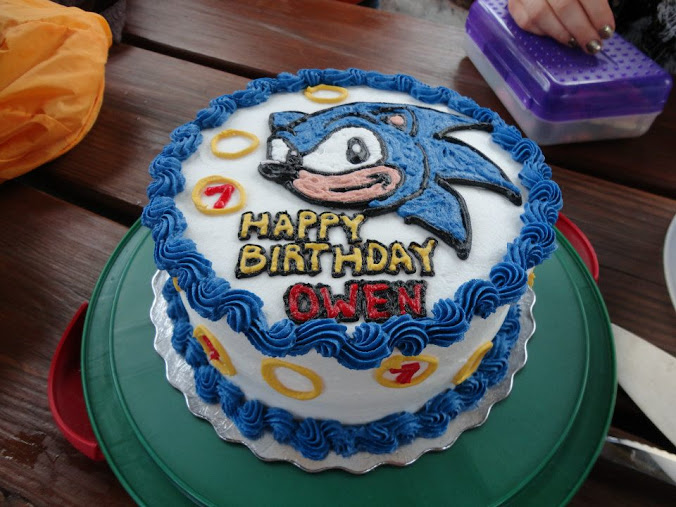
Update: Here’s his 7th birthday cake:

Thankful Thursday #40: Daddy Warbucks


I made a thanksgiving resolution to find something to be thankful for every day until next Thanksgiving.  Here’s what I am thankful for this week!

Thursday:  Spoke to my supervisor for the first time since I got in trouble for clocking in late (was a minute over the allowed five), and was nervous about how she would interact with me, but she was totally normal.  I know she hasn’t forgotten, but at least she’s not holding a grudge.  Now I won’t feel so awkward when she calls me to her desk for edits.

Friday:  Time with the hubster is rare nowadays (he works days, I work nights), but he stayed up late so that we could snuggle up together with a big bowl of popcorn and watch half a movie (The Miracle Worker) before bed.  :)

Saturday:  I couldn’t make it to my nephew’s birthday party because I had to work, but my wonderful husband went just so he could take pictures for me since I couldn’t be there.  Awwwww!  Check out the cake I made for the birthday boy:


You can get the step-by-step tutorial for making this cake here.

Sunday:  I didn’t have to go to work until 2:45, which gave me enough time to go to the morning worship service, which I prefer over the shorter evening service, and have lunch with my hubby!

Monday: Last day (#8) of work before my weekend, baby!

Tuesday: Despite many, many setbacks, I did manage to finish three baked items for the fair!  I’m REALLY excited about my red velvet cake.  I can’t wait to share this one with you guys but it will be a while because I have to make another one for pictures–I can’t cut the one that’s going to be judged. Sorry!  I promise it will be worth the wait.

Wednesday: My Dad!  I’m not the kind of person that asks to borrow money usually, but I was desperate today and thankfully Dad was able to help me out.  And thankfully I get paid Friday and will be able to pay him back really fast!  It’s embarrassing to admit on my blog about our financial difficulties but this is what I was thankful for today and didn’t know how to say it without revealing less specifics.  Please don’t feel sorry for us–we have more than we need and are doing better and better the longer I work with this higher pay.  Thank God for that too! :D

Amish Friendship Creamed Cornbread

Posted on

I don’t enjoy eating hot, hearty meals in the summer.  It makes me feel icky.  And yet I’ve been eating them like crazy.  Enchiladas, chicken noodles, meatloaf and creamed corn, chicken and rice, pot roast.  Today?  Pinto beans and cornbread. All foods I associate with cold winter months, and that have no business being in my belly this time of year.

OK, so I have some excuses.  The enchiladas?  I had all the ingredients without even planning for it.  The chicken noodles, meatloaf, chicken and rice, and pot roast I made all in a single day with Teri because she was teaching me to cook more homestyle-type foods.  So that’s a pretty good excuse.  And today, with the winter beans and cornbread? Four words.

AMISH FRIENDSHIP BREAD STARTER.

(Click here if you want to make your own starter.  But you might want to read the rest of this blog first.  As a warning.)

It’s taking over my life.  Sparking creative neurons in my brain and making me want to bake things with it that I’d rather not eat this time of year.  But I just couldn’t resist the idea of turning this round of starter into cornbread, despite having no desire to actually eat it.  (Until I baked it of course, and then I couldn’t stop eating it!) I was inspired by the Miller-family’s creamed corn to incorporate the same ingredients into this recipe, which made the most moist cornbread I’ve ever had.  It almost melts in your mouth!

Debbie left a comment yesterday on the creamed corn recipe that made me LOL: “Oh sure, stick a brick of cream cheese and a whole stick of butter on it and you could make your shoes taste awesome!!”  Can’t argue with that, or with what the magic of excessive cream cheese and butter do to this cornbread.  There is not a dry crumb to be found on this bread.  It is so moist, it’s almost a cross between cornbread and corn pudding.  The starter has enough sugar to give it a very nice, sweet, Northern-cornbread feel, and I love the sharp and salty edge the cheddar on top imparts.

If you decide to make this during the winter months, particularly for a holiday gathering, I’m going to tell you right now to go ahead and shred the whole block of cheese and add the other half to the batter.  But if you’re making it right now…well, I hope you’ve at least packed away your swimsuit for good until next summer.  Just sayin’.

Amish Friendship Creamed Cornbread

Printable recipe
Printable recipe with picture

Remaining starter after you’ve divied up three bags for friends
1 (8 oz) package cream cheese, room temperature
1 stick butter, room temperature
2 eggs
1 ½ cups cornmeal (I used stone ground)
1 ½ teaspoons baking powder
½ teaspoon baking soda
½ teaspoons salt
1 can corn, drained
4 oz sharp cheddar cheese, shredded

Preheat oven to 350 degrees F. Spray a 9×13 dish with cooking oil and set aside.

Add the cream cheese and butter to the starter in a large bowl and beat until fairly smooth. Beat in eggs until combined. Stir in cornmeal, baking powder, baking soda, and salt just until combined. Stir in corn and mix until well combined. Spread into prepared dish and bake for 30 minutes or until tester inserted in center comes out clean. Sprinkle cheese on top and allow to cool for ten to fifteen minutes before serving. Cheese will melt while the cornbread cools.

Creamed Corn

Posted on

Until I married Dennis, I defined creamed corn as that uber-sweet yuck that comes in a can.  My first Thanksgiving with my in-laws, however, brought to light the real stuff that puts the canned goop to shame.  My sister-in-law, Joan, is in charge of the creamed corn in the Miller family, and she brings it to every single family gathering we have, for which my husband is eternally rejoicing and thankful.

It’s a Miller-family staple, and one of Dennis’ favorite foods.  At Thanksgiving, the creamed corn is just as important to him as the turkey.  Although I’ve brought it to my own family reunion before, I rarely make it at home (I prefer to indulge in desserts rather than side dishes), so he is super excited to pile it on his plate at every holiday gathering.  He got lucky recently, however, because I decided to make it in lieu of the usual mashed potatoes to go with our meatloaf.

Creamed corn the Miller way (OK, I know lots of you already make it this way, but to me, it will always be the Miller way) is buttery, creamy, has just a bit of tang to offset the sweet corn, and is crazy delicious.  It’s homestyle comfort food at it’s finest!  If you want to do it up completely Miller-style for a big gathering, triple the corn, double the other ingredients, and throw it in a crockpot to heat all day, stirring to combine everything once it’s hot, until it’s time to eat.

Creamed Corn

Printable recipe
Printable recipe with picture

1 bag frozen sweet yellow corn
1 (8-oz) package cream cheese
1 stick salted butter*

Melt the cream cheese and butter together in a large saucepan over medium heat. Once they are melted and pretty smooth, stir in the corn. Continue cooking, stirring every few minutes, until heated through. Serve hot.

*If using unsalted butter, add 1/4 teaspoon salt to the recipe.

**The above recipe is the long-loved and family-approved version, but I tried adding 1/4 teaspoon garlic powder to the latest batch since Teri adds it to hers, and Dennis loved it. He doesn’t like sweet in his savory foods and usually adds extra salt to combat the corn’s sweetness, but he didn’t have to do that with the addition of garlic powder.  I like this corn either way, so it’s up to you.

Choco-Cherry Cheesecake Cookie Bars

Posted on

*Update 10/4/11: I won the editor’s choice award for these bars. Whee!

Editor's Choice: Choco-Cherry Cheesecake Cookie Bars

It’s Secret Recipe Club time again!  Members of the club are assigned a secret food blog each month and they can pick any recipe(s) they want to make from the blog.  On reveal day, nobody knows what other blogger was assigned their blog so I find it really fun.

This month I was super stoked to get assigned to Big Bear’s Wife, because Angie (who also happened to be my group’s host this month) has plenty of dessert recipes to choose from.  I think you all know by now that dessert is both my strength and my weakness!

I thought of Dennis when I saw these bars because he loves cherries and chocolate.  Chocolate-covered cherries (aka cherry cordials), black forest ice cream sundaes, cherry mudslides (layers of ice cream, cherry pie filling, and hot fudge), black forest cake.  He loves it all.  And I think I’ve mentioned my little cheesecake problem.  So yeah, I pretty much had to make these.  And then I pretty much had to get them out of the house as soon as possible so I didn’t eat the whole pan.  I managed to inhale two rows before he got them out the door to bring to work.  Doh!

I never buy packaged cookie dough (perhaps it’s hypocritical to be for cake mixes but against premade cookie dough-lol), so I adapted the recipe with homemade, but you can use a package of store-bought to save time.

Be sure to check out all the other secret recipe club blogs at the bottom of this post! ***Something is up with the linky thing so there may be no links at the bottom. While it is getting figured out, you can go to Big Bear’s Wife at the bottom of her post to see all the links.***

Choco-Cherry Cheesecake Cookie Bars

Printable recipe
Printable recipe with picture

Sugar Cookie layer:
½ cup (1 stick) butter, softened to cool room temperature
½ cup granulated sugar
3 tablespoons powdered sugar
1 large egg
½ teaspoon vanilla extract
¼ teaspoon almond extract
1 ½ cups all-purpose flour
1 teaspoon baking powder
¼ teaspoon salt

Filling & topping:
1 egg, separated
1 package (8 oz) cream cheese, softened
2 eggs
1 can (14 oz) sweetened condensed milk (not evaporated)
¼ teaspoon almond extract
3 drops red food color
1 jar (10 oz) maraschino cherries, finely chopped, drained on paper towels
1 (12 oz) bag semisweet chocolate chips (2 cups)
½ cup butter or margarine
½ cup whipping cream

Preheat oven to 350°F. In a large bowl, cream together the butter and sugars for 3-4 minutes, until the mixture is light and fluffy. Add the egg and extracts and mix until blended. Add half the flour, baking powder and salt. Mix. Add remaining flour and mix just until flour is incorporated and the dough is smooth and soft. Spread and press dough into the bottom of a 9”x13” baking dish. Bake 15 to 20 minutes or until light golden brown. Meanwhile, in small bowl, beat 1 egg white until frothy. Brush egg white over crust. Bake 3 minutes longer or until egg white is set.

Meanwhile, in large bowl, beat cream cheese with electric mixer on medium speed until smooth. Add egg yolk, 2 eggs, the condensed milk, almond extract and food color; beat until well blended. Stir in chopped cherries. Pour cherry mixture evenly over crust. Bake 20-25 minutes longer or until set. Cool completely, about 45 minutes.

Meanwhile, in medium saucepan, heat chocolate chips and butter over low heat, stirring frequently, until melted and smooth. Remove from heat. Cool 20 minutes. Stir whipping cream into chocolate mixture until well blended. Spread over cooled bars. Refrigerate about 30 minutes or until chocolate is set. For bars, cut into 8 rows by 6 rows. Store in refrigerator.

Recipe source: adapted from Big Bear’s Wife


Caramel Chocolate Chip Bars

Posted on

I like to have an arsenal of easy emergency recipes on hand for gifts, and recently added this one because I happened to have a caramel cake mix and dulce de leche in my cupboard when I was scrambling to get something ready for a friend with a birthday, who I was going to see later in the day.  If you can’t find caramel cake mixes in your grocery store, you can request them at your customer service counter like I do, or purchase them online.

Caramel Chocolate Chip Bars

Printable recipe
Printable recipe with picture

1 (18.25 oz) Duncan Hines caramel cake mix
2 eggs
¼ cup brown sugar
¼ cup butter
¼ cup water
1 (12 oz) package semisweet chocolate chips, divided
1 (14 oz) can dulce de leche

Preheat oven to 375 ºF.. Spray a 9×13 dish with oil. Combine cake mix, eggs, water, brown sugar and butter in large bowl. Stir until thoroughly blended. Mixture will be thick. Stir in chocolate chips. Spread in greased pan.

Bake for 24 to 27 minutes or until toothpick inserted in center comes out clean. While it’s still hot and fresh from the oven, spread dulce de leche over the top and sprinkle chocolate chips over that. Wait five minutes, then use a butter knife or spatula to swirl the chocolate into the caramel. Cool completely in pan. Cut into bars.

Recipe source: adapted from Duncan Hines

Thankful Thursdays #39: pot roast for Dennis

Posted on

I made a thanksgiving resolution to find something to be thankful for every day until next Thanksgiving.  Here’s what I am thankful for this week!

Thursday: Day off, day off, day off!  Days off now are unpredictable, sometimes coming three days apart, sometimes eight or ten.  This time it was seven days and YES, thank you, I was ever so ready for it.  We needed some food in our pantry, stat!

Friday:  I spent the day cooking with Teri, who taught me several basic home-style meals to make my husband happy with.  I came home with enough food to feed us for a week!  At dinner, Dennis was like, “Oh, goody, pot roast! We never eat pot roast!”  Poor guy!

Teri fixed us barbecue enchiladas for lunch.

I make funny faces when I'm concentrating.

Guess what we made with these egg noodles?

Homemade chicken noodles baby! I couldn't believe how easy it was.

Saturday:  Had a little free time and was able to get one of my fair entries baked and frozen.  (Teaser alert: it’s a new twist on the pound cake I won third place for last year.)  One down…twenty-nine to go!  Obviously, with only a few weeks to go, that isn’t happening.  I always sign up for more than I can do.  I will just do as many as I can fit in between work and everything else.

Sunday:  A stirring sermon that reminded me why I’m a Christian.  I have been so caught up in the details lately I needed a reminder of what Christ did for me and how much I love Him for that.

Monday:  That I didn’t throw out all my fat clothes when I lost weight!  OK, I’m not thankful for the reason I need them again, but I’m certainly glad to have something that accommodates the junk in my trunk.  There is nothing more depressing than going shopping for bigger clothes.  As for the battle of the bulge issue, I’m thinking too much about other things right now to even care that much, but Dennis and I are making some cool weight loss plans.  Stay tuned!

Tuesday:  Money in the bank.  Most of you can probably relate to living paycheck to paycheck and having overdrafts more times than you’d care to admit.  This is the first week in many that we’ve had some extra breathing room in our budget.  I’m now playing catch up on all the things we’ve been putting off–my raise really was a Godsend.

Wednesday:  OK, so while I may really dislike working second shift, I do really appreciate having the mornings free for doctor appointments.  I have had to take Dad in twice in the last week and my schedule has been perfect for it, because I don’t go in until mid-afternoon.  He had a lump removed from his arm today and it was sent to the lab to see if it was cancerous, so please say a prayer for him!  We really don’t think it is cancer, but prayers can’t hurt, that’s for sure.

Homemade Miracle Whip & Tartar Sauce

Posted on

OK, which side are you on?  Mayonnaise or Miracle Whip?  In our house, my husband goes for the mayo, and I reach for the whip.  I just love the sweet tanginess of it!  So when I discovered how easy making my own mayonnaise was, I very quickly adapted it to taste like my preferred sandwich spread.  I don’t know what took me so long to share it with you.  Enough delaying, here you go!

Homemade Miracle Whip

Printable recipe
Printable recipe with picture

1 egg
1 tablespoon sugar
1 tablespoon white vinegar
½ tablespoon lemon juice
½ teaspoon mustard powder
½ teaspoon salt
¼ teaspoon onion powder
1 ½ cups flavorless oil

Place all ingredients, except the oil, in the bowl of a food processor fitted with blade attachment. Have the oil measured and at hand. Turn on the food processor and pour the oil through the feed tube in a thin, steady stream. Gradually increase the flow until all oil is in the mixture. Continue to process until a thick mixture. Refrigerate.

To make tartar sauce, stir in finely chopped onion and dill relish (or finely chopped pickles), as much as you desire. I think I added 3 tablespoons of each to about half the Miracle Whip recipe.  It’s so yummy with fish sticks!

Chicken Shawarma Pita Sandwiches

Posted on

I don’t know what to tell you except that these are great and if you like Mediterranean foods, you need to make them! :)  I’ve discovered that no two chicken shawarma recipes are the same, and this one seems very different from all the others I’ve seen.  So I don’t know how typical or traditional this particular recipe is, but I enjoyed it nonetheless.

The chicken has a unique and potent marinade that includes plenty of acids to tenderize the meat.  I love the combination of the flavorful meat with fresh vegetables and the tahini sauce wrapped in pita bread.  I’ve been making these sandwiches for several months now and only had to tweak the recipe a little to suit my preference.  I hope you enjoy!

Chicken Shawarma Pita Sandwiches

Printable recipe
Printable recipe with picture

Chicken
2 teaspoons fenugreek
1 teaspoon cumin
1 teaspoon allspice
1 teaspoon black pepper
1 teaspoon cinnamon
1 teaspoon nutmeg
1 teaspoon ginger
1/2 teaspoon cardamom
1/2 teaspoon ground cloves
1/2 teaspoon salt
3 tablespoons lemon juice
2 Tbsp White Vinegar
2 Tbsp Minced Garlic
2 pounds boneless, skinless chicken breasts

Tahini Sauce
1/2 cup plain yogurt
1/4 cup tahini
1/4 cup lemon juice
5 cloves garlic, minced
2 teaspoons sugar

Sandwiches
Pita bread
Shredded lettuce
Tomato slices
Cucumber slices
Red onion slices

The night before, combine spices for chicken in a gallon-size Ziploc bag and shake to combine. Add the lemon juice, vinegar, and garlic, and massage the bag to combine. Add chicken, seal, and massage the marinade around (will be thick like a paste) until all the chicken pieces are coated. Refrigerate overnight. You can also prepare the tahini sauce the night before by whisking all the ingredients together and storing in the refrigerator until it’s time to serve the sandwiches.

Grill the chicken breasts until no longer pink in the center. To serve sandwiches, fill pita bread with lettuce, chicken, tomato, cucumber, and onion, and top with tahini sauce.

Recipe source: adapted from Food o’ del Mundo

No-Bake Granola Cookie Bars

Posted on

In Tupperware’s July specials brochure, there was a recipe for Peanut Butter Granola Bites that caught my eye because it was easy and the photo was very appealing.  The best part is that it contained no granola, which I never have on hand, just ingredients contained in granola, which I always have on hand.

However, I just so happened to be running low on peanut butter when I decided it was time to make them (we are always running low on peanut butter because we eat it like crazy), so I adapted the recipe and made my own walnut butter for it.  I have the original printer-friendly recipe here if you want to try that one instead.  I can’t vouch for it since I haven’t tried it yet, but my similar version was very good and I’m sure it is too.  I mine for snacks and even had some for breakfast since they are fairly healthy.

No-Bake Granola Cookie Bars

Printable recipe
Printable recipe with picture

2 cups raw nuts (I used walnuts)
½ teaspoons salt
½ cup (1 stick) unsalted butter
½ cup honey
2 cups rice cereal
2 cups rolled oats
1 cup dried fruit, roughly chopped (I used half cherries, half cranberries)

Spread nuts out on microwave-safe plate. Microwave one minute; stir with fingers. Microwave for 1-2 minutes more, stirring every thirty seconds, until toasted and fragrant. Place nuts in food processor bowl with blade attachment in place, and process until nuts go from a meal, to a paste, to liquid. You will have to stop the food processor several times to scrape the sides down. Once it it liquid, add salt (use ¼ teaspoon if you’re using salted butter) and let it run another minute.

While you’re toasting and processing the nuts, start your oats to toasting. Place them in a skillet over medium heat and stir every minute or two until golden and fragrant, about five minutes. Set aside until you’re ready for them.

Melt butter in a microwave-safe bowl, microwaving one minute or until melted. Add to the nut butter in the food processor, then pour in the honey. Process until mixture is blended.

Place cereal, oats, cherries, and cranberries in large bowl. Pour the butter mixture over the top and mix until combined. Spray a 13″ x 9” baking dish with oil and spread mixture into the pan. Cover with plastic wrap and refrigerate for two hours, or until firm. Slice into squares and devour.

Recipe source: adapted from Tupperware