RSS Feed

Category Archives: Sweets

Tiger Butter


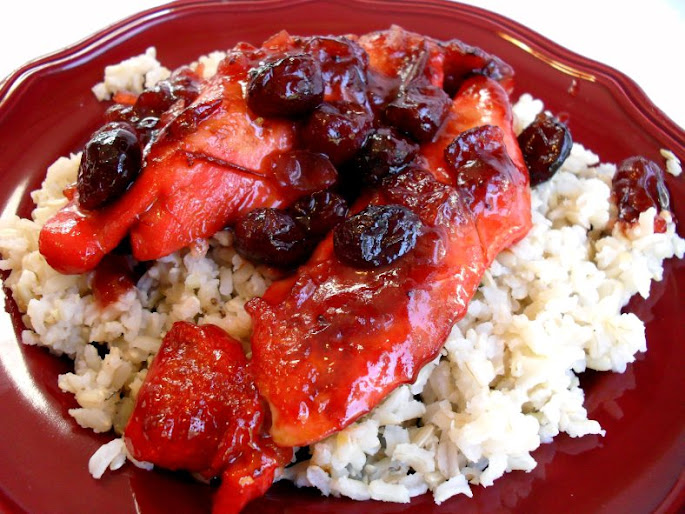
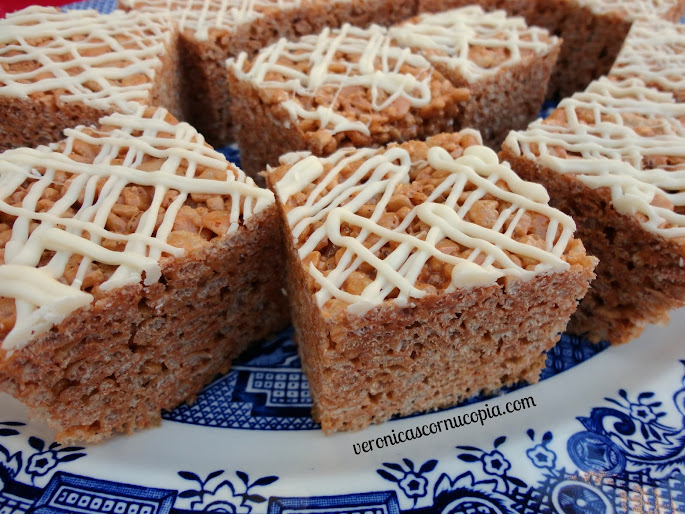
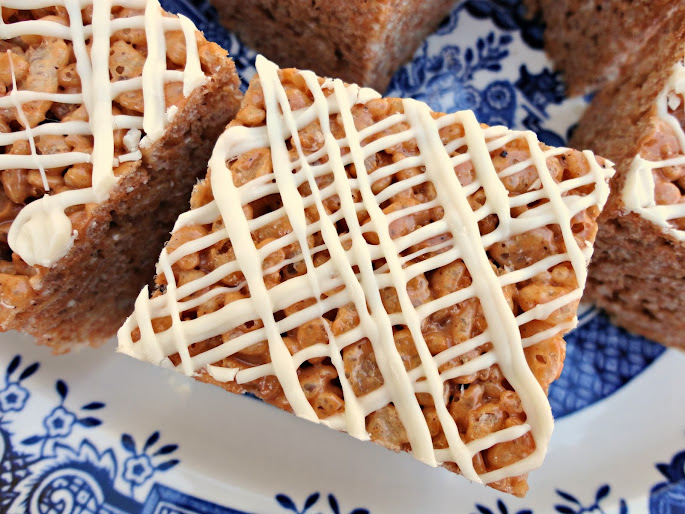
If you need an idea for last-minute Valentine’s Day treats for your loved ones, I gotcha covered!  I’ve made four batches of this Tiger Butter fudge since Christmas and everyone has been so impressed with it, I don’t know whether to be proud or ashamed of how easy it is to make!  Three ingredients, melt, stir, and swirl, and you’re done.

And if you’re wondering about the taste, it is oh so good.  The peanut butter layer is incredibly creamy and of course the chocolate is the perfect complement.  Need I say more?

Tiger Butter

Printable recipe
Printable recipe with picture

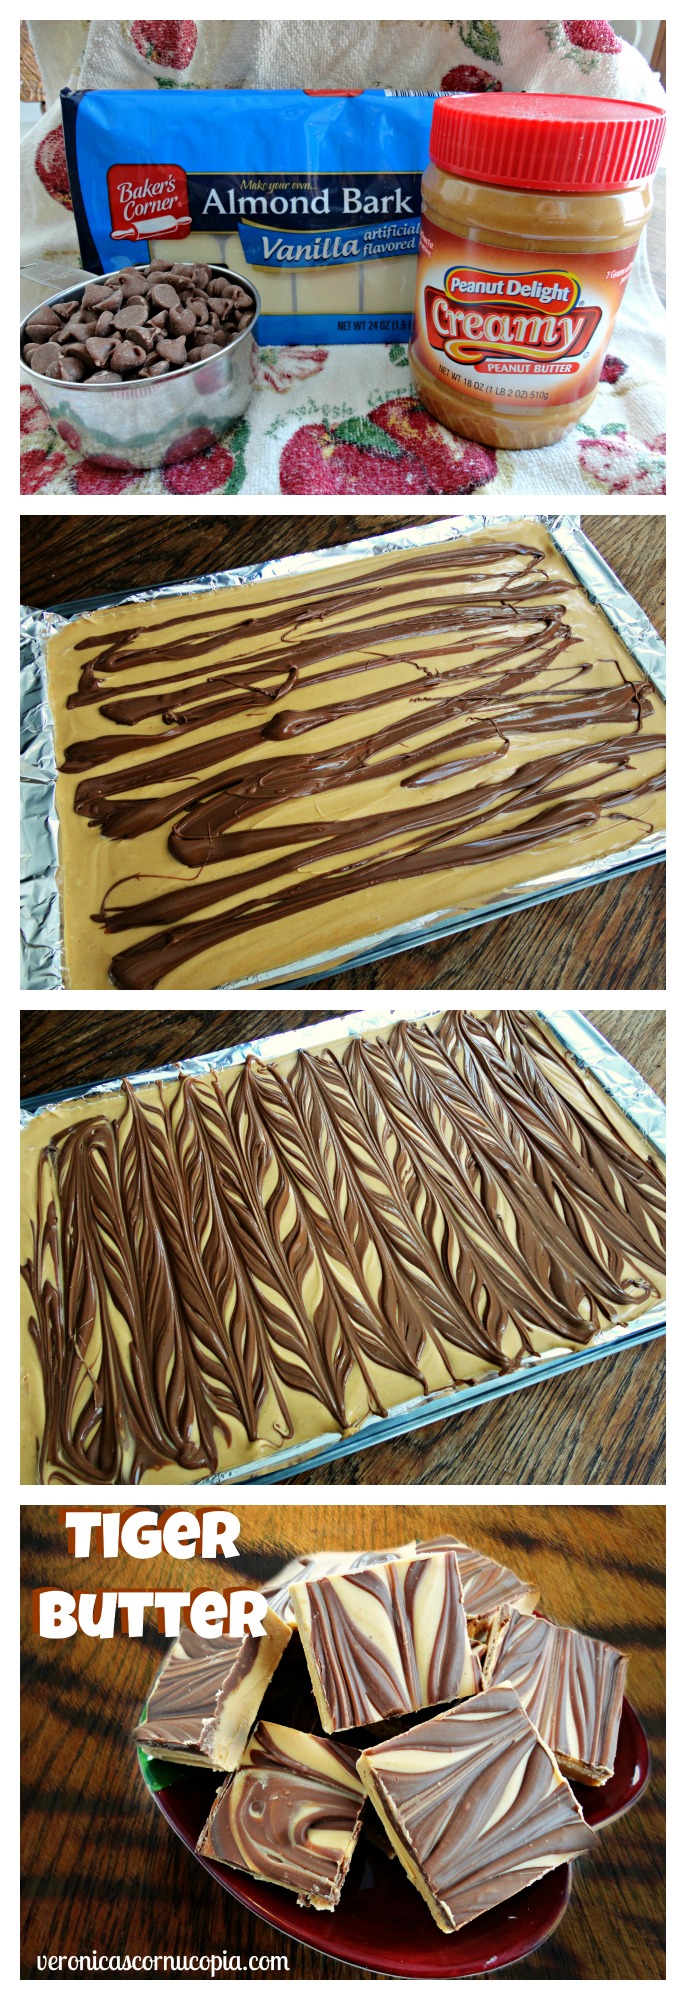
1 (24 oz) package vanilla almond bark candy coating
1 (1 lb 2 oz) jar creamy peanut butter
1 1/4 cups milk chocolate chips

Line a rimmed baking sheet with foil; set aside.

In a microwave-safe bowl, microwave the chocolate chips for one minute and stir well. Microwave in 15-second intervals, stirring well in between, until completely melted. This takes 2 intervals for my microwave. Be careful not to overheat the chocolate and stir well after each interval, allowing the residual heat to melt the chips before microwaving again. If you overheat them, they will get too thick and you won’t be able to use the melted chocolate for swirling. Once melted, set aside.

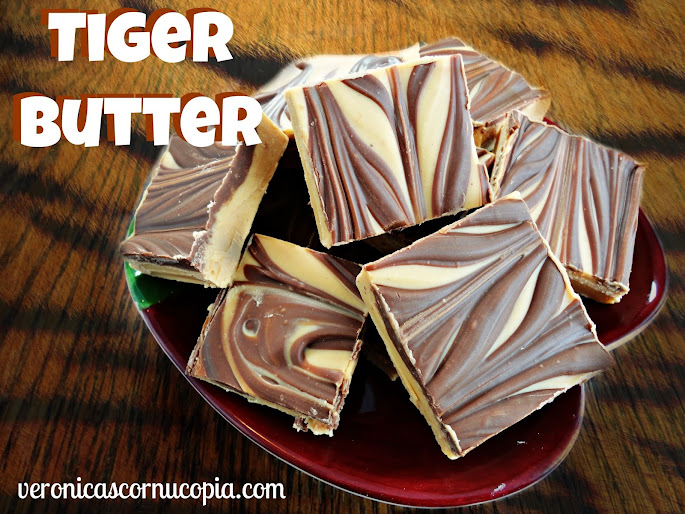
Melt the almond bark according to package directions. Usually that would be to place them in a microwave safe bowl, microwave for 1-1 1/2 minutes, stir well, and microwave in 15 second intervals, stirring in between, until melted and smooth. Once melted, stir in the peanut butter until creamy and smooth. Spread into prepared baking sheet.

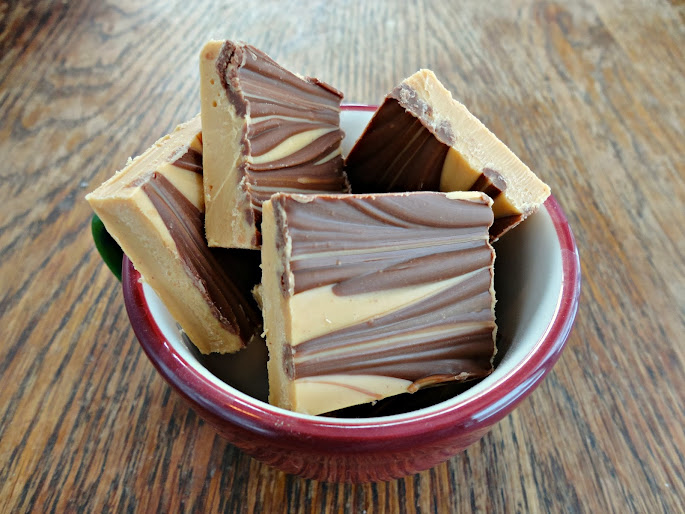
If the melted milk chocolate has become too firm with standing, microwave for ten seconds, stir, then pour it over the peanut butter mixture in long horizontal lines. Drag a spatula through the lines in a vertical pattern, going up on one line, then down on the next, repeating until the pan is swirled. Allow to set for several hours or overnight before cutting. You may refrigerate the fudge to set it up quickly.

Stores great at room temperature, and you don’t even have to cover it. Great shelf life. I’ve left some uncovered for up to two weeks with no spoiling.

Veronica’s notes: although I haven’t tried it, you should be able to substitute 1 1/2 lbs white baking chips for the candy coating if you can’t find it in your area, or even real white chocolate if you don’t mind the big price tag. I like to use milk chocolate with peanut butter, but semisweet chocolate is perfectly fine and would create a more dramatic stripe effect.

Recipe source: adapted from The Better Baker

Cranberry Crumb Bars

Posted on

Are cranberries in season any more?  I haven’t been looking for them since they’re more of a December thing for me, but I had a jar of Killer Cranberry Sauce leftover from a large batch I made in December and I wanted to use it, so these bars were made…in season or not.

And oh my goodness, they are amazeballs.  I include orange juice and zest in my cranberry sauce, and there is even more orange flavor from the zest in the crust and crumb topping, which pairs so well with cranberry filling.  The crust and crumb are so tender, buttery, and crumbly – the perfect texture and I plan to use the base recipe for other crumb bars in the future.  The recipe does include a little bit of an unusual ingredient – almond flour or meal, but you can make your own by grinding almonds very fine in a food processor.  Also the Killer Cranberry Sauce is great in these bars, if you don’t want to make cranberry sauce, go see Bakerita’s recipe for her filling that doesn’t require cooking beforehand.

If you prefer very tart desserts you can skip the glaze, but for the sweet tooth like me, it is necessary to balance the cranberry.  Alternately, you could melt some white chocolate to drizzle over the top – a classic cranberry pairing.  Enjoy!

Cranberry Crumb Bars

Printable recipe
Printable recipe with picture

2 1/2 cups (10 1/2 oz) all purpose flour
1/2 cup (2 oz) almond meal (almond flour)
1 cup (7 oz) granulated sugar
1 teaspoon baking powder
1/4 teaspoon salt
1 cup (2 sticks) cold, unsalted butter
1 large egg
Zest of 1 orange
1/2 teaspoon cinnamon
2 cups Killer Cranberry Sauce
1 cup (4 1/2 oz) powdered sugar
2 tablespoons orange juice (or milk or water)

Preheat oven to 375F. Butter a 9×13 baking dish.

In a medium bowl, mix together flour, almond meal, sugar, baking powder, and salt. Use a fork or pastry cutter to blend in the butter and egg. The dough will be crumbly. Alternatively, you can pulse the dry ingredients in a food processor with the butter until pebbly, then mix in the egg until it all comes together. pat half the dough into the buttered pan. Spread the cranberry sauce over the crust, the crumble remaining dough over sauce. Bake for 45-55 minutes, or until top is a light golden brown. Cool completely, then blend the powdered sugar and orange juice together in a small bowl and drizzle over the top. let set for 5-10 minutes before slicing into bars.

Recipe source: adapted from Bakerita

Who cares if cranberry is out of season when it makes such delicious eats?  Here are a few other ways to enjoy it…

Cranberry Chicken

Cranberry Bliss Cookies

Romaine Salad with Chicken, Cheddar, Apples, Spiced Pecans and Cranberry Vinaigrette

Oatmeal Raisin Bars with Brown Butter Icing

Posted on

When I look back on things I’ve pinned, sometimes I’m like, “I would never make something like that – it’s just not me.  Why did I pin it?”  But I know why.  The blogger’s enthusiasm about how good it is sells me every time and I end up pinning a lot of things I’ll never make, but still want to make because the blogger was so enthusiastic about how good it was.  Such is the case with these bars, but they are SO me so of course I had to make them almost immediately. :)

Miss Marsha sold me with her sheer enthusiasm, but hello, did I ever mention that cookies are my second favorite food group (with dip being the first)?  The recipe itself probably would have sold me without her enthusiasm.  It had been way too long since I’d enjoyed an oatmeal raisin cookie and making them in bar form sounded genius.  I don’t have time to be portioning out dough right now, but I can fo sho pat it into a pan!

These bars are just as good as my award-winning oatmeal raisin cookies and I even used the same icing on them.  Marsha’s recipe uses cream cheese frosting so please check it out to if you’d like to make them that way – it looks and sounds majorly delish but I just had to go with brown butter this time.  It’s my weakness.  Along with cookies and dip.

Oatmeal Raisin Bars with Brown Butter Icing

Printable recipe
Printable recipe with picture

½ cup (1 stick) unsalted butter, softened
1 cup (8 oz) light brown sugar, packed
1 large egg
1 teaspoon vanilla extract
1 cup (4 ¼ oz) all-purpose flour
1 cup (3 ½ oz) old fashioned or quick cooking oats
1 cup (5 ¼ oz) raisins
½ cup (2 oz) chopped walnuts
1 teaspoon cinnamon
½ teaspoon baking soda
¼ teaspoon salt

Icing
1/4 cup (1/2 stick) unsalted butter
1 1/2 cups (6 oz) powdered sugar, sifted
1 teaspoon vanilla extract
1-2 tablespoons water

Preheat oven to 375F and grease a 9″ X 13″ baking dish.

In a large bowl, beat together the butter and brown sugar until lightened and fluffy. Beat in the egg and vanilla until combined. In a medium bowl, combine flour, oats, raisins, walnuts, cinnamon, baking soda, and salt. Stir into butter mixture until well combined. Spread into prepared pan and press into an even layer with floured fingers. (It may seem there isn’t enough dough to cover the bottom, but there will be). Bake 15 – 20 minutes, or until golden brown. Place on wire rack to cool.

While cooling, prepare the icing. In a small saucepan, heat the butter over medium heat, stirring occasionally, until golden brown and the solids separate and turn a chocolate brown. Remove saucepan from heat; stir in sifted powdered sugar and vanilla. Stir in enough water to make an icing of drizzling consistency. Drizzle on warm bars and cool completely before cutting.

Recipe source: adapted from The Better Baker

You don’t have to go clubbing to hit up some good bars.  Check these babies out!

Fudge Brownies

Posted on

Pretty excited about these brownies! It’s my first time making a from-scratch brownie recipe that turned out better than a box mix (I’m not ashamed to admit I LOVE brownies from a box), AND had the shiny crackly top. Exciting stuff, at least in my world!  These were so fudgy and so chocolatey and so delicious, especially with a scoop of vanilla ice cream and chocolate sauce on top.  Ultimate dessert treat!  Treat yourself today…

Fudge Brownies

Printable recipe
Printable recipe with picture

1 cup (2 sticks) unsalted butter
2 ¼ cups (1 lb) granulated sugar
1 ¼ cups (3 ¾ oz) Dutch-process cocoa (I use Hershey’s Special Dark)
1 teaspoon salt
1 teaspoon baking powder
1 teaspoon espresso powder or 2 teaspoons instant coffee granules
1 tablespoon pure vanilla extract
4 large eggs (cold)
1 ½ cup (6 ¼ oz) all-purpose flour
2 cups chocolate chips (optional)

Preheat the oven to 350°F. Lightly grease the bottom of a 9×13” baking dish.

In a medium-sized microwave-safe bowl, or in a saucepan set over low heat, melt the butter, then add the sugar and stir to combine. Return the mixture to the heat (or microwave) briefly, just until it’s hot (about 110°F to 120°F), but not bubbling; it’ll become shiny-looking as you stir it.

Transfer the sugar mixture to a medium-sized mixing bowl, if you’ve heated it in a saucepan. Stir in the cocoa, salt, baking powder, espresso powder, and vanilla. Whisk in the eggs, stirring until smooth. Add the flour, again stirring until smooth, then stir in the chocolate chips if using. Spread the batter into prepared dish.

Bake the brownies for about 35 minutes, until they feel set on the edges, and the center looks very moist, but not uncooked. Remove from the oven and cool completely on a rack before cutting and serving.

Recipe source: King Arthur Flour

Other brownie favorites…

Mocha-Frosted Kahlua Brownies

Dark Chocolate Raspberry Swirl Brownies

Mocha Toffee Brownies

Iron-Woman Ginger Cake


I don’t usually post on Saturdays, but I’ve had the honor of being a guest contributor for whattoexpect.com, a site I go to every week to see my baby’s progress!  I really hope you will visit to check out my recipe for Iron Woman Ginger Cake.  It’s so nice to have healthier options (especially ones that taste good) during the holidays, and this cake definitely fits the bill!

XOXO,

Veronica

Brown Butter Pumpkin Spice Krispies Treats

Posted on

*Disclaimer: this post is sponsored by Kellogg’s, but all thoughts and opinions (and recipe-hehe) are my own. :)

Have you seen this adorable Rice Krispies commercial?  Sometimes I really miss commercials (we don’t watch TV), so it’s nice that the good ones are available online whenever I choose to watch them.

[unrulysponsored code=144502383 align=center]

It’s true, they are so gentle on your tummy, which I know because I’m pregnant and a pregnant tummy can be awfully sensitive sometimes.  Although I lucked out in the morning sickness department, even I have food aversions and prefer Rice Krispies over a flavorful meal once in a while.  They are just so good!  They also supply a surprising amount of nutrition, despite consisting mainly of rice.  Have you ever looked at a nutrition label for these babies? Gotta love that they’re low in calories as well.

The ingredients for my treats. Still easy to digest…maybe not as nutritious. ;)

Anyway, after watching the commercial, I realized just how long it’s been since I’ve made Rice Krispies treats!  I had a special reason to make these, as well as the Pretzel Pumpkins yesterday, but I’ll share that with you later.

Although I love to bake, there is something really satisfying about combining a few ingredients and having a delicious treat to enjoy without ever having to turn on the oven.  Rice Krispies treats are my favorite no-bake treat, and I love coming up with new & fun recipes for them.  These were inspired by the Pumpkin Spice Mallows that are cropping up in stores lately, combined with my favorite recipe for Brown Butter Crispy Treats.  They are so simple and delicious!

Brown Butter Pumpkin Spice Krispies Treats

Printable recipe
Printable recipe with picture

½ cup (1 stick) unsalted butter, plus extra for the pan
1 10-ounce bag Pumpkin Spice Mallows
1/8 teaspoon salt
6 cups Rice Krispies cereal (about half a 12-ounce box)
1 cube of vanilla almond bark/candy coating (for optional drizzle)

Line a 9-inch square cake pan with 2-inch sides with foil, letting some hang over the edge. (You can also use a 9×13 pan if you prefer thinner treats.) Butter the foil and set aside.

In a large pot, melt butter over medium heat. Continue to cook, stirring constantly, until the butter turns amber in color, and the solids have separated and turned a chocolate brown. Turn off the heat and stir in the salt and the Pumpkin Spice Mallows. Continue to stir until the marshmallows have melted completely and the mixture is smooth. Remove the pot from the stove and stir in the cereal until well coated, then quickly spread into prepared pan and press down using a silicone spatula or a piece of waxed paper that has been sprayed with oil.

Once the bars are completely cool, use the foil overhang to lift the bars out of the pan. If desired, melt the almond bark in a small microwave safe bowl – microwaving for 1 minute at 50% power, then turning over and cutting in half, and microwaving another minute at 50% power, stirring well until smooth.  You might need an additional 10 seconds or so to get it completely smooth but be careful not to overheat it or it will seize up.  Spoon into a disposable pastry bag or small Ziploc bag and snip a bit off the tip (or corner for the Ziploc bag) and use a sweeping motion while gently squeezing to drizzle over the top of the treats. Allow to set, then cut into squares.

Need some more snap, crackle, pop in your life?  Try these yummy treats!

Salted Brown Butter Crispy Treats

Gingerbread Rice Crispy Treats

Cake Batter Crispy Treats

Pumpkin Pretzels

Posted on

I ran across the cutest idea for making pumpkins out of mini pretzels on Butter with a Side of Bread.  I found a limited edition of Wilton’s candy melts called “Pumpkin Spice” and thought of those cute pumpkins.  I couldn’t resist!

Jessica made solid pumpkins, covering the holes with the candy coating (see photo below for my attempt at this), but I decided to just keep to a thin coating and leave the holes because it seemed to turn them too sweet to use that much coating.  Also, I think the texture of my coating made it harder to do the way she did hers.  In my experience, adding food coloring (the gel kind used in frosting, like Jessica used) to candy coating changes the texture and makes it thicker, which probably helped her coat her pretzels completely with no holes.  Mine was thinner and it was a lot easier to coat the pretzels thinly – the two I did like Jessica’s actually took more time because the coating kept wanting to fall through the holes.  Whatever you decide to do, these are fun, easy, and tasty! Kids are sure to love them.

I highly recommend the Pumpkin Spice flavored candy melts if you can find them – they are so good!  I found mine at Walmart in the Halloween section where all the Halloween sprinkles and treat-making supplies were located.

They almost looks like spooky jack-o-lanterns!

Pumpkin Pretzels

Printable recipe
Printable recipe with picture

50-75 mini pretzels
1 (10 oz) bag orange colored candy melts (Wilton’s Pumpkin Spice recommended)
Green M&M’s*

Melt the candy melts according to the package directions.  I recommend being even more careful than the package recommends and after doing 1 minute at 50% power in the microwave, doing only 15 second intervals and stirring extremely well between zaps.  These candy melts tend to get very thick if you overheat them at all, so be careful.  Once melted, dip each pretzel in the coating using a fork and tap off the excess chocolate before placing on waxed paper.  Take a green M&M and press into the top (I dipped mine in the coating a little to help them adhere, but it’s probably not necessary) to make a stem.  Continue with remaining pretzels until all the M&M’s are used up, gently reheating the coating as necessary when it becomes too thick or starts to harden.  If you still have coating left when the M&M’s are gone, keep dipping pretzels until it’s used up.  Allow the coating to set completely before removing the pretzels to a bowl to serve.  Keep covered until ready to serve.

Makes about 50 pumpkin pretzels

*I got about 50 green M&M’s from a regular bag, which turned out to be an almost perfect amount. I only had a little bit of candy coating left once I ran out of the M&M’s, and I just coated about a dozen more without stems and mixed them in with the others.

Recipe source: adapted from Butter With a Side of Bread

Thankful Thursday #116: birthday cake

Posted on

I was blessed to celebrate another birthday this week – my 33rd! So thankful to celebrate another birthday.  It may mean I’m older, but hopefully it means I’m wiser too.  And it also means I’ve almost lived long enough to see my life-long dream of having a baby fulfilled, so there was no sting at all affiliated with turning another year older.  :)

Every year, my only birthday plan is to eat a piece of cake.  If I can have a piece of cake on my birthday, I’m a happy girl.  I’ve only posted maybe 200 recipes for cake on my blog, so you might have noticed I’m a fan.  But my sister, Danielle, thought I needed an actual celebration, so she decided to throw a little pizza party for me at her shop.  Imagine my surprise to get gifts to boot!  I didn’t celebrate my birthday growing up, but I felt like a kid again, or what one probably feels like that celebrates their birthday. :)

Danielle is crackin’ me up how she is holding little Mariam to feed her! I was feeding her but needed a cake break, then I got schooled on how to feed babies, Danielle style. Dad, Dennis, Owen, and Margo’s middle daughter, Norah, are in the other room.

And I got my piece of cake too.  It’s a new tradition for Dennis to make my birthday cake because for me, that’s the ultimate gift and thankfully, while baking (or cooking) isn’t really his thing, he’s willing to do it for me every year that I ask (this year makes three cakes he’s made for me).  I picked out an easy one this year since he went a tad overboard last year (lol – see below the recipe).  He rocked it!

Coconut Orange Cake

Printable recipe
Printable recipe with picture

Cake:
1 (18.25 oz) Duncan Hines Orange Supreme cake mix, plus ingredients called for on box
1 cup (3.5 oz) flaked, sweetened coconut

Frosting:
1 (15 oz) can mandarin oranges, plus more for garnish if desired
1 (5.1 oz)large instant vanilla pudding mix (not prepared)
1 cup (3.5 oz) flaked, sweetened coconut
1 (8 oz) container frozen whipped topping, thawed

Preheat oven to 350F degrees. Brush Miracle Pan Release on the bottom and sides of two 8″ or 9″ cake pans, or grease and flour them; set aside.

Prepare the cake mix according to the package directions. After you’ve finished mixing the cake, stir in 1 cup of coconut. Bake according to cake mix instructions for the size of pans you’re using. After cooked through, remove from oven and turn out onto wire racks to cool completely.

Prepare frosting: In a large mixing bowl, mix the mandarin oranges with their juices with an electric mixer until crushed. Mix in the instant pudding mix and coconut and mix well. Fold in the whipped topping until combined.

Using a cake leveler or a long serrated knife, cut the tops off both of the cakes to get a flat surface. Take one of the cakes and place the cut side up on the cake plate. Add a layer of frosting. Place the 2nd layer cut side down on top of the frosting layer. Frost the top and sides of the cake. Garnish with mandarin orange slices if desired.  Chill in the fridge for several hours before serving.

Recipe source: Sweet Tea and Cornbread, as seen on Jam Hands

Love cake as much as I do?  Check out some of my past birthday cakes:

2010: Easy Coconut Layer Cake

2011: Chocolate Oblivion Truffle Torte

2012: Den’s Birthday Cake-tastrophy

Banana Bread Bars

Posted on

This year I only had a couple hours to prepare the food I was going to take to the Pig Roast so I didn’t have time to make some really razzlin’ dazzlin’ cupcakes like I had planned.  I went to the recipes I had saved on Pinterest and decided on these bars because they were pretty quick to make, could feed a crowd, and I had some overripe bananas ready to be used.  While many were disappointed I didn’t bring cake or cupcakes (I guess by now I’m kind of known for them), most of the pan was eaten by the time the meal was over (and there were tons of desserts) so apparently they weren’t too disappointed. :)

I got the best reaction from the teenage girls, for some reason – they flipped for them.  There were two short rows left when we were cleaning up after the meal, and I asked one of them if she wanted any more before I put them in my trunk and she took another three, saying she’d already eaten five.  I’d say that’s a pretty good endorsement.

The bars have a nice, moist crumb, and really good classic banana bread flavor, but the thing that makes them stand out is the browned butter icing.  I knew brown butter and bananas was a good match, and that’s why I worked so hard to perfect my recipe for Brown Butter Banana Bread.  But I think that the flavor comes through so much better when used in an icing on top of the bread.  Oh soooo delicious!

Banana Bread Bars

Printable recipe
Printable recipe with picture

Bars:
1 ½ cups (10 ½ oz) granulated sugar
1 cup (8 oz) sour cream
½ cup (4 oz / 1 stick) butter, softened
2 eggs
1 ¾ cups (15.25 oz, peeled) over-ripe bananas, mashed (about 3 or 4)
2 teaspoons vanilla extract
2 cups (8 ½ oz) all-purpose flour
1 teaspoon baking soda
¾ teaspoon salt
½ cup (2 oz) chopped walnuts or pecans (optional)

Frosting:
½ cup (4 oz / 1 stick) butter
4 cups (1 lb) powdered sugar
1 ½ teaspoons vanilla
about 3 tablespoons milk or half and half

Heat oven to 375F. Grease and flour a 10×15 jelly roll pan or line with parchment paper (for thicker bars use a 9×13 pan and bake longer). Beat first four ingredients until creamy. Blend in bananas and vanilla for one minute. Add dry ingredients and blend for one minute. Stir in nuts if desired and spread in pan. The pan will be very full but it’s OK, it won’t rise over the edge during baking. Bake 20 to 25 minutes until golden brown. Allow to cool on a wire rack while you make the frosting.

For the browned butter frosting: Heat butter in saucepan over medium heat past the melting point until it is boiling and a delicate brown, stirring constantly. The solids will separate and turn into chocolate brown flecks at the bottom of the pan.  Remove from the heat and immediately add the remaining ingredients. This should be thicker than a glaze and thinner than frosting. Using a spatula, smooth over the top of the Banana Bread Bars immediately. The frosting will be easier to spread once it’s on the warm bread.

If not serving the same day, let the pan sit out until cool and the frosting is dry to the touch, then cover with foil until ready to serve.  These will last several days at room temperature, but I found them even more delicious when served cold from the fridge!

Recipe source: The Girl Who Ate Everything

Nutty for banana bread? You might go ape for these…

Chocolate Chip Banana Bread {Low Fat, Low Sugar}

Buttermilk Banana Bread (my favoritest favorite!)

Virginia Street Banana Nut Bread (multiple blue ribbons winner!)

*You may have noticed I’ve started to include links to older recipes at the bottom of each recipe post.  Since I’ve built up quite a collection of recipes on my blog that many new readers have never seen, I’d been thinking about sharing recipes from my archives on a certain day each week like my girl Marsha.  But I’m having so much fun rehashing them this way, because I get to search my own archives like a treasure hunter and see if I can come up with three similar recipes to the one I’m posting.  So far I’ve been able to do it fairly easily, and I hope you guys enjoy these oldies along with the newbies! :)

Chocolatey Chocolate Zucchini Bread

Posted on

Back when I made the super-fantastic Double Chocolate Banana Bread, I also made a loaf of chocolate zucchini bread, hoping it would turn out as good as the banana bread.  It was a huge, miserable disappointment.  Dry, and hardly any chocolate flavor.  I didn’t mention this on that post, but out of the blue, reader Caren K. mentioned she had a chocolate zucchini bread recipe that was to die for.  Of course I had to ask her for it, and she thankfully obliged.

This bread totally met my expectations!  As you can see in the pictures, I barely had half a loaf to photograph the next day because we couldn’t help but dig in, and dig in some more, while it was cooling the night before.  It is so incredibly moist, to the point of being fudgy, and I love the hint of cinnamon – it really adds some warmth and mystery to the bread.  You don’t taste the instant coffee, and I suspect it is there to enhance the chocolate flavor.  If so, I think it does its job well, as this bread is perfectly chocolatey!

Chocolatey Chocolate Zucchini Bread

Printable recipe
Printable recipe with picture

2 cups grated zucchini, measured after draining
1 ¼ cups (5 ¼ oz) all-purpose flour
¼ cup (3/4 oz) unsweetened cocoa
1 teaspoon baking soda
¼ teaspoon salt
½ teaspoon cinnamon
¾ cup (5.25 oz) sugar
1 large egg
6 tablespoons melted butter
¼ heaping teaspoon instant coffee granules
1 teaspoon vanilla extract
½ cup semisweet chocolate chips
Mini semisweet chocolate chips for top, if desired

Preheat oven to 350 degrees and spray the bottom of an 8×4 loaf pan with oil; set aside. (I have an excellent nonstick pan, so you might want to spray the sides too, or use Miracle Pan Release if your baked goods tend to stick to yours.)

Grate zucchini and place in a colander in the sink to drain while you continue with the recipe. After it has drained, squeeze it to get out the extra liquid before measuring. Don’t pack the cups too much or your bread might be a little soggy the second day.

Whisk together the flour, unsweetened cocoa, baking soda, salt, and cinnamon in a medium bowl. Whisk until well combined. In a separate larger bowl, whisk together the sugar and egg until smooth. Add the melted butter, instant coffee granules, and vanilla extract and whisk until well combined. Add the shredded zucchini into the sugar mixture, then add the flour mixture in small sections, stirring to combine after each addition.

Pour batter into prepared pan. Bake for 50 minutes or until a skewer inserted in the center comes out clean. Let cool in pan for 5 minutes. Remove from the pan and let cool completely on a rack.  If desired, sprinkle some mini chocolate chips over the top while it cools. The heat from the loaf will make them soften and melt a little and stick well to it.

Recipe source: Caren K.

You may also be interested in…

Double Chocolate Banana Bread

Double Chocolate Banana Muffins (healthy!)

Double Chocolate Rum Amish Friendship Bread