RSS Feed

Category Archives: Lighter Fare

Greek Salad

Posted on

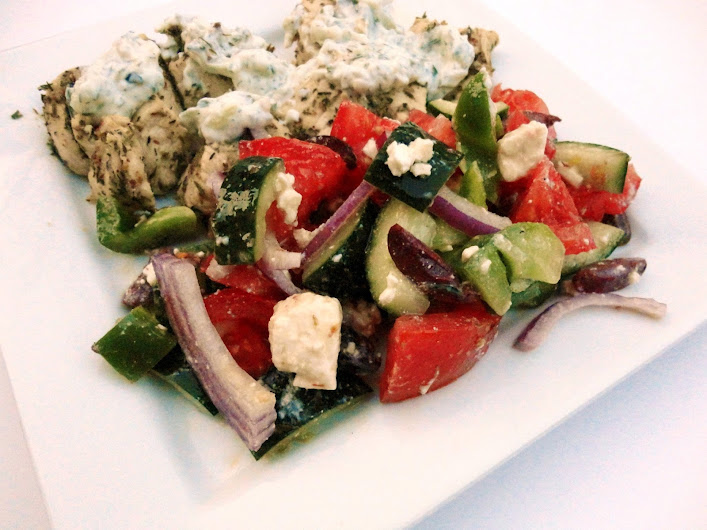
Since this is my first blog of the week, I hope you’ll forgive me for skipping Thankful Thursday in favor of a recipe for Greek salad.  I made it months ago and kept forgetting to share it, but now that the weather is heating up and cool, crunchy salads are especially appealing, I knew it was now or never.

I’ve eaten a lot of Greek salads at restaurants and they are always lettuce salads with kalamata olives, red onions, tomatoes, and feta cheese.  This salad has the same elements but the lettuce is replaced with chopped peppers and cucumber.  The result is a crunchy, more fulfilling salad–it really feels like you’re eating something other than air with some toppings.  And it’s so delicious!  My husband’s favorite salad is a Greek salad and he really went wild for this, somehow managing to eat all but the little bit I managed to grab for myself before he basically confiscated the whole bowl and started murmuring, “My preeeecious.”

It makes a wonderful side dish for a Mediterranean meal and I’ll be sharing the recipe for the chicken I served it with tomorrow.

Greek Salad

Printable recipe
Printable recipe with picture

Dressing:
½ cup extra virgin olive oil
¼ cup lemon juice
1 teaspoon minced garlic (from a jar is fine)
2 teaspoon dried oregano
1/8 teaspoon salt
Dash of pepper

Salad:
1 large cucumber, quartered lengthwise, seeds removed then chopped
1 ½ cups chopped tomatoes
12 large kalamata olives, quartered
1 cup diced green pepper
¾ cup thinly sliced red onion
3.5 oz good quality feta cheese, diced

Mix the dressing together and store at room temperature until ready to serve, preferably overnight to allow the flavors to develop. Combine salad ingredients, shake the dressing and add half of it, then gently stir everything together. Add more dressing to taste.

Recipe source: Eat Little, Eat Big

***

P.S. As you can see from the video ad below, I’ve been approved for participation in WordPress’s WordAds program.  I’ve been blogging with WordPress for more than two years without having any affiliates or any other monetary support.  I never thought I would want ads on my blog, but I applied for this program on a whim since applying doesn’t mean you’ll get accepted or that you even have to do it if you get accepted.  I was approved and I decided to try it out on a trial basis.  The two commercials I have watched were tasteful and well done, one was actually really informative, comparing our country’s standard of living to other countries with statistics, and I do like that it is optional to my readers to watch them, so I hope you enjoy the ads you do choose to watch.

My reason for not having ads until now has been a fear of turning my blog into work instead of something I do for fun, turning my concentration from creativity to money.  So far there’s no difference in my thinking, so maybe I can make a few cents while I’m having fun without it spoiling my fun. :)

Watermelon Black Bean Salsa

Posted on

For the Holiday Recipe Club‘s Memorial Day blog hop, the secret ingredients to choose from were watermelon, beer, and pork.  I think I’m on a salsa kick because my last recipe for the HRC on Cinco de Mayo was for Fresh Mild Salsa, and the first thing I thought of when I saw that watermelon was one of the ingredients for Memorial Day was the salsa recipe my hair dresser gave me back in February.  I have been craving it ever since I read the recipe, imagining how wonderful it must taste, and I was trying to wait until watermelon were truly in season here in Wichita to try it (that happens in August for us), but with the added incentive of the Holiday Recipe Club blog hop, I knew the time had come.

This stuff is the bomb, yo!  The only change I made was to add in some lime juice, which I feel was essential to achieve the salsa flavor and balance the sweetness of the watermelon.  The beans, which may seem strange, are somehow a perfect fit with the flavors & textures.  I could eat this as a meal, it is so good!  It is juicy, and seriously addictive.  It is, however, best if eaten within four hours of making it as the watermelon leaks more and more water and becomes mushy after a while.  To serve this at your Memorial day barbecue or another gathering,  just have the watermelon prepped in a separate container than the other ingredients, then stir them all together and refrigerate an hour before serving and you’ll have a bowl of salsa perfection ready to wow your guests.

Watermelon Black Bean Salsa

Printable recipe
Printable recipe with picture

2 cups diced seedless watermelon
3/4 cup finely diced sweet onion
3/4 cup canned black beans, rinsed and drained
2 jalapeno peppers, seeded and finely diced
1/4 cup minced fresh cilantro
Juice from 1/2 a lime
2 teaspoons brown sugar, packed
1 garlic clove, minced
1/2 teaspoon salt
Tortilla chips

In a small bowl, combine all ingredients but the chips. Cover and refrigerate for at least 1 hour. Drain if necessary before serving. Serve with chips within 2-3 hours of making.

Yield: 3-1/2 cups.

Veronica’s Note: I advise wearing latex gloves when handling and dicing the jalapenos, as the oils can burn your skin.

Recipe source: Jennifer L.

A big thank you to Erin for creating this club!  I’m having a lot of fun with it.  If you’d like to join or find out more, check out the Holiday Recipe Club website.  And don’t forget to check out the other Memorial Day recipes by clicking the linky frog below.


Asian Lettuce Wraps

Posted on

I’m still on vacation but, SURPRISE!  I had another blog scheduled.  :)

This is one of the fabulous recipes I made on the first cycle of the 17 Day Diet, one that I would eat whether I was on a diet or not, and one I intend to eat again soon.  I doubt it is any sort of copycat PF Changs recipe, but it is good, nonetheless, and doesn’t use any pre-made, packaged sauces for flavoring, which is the main reason I chose this recipe over others.  I didn’t want the sugar you find in those sauces!  I did think it needed a hint of sweet to compliment the other flavors, so I added some stevia, but that’s totally optional.

This recipe makes a large family-sized batch, and I took it for lunch a couple days.  Eating lettuce wraps with a dipping sauce is a bit messier than I’d like for a work lunch, so I just put a bunch of lettuce in a bowl then heated the filling at work and dumped it on top, then drizzled the sauce over.  And voila!  Asian Lettuce Wrap salad.  The easier way to eat lettuce wraps!

Asian Lettuce Wraps

Printable recipe
Printable recipe with picture

2 teaspoons olive oil
5 cloves garlic, minced
1 tablespoon fresh shredded ginger
20 oz 97% lean ground turkey (or ground chicken breasts)
5 oz mushrooms, finely chopped
½ teaspoon kosher salt
4 cups bagged coleslaw mix or finely shredded cabbage
1 (8 oz) can water chestnuts, drained, and finely minced
1 cup thinly sliced green onions
¼ cup soy sauce
2 teaspoons sesame oil
1 packet NuNaturals stevia powder, or other sweetener to taste
1 lemon, zested and juiced
½ to 1 teaspoon sriracha (optional)
1/3 cup chopped cilantro
1-2 heads iceberg lettuce

Dipping/Drizzling Sauce
¼ cup soy sauce
¼ cup rice vinegar
3 tablespoons water
1 packet NuNaturals stevia powder, or 2 teaspoons honey
1 teaspoons fresh shredded ginger

Heat an extra-large skillet to medium-high heat on the stovetop. When hot, add oil and then garlic and ginger. Saute for about 30 seconds, or until fragrant, then add the turkey, mushrooms, and salt. Cook for about five minutes, breaking the turkey up and stirring often until it is cooked through. Drain off the broth, and add the cabbage, water chestnuts, and green onions. Cook until the cabbage is wilted, about 2 minutes, then add the soy sauce, sesame oil, stevia, lemon zest and juice, and sriracha if desired. Remove from heat and stir in the cilantro.

To prepare the dipping sauce, combine all the ingredients and whisk to combine.

To serve, carefully remove each individual leaf from the head(s) of lettuce, place chicken mixture on the leaves and serve with sauce.

Recipe source: adapted from Our Best Bites

Secret Recipe Club

Avocado Chocolate Pudding

Posted on

You may have noticed I’m no longer posting regularly.  I have a feeling that’s how VC will be from now on, with periodic posts when I have the time.  While I hope my sporadic posting doesn’t bother any of my readers, I likely wouldn’t begin to post regularly for your sake at the expense of my own, so it would help my conscience out a lot if you would just be OK with it.  Thanks. :)

Onto the pudding.  I know it sounds weird, but you just have to try this to believe it how good it is.  Even my avocado-hating husband loves this pudding!  Basically it’s just avocado blended up with cocoa powder and agave nectar to create a sweet, silky, perfectly chocolate-y pudding.  No dairy, no refined sugar, no gluten, no cooking, just blending and eating of the most delicious & wholesome dessert ever…refrigeration totally optional.  We couldn’t wait and ate ours as soon as it was blended and it was fabulous.  But I bet it would be even better cold.

Chovocado Pudding

Printable recipe
Printable recipe with picture

1 ripe avocado
1/4 cup cocoa powder
1/4 cup raw agave nectar
1/4 cup almond milk
1 teaspoon vanilla extract

Peel and quarter the avocado. Put all the ingredients in a Magic Bullet or food processor and blend until smooth. Serve and enjoy!

Recipe source: Forgiving Martha

Zucchini Spaghetti

Posted on

**I apologize to subscribers for the weird “password protected” post that came to your inbox or feed early this morning!  It was me just being a spaz, but I’ve got this “top secret” recipe now set to public visibility instead of password protected.  Sorry to disappoint if you thought my zucchini spaghetti recipe must contain codes to reveal a huge conspiracy theory, but I hope you’ll find the delicious recipe is quite enough to get excited about in and of itself.  :) **

Have you been wondering what ever happened to the weight loss contract and the 17 Day Diet?  Join the club–I’m wondering too! :D  We did save a good amount of money with the contract, though we only actually stuck to the agreements made in it for like a week.  And we ended up with a bunch of emergencies (car stuff, etc.) that most of the money went toward.  We did much better with the 17 Day Diet and stuck with it for over a month, but soon after got to the third 17-day cycle, which allows for a wider range of foods, we cheated our way into widening the range to all foods, and in great abundance.  Soooo, I think I lost 15 pounds and gained most of it back.  Story of my adult life.  I pretty much diet half the year so I can eat like a pig the other half.  It kind of works for me.

Anyway, this “spaghetti” was the romantic Valentine’s Day dinner I made while we were on the first cycle of the 17 Day Diet, which allows for no starches except for fruit.  The lean meats allowed are minimal as well (turkey, chicken, and fish) and I was challenged to come up with a 17 Day Diet-friendly recipe that would be really delicious and impressive.  Debbi posted her version of Kalyn’s zucchini spaghetti and I knew I had a winner.  And wow, I was right!  This was the most delicious thing we ate during the entire diet, and I would even say it’s one of the most delicious meals I’ve eaten in my entire life.  The sauce is just spectacular (it would be great on real spaghetti, too) and the zucchini is perfect here.  I always have thought zucchini was a vegetable best suited to Italian seasonings and this recipe further proves it.   I can’t even tell you how much I love this dish!

A funny thing about the “spaghetti” strands.  The only julienne slicer I could find was this one, which also has three other cutting blades.  For some reason, I didn’t look at the owners manual and thought that the crinkle cutter was the julienne blade.  I was so frustrated with the slicer, thinking that it was just a poor product, because every time I “julienned” a zucchini, I had to go back and cut the strands apart because the stupid julienning blade was just cutting crinkle-cut slabs.  DUH!  Seriously, I didn’t figure out my mistake until just this week when I finally opened the owners manual and saw that there was another blade that I had missed.  The one for julienning veggies.  DOY.

If you don’t have a julienne cutter, The Pampered Chef has a julienne peeler for $10.50 that I’d recommend–it won’t take up a lot of space and does a fabulous job of julienning your veggies.  I got one and gave the other cutter to Goodwill because, well, you guys know I don’t even have room for my cake pans in this house, so I’m  not about to give up good space for a bulky cutting tool when I could just use Pampered Chef’s fabulous peeler!  Thanks, Tracy (my Pampered Chef consultant)!

Zucchini Spaghetti

Printable recipe
Printable recipe with picture

3 links low-fat turkey Italian sausage, hot or mild
2 tablespoons olive oil, divided
3 large cloves of garlic, minced + 4 more to season the oil
pinch hot pepper flakes (optional)
1 (14.5 oz.) can roasted diced tomatoes with juice
1 (8 oz) can tomato sauce
1 tablespoon dried basil
1 teaspoon dried oregano
¼ teaspoon fennel seeds
2 medium sized zucchini (9-10 inches long)
salt and fresh ground black pepper to taste (for seasoning zucchini)
freshly grated Parmesan cheese for serving, if desired

Heat about 1 tablespoon olive oil in a heavy frying pan, then add turkey sausage, squeezed out of the links, and use a spatula to break the sausage apart and cook until it’s lightly browned, about 5 minutes. When the sausage is browned, add 3 cloves of minced garlic, and hot pepper flakes, if using. Stir together and let cook with the sausage about a minute, then add the tomatoes, tomato sauce, fennel, basil, and oregano. Turn heat down to low and let the sauce simmer while you prep the zucchini.

Use a julienne cutter to cut the zucchini into long spaghetti-like strands. (Cut off the ends, wash and dry the zucchini, and then cut into julienne strands. You can also do this with a knife if you’re patient.)

Heat about 1 tablespoon olive oil over high heat in a very large frying pan, add 3 whole garlic cloves and sauté until you can start to smell garlic, then remove garlic to another dish (you can discard it, but fried garlic cloves are delicious and you can add them to salad or even eat them straight!) Immediately add the zucchini strands to the hot pan and cook stirring a few times just until the zucchini is heated through, about 2 minutes. Season the cooked zucchini with salt and fresh ground black pepper to taste. Divide between 2-4 plates, then ladle sauce over the top. Serve hot, with freshly grated Parmesan cheese if desired.

Recipe source: adapted from Kalyn’s Kitchen, as seen on Debbi Does Dinner

Lemongrass Chicken with Peppers

Posted on

Secret Recipe Club

It’s that time again! Secret Recipe Club time!  This is my sixth month with the club, and still having a ball.  My favorite part is getting my assignment and then stalking my assigned blog, bookmarking all the recipes I want to try.  I really love the secrecy and wonder how far the other members take it.  I take it so far as to not even pin the recipes I want to try on Pinterest (how I usually keep track of recipes), for fear that the blog owner will find my bajillion pins and figure out I have their blog this month.  That would ruin the surprise.  I also don’t subscribe to the blog I’m assigned to, just in case they keep track of their subscribers, and I don’t leave comments.  Nothing to let on that I’m the one that has their blog!  The secrecy is pretty fun and makes me feel super sneaky. :)

This month, I was assigned to Quick and Easy, Cheap and Healthy, and boy did I have fun scouring Anne’s archives.  Although you may not be able to tell  it from the amount of buttery, sugary treats I post, I really love healthy food, especially if it’s easy to prepare (kinda helps balance out all the time and calories in my desserts), so this blog was perfect for me!  I counted the recipes I bookmarked and know this has got to be a personal record: 44.  No joke.  Um, Amanda (Amanda started the club), is there a reward for “most recipes bookmarked in a SRC assignment?” ;)

But when I came across Anne’s Lemongrass Chicken, there was little doubt that it was the winning recipe.  The grocery store closest to us started carrying lemongrass a couple years ago, and was really happy to have an excuse to buy some!  Of course, when I went to buy it, they were out. Of course!  So off I went to my trusty Asian market, and I found a big bucket of lemongrass stalks, bundled in bunches of 3 for $1.  Can’t beat that!

My friend, Pia, mailed me some vegetable cutters for Christmas and while I was trying to think of what veggies I could add to the chicken (I bulk up most of our meals with as many veggies as I can), I thought of those cutters and knew I’d be adding in some pretty peppers.  I know most people will not have these special cutters (I believe you can buy them at Asian markets, though), so just slice your peppers if you don’t–it will still make a very colorful and pretty dish!

Thanks, Anne, for sharing this wonderful recipe!  It was the MOST delicious dish I’ve ever made with SRC, hands down.  I’ve never had lemongrass before, and I was surprised (though I shouldn’t have been) that it smelled exactly like the lemongrass soap that my sister makes!  It has a bright & fresh slightly lemony smell and flavor.  It looks like a green onion, and has a fibrous texture similar to ginger.  It is very good and I hope that you have an Asian market near you so you can make this chicken.

I do want to mention that I made this sweet, almost as sweet as the sauces you get on Americanized Chinese fare, so if you want a more subtle sweetness, halve the honey.  I started with 1/4 cup, which was good but barely sweet.  I wanted it sweeter and my recipe reflect the change I made to 1/2 cup honey, but you might want to start with less and taste it once the chicken is cooked. You can always add more!

Lemongrass Chicken with Peppers

Printable recipe
Printable recipe with picture

3 lbs. boneless skinless chicken breasts, cut into bite-size pieces
½ cup honey
½ cup soy sauce, divided
1 teaspoon (1 clove) minced garlic
1 tablespoon cornstarch
2 tablespoons canola oil
½ cup (about 1 large stalk) minced fresh lemongrass
3 green onions, chopped
½ of a red pepper, cut into strips or shapes
½ of a green pepper, cut into strips or shapes
½ of a yellow pepper, cut into strips or shapes
¼ cup fresh cilantro, chopped

In a gallon-sized Ziploc bag or in a large bowl, combine chicken, honey, ¼ cup of the soy sauce, and garlic, and allow to marinate 10-15 minutes (this is a good time to prep your veggies). Mix the remaining ¼ cup soy sauce with the cornstarch and set aside.

Heat an extra-large skillet over medium-high heat and add the oil. Add lemongrass and stir-fry for about 15 seconds, until fragrant but not brown. Add the chicken, and continue to stir-fry until the pieces are cooked through, about ten minutes. Stir the soy sauce & cornstarch mixture, and add it to the skillet along with the green onions and peppers. Stir-fry until sauce is thickened and serve hot over rice, topped with a sprinkle of cilantro.

Makes 6-8 servings

I have to pimp my Tupperware lady, Stacy, because I just got a rice maker from her and used it to prepare my brown rice for this dish.  There are only instructions for white rice and a few other quick-cooking grains on the insert, so here’s how I did mine if you get one and want to make brown rice (the insert does say it can be used for brown rice, but doesn’t give instructions): 1 cup brown rice, 2 1/4 cups water.  5 minutes on high, 30 minutes on 50% power in a 1000 watt microwave.  (The rice cooker is BPA-free, in case you are worried about cooking your rice in plastic.)  Perfect brown rice, and a little faster than it takes on the stove!  Get your own rice cooker here.


Black Bean & Butternut Squash Burritos

Posted on

Really, I don’t know what to tell you about these burritos.  They are fabulous.  And that sums it up.  Really, truly, seriously the best burritos I’ve ever made or eaten.  I have nothing else to tell you except that Dennis is losing his job.

WHAT?

Yeah, I know.  What a way to drop a bomb.  I guess I’m not good at breaking things gently.  Or very good at segues, apparently.  It’s something we’ve known about for several weeks and it’s something I’ve wanted to share, but how do you fit in personal information like that on a blog that usually only features recipes and reasons for thanksgiving?  So I figured I’d just fit it in where I could.

Burritos and unemployment.  Sure, it fits. :)

They no longer need him in the position he fills at his current job, and rather than move to a different department and take a pay cut and a position that would make him miserable, he accepted the soon-to-come lay-off.  He applied for a job with the state as a 911 emergency call-taker, which would be a pay raise for him, and something he would find fulfilling and rewarding.  He passed both his tests for the position with flying colors, and is scheduled for a “job information” session next week.  We’re not sure what that exactly means, but we think it’s a good sign that they’ve asked him to come back.

When our preacher says a prayer, many times he has thanked God for the doors he opens, and the doors he closes.  It is a good reminder to stay thankful not only for the good that God provides, but for things we perceive as bad as well.  In this case, the closed door may very well lead to a better future for us.

It is easy to become complacent when you can make ends meet, so it can be good to be forced out of your comfort zone to reach a little higher for  something that will allow you to provide better for your family.  In addition to some house repairs, I could really use a new car, because I’m not sure Baby will last much longer. (You can witness Baby in all her hooptie glory, and me in my Valley-girl glory, in this video.)  So this 911 job would be a step in a better direction for us!  We are hopeful, but we know that whatever may come, God will provide.

As for the burritos, really, there’s nothing else for me to say.  Best burritos ever.  I really hope you try them!

Black Bean & Butternut Squash Burritos

Roasting the squash and cooking the rice makes this a long process for a lunch. I recommend preparing these two things in advance, so that when you’re ready for lunch, you only have to proceed as the recipe directs: heat and eat!

Printable recipe
Printable recipe with picture

1 tablespoon canola oil
1 cup chopped onion
2 garlic cloves, minced
1 red pepper, chopped
1/2 teaspoon salt, or to taste
2 teaspoons ground cumin, or to taste
1/4 teaspoon cayenne pepper, or to taste
1 (15 oz) can black beans (about 1.5-2 cups cooked), drained and rinsed
1 1/2 cups cooked brown rice
1/2 of a medium butternut squash, peeled, cubed, & roasted*
1 cup (4 oz) shredded cheddar cheese
4 large/extra-large flour tortillas

Toppings of choice: avocado, salsa, sour cream, spinach/lettuce, cilantro, etc

In a large skillet over medium-low heat, add oil, onion, and minced garlic. Sauté for about 5 minutes, stirring frequently. Add the salt and seasonings and stir well. Add chopped red pepper, black beans, and cooked rice and sauté for another 10 minutes on low. Add the roasted butternut squash to the skillet and stir well.  You can mash the squash with a fork if some pieces are too large. Add the cheese and heat another couple minutes.

Scoop bean filling onto tortillas along with desired toppings. Wrap and serve. Leftover filling can be reheated the next day for lunch in a wrap or as a salad topper.

*To roast the squash, preheat oven to 425F and line a rimmed baking sheet with tinfoil. Drizzle olive oil on squash and give a shake of salt and pepper. Coat with hands. Roast chopped butternut squash for 30-45 minutes (depending on the size of your cubes), or until tender.  I highly recommend using the second half of your butternut squash in Jenna’s Split Pea Soup. It is fantastic!

Recipe source: tweaked from Oh She Glows

Chickpea Salad Wraps {Mock Tuna Salad}

Posted on

The Jey of Cooking is donating $1 to the American Heart Association for each heart-healthy recipe that is linked to her fundraiser, and I thought this was a fun way to spread the word on the importance of heart health, so I decided to post this particular recipe because it’s chock full of ingredients to keep your ticker in tip-top shape!

Heart disease is the leading cause of death for both men and women in the United States.  In 2008, 616,000 people died of heart disease.  Studies have shown that lowering blood pressure and cholesterol can reduce your risk of developing of heart disease, and this recipe perfectly fits into a dietary plan focused on doing both.

The chickpeas and celery add dietary fiber (and so will your tortilla, if you choose a whole wheat one), which is well-known for naturally lowering cholesterol and blood pressure.  What you may not know about onions  is that they stave off heart disease by promoting thinner blood and breaking up blood clots.  They contain a powerful antioxidant called quercetin, which can help with high blood pressure.  These benefits are most powerful when onions are eaten raw, as in this salad.  And last but not least, the sunflower seeds add some heart-healthy poly- and monounsaturated fat into the mix, not to mention a tasty crunch!

Now that we know how healthy this recipe is, let’s talk about how it tastes.  Eating foods for the sake of health is all well and good, but I’m a firm believer that those foods should also be full of flavor to make it an enjoyable experience.  And this salad certainly fits the bill!  It tastes very similar to tuna salad, and if you like tuna salad, I know you will like this as well.  The beans make it creamy, with a lovely contrasting crunch from the celery, onions and sunflower seeds.  You might be surprised how similar this tastes to tuna salad, and if you are following a vegan diet, this would be a great substitute.

Chickpea Salad Wraps

Printable recipe
Printable recipe with picture

1 (15 oz) can chickpeas, drained and rinsed
½ cup celery, diced
¼ cup roasted, salted sunflower seeds
¼ cup mayonnaise, Miracle Whip or Vegenaise
3 tablespoons red onion, diced
3 tablespoons dill pickle, diced (or use dill relish)
2 tablespoons fresh dill, minced (or 2 teaspoons dried)
1 tablespoon fresh parsley, minced (or 1 teaspoon dried)
2 tablespoons lemon juice
1 garlic clove, minced
1 teaspoon reduced sodium soy sauce
½ teaspoon prepared mustard
Salt & pepper to taste

Place everything in the bowl of a food processor fitted with the blade attachment. Pulse until it is the texture you desire. I wanted mine to be slightly chunky and a little creamy, which took about 20 pulses. Serve in burrito-size tortillas, other wraps, or on bread as a sandwich.

Recipe source: adapted from Oh She Glows

*Sources for information on heart health: Centers for Disease Control and Prevention, How Dietary Fiber Lowers Cholesterol, The Healing Power of Onions, Nutritional Power of Sunflower Seeds

And you know you want to see my First Day of Spring manicure (I did it yesterday):

I forgot the grass but still love it.  Guess how many nail polishes I used on it?  Every single one of these:

I know. I’m crazy.  Big thanks to Suzie, who gifted me with a gazillion polishes, some pictured here.  You know you’re feeding my problem, right Suze? ;)

Baba Ghanoush Two Ways: Classic & Tahini-Free

Posted on

After last week’s sugar & booze fest, I thought it was time to break out a beautifully healthy AND delicious recipe.  I’m feeling the need to cleanse my system after indulging in a few too many “tastes” of my creations and this is a perfect way to do it: with baba ghanoush!

Never heard of it?  Baba ghanoush is a Middle Eastern roasted eggplant dip that is similar to hummus, but eggplant stands in for chickpeas.  All other ingredients are pretty much the same!

I’ve always loved hummus but was never impressed with the baba ghanoush I ordered at restaurants.  It was either too smoky or too bland, but I’m stubborn and I had it in my head that if it was prepared properly, I would love it.  So when Jenna posted a recipe for it, and her beautiful pictures mesmerized and dazzled me, convincing me that indeed, I would love it if I made it myself, I ventured forth.

Behold, the baba ghanoush.

There was much jubilation in my kitchen upon the first bite, proof that baba ghanoush is delicious!!

I made the first batch and ate it within a week, then made a tahini-free batch the following week (I ran out of tahini, plus, leaving it out made the recipe 17 Day Diet-friendly).  I actually liked the tahini-free version better, but that is more likely due to me roasting the eggplant longer (the first batch was a little undercooked) than the lack of tahini.  I definitely recommend roasting your eggplants thoroughly (like Jenna says, when you think they’re done roasting, roast them a little more), because it makes a great difference in taste.

I tell you I can’t get enough of this stuff.  I have half a jar in my fridge right now and I had to get up and take a spoonful as I was writing this blog.  And that’s my favorite way to eat it, by the way.  Straight from the jar (or the food processor) with a spoon.  I use it more like a side dish than a dip, but it’s really good with pita chips too!

Baba Ghanoush

Printable recipe
Printable recipe with picture

3 medium eggplants
1/4 cup lemon juice
1/4 cup tahini
3 tablespoons extra virgin olive oil
4 cloves garlic, finely minced
1 teaspoon salt
1/2 teaspoon cumin
1/3 cup parsley, minced
Chips or bread, to serve

Prick each eggplant with a fork until the surface is covered with holes. Place the eggplants under a broiler (or on a grill) and cook for about 40 minutes, until blackened and slightly shrunken, turning occasionally. When they’re very tender, let them cool.

When cool enough to handle, scoop the eggplant flesh into a the bowl of a food processor with a spoon, discarding the skins. Add the lemon juice, tahini, olive oil, minced garlic, salt, and cumin. Process until desired texture, then add the parsley and pulse to combine. Serve with chips, pita bread, a baguette, crackers, etc.

Tahini-Free Baba Ghanoush

Printable recipe
Printable recipe with picture

3 medium eggplants
¼ cup lemon juice
¼ cup extra virgin olive oil
2 tablespoons minced garlic
1 teaspoon salt
½ teaspoon cumin
1/3 cup parsley, minced
Pita chips, crackers, or vegetables, to serve

Prick each eggplant with a fork until the surface is covered with holes. Place the eggplants under a broiler (or on a grill) and cook for about 40 minutes, until blackened and slightly shrunken, turning occasionally. When they’re very tender, let them cool.

When cool enough to handle, scoop the eggplant flesh into a the bowl of a food processor with a spoon, discarding the skins. Add the lemon juice, olive oil, minced garlic, salt, and cumin. Process until desired texture, then add the parsley and pulse to combine. Serve with chips, pita bread, a baguette, crackers, etc.

Recipes source: adapted from Jenna’s Everything Blog

Cauliflower Colcannon

Posted on

I’m linking this post with the GreensLove bloghop.  If you are posting a recipe with any sort of greens this month, check it out and join the party!

A couple years ago I made lasagna and garlic bread for dinner on St. Patrick’s Day and happened to mention it in my Facebook status.  I don’t really celebrate the holiday, so it wasn’t on my radar, but one of my Facebook friends was like, “Hey! Where’s the corned beef and cabbage???”  I’d never made any sort of Irish-type food whether on St. Patrick’s Day or otherwise, and thought I just might try it the following year.

And so I purchased my first beef brisket last year.  It turned out to be the worst brisket in the history of briskets.  It. was. horrid.  I still shudder just thinking about it.  (80% fat, with a foul flavor.)  But, I also made this cauliflower colcannon, which was very good and ended up being the main course rather than our side dish.

The pureed cauliflower serves as a lower-carb, more nutritious replacement for the mashed potatoes that colcannon is usually made with.  I opted for kale instead of cabbage in my colcannon, but it would be good either way.  This made a mighty tasty dish, and a good alternative to traditional colcannon if you are going to be eating a high-calorie dessert afterward.  Kinda helps balance things out.  And I’m a Libra, so I’m all about balance.  Cauliflower Colcannon + 1 dozen Andes Mint Cupcakes = balance.  Right?  Right.  Let’s do this.

Cauliflower Colcannon

Printable recipe
Printable recipe with picture

1 medium head cauliflower
1 tablespoon cream cheese, softened
1/4 cup grated Parmesan
4 tablespoons unsalted butter, divided, plus more for serving
1/2 teaspoon salt
1/8 teaspoon freshly ground black pepper
3 lightly packed cups kale, cabbage, or other greens
½ cup chopped green onions
1/2 teaspoon minced garlic (1 clove)
Milk or heavy cream for thinning, if necessary

Set a stockpot of water to boil over high heat. Meanwhile, clean and cut the cauliflower into small pieces. Cook in boiling water for about 6 minutes, or until very tender. Drain the cauliflower well and pat it very dry between several layers of paper towels, not allowing it to cool.

In the bowl of a food processor, puree the hot cauliflower with the cream cheese, Parmesan, 1 tablespoon of the butter, salt, and pepper until almost smooth. Set aside.

Melt the remaining 3 tablespoons butter in a skillet and add the greens. Cook over medium-high heat for about 5 minutes, until greens have wilted and given off some of their water. Add the onions and garlic and cook one minute more. Stir in the cauliflower mixture and thin with milk or cream, if necessary. Serve hot with a pat of butter, if desired.