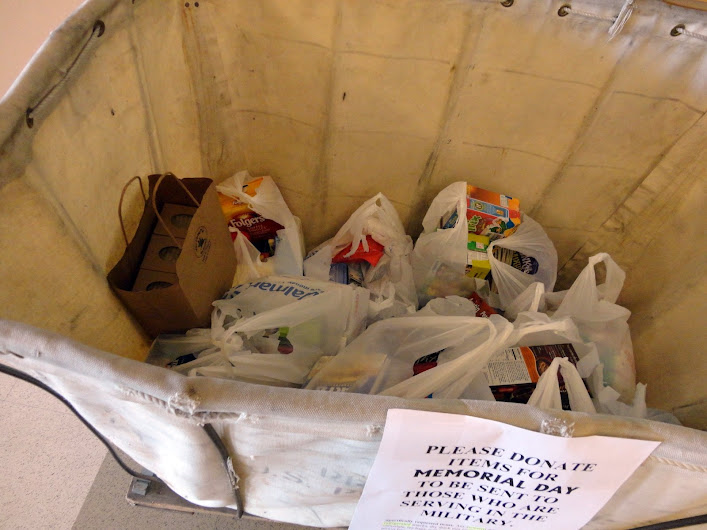
Several weeks ago, this appeared near the entrance of my work facility:
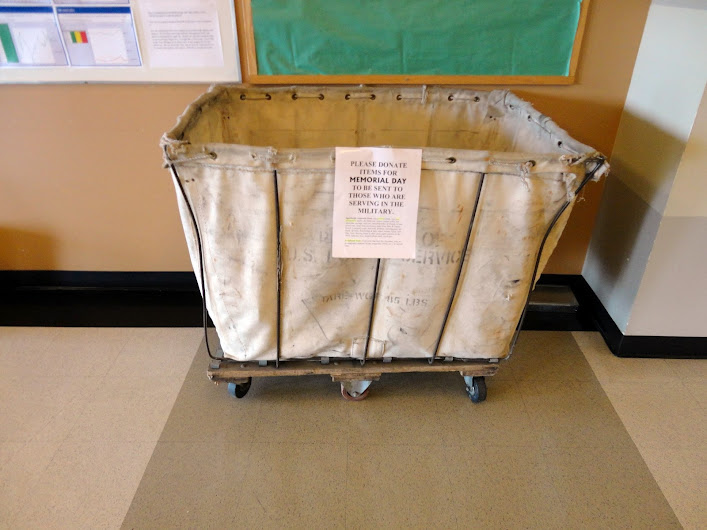
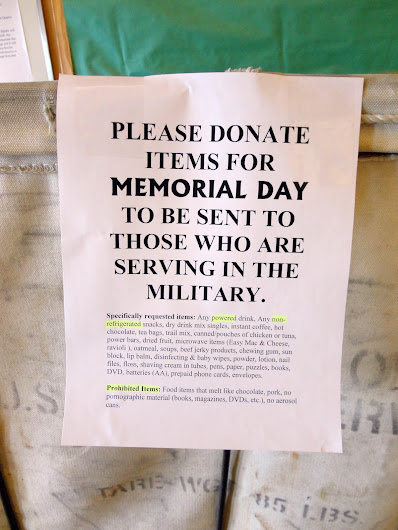
I donated some requested items, but I got to thinking about what I would crave most if I were away from home, fighting every day to survive. Besides a good, home cooked meal, my second biggest comfort and indulgence is a luxurious bath with lovely scented soaps, body scrubs, etc. But what I’d want most of all is love and appreciation.
The military can’t accept homemade food from people they don’t know personally, but I really wanted to make something to make the gift more personal, so that the soldiers that received it would know that love was poured into it, not just money.
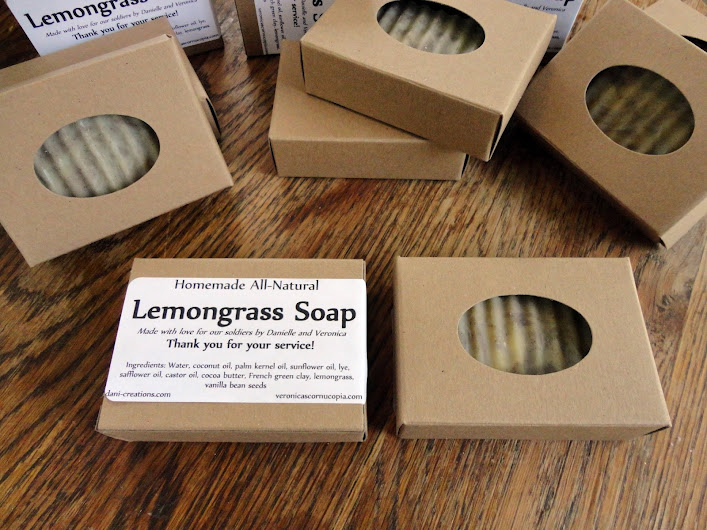
Soap wasn’t listed as a requested item, but I got the idea in my head to donate some homemade soap, and I called my sister, who is an old hand at making it by now (she has been making it for six years and selling it in her own shop for the last four), to see if she’d be game to help me do it. I knew she would love the idea, and I was right! She agreed to help me make it for only the cost of the supplies, and we met in the back room of her shop to get our soap-making party started.
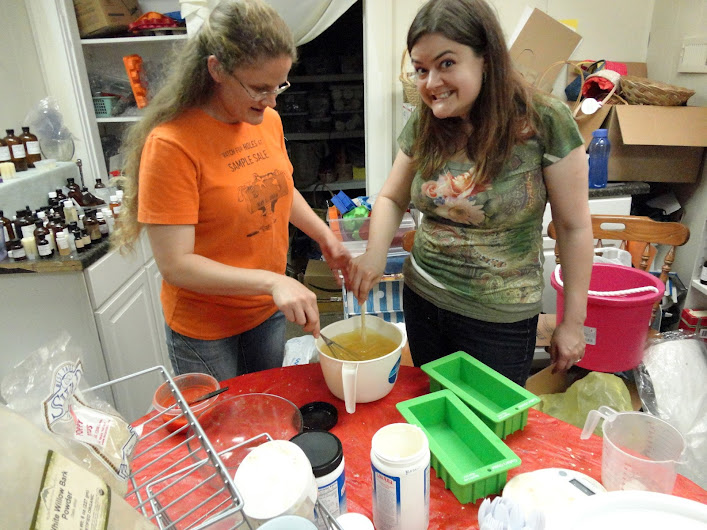
Dennis came along to photograph the process so you can learn how to make soap along with me. Thank you, honey! <3
This is Danielle’s basic soap recipe, which we tripled to fill two log soap molds. All measurements are in ounces and all but the last two ingredients are oils & butters. To make goat’s milk soap, she just subs goat’s milk for the water, but we went with water this time.
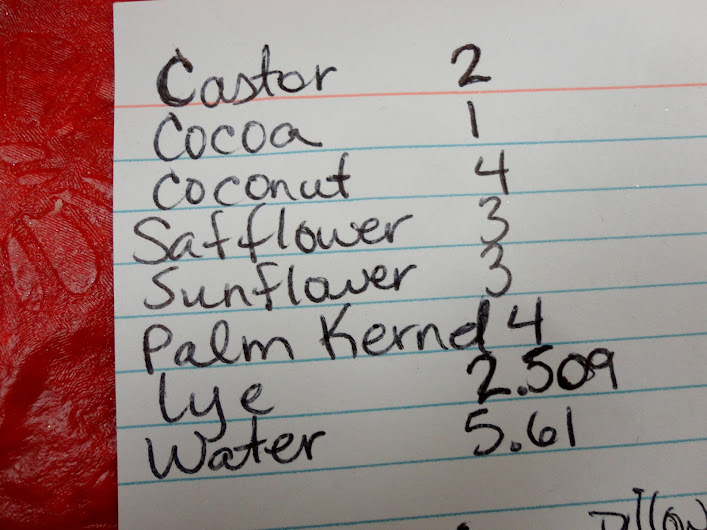
You can click here for a printable recipe with step-by-step instructions, or click here for one that includes a photo of the finished product.
Danielle ate her dinner while I measured the oils using an electronic kitchen scale.
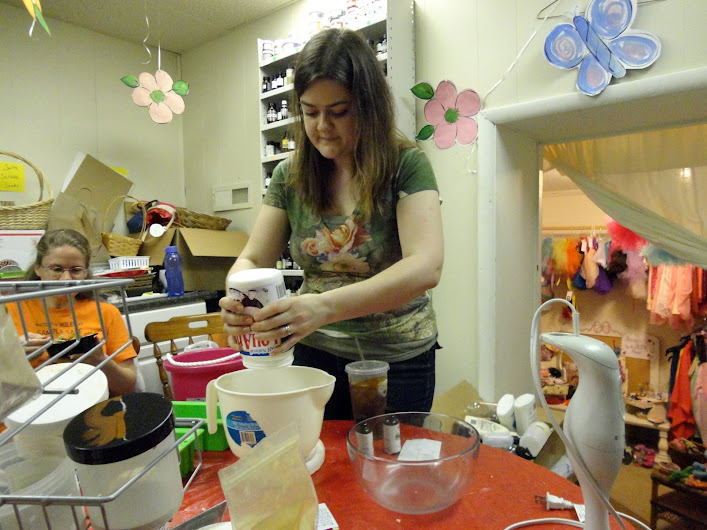
Coconut oil

“I only use the best Mountain Rose Herb organic cocoa butter in my homemade soap!”
Castor oil. Apparently soap-making has already driven me to drink.
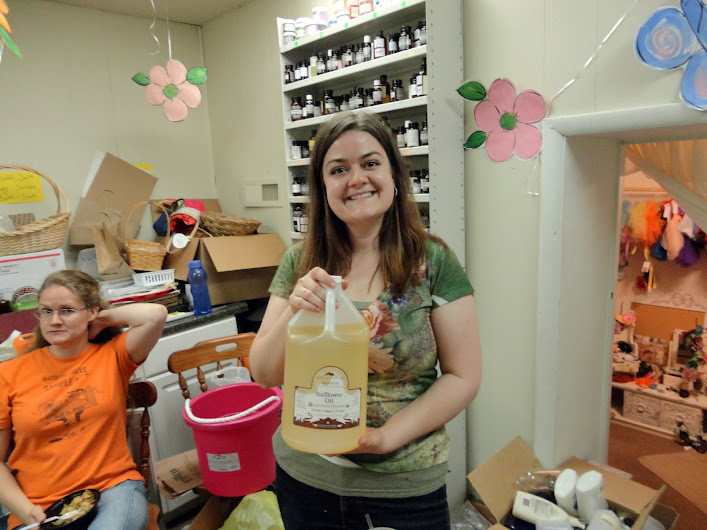
Safflower Oil
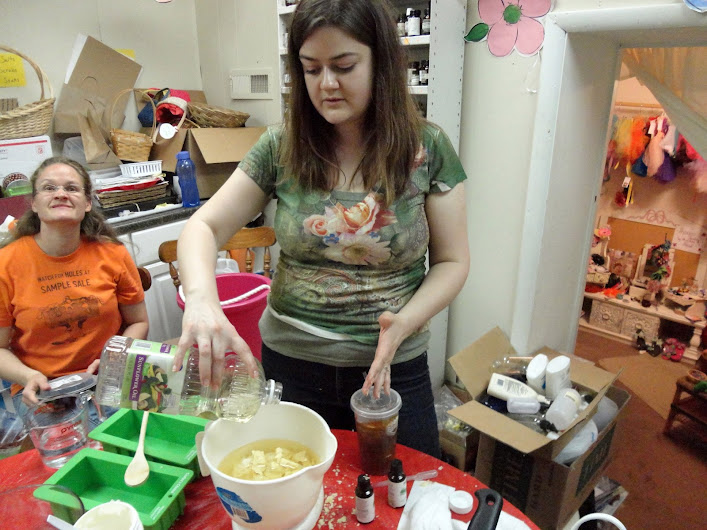
Sunflower oil. Allow me to deflect the attention away from my sister’s hilarious expression and onto my shirt with the flipped hem. It is this way in every. single. photo. And Dennis didn’t tell me. He also lets me go shopping with chocolate on my forehead. But I love him anyway. :)
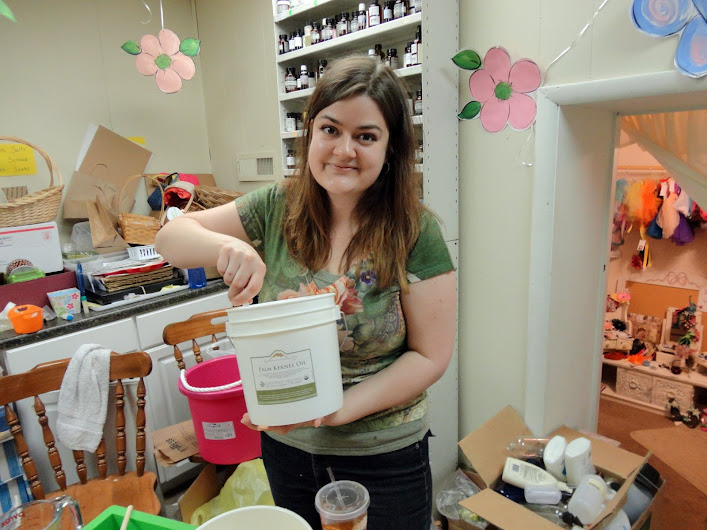
Palm kernel oil. This stuff is firm like cocoa butter and has to be hacked out with a knife or spoon.

Once all the oils are measured, it’s time to melt them together. Some people do this on the stove, but Danielle just does it in her microwave.
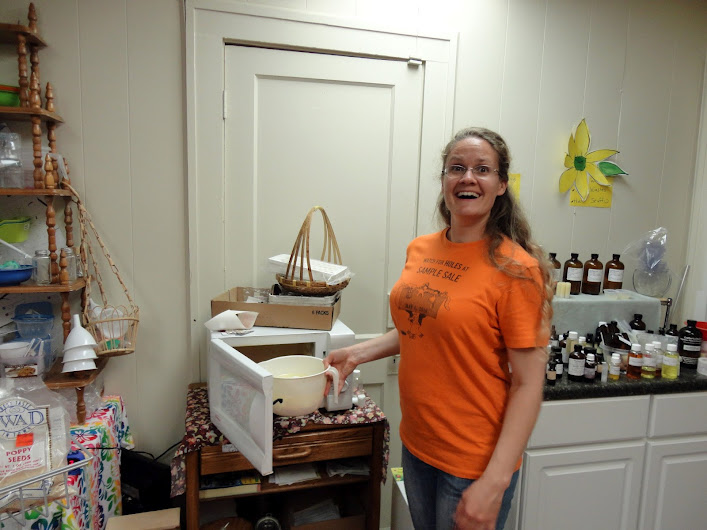
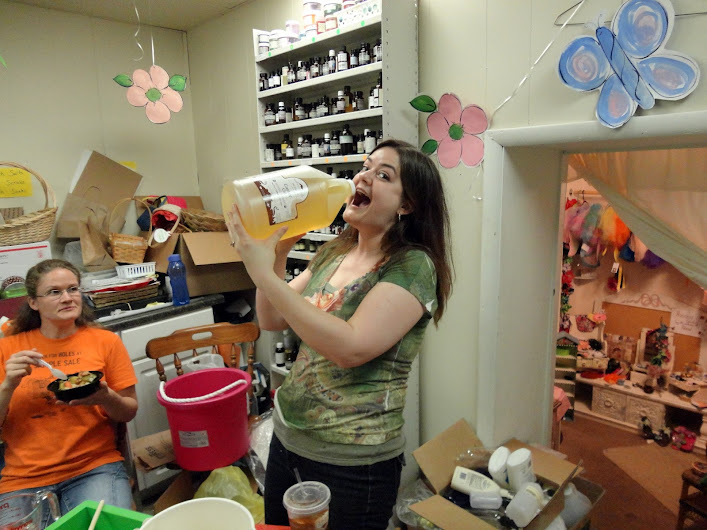
“I LOVE MAKING SOAP SO MUCH I COULD DIIIIIE!!!!!”
While the microwave was doing its thing, Danielle measured her water into a glass bowl in preparation for making her lye-water mixture.
It is very important to add lye to water, meaning putting the water in your bowl first and adding the lye second, and not the other way around, or it will explode and burn your skin. I know that sounds like something I’d usually say as a joke, since I like to exaggerate, but I’m not exaggerating here. Please be careful with lye!
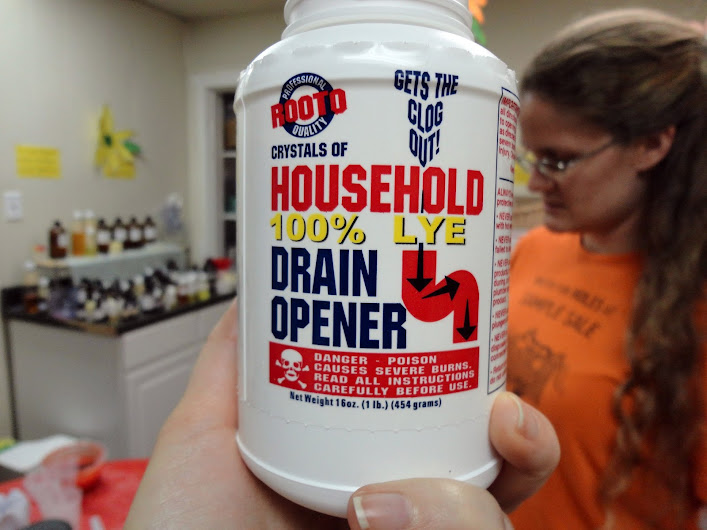
You can find lye at any hardware store by the other drain cleaners in the plumbing section. Make sure it says “100% lye” on the label. And don’t’ be scared that you are putting it in something that will be used on your skin. The process of making soap, combining the lye with water and fat and then curing the mixture, makes it completely safe for your skin. All soap you’ve ever used contains lye–it is a necessary ingredient.
Danielle microwaved her oil mixture in bursts, stirring in between to help it melt evenly without heating it too much. Here she’s preparing to put it in for about the third time before she adds lye to the water.

“And now, Pinky, we add the lye to the water and TAKE OVER THE WORLD!”

Combining the lye with water causes a chemical reaction which heats the water and puts off fumes that will make you choke and can burn your skin, so as soon as your lye is measured, take the bowl outside and start stirring to keep the mixture from solidifying. You should wear a glove on the hand you stir with, as the vapors could burn you if you have sensitive skin. Danielle has been doing this long enough to know she doesn’t need a glove, but she recommends you use one to be on the safe side. Danielle also says to make sure you’re situated so that the wind is blowing the fumes away from you.
Stir for about a minute or so to allow the fumes to dissipate. The mixture will be quite cloudy when you first start stirring, and will get more clear as you stir. Danielle held the bowl up so I could feel how hot it got.
It reaches 200F, so be careful when handling the bowl not to burn yourself, either from the heat or the corrosive mixture inside it. Again, gloves are a good idea.
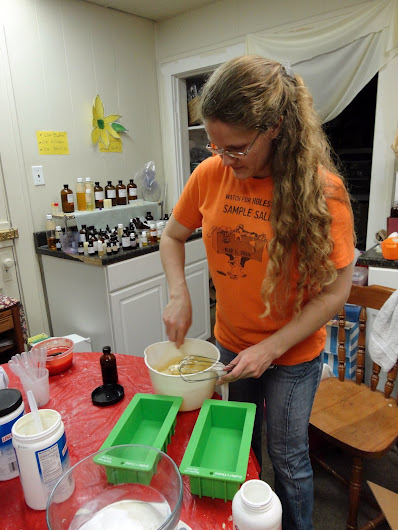
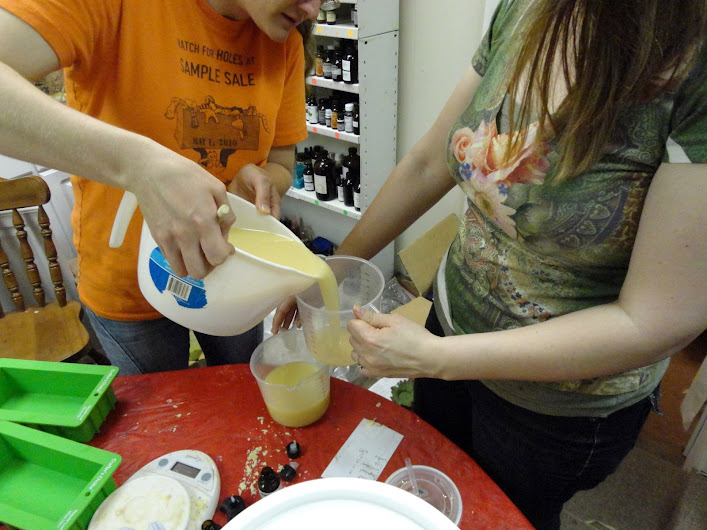
Once inside, Danielle set the lye mixture aside to cool a bit while she finished melting the oil. At this point it was melted except for a few cocoa butter and palm kernel oil chunks, so she removed them to a separate container to melt completely so that she wouldn’t have to heat the whole batch too much to get them melted. You want both your oil and lye mixtures to be about 110F when you combine them.

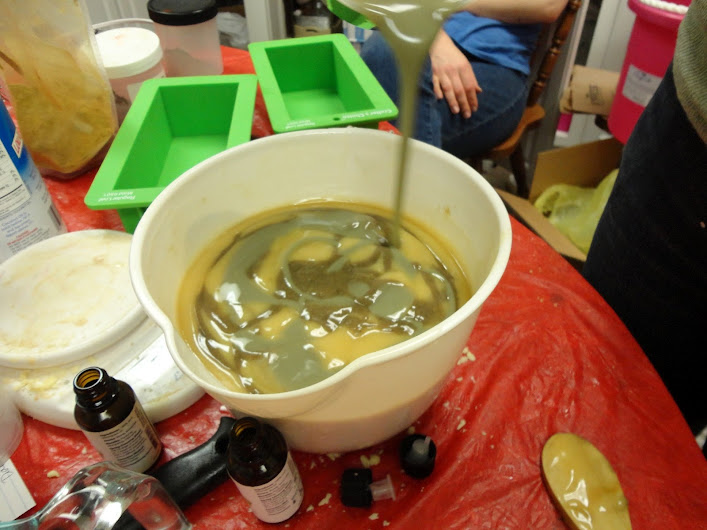
Once the oil was ready, we combined them because the lye mixture had time to cool off and the oil wasn’t too hot either. Danielle doesn’t use a thermometer, but you probably should until you get comfortable with the process.
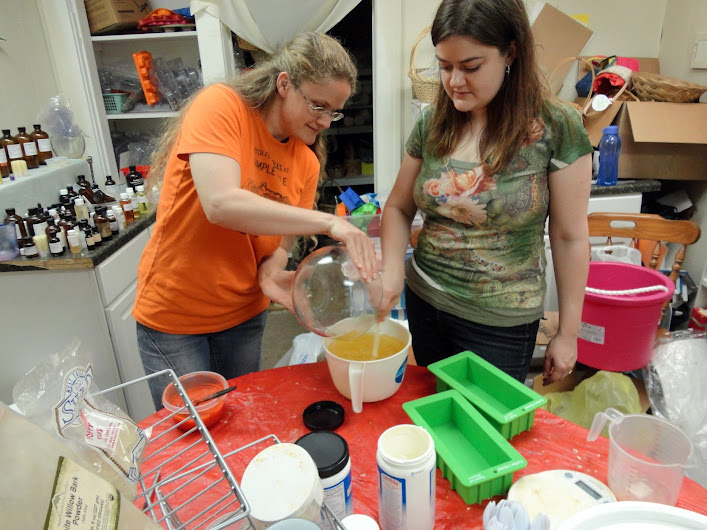
Danielle likes to stir while pouring the lye water into the oil, but she says it’s not necessary. You can just dump it in and then start your stirring.
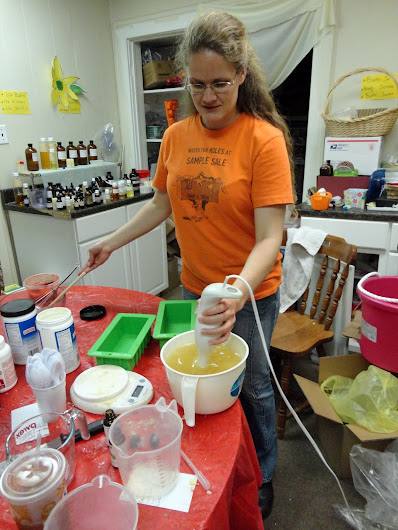
You’re going to stir, stir, stir, until the mixture is thickened. This can take a very long time, but an immersion blender makes the process much faster and it will be ready in a matter of a minute or two.
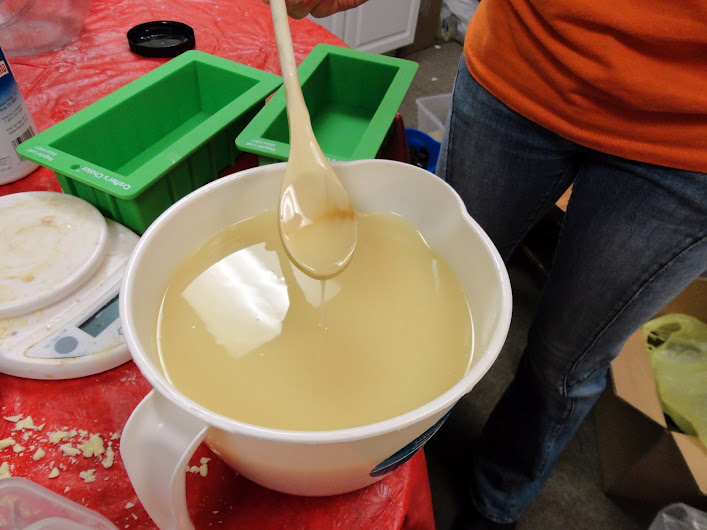
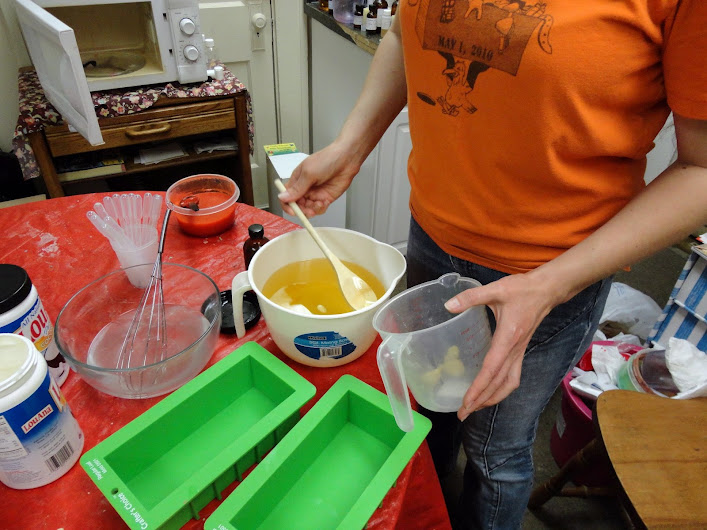
You will know it’s ready when it starts to trace. To test it, lift a spoonful and drizzle it over the surface. If you can see a line for a second or two before it disappears (leaves a trace), your soap is ready to pour into molds. Here it was just barely tracing, but we stopped at this point because we were going to be adding more stuff and stirring a lot more.
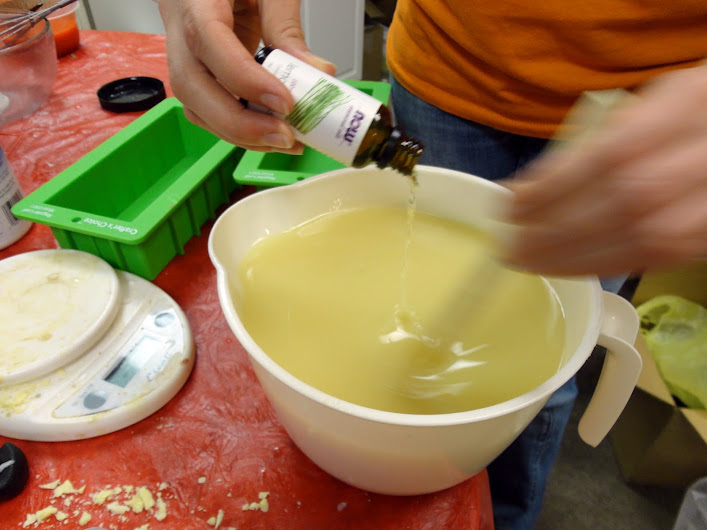
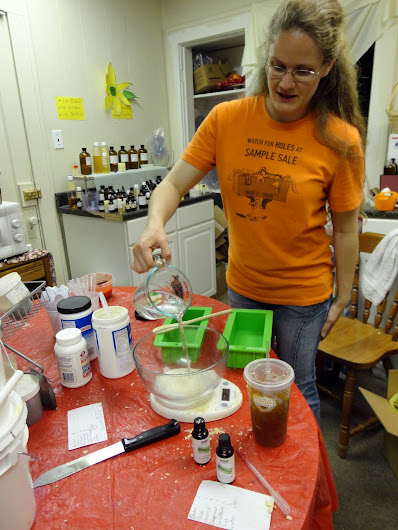
Now’s the time to add the scent and extras you desire. I chose lemongrass because it is a nice unisex smell.

For a batch this big, we needed two (1 ounce) bottles of lemongrass oil.
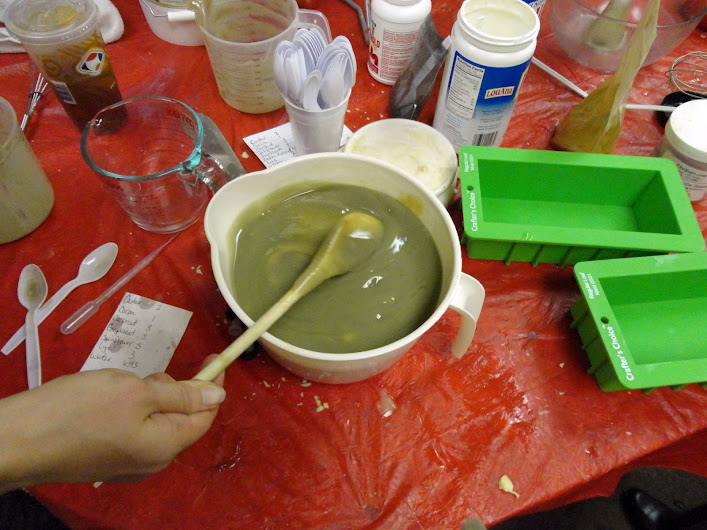
I wanted to do sort of a camouflage swirl so we divided the batch into thirds to turn each a different color with natural additions.
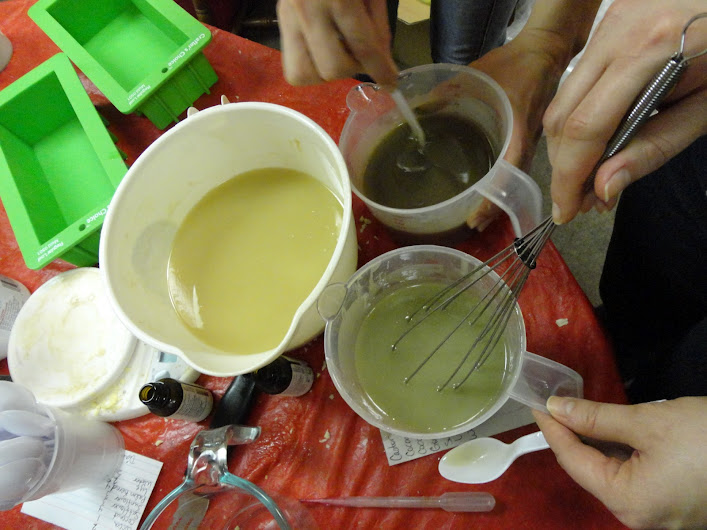
We added chamomile powder to the large bowl to give it a golden color, French green clay powder to the bottom bowl for a green color, and vanilla bean seeds and black clay powder to the top bowl for a brown color. You can also put in herbs or oats into your soap at this point–all additions like this will make your soap more firm and it will last longer. We just poured our additions in until we liked the colors. Then we mixed, mixed, and mixed some more.
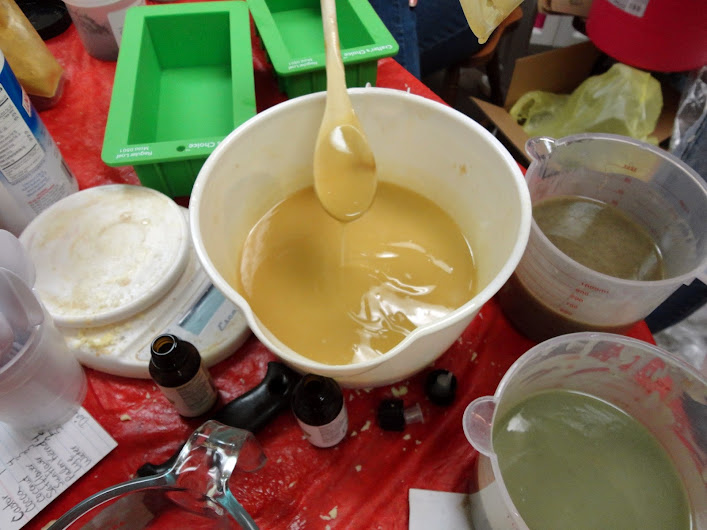
We made sure the soap traced before we stopped mixing. This isn’t a great photo, but you can see the lines of soap that fell from the spoon. It’s ready!
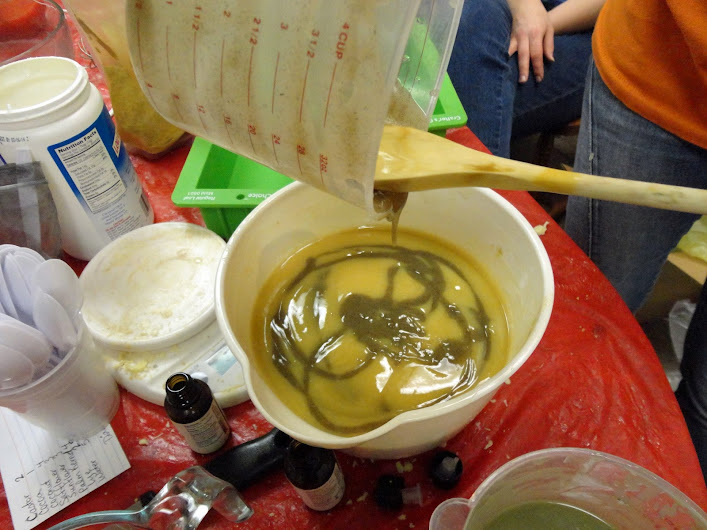
We poured the smaller batches of soap into the large bowl in random patterns to help the swirl effect.
Danielle gave the whole batch one swoop of the spoon for a swirl effect. Don’t do more than this or your soap will become one color–it’s very easy to over mix. One circular swoop from top to bottom is plenty.

Pour the soap into molds. She uses silicone molds, which you do not have to line.
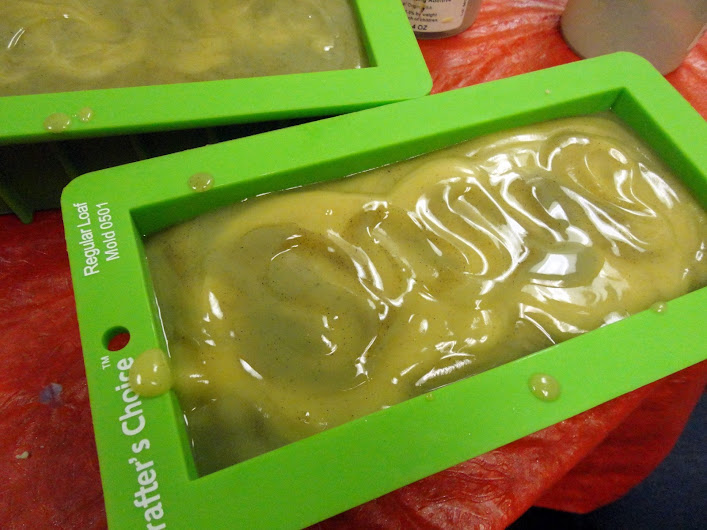
You can texturize the top with a spoon or spatula.
Allow the soap to set up in the molds overnight before removing. Danielle took the soap out of the molds and cut them when I wasn’t there so I don’t have any photographs of that part, but I’m sure you can figure it out. :)
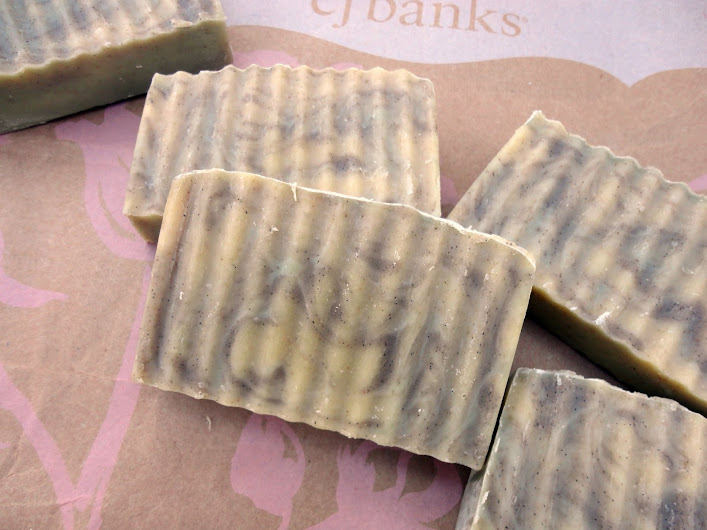
You can use the soap after a week, but it is generally recommended to let it cure for 4-6 weeks before using it, especially if you have sensitive skin. The longer you let it cure, the harder it gets and the longer it lasts because it won’t “melt” so easily in the shower.
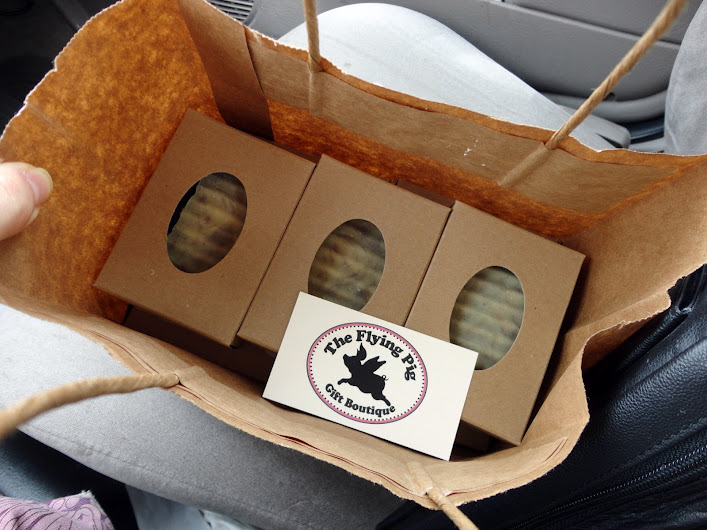
We got 19 bars out of this batch. Pack it up…
…and share the love!
Hope you guys enjoyed this. I know I enjoyed making soap for the first time and giving it to the soldiers, and I hope it helps boost 19 spirits. If you’d like to send a letter or goodies to a soldier, you can get the name and address of an actual soldier serving now at this website.
Thank you, Danielle, for helping a sister and some soldiers out! You’re the bomb-diggity! And thank you to the Haus (that’s what I call Dennis if I never told you before-pronounced Hoss, like “boss”), who not only provided most of the photos here, but helped me with some of the captions. You’re also the bomb-diggity. And thank you to my readers for reading and (hopefully) enjoying my antics. You’re all sorts of bomb-diggitiness. <3
And for those of you still recoiling from the mess in Danielle’s supply room, her excuse is the same as mine…


I did not expect to wake up to a full- all-out roaring giggle this morning, but thank you! He let you go out with chocolate on your forehead? LOL!!!!! Yes, the look on your sisters face is classic in that photo. Hee hee
What a nice thing to make.. I know if I was away from home, knowing someone handmade me soap would def. make me feel a little more loved, and love the way you “camouflaged” It. There won’t be and enemies sneaking up on their toiletries ;)
LikeLike
*any* enemies.
LikeLike
LOL, you’re a riot. Yup, I think the toiletries are fairly safe in this color-haha.
LikeLike
What a good idea to make soap for them! I made soap a long time ago but I didn’t have to do lye, so I must have already had a soap base that you melt down to add stuff to then let it re-solidify. I wasn’t a hard core soap-maker like your sister, just tried it out when I did candles since I had some molds anyway. I’m sure the soldiers liked it!!
LikeLike
Yeah, I think when you make glycerine soap you get a base and just add color/scent to it before molding. The base already has been prepared with lye. That’s what Danielle started out with b/c it’s much easier and you can get some really pretty soaps with it. She still does them, and handpaints the designs! She’s really into it.
LikeLike
This was so informative. I have made soap – but the laundry type. I used only palmoil in my soap.
LikeLike
This is so awesome! I have always wanted to make homemade soap, and you just inspired me! And I think it is so cool you donated it! It looks so pretty :)
LikeLike
Love the tutorial and the idea of sending them to the soldiers well, you know I love that!! I like how you thought of what you would miss from home.
Many years ago I dabbled in soap-making. I made these melon soap bars. Thankfully, I did not give them away as gifts because after they sat for awhile once opened they smelled like rotting fish…ha ha ha! That put an end to my soap making days ;)
LikeLike
LOL!! I can totally see that happening with melon…I wonder if maybe the scent was a little too natural and it went bad or something. People like Danielle appreciate people who don’t make their own soap–it keeps her in business! haha
LikeLike
I love this post! I so want to try to make my own soap and lotion one day. I’m inspired! An a great cause to boot.
LikeLike
Nice!! I’m sure there will be some very excited soldiers (especially the female ones, yippee!). Homemade scented soap is so decadently luxurious. Mmmmmm. Though after seeing how complicated it looks to make, I think I’ll leave it to the professionals . . . =)
LikeLike
My sister totally approves of those who leave it to the professionals. If everyone made their own, she’d go out of business! lol
LikeLike
If you told me you had chocolate on your forehead then I would remember to tell you to take it off.
LikeLike
LOL! I’d hope that you would NOTICE IT YOURSELF crazy man! haha
LikeLike
That is so nice of you and your sister – I had no idea there would be so many steps to making soap! I love lemongrass too. :D Hugs!
LikeLike
what a crafty family! this was such a happy post, just loved to look at all the pictures of you and your sister having so much fun. also sneaked in the post about your sister’s store, those are the types of places we go crazy about (and spend a lot of many in) when we visit US. totally amazed on how professional the hand-made soaps look. you girls are special!
LikeLike
Awesome idea. That is exactly what I would crave. I can’t imagine what military-issue soap might be like.
LikeLike
this is SO cooL! I’ve always wanted to try to make soap….but never got around to it. Where does she get all her oils and such?
LikeLike
Where ever she can find them. The ones we used here were purchased at the local health food store but I’m sure you can find essential oils online if you can’t find them locally.
LikeLike
I’ve never made soap but that’s really interesting. I’d love to try it one day.
LikeLike
Veronica, this is fascinating! And you are so sweet to think to do this – I’m sure this will be greatly appreciated!
LikeLike
What a great idea, and a fun post. I loved all the candid photos. I am sure you will raise the spirits of some very deserving people.
LikeLike
Pingback: Thankful Thursdays #74: sisters « Veronica's Cornucopia
Pingback: Soapmaking: How to make lemon salt scrub soap - The Healthy Beehive
How did she get the ripple effect look on her finished soap? Was the silicone pans rippled on the bottom? . I couldn’t see from the pictures. Great job. Want to try this.
LikeLike