
RSS Feed

Tag Archives: wholesome

Potato, Onion & Spinach Hash

Posted on

This is something I threw together to use up a few things before they went bad, and ended up with a plate of magics. Weeks later, we are still eating this once or twice a week and is one of Joshua’s favorite meals.  I’ve never been very much of a potato person, but man, you can’t hardly beat crispy seasoned potatoes dipped in runny egg yolk.

Potato, Onion & Spinach Hash

Printable recipe
Printable recipe with picture

1 medium potato
2 thick slices of sweet onion
1/2 cup fresh spinach
Extra-virgin olive oil
Garlic salt & pepper to taste

Pierce the potato through the middle with a knife and microwave for 3 minutes, or until tender all the way through. Meanwhile, dice the onion. Once the potato is cooked, put a skillet on medium-high heat, and cut the potato into small cubes, removing the peel if you wish. Once the skillet is hot, add a generous swirl of olive oil to the pan, along with the potato and onion. Stir to coat with the oil, then sprinkle with garlic salt and pepper to taste. Allow to cook without stirring until golden brown on one side, then stir, trying to turn over as many of the pieces as possible. Allow to sit again until golden brown, then add the fresh spinach and cook for a few more minutes, until wilted and soft. Serve hot with eggs, or as a side dish.

Kumquat & Coconut Cookies {Grain & Sugar-Free}

Posted on

Whew, two recipe contests in the same week!  I don’t know what’s come over me.  It must be all that state fair competitive spirit leaking over into my everyday baking life!  This one is for Baker Bettie’s Cookie Wars, in which she charged us with a mission to invent a cookie using at least two of the following ingredients:

  • Avocado
  • Balsamic Vinegar
  • Basil
  • Beer
  • Coffee
  • Cranberries
  • Cream Cheese
  • Dark Chocolate
  • Dried Chilies
  • Dr. Pepper
  • Fennel Bulb
  • Garlic
  • Goat Cheese
  • Grapefruit
  • Greek Yogurt
  • Hazelnut
  • Honey
  • Kumquat
  • Maple Syrup
  • Marshmallows
  • Mint
  • Passion Fruit
  • Peach
  • Poppy Seeds
  • Rosemary
  • Sour Cherries
  • Sweet Potato
  • Tomato

I’m really curious to see how many people are daring and creative enough to use tomato, vinegar (wait, I’ve done that and it’s fabulous! lol), beer, rosemary, etc.  I’m thinking there are going to be a few savory cookies in the mix!

But me, well, you know my affinity for sweets, so that’s what I went for.  I didn’t intend to make a wholesome cookie, it kinda just happened in the evolution of my creative process.  Here’s how it went.

My first inclination was to create a yogurt and honey spice cookie, which I knew would be a cake-like cookie because of the honey, and since I don’t like cakey cookies unless they’re part of a whoopie pie, I figured I’d also make a yogurt and honey filing for them.

Then I remembered the bag of coconut flour in my refrigerator that I won from Nutmeg Nanny’s giveaway several months ago, and thought it would work well here since the honey and yogurt would add a lot of liquid that usually isn’t in cookies, and you need more wet ingredients in any coconut flour recipe–it’s very thirsty and absorbs lots of moisture.  (I know this from a previous failure.)

I scanned the list again, trying to see if any other ingredients would pair well with the flavor of coconut and pondered over the kumquats.  I’d never had them but had seen them at the grocery store from time to time and always assumed they were miniature oranges.  I remember asking Dennis, “What is the point of these?  It would take forever to peel enough of these to make them worth eating!”  But I Googled kumquats anyway, to see if they might work for me in my cookies.

I found out that the skin is the part that is sweet and delicious, and the inside is very sour.  Most people eat them whole to savor the contrast of sweet and sour.  (I tried this after buying them, and whoo-ey, even the sweet peel wasn’t enough for me to dig the sour explosion on the inside.  But the flavor is very good-very similar to an orange.)  I also found a recipe for kumquat chocolate chip cookies that described the kumquat peels as being great after baking because they get chewy like pieces of candy.  OK, I was sold.  I had to find me some kumquats.
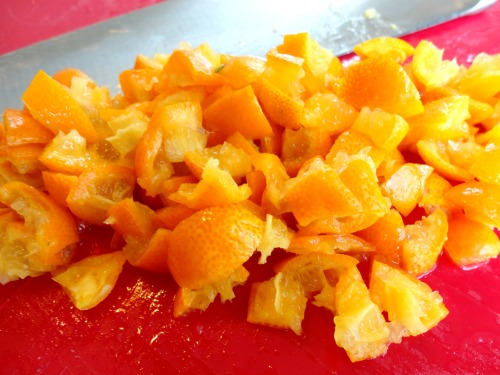
Find them I did, and then I went to work.  I’m pretty happy with my creation!  These cookies have an exotic flavor profile, with a semi-tropical feel.  The honey wasn’t quite enough to balance the sour yogurt and and kumquats (yes, I totally tasted the raw dough. I always do. :) ), but the stevia made them nicely sweet like any good cookie should be.  I love the kumquat flavor, it is a perfect match with the coconut.  I added the spices because a recipe I have from my friend, Marina, called “Cream Cheese Cookies” uses them, but I honestly can’t say they really pronounce themselves on the palate.  They sort of just add a layer of mystery in the background to the overall exotic flavor.
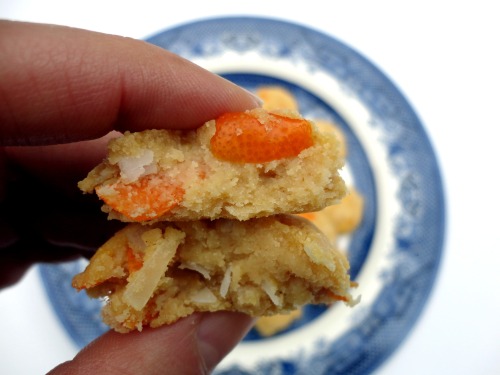
The texture is soft and moist and very tender, which isn’t my usual choice for a cookie (I’m in the crispy on the outside, chewy on the inside camp), but these are so unique that it doesn’t strike me as “wrong.”  These cookies are supposed to be different, and it’s actually a nice texture…not unlike shortbread.  The one downside is that coconut flour makes them a bit grainy and while they’re not a dry cookie, the flour makes you thirsty after eating one.

All in all, these aren’t the typical American cookie, but I think they’d be perfect with tea.  In fact, I think I’m going to enjoy a few with a hot cup right now…

Kumquat & Coconut Cookies

Printable recipe
Printable recipe with picture

½ cup unsalted butter, melted
½ cup raw, local honey
½ cup Greek yogurt (I used nonfat)
2 eggs
1 teaspoon vanilla
1 cup coconut flour
5 packets NuNaturals stevia powder
½ teaspoon ground coriander
½ teaspoon ground ginger
½ teaspoon mace
¼ teaspoon salt
½ lb. kumquats
1 cup shredded unsweetened coconut

Preheat oven to 350 degrees F.  Line two baking sheets with parchment paper and set aside.

Whisk the butter and honey together in a small bowl until combined, then whisk in the yogurt until combined, then the eggs and vanilla. Doing it in this way emulsifies the butter so that it doesn’t harden and get clotted when you add the cold yogurt and eggs.

In a separate large mixing bowl, whisk the coconut flour to get any clumps out, then whisk in the coriander, ginger, mace, and salt. Add the honey & yogurt mixture, and stir with a spoon until mixed. The dough will be thick and will get thicker upon standing. Set aside.

Pick off the small stems from the kumquats, then roughly chop them, removing seeds as you go. I don’t have a great knife, so I sliced each kumquat into four slices, then quartered each slice, otherwise I just would have gone nuts chopping like I do with nuts. Add the chopped kumquats into the cookie dough along with the coconut and mix well with your clean hands.

Scoop the dough onto parchment-lined baking sheets with a tablespoon-sized cookie scoop. You can place them fairly close together as they will not spread. Flatten each ball with the palm of your hand, and bake for 10-12 minutes, or until lightly golden brown around the edges.

Cool on a wire rack and store in an airtight container.

Notes: coconut oil can be substituted for the butter to make these dairy-free. If you are using a different brand or form of stevia, add it in to taste. There is no gluten to toughen the cookies, so you can mix and re-mix to your heart’s content as you add ingredients to get the right balance to suit your tastes.

Honey Whole Wheat Beer Bread

Posted on

Sheesh, I know what you guys are thinking. That with all the alcohol-laden recipes I’ve been posting lately, I must be a secret raging alcoholic! Well, I promise I’m not.  While I will take a sip once in a while, I generally dislike it on several levels. Besides the taste, and abstaining for scriptural reasons like not wanting to cause a brother to sin against their conscience (1 Corinthians 8:9-13), I’ve seen firsthand the effect it can have on a person’s health and on a family if abused, and I steer clear of alcohol so that I don’t continue that legacy.

However, while I have a personal distaste for it in its pure state, I do have quite a fondness for adding it to my baked goods. A little bit can really intensify the flavor in a recipe, and the baking (and cooking) process eliminates the alcohol content so that it will not have an intoxicating effect on your body.  Win-win!

Because of my fondness for baking with it, you really might think I had an alcohol problem if you took a look in my cupboard! I’ve got rum, bourbon, and brandy upstairs (great for so many things, including a fantastic fruit cake recipe I’ll be sharing come October–it takes two months to make), and I keep a few beers in the basement. Beer is my least favorite alcohol, but I make sure I always have a few on hand because one of my favorite breads happens to be beer bread. Go figure.

Beer creates magic when you put it in a quick bread, supplanting a yeasty flavor that quick breads lack, and it’s just so delicious! I’m very excited about my newest variation on beer bread (I can not believe this is my fourth beer bread post! Stop the madness!) because it is not only delicious, but healthy!

My favorite beer bread has white flour, butter, and white sugar in it, but I wanted something more wholesome this time so I used white whole wheat flour, canola oil, and honey. I was so delighted when I sliced into this loaf and took my first bite! I couldn’t believe how soft, tender and moist it was, and the flavor was incredible. Very yeasty, with a mild sweetness.  I think that honey and beer were meant to come together in bread!

You may remember the leftover Guiness I was going to throw out because I’d already made cupcakes and brownies and couldn’t take it any more. I’m so glad I decided to use the last of it to make this bread because it added a much more intense yeasty flavor to the bread than what I usually get from the lighter colored beers I use and it was quite lovely! But if you have a lighter beer, don’t make a special trip to the store, it will work just fine here and your bread will be much lighter in color (if you use white whole wheat flour like I did), and you might fool healthy-phobic people into thinking it’s white bread.

And lest you think that the beer-haters in your family won’t dig this, just remember I hate beer, and it literally makes my husband gag to even smell it.  (Remember when he threw up after I served him vodka sauce on his spaghetti?  Yeah, alcohol and him do not mix!)  But we both love this bread.  I think you will too.

Honey Whole Wheat Beer Bread

Printable recipe
Printable recipe with picture

3 cups white whole wheat flour
1 tablespoon aluminum-free baking powder, such as Rumford
1 teaspoon salt
1 egg
¼ cup canola oil
1/3 cup honey
12 oz. (1 1/2 cups) beer

Preheat oven to 375 degrees F. Butter or oil a loaf pan and set aside.

In a large bowl, whisk together the flour, baking powder, and salt; set aside. In a smaller bowl, beat the egg until uniform in color, then whisk in the oil, honey, and beer. Pour into the larger bowl and whisk well to combine. Pour into prepared pan, smooth the top, and bake for 50-55 minutes, or until golden brown and a tester inserted in the center comes out clean. Remove from pan and cool for at least 15 minutes prior to cutting. Wrap leftovers in plastic wrap or keep in a Ziploc bag with the air pressed out. This bread freezes well too, just slice it before you freeze it and you can take it out slice by slice, as you need it.

A Veronica’s Cornucopia Original

White Wheat Bread


I’ve been posting a lot of soup recipes lately, so I figured a good bread recipe was in order.  After all, that’s why we make soup in the first place, right?  To go with our bread?

Dennis and I actually haven’t had any bread for the last 22 days, and won’t have any again for the next twelve.  We started the 17 Day Diet at the end of January, and this bread was the last thing I made as a temporary farewell to high-carbohydrate foods, knowing our mouths would not enjoy it for another month or so.  This diet cycles in 17-day increments and during the first two, there is no bread.  We are eating so good that I don’t miss it, but perhaps this spectacular recipe helped with the separation anxiety.  It was so delicious that recalling it makes me smile even a month later!  It also helps that I got the original recipe, which I adapted to the one I’m sharing here, from a friend (thank you, Tracy!), so it gives me the warm fuzzies all around.  You just can’t beat the combination of friendship and warm bread.

While this bread still does not beat out my number one favorite to date, Honey Oatmeal Bread, it is a very close second.  I was very impressed with how soft and tender the bread is, and the flavor, as with all homemade bread, is of course incredible.  It goes very well with soup, or just slathered with butter as a meal.  Not that I speak from experience or anything.

White Wheat Bread

To ensure success, make sure all your ingredients are at room temperature before you start. Cold will inhibit the yeast’s growth.  If you’re in a hurry, you can quickly bring the egg to room temperature by placing in a bowl of hot tap water for five minutes before cracking, and can warm the milk by zapping it in the microwave, stirring every 30 seconds until lukewarm.

Printable recipe
Printable recipe with picture

1 package (2 1/4 teaspoons) dry yeast
2 tablespoons sugar
1/2 cup warm water (105-115 degrees)
1 cup milk, room temperature
1/4 cup vegetable or canola oil
2 tablespoons honey
1 egg, beaten, room temperature
1 3/4 cup white whole wheat flour
1 teaspoon salt
2 1/4 – 2 3/4 cups all-purpose flour

Combine yeast, sugar, and water in a large bowl; let stand five minutes. Add milk, oil, honey & egg; stir well. Stir white whole wheat flour and salt into yeast mixture. Gradually stir in enough all-purpose flour to make a soft dough.

Turn dough out onto a floured surface & knead until smooth & elastic (about 8-10 minutes.) (Tracy says it will only take a few minutes to do this if you use a bread hook on your Kitchenaid.) Place in a well-greased bowl, turning to grease top. Cover and let rise in a warm place (85 degrees), free from drafts, for 1 hour or until doubled in bulk.

Punch dough down, and divide in half; shape each half into a loaf. Place in 2 greased 8 1/2 by 4 1/2 by 3 inch loaf pans (I used 9×5 which seemed to work well, but they’ll probably be higher with the smaller pans). Cover and let rise in a warm place (85 degrees), free from drafts, 45 minutes or until doubled in bulk. Bake at 350 degrees for 25 minutes or until loaves sound hollow when tapped. Remove from pans and cool on wire racks.

Makes 2 loaves.

Recipe source: adapted from a 1986 Southern Living Magazine, shared with my by Tracy R.

Oatmeal Sandwich Bread


This isn’t my favorite bread, but it does have a great, wholesome & hearty flavor. It is an excellent loaf for slicing and making sandwiches. My favorite use for it is making grilled cheese sandwiches, and I also made some yummy ham and cheese melts (with apricot preserves spread on the insides) that this bread was wonderful with. This makes a very large, tall loaf, so if you prefer you can make two smaller, shorter loaves with the dough as I chose to, which makes the bread go further, although your sandwiches will be smaller.  I’m on a mission to lose these last 15 pounds so the smaller sandwiches totally fits in with my plan!  I love it when I can eat real food (read: non-“free” stuff.  Free is good as long as it’s not associated with fat or sugar!) and stay within my calorie budget.

Be sure to check out the recipe source at the end–this gal has tons of healthy, delicious recipes!  I won her low-fat cinnamon rolls in an online bake sale auction and I have to say they are crazy good.  I never thought to replace butter in the filling with applesauce–brilliant!

Oatmeal Sandwich Bread

Printable recipe
Printable recipe with picture

2 cups warm water
1 tablespoon yeast
3 tablespoon molasses
2 1/2 cups whole wheat flour
2 cups all purpose flour
2 tablespoons vital wheat gluten
1 cup rolled oats
4 tablespoon butter, melted and cooled slightly
1 tablespoon salt

For optional topping
1 egg, beaten with a teaspoon of water
2 tablespoons rolled oats

Butter a large bowl and a 9″ loaf pan and set aside. In a large mixing bowl or food processor fitted with a dough hook, mix together water, yeast and molasses. Allow the yeast to stand for 5 minutes until it begins to bubble. Add the whole wheat and bread flour, the oats and the melted butter. Stir to combine. Cover with towel and let rise for 30 minutes. Add in salt and then mix until dough pulls away from sides and becomes a ball. You can add a tablespoon or two of flour or water if necessary. Scrape dough onto a lightly floured surface and knead 5-10 times. Place into the large, buttered bowl. For the first rise, scrape the dough onto a lightly floured work surface and knead it a few times. Put the dough into the buttered bowl, cover with a towel, and leave it to rise for about 1 hour or until it doubles in size. Turn dough out onto floured surface after first rise. Shape by folding into a square, folding top down towards center and bottom up towards the center. Pinch the new top and bottom together to seal, roll to shape and place in the loaf pan, seam side down. Allow to rise in a warm place, covered with a towel for one hour or until dough rises an additional half its size. Preheat oven to 400° F. Right before placing in oven, brush egg wash over the top of the loaf and sprinkle on the rolled oats. Bake for 40 minutes or until the loaf sounds hollow when tapped on the bottom. Remove from pan and cool on wire rack. The loaf slices best when at room temperature.

Veronica’s notes: I substituted rapid-acting yeast as usual, so I mixed it in with the dry ingredients and then added the wet–no proofing necessary.  You don’t technically have to do two rises when you use rapid-acting/instant yeast, so you can just shape it into a loaf and let it rise once before baking, but I usually go ahead and do two rises anyway to develop a more yeasty flavor.

I calculated the nutritional information based on making two loaves and dividing each into 14 slices.  Per slice: 111 calories; 2.7 g fat; 21 g carbohydrate; 2.2 g fiber; 3.4 g protein

Recipe source: From Apples to Zucchini